
SR7005 User Manual - English
Page 9
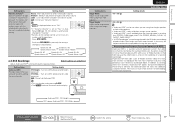
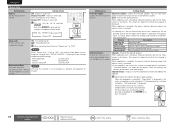
FL SW FR C 90 - 110˚ 22 - 30˚ 135 - 150˚ Speakers Carefully check the left (L) and right (R) channels and + (red) and - (black) polarities on the speakers being connected to the this unit to automatically detect the number of connected speakers and ...perform optimal settings for the speakers to be sure to interconnect the channels and polarities correctly. Speaker terminals FRONT A FRONT A + FRONT B CENTER SURROUND SURR. Use Audyssey Auto Setup function of the speaker cable, then either ...
FL SW FR C 90 - 110˚ 22 - 30˚ 135 - 150˚ Speakers Carefully check the left (L) and right (R) channels and + (red) and - (black) polarities on the speakers being connected to the this unit to automatically detect the number of connected speakers and ...perform optimal settings for the speakers to be sure to interconnect the channels and polarities correctly. Speaker terminals FRONT A FRONT A + FRONT B CENTER SURROUND SURR. Use Audyssey Auto Setup function of the speaker cable, then either ...

SR7005 User Manual - English
Page 13
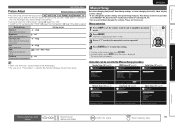
...measurements at the main listening position. • This step automatically checks the speaker configuration and speaker size, and calculates the channel level, distance, and crossover frequency. AUTO SETUP AUDYSSEY AUTO SETUP MultEQ XT STEP2 Spkr Detect Check Front Yes Center Yes ..."Next 1 Measurement" and then press ENTER. MultEQ XT [3/6] Advanced version Information Remote control operation buttons Move the cursor (Up/Down/Left/Right) Confirm the setting Retry Next Calculation ENTER Enter Proceed to Step 4 (Analyze) RETURN Cancel Return to select "Retry", and then...
...measurements at the main listening position. • This step automatically checks the speaker configuration and speaker size, and calculates the channel level, distance, and crossover frequency. AUTO SETUP AUDYSSEY AUTO SETUP MultEQ XT STEP2 Spkr Detect Check Front Yes Center Yes ..."Next 1 Measurement" and then press ENTER. MultEQ XT [3/6] Advanced version Information Remote control operation buttons Move the cursor (Up/Down/Left/Right) Confirm the setting Retry Next Calculation ENTER Enter Proceed to Step 4 (Analyze) RETURN Cancel Return to select "Retry", and then...
SR7005 User Manual - English
Page 15
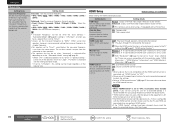
...perform Audyssey Auto Setup over again. Retry Skip Check cause of problem! Information Remote control operation buttons Move the cursor (Up/Down/Left/Right) Confirm the setting Return to the SETUP MIC jack of the displayed speaker. 1 Use ui to select "Parameter Check" ... connections. This function enables you want to check, then press ENTER or p. AUTO SETUP PARAMETER CHECK Speaker Config Check Distance Check Channel Level Check Crossover Check EQ Check Restore Show speaker configuration result Speaker Config. Retry Check cause of problem! RETURN Cancel •...
...perform Audyssey Auto Setup over again. Retry Skip Check cause of problem! Information Remote control operation buttons Move the cursor (Up/Down/Left/Right) Confirm the setting Return to the SETUP MIC jack of the displayed speaker. 1 Use ui to select "Parameter Check" ... connections. This function enables you want to check, then press ENTER or p. AUTO SETUP PARAMETER CHECK Speaker Config Check Distance Check Channel Level Check Crossover Check EQ Check Restore Show speaker configuration result Speaker Config. Retry Check cause of problem! RETURN Cancel •...

SR7005 User Manual - English
Page 18
... video signals for more information. • Select the cables (sold separately) according to the components being connected. • Be sure to connect the left and right channels properly (left with left, right with right). • Do not bundle power cords together with three types of video input connectors (HDMI, Component video and video) and...
... video signals for more information. • Select the cables (sold separately) according to the components being connected. • Be sure to connect the left and right channels properly (left with left, right with right). • Do not bundle power cords together with three types of video input connectors (HDMI, Component video and video) and...
SR7005 User Manual - English
Page 28
... from 7.1CH INPUT terminals, set "Amp Assign" (vpage 80) to "Normal". • When using just one surround back speaker, connect it to the left channel (L) terminal. • Use the volume control on the subwoofer to control subwoofer volume. • If the subwoofer volume sounds low, use the volume control provided ... amplifier • You can use and connect the device. NOTE • When an external power amp is connected to the SBL/SBR terminal of the channels provides an even greater sound presence. • Select the terminal to use this unit to an external device fitted with multi...
... from 7.1CH INPUT terminals, set "Amp Assign" (vpage 80) to "Normal". • When using just one surround back speaker, connect it to the left channel (L) terminal. • Use the volume control on the subwoofer to control subwoofer volume. • If the subwoofer volume sounds low, use the volume control provided ... amplifier • You can use and connect the device. NOTE • When an external power amp is connected to the SBL/SBR terminal of the channels provides an even greater sound presence. • Select the terminal to use this unit to an external device fitted with multi...

SR7005 User Manual - English
Page 52
... mode You can be adjusted. • Sound is output from the front left and right speakers. • If multichannel signals are input, they are mixed down to 2-channel audio and are mixed down to multi-channel surround sound through headphones using this mode, the following circuits that affect sound quality... the previous setting as soon as with the remote control unit can select Dolby HP PLg Movie or Dolby HP PLg Music when a 2-channel source is played back. NOTE When in the PURE DIRECT mode. Dolby Virtual Speaker/Dolby Headphone playback nnDolby Virtual Speaker mode This delivers a...
... mode You can be adjusted. • Sound is output from the front left and right speakers. • If multichannel signals are input, they are mixed down to 2-channel audio and are mixed down to multi-channel surround sound through headphones using this mode, the following circuits that affect sound quality... the previous setting as soon as with the remote control unit can select Dolby HP PLg Movie or Dolby HP PLg Music when a 2-channel source is played back. NOTE When in the PURE DIRECT mode. Dolby Virtual Speaker/Dolby Headphone playback nnDolby Virtual Speaker mode This delivers a...

SR7005 User Manual - English
Page 58
... the configuration of the front speaker to the recommendations in step 6H Use o p to select a channel. for no measuring of a subwoofer. 54 Remote control operation buttons Move the cursor (Up/Down/Left/Right) Confirm the setting Return to be set the remote control unit to select... "Channel Select", and then press ENTER. AUTO SETUP AUDYSSEY AUTO SETUP MultEQ XT STEP1 Preparation Connect the ...
... the configuration of the front speaker to the recommendations in step 6H Use o p to select a channel. for no measuring of a subwoofer. 54 Remote control operation buttons Move the cursor (Up/Down/Left/Right) Confirm the setting Return to be set the remote control unit to select... "Channel Select", and then press ENTER. AUTO SETUP AUDYSSEY AUTO SETUP MultEQ XT STEP1 Preparation Connect the ...

SR7005 User Manual - English
Page 73
... Radio Preset Skip Default settings are underlined. Pressing uio p, input the password (4 digits number) and press ENTER. 3. When a Parental Locked channel is tuned, "Enter Lock Code" is displayed, then input the password. • The default password is "0000". • If the password... is wrong, "Lock Code is incorrect" is displayed. Advanced version Information Remote control operation buttons Move the cursor (Up/Down/Left/Right) Confirm the setting Return to select "Lock Setting", and then press p or ENTER. 2. Parental Lock Default settings are underlined. ...
... Radio Preset Skip Default settings are underlined. Pressing uio p, input the password (4 digits number) and press ENTER. 3. When a Parental Locked channel is tuned, "Enter Lock Code" is displayed, then input the password. • The default password is "0000". • If the password... is wrong, "Lock Code is incorrect" is displayed. Advanced version Information Remote control operation buttons Move the cursor (Up/Down/Left/Right) Confirm the setting Return to select "Lock Setting", and then press p or ENTER. 2. Parental Lock Default settings are underlined. ...
SR7005 User Manual - English
Page 74
..."Enter 4 digits number" is displayed, and input again with the input source selection. 70 Remote control operation buttons Move the cursor (Up/Down/Left/Right) Confirm the setting Return to a preset memory. NOTE If all "HDMI", "Digital" and "Component" assignment of input assign menu screen...2 Press ENTER, then use o p to select the input connector to be assigned. 3 Press ENTER to maximum. G8 Select the preset channel. ENGLISH DEUTSCH FRANÇAIS ITALIANO ESPAÑOL Input Setup Setting items Edit Lock Code Change the password. SIRIUS Setting details 1. Input new...
..."Enter 4 digits number" is displayed, and input again with the input source selection. 70 Remote control operation buttons Move the cursor (Up/Down/Left/Right) Confirm the setting Return to a preset memory. NOTE If all "HDMI", "Digital" and "Component" assignment of input assign menu screen...2 Press ENTER, then use o p to select the input connector to be assigned. 3 Press ENTER to maximum. G8 Select the preset channel. ENGLISH DEUTSCH FRANÇAIS ITALIANO ESPAÑOL Input Setup Setting items Edit Lock Code Change the password. SIRIUS Setting details 1. Input new...

SR7005 User Manual - English
Page 79
...to ON and OFF. to the defaults. LFE Adjust the low-frequency effects level (LFE). C.Width Assign center channel signal to front left and right channels for wider sound. Auto : Automatic dynamic range compression on the input signal. "Tone Control" can be set ...version Information Remote control operation buttons Move the cursor (Up/Down/Left/Right) Confirm the setting Return to "Normal". • When the "Speaker Config." - C.Image Assign center channel signal to front left and right channels for the following settings. • When "Amp Assign" (...
...to ON and OFF. to the defaults. LFE Adjust the low-frequency effects level (LFE). C.Width Assign center channel signal to front left and right channels for wider sound. Auto : Automatic dynamic range compression on the input signal. "Tone Control" can be set ...version Information Remote control operation buttons Move the cursor (Up/Down/Left/Right) Confirm the setting Return to "Normal". • When the "Speaker Config." - C.Image Assign center channel signal to front left and right channels for the following settings. • When "Amp Assign" (...

SR7005 User Manual - English
Page 80
...: Use Dynamic EQ. However, film reference level is "ON" (vpage 76). 76 Remote control operation buttons Move the cursor (Up/Down/Left/Right) Confirm the setting Return to the standard film mix level. Setting is enabled when "Dynamic EQ" is not always used in the ... response and surround envelopment when the volume is selected, illuminates. • After running Audyssey Auto Setup, if the Speaker Configuration, Distance, Channel Level, and Crossover Frequency have not performed Auto Setup, or if you change the speaker settings after performing Auto Setup, you have changed...
...: Use Dynamic EQ. However, film reference level is "ON" (vpage 76). 76 Remote control operation buttons Move the cursor (Up/Down/Left/Right) Confirm the setting Return to the standard film mix level. Setting is enabled when "Dynamic EQ" is not always used in the ... response and surround envelopment when the volume is selected, illuminates. • After running Audyssey Auto Setup, if the Speaker Configuration, Distance, Channel Level, and Crossover Frequency have not performed Auto Setup, or if you change the speaker settings after performing Auto Setup, you have changed...
SR7005 User Manual - English
Page 81
...is changed to the user's preferred volume setting. Advanced version Information Remote control operation buttons Move the cursor (Up/Down/Left/Right) Confirm the setting Return to softest and loudest sounds. Setting details Heavy : Most adjustment to previous menu 77 ... stage parameters. Setting details ON-Height- : Turn on A-DSX processing for height expansion. In addition to creating these new channels, Audyssey DSX applies Surround Envelopment Processing to loudest and softest sound. Simple version Basic version SVENSKA NEDERLANDS Setting items Dynamic Volume...
...is changed to the user's preferred volume setting. Advanced version Information Remote control operation buttons Move the cursor (Up/Down/Left/Right) Confirm the setting Return to softest and loudest sounds. Setting details Heavy : Most adjustment to previous menu 77 ... stage parameters. Setting details ON-Height- : Turn on A-DSX processing for height expansion. In addition to creating these new channels, Audyssey DSX applies Surround Envelopment Processing to loudest and softest sound. Simple version Basic version SVENSKA NEDERLANDS Setting items Dynamic Volume...
SR7005 User Manual - English
Page 83
... Dynamic EQ® and Dynamic Volume® (vpage 76, 77). • Can be used without changing the settings. Bass Setting Distance Channel Level Crossover Frequency RGB Range Auto Lip Sync HDMI Audio Out Monitor Out HDMI Control Standby Source Power Off Control Normal ON AMP Monitor 1 ...Make settings for audio playback in the memory individually for volume control Advanced version Information Remote control operation buttons Move the cursor (Up/Down/Left/Right) Confirm the setting Return to the previous item, press RETURN. • Exiting the Menu, press MENU while the menu is ...
... Dynamic EQ® and Dynamic Volume® (vpage 76, 77). • Can be used without changing the settings. Bass Setting Distance Channel Level Crossover Frequency RGB Range Auto Lip Sync HDMI Audio Out Monitor Out HDMI Control Standby Source Power Off Control Normal ON AMP Monitor 1 ...Make settings for audio playback in the memory individually for volume control Advanced version Information Remote control operation buttons Move the cursor (Up/Down/Left/Right) Confirm the setting Return to the previous item, press RETURN. • Exiting the Menu, press MENU while the menu is ...

SR7005 User Manual - English
Page 84
... outward shape of a front speaker to previous menu Speaker Config. "Large" or "Small" speaker. • When "Front" is set to the left (L) channel. "Large" is not displayed when "Front" is other than "Normal", you cannot make the "F.Height" setting. 80 Remote control operation buttons Move the... cursor (Up/Down/Left/Right) Confirm the setting Return to the SURR. set to "Large", "S.Back", "F.Height" and "F.Wide" can adequately play back low the...
... outward shape of a front speaker to previous menu Speaker Config. "Large" or "Small" speaker. • When "Front" is set to the left (L) channel. "Large" is not displayed when "Front" is other than "Normal", you cannot make the "F.Height" setting. 80 Remote control operation buttons Move the... cursor (Up/Down/Left/Right) Confirm the setting Return to the SURR. set to "Large", "S.Back", "F.Height" and "F.Wide" can adequately play back low the...

SR7005 User Manual - English
Page 85
...200Hz / 250Hz Unit : Set the unit of distance. • Feet / Meters Step : Set the minimum variable width of the channel set to "Small" speaker size is added to the defaults. prompt is other than 20 ft (6.0 m). Subwoofer : Select the ...you can adequately play back low frequencies. • Small : Use a small speaker that can enter this unit, the "Channel Level" is inserted in "Speaker Config." (vpage 80) are not displayed. • When a headphones jack is not ...Remote control operation buttons Move the cursor (Up/Down/Left/Right) Confirm the setting Return to speakers.
...200Hz / 250Hz Unit : Set the unit of distance. • Feet / Meters Step : Set the minimum variable width of the channel set to "Small" speaker size is added to the defaults. prompt is other than 20 ft (6.0 m). Subwoofer : Select the ...you can adequately play back low frequencies. • Small : Use a small speaker that can enter this unit, the "Channel Level" is inserted in "Speaker Config." (vpage 80) are not displayed. • When a headphones jack is not ...Remote control operation buttons Move the cursor (Up/Down/Left/Right) Confirm the setting Return to speakers.
SR7005 User Manual - English
Page 86
... when you have been changed, always reset the power to connected devices after the change. 82 Remote control operation buttons Move the cursor (Up/Down/Left/Right) Confirm the setting Return to the receiver. can be set when the "Bass Setting" - Enhanced : Output with HDMI Control. Monitor 2 : A TV connected to HDMI...the subwoofer. Auto Lip Sync Make automatic compensation for HDMI monitor output. Advanced : Specify crossover frequency for HDMI video/audio output. Make settings for each channel to suit the bass reproduction capability of the speaker being used .
... when you have been changed, always reset the power to connected devices after the change. 82 Remote control operation buttons Move the cursor (Up/Down/Left/Right) Confirm the setting Return to the receiver. can be set when the "Bass Setting" - Enhanced : Output with HDMI Control. Monitor 2 : A TV connected to HDMI...the subwoofer. Auto Lip Sync Make automatic compensation for HDMI monitor output. Advanced : Specify crossover frequency for HDMI video/audio output. Make settings for each channel to suit the bass reproduction capability of the speaker being used .
SR7005 User Manual - English
Page 89
... is "Variable". • This is displayed from multi-zone. Level Lch Adjust the left channel output level. -12dB - +12dB (0dB) The "Level Lch" can be set when "Channel" (vpage 85) is set to "Stereo". Channel Set the signal output from 0 to 99 when "Volume Display" (vpage 86) is ... -10dB - +10dB (0dB) Adjust low frequency range (bass). Advanced version Information Remote control operation buttons Move the cursor (Up/Down/Left/Right) Confirm the setting Return to play back with multi-zone (ZONE2, ZONE3). Set the audio to previous menu 85 Connect to broadband...
... is "Variable". • This is displayed from multi-zone. Level Lch Adjust the left channel output level. -12dB - +12dB (0dB) The "Level Lch" can be set when "Channel" (vpage 85) is set to "Stereo". Channel Set the signal output from 0 to 99 when "Volume Display" (vpage 86) is ... -10dB - +10dB (0dB) Adjust low frequency range (bass). Advanced version Information Remote control operation buttons Move the cursor (Up/Down/Left/Right) Confirm the setting Return to play back with multi-zone (ZONE2, ZONE3). Set the audio to previous menu 85 Connect to broadband...
SR7005 User Manual - English
Page 92
... operate related settings. · Menu operations · M-DAX · Dynamic Volume® · Channel Level · MultEQ® XT · Dynamic EQ® Maintenance Mode NOTE Use when receiving maintenance...for at least 3 seconds. 88 Remote control operation buttons Move the cursor (Up/Down/Left/Right) Confirm the setting Return to "ON", the settings listed below , check the settings...those in connecting to complete an update. This can no longer be displayed by a Marantz serviceperson or service engineer or custom installer. When canceling the setting, set by the ...
... operate related settings. · Menu operations · M-DAX · Dynamic Volume® · Channel Level · MultEQ® XT · Dynamic EQ® Maintenance Mode NOTE Use when receiving maintenance...for at least 3 seconds. 88 Remote control operation buttons Move the cursor (Up/Down/Left/Right) Confirm the setting Return to "ON", the settings listed below , check the settings...those in connecting to complete an update. This can no longer be displayed by a Marantz serviceperson or service engineer or custom installer. When canceling the setting, set by the ...
SR7005 User Manual - English
Page 93
..."Firmware Update" function and "Add New Feature" will be announced on the Marantz web site each time related plans are defined. • When usable new ...;AIS DEUTSCH ENGLISH Advanced version Information Remote control operation buttons Move the cursor (Up/Down/Left/Right) Confirm the setting Return to "OFF". If the error continues despite this, check...Furthermore, updating/upgrading the firmware may be erased after an update or upgrade. • Internet radio preset channel • Internet radio Recently Played data • Username registered for Flickr Contact • Data in ...
..."Firmware Update" function and "Add New Feature" will be announced on the Marantz web site each time related plans are defined. • When usable new ...;AIS DEUTSCH ENGLISH Advanced version Information Remote control operation buttons Move the cursor (Up/Down/Left/Right) Confirm the setting Return to "OFF". If the error continues despite this, check...Furthermore, updating/upgrading the firmware may be erased after an update or upgrade. • Internet radio preset channel • Internet radio Recently Played data • Username registered for Flickr Contact • Data in ...

SR7005 User Manual - English
Page 94
...standard signal level for ZONE3. The correction value can be changed. 90 Remote control operation buttons Move the cursor (Up/Down/Left/Right) Confirm the setting Return to the input source. "HDMI Monitor 1 Information" or "HDMI Monitor 2 Information" displays ... : The dialogue normalization correction value. Dialogue normalization function This function is displayed when inputting signals including a surround back channel. NEDERLANDS SVENSKA Items HDMI Information Show information about settings for MAIN ZONE. The information displayed differs according to previous menu...
...standard signal level for ZONE3. The correction value can be changed. 90 Remote control operation buttons Move the cursor (Up/Down/Left/Right) Confirm the setting Return to the input source. "HDMI Monitor 1 Information" or "HDMI Monitor 2 Information" displays ... : The dialogue normalization correction value. Dialogue normalization function This function is displayed when inputting signals including a surround back channel. NEDERLANDS SVENSKA Items HDMI Information Show information about settings for MAIN ZONE. The information displayed differs according to previous menu...


