SR7005 User Manual - English
Page 5
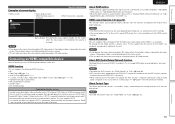
... version SVENSKA NEDERLANDS ESPAÑOL ITALIANO FRANÇAIS DEUTSCH ENGLISH Getting started 1 Accessories 2 About this manual 2 Features 2 Cautions on handling 3 Simple version (Simple setup guide 4 Basic version 13 Connections 14 Important information 14 Connecting an HDMI-compatible device 15 Connecting a TV 17 Connecting a Blu-ray Disc player 17 Connecting... of preset codes End of this manual Advanced version Information 1 Contents Getting started Thank you for future reference. To ensure proper operation, please read this Marantz product.
... version SVENSKA NEDERLANDS ESPAÑOL ITALIANO FRANÇAIS DEUTSCH ENGLISH Getting started 1 Accessories 2 About this manual 2 Features 2 Cautions on handling 3 Simple version (Simple setup guide 4 Basic version 13 Connections 14 Important information 14 Connecting an HDMI-compatible device 15 Connecting a TV 17 Connecting a Blu-ray Disc player 17 Connecting... of preset codes End of this manual Advanced version Information 1 Contents Getting started Thank you for future reference. To ensure proper operation, please read this Marantz product.
SR7005 User Manual - English
Page 6
... unit is equipped with the product. q User guide 1 w Warranty card (for USA 1 e Warranty card (for CANADA 1 r Power cord 1 t Remote control unit (RC011SR 1 y R03/AAA batteries 2 u Setup microphone (ACM1H 1 i AM loop antenna (for HD Radio broadcasts 1 o FM indoor antenna (for operations. High definition audio support The unit is equipped with HD level...
... unit is equipped with the product. q User guide 1 w Warranty card (for USA 1 e Warranty card (for CANADA 1 r Power cord 1 t Remote control unit (RC011SR 1 y R03/AAA batteries 2 u Setup microphone (ACM1H 1 i AM loop antenna (for HD Radio broadcasts 1 o FM indoor antenna (for operations. High definition audio support The unit is equipped with HD level...

SR7005 User Manual - English
Page 8
...(with surround back speakers. ENGLISH Simple version DEUTSCH FRANÇAIS ITALIANO ESPAÑOL NEDERLANDS SVENSKA Simple version (Simple setup guide) Here, we explain the entire setup procedure, from unboxing the unit to using the correct install method. STEP 5 Check STEP 6 Store Finish The "Simple...back speakers), see page 50. Connect 7.1-channel speakers, a TV and Blu-ray Disc player equipped with the product, for automatic setup. Set up Play back (vpage 5) (vpage 5) power speakers disc (vpage 7) (vpage 7) (vpage 12) Enjoy better audio, using it in ...
...(with surround back speakers. ENGLISH Simple version DEUTSCH FRANÇAIS ITALIANO ESPAÑOL NEDERLANDS SVENSKA Simple version (Simple setup guide) Here, we explain the entire setup procedure, from unboxing the unit to using the correct install method. STEP 5 Check STEP 6 Store Finish The "Simple...back speakers), see page 50. Connect 7.1-channel speakers, a TV and Blu-ray Disc player equipped with the product, for automatic setup. Set up Play back (vpage 5) (vpage 5) power speakers disc (vpage 7) (vpage 7) (vpage 12) Enjoy better audio, using it in ...

SR7005 User Manual - English
Page 9
...so that the speaker cable core wires do not protrude from the sideH The "Simple version" section provides the speaker installation, connection, and setup methods for the 7.1-channel playback using surround back speakers as an example. BACK / AMP ASSIGN FRONT B/HEIGHT FRONT WIDE Speaker impedance 6...; Install the surround speakers in electric shock. • Use speakers with surround back speakers. 5 For the installing, connecting, and setup methods of speakers other (vpage 113 "Protection Circuit"). • Never touch the speaker terminals while the power supply is 7.1-channel. ...
...so that the speaker cable core wires do not protrude from the sideH The "Simple version" section provides the speaker installation, connection, and setup methods for the 7.1-channel playback using surround back speakers as an example. BACK / AMP ASSIGN FRONT B/HEIGHT FRONT WIDE Speaker impedance 6...; Install the surround speakers in electric shock. • Use speakers with surround back speakers. 5 For the installing, connecting, and setup methods of speakers other (vpage 113 "Protection Circuit"). • Never touch the speaker terminals while the power supply is 7.1-channel. ...

SR7005 User Manual - English
Page 10
... player and TV Use only an HDMI (High Definition Multimedia Interface) cable that bears the HDMI logo (a genuine HDMI product). For the installing, connecting, and setup methods of speakers other than the 7.1-channel system (with connection cables. Doing so can result in humming or noise. 6 The "Simple version" section provides the...
... player and TV Use only an HDMI (High Definition Multimedia Interface) cable that bears the HDMI logo (a genuine HDMI product). For the installing, connecting, and setup methods of speakers other than the 7.1-channel system (with connection cables. Doing so can result in humming or noise. 6 The "Simple version" section provides the...

SR7005 User Manual - English
Page 11
...first time, be affected by these test signals will increase in the path while the measurements are connected. This is called "Audyssey Auto Setup". Background noise can disrupt the room measurements. Advanced version Information NOTE Before you measure in six or more positions, as shown in ... home appliances, light dimmers, or other devices as possible. If there is supplied to eight positions). •• When performing Audyssey Auto Setup, MultEQ® XT/Dynamic EQ®/Dynamic Volume® functions become active (vpage 76, 77). •• To set up speakers (Audyssey®...
...first time, be affected by these test signals will increase in the path while the measurements are connected. This is called "Audyssey Auto Setup". Background noise can disrupt the room measurements. Advanced version Information NOTE Before you measure in six or more positions, as shown in ... home appliances, light dimmers, or other devices as possible. If there is supplied to eight positions). •• When performing Audyssey Auto Setup, MultEQ® XT/Dynamic EQ®/Dynamic Volume® functions become active (vpage 76, 77). •• To set up speakers (Audyssey®...

SR7005 User Manual - English
Page 12
... direct mode Make the following adjustments, set up the subwoofer as possible to 75 dB using a subwoofer capable of the listener's ear. When placing the setup microphone, adjust the height of the sound receptor to the level of the following settings: • Volume : "12 o'clock position" • Crossover ... (*M) The main listening position is as close to a seat back or wall as shown in GExample qH. For the installing, connecting, and setup methods of speakers other than the 7.1-channel system (with a direct mode Set the direct mode to "On" and disable the volume adjustment and...
... direct mode Make the following adjustments, set up the subwoofer as possible to 75 dB using a subwoofer capable of the listener's ear. When placing the setup microphone, adjust the height of the sound receptor to the level of the following settings: • Volume : "12 o'clock position" • Crossover ... (*M) The main listening position is as close to a seat back or wall as shown in GExample qH. For the installing, connecting, and setup methods of speakers other than the 7.1-channel system (with a direct mode Set the direct mode to "On" and disable the volume adjustment and...

SR7005 User Manual - English
Page 13
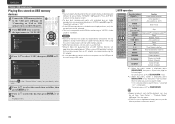
...perform measurements at 2nd listening position. The measurement of this unit. message is displayed. AUTO SETUP AUDYSSEY AUTO SETUP STEP3 Measurement Measurements finished. AUTO SETUP AUDYSSEY AUTO SETUP MultEQ XT STEP1 Preparation Connect the speakers and place them according to the recommendations in the...If unused channels are displayed. Measurements can be made in up speakers (Audyssey® Auto Setup) STEP 3 Measurement 4 Connect the setup microphone to the SETUP MIC jack of the second position starts. MultEQ XT [3/6] Advanced version Information Remote control ...
...perform measurements at 2nd listening position. The measurement of this unit. message is displayed. AUTO SETUP AUDYSSEY AUTO SETUP STEP3 Measurement Measurements finished. AUTO SETUP AUDYSSEY AUTO SETUP MultEQ XT STEP1 Preparation Connect the speakers and place them according to the recommendations in the...If unused channels are displayed. Measurements can be made in up speakers (Audyssey® Auto Setup) STEP 3 Measurement 4 Connect the setup microphone to the SETUP MIC jack of the second position starts. MultEQ XT [3/6] Advanced version Information Remote control ...

SR7005 User Manual - English
Page 14
... still appears, it takes to perform analysis. 12 Use ui to select the item you change speaker positions or orientation, perform Audyssey Auto Setup again to previous menu Press o then select "Yes". In event of Dynamic Volume settings, see "Error messages" (vpage 11). Level .... 13 Use ui to store calculation results. MultEQ XT [6/6] Store ENTER Enter RETURN Cancel Apply and store measurement result AUTO SETUP AUDYSSEY AUTO SETUP STEP6 Store Now storing... nn When turning Dynamic Volume off , check the speaker connections and repeat the measurement process from the...
... still appears, it takes to perform analysis. 12 Use ui to select the item you change speaker positions or orientation, perform Audyssey Auto Setup again to previous menu Press o then select "Yes". In event of Dynamic Volume settings, see "Error messages" (vpage 11). Level .... 13 Use ui to store calculation results. MultEQ XT [6/6] Store ENTER Enter RETURN Cancel Apply and store measurement result AUTO SETUP AUDYSSEY AUTO SETUP STEP6 Store Now storing... nn When turning Dynamic Volume off , check the speaker connections and repeat the measurement process from the...
SR7005 User Manual - English
Page 15
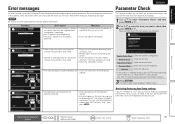
.... Front L Phase MultEQ XT • The displayed is connected with the polarities reversed. equalizer characteristics after Audyssey Auto Setup. RETURN Cancel AUTO SETUP AUDYSSEY AUTO SETUP Caution! If you have changed each speaker are quieter. • Check the speaker installation and the direction in step ...ESPAÑOL ITALIANO FRANÇAIS DEUTSCH ENGLISH Error messages Parameter Check An error message is displayed if Audyssey® Auto Setup could not be completed due to select "Skip", then press ENTER. Retry Skip Check cause of this happens, check the...
.... Front L Phase MultEQ XT • The displayed is connected with the polarities reversed. equalizer characteristics after Audyssey Auto Setup. RETURN Cancel AUTO SETUP AUDYSSEY AUTO SETUP Caution! If you have changed each speaker are quieter. • Check the speaker installation and the direction in step ...ESPAÑOL ITALIANO FRANÇAIS DEUTSCH ENGLISH Error messages Parameter Check An error message is displayed if Audyssey® Auto Setup could not be completed due to select "Skip", then press ENTER. Retry Skip Check cause of this happens, check the...

SR7005 User Manual - English
Page 18
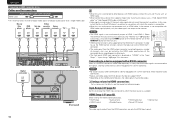
... HDMI connector Component video connectors Component video connectors Video connector Video connector Video device GFlow of video signals for ZONE2 video signal output, set "Input Setup" - NOTE • Do not plug in the menu to be connected. Use the connectors corresponding to the components to be connected. • You may need...
... HDMI connector Component video connectors Component video connectors Video connector Video connector Video device GFlow of video signals for ZONE2 video signal output, set "Input Setup" - NOTE • Do not plug in the menu to be connected. Use the connectors corresponding to the components to be connected. • You may need...
SR7005 User Manual - English
Page 19
... version Examples of screen display • Menu screen • Status display screen When the input source is switched MENU Audio/Video Adjust Information Auto Setup Manual Setup Input Setup SVENSKA NEDERLANDS Important information When the volume is adjusted Adjust various audio and video parameters Input BD Mode STEREO Auto Master Volume -80.0dB...
... version Examples of screen display • Menu screen • Status display screen When the input source is switched MENU Audio/Video Adjust Information Auto Setup Manual Setup Input Setup SVENSKA NEDERLANDS Important information When the volume is adjusted Adjust various audio and video parameters Input BD Mode STEREO Auto Master Volume -80.0dB...
SR7005 User Manual - English
Page 20
... When an HDMI/DVI conversion cable (sold separately) HDMI cable • This interface allows transfer of channels, etc.) may not be output. HDMI Setup (vpage 82) Make settings for HDMI video/audio output. • RGB Range • Auto Lip Sync • HDMI Control • Standby Source...The HDMI signal is not simultaneously output to a resolution with which the input source is assigned. "Input Assign" (vpage 70) in the "Input Setup" - NOTE • No sound is output when connected to a device equipped with a DVI-D connector. ENGLISH DEUTSCH FRANÇAIS ITALIANO ESPA&#...
... When an HDMI/DVI conversion cable (sold separately) HDMI cable • This interface allows transfer of channels, etc.) may not be output. HDMI Setup (vpage 82) Make settings for HDMI video/audio output. • RGB Range • Auto Lip Sync • HDMI Control • Standby Source...The HDMI signal is not simultaneously output to a resolution with which the input source is assigned. "Input Assign" (vpage 70) in the "Input Setup" - NOTE • No sound is output when connected to a device equipped with a DVI-D connector. ENGLISH DEUTSCH FRANÇAIS ITALIANO ESPA&#...

SR7005 User Manual - English
Page 23
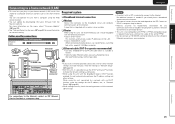
"Input Assign" setting (vpage 70) in the "Input Setup" - In this case, use the monitor output of video cable for connections Video cable (sold separately) Video cable (Yellow) Audio cable (sold separately) (White) L L Audio ...
"Input Assign" setting (vpage 70) in the "Input Setup" - In this case, use the monitor output of video cable for connections Video cable (sold separately) Video cable (Yellow) Audio cable (sold separately) (White) L L Audio ...

SR7005 User Manual - English
Page 25
... be "booming" noise from the speakers. The above figure shows an example of changing the assignment of this case, it to "CDR" by selecting "Input Setup" - Note that depending on a CD or cassette tape. • Select the connector to use and connect the device. • When recording analog audio, use a commercially...
... be "booming" noise from the speakers. The above figure shows an example of changing the assignment of this case, it to "CDR" by selecting "Input Setup" - Note that depending on a CD or cassette tape. • Select the connector to use and connect the device. • When recording analog audio, use a commercially...
SR7005 User Manual - English
Page 29
...resulting from a computer using a normal type cable. You can update by noise. Contact an ISP or a computer shop for details. • Marantz assumes no DHCP function, make the network settings automatically. • When using this unit, we recommend a switching hub with a speed of line.... A PPPoE-compatible router is available at retailer. • Some flat type Ethernet cables are made manually, make the settings at "Network Setup" (vpage 83). • When setting manually, check the setting contents with the broadband router's DHCP function enabled, this unit with the ...
...resulting from a computer using a normal type cable. You can update by noise. Contact an ISP or a computer shop for details. • Marantz assumes no DHCP function, make the network settings automatically. • When using this unit, we recommend a switching hub with a speed of line.... A PPPoE-compatible router is available at retailer. • Some flat type Ethernet cables are made manually, make the settings at "Network Setup" (vpage 83). • When setting manually, check the setting contents with the broadband router's DHCP function enabled, this unit with the ...

SR7005 User Manual - English
Page 33
...-forward) Playback / Pause Auto search (cue) Pause Stop Repeat playback RANDOM Random playback TV POWER TV power on/standby (Default : Marantz) TV INPUT Switch TV input (Default : Marantz) z1 When the menu screen is compatible with WMA META tags. • WAV format Quantization bit rate: 16 bits. • ... • If it is compatible with MTP. Content downloaded from pay sites on the Internet are stored in WMA format when ripped from "Input Setup" - on a computer may not be played on this unit to select the first letter you may be played on the computer's settings. Album...
...-forward) Playback / Pause Auto search (cue) Pause Stop Repeat playback RANDOM Random playback TV POWER TV power on/standby (Default : Marantz) TV INPUT Switch TV input (Default : Marantz) z1 When the menu screen is compatible with WMA META tags. • WAV format Quantization bit rate: 16 bits. • ... • If it is compatible with MTP. Content downloaded from pay sites on the Internet are stored in WMA format when ripped from "Input Setup" - on a computer may not be played on this unit to select the first letter you may be played on the computer's settings. Album...
SR7005 User Manual - English
Page 34
... the list is not in conjunction with the USB memory device. • USB memory devices will not work via a USB hub. • Marantz does not guarantee that all USB memory devices will accept no responsibility whatsoever for any problems arising with MP3 files conforming to perform a character search... setting is "OFF". • If the USB memory device is divided into multiple partitions, only the top partition can draw power from "Input Setup" - To cancel, press ui or SEARCH/INFO. • Repeat playback and shuffle playback can specify the duration of this unit in alphabetical order...
... the list is not in conjunction with the USB memory device. • USB memory devices will not work via a USB hub. • Marantz does not guarantee that all USB memory devices will accept no responsibility whatsoever for any problems arising with MP3 files conforming to perform a character search... setting is "OFF". • If the USB memory device is divided into multiple partitions, only the top partition can draw power from "Input Setup" - To cancel, press ui or SEARCH/INFO. • Repeat playback and shuffle playback can specify the duration of this unit in alphabetical order...
SR7005 User Manual - English
Page 35
Easy to follow installation and setup instructions are the property of their respective owners. and Canadian customers can be displayed (default: 30 sec) at menu "TUNER" (vpage 87). All other marks ...
Easy to follow installation and setup instructions are the property of their respective owners. and Canadian customers can be displayed (default: 30 sec) at menu "TUNER" (vpage 87). All other marks ...

SR7005 User Manual - English
Page 54
... Listening position SB z1 22˚ - 30˚ z2 90˚ - 110˚ 50 For the speaker installation, connection, and setup methods of connected speakers and perform optimal settings for Audyssey DSX When 7.1ch (Surround back / Front height / Front wide speaker) installed FHL... FRANÇAIS ITALIANO ESPAÑOL NEDERLANDS SVENSKA Speaker installation/connection (Advanced connection) This section provides the installation, connection, and setup methods of speaker systems other than ear level. Procedure for speaker settings Install Connect (vpage 51) Set up speakers (vpage 54)...
... Listening position SB z1 22˚ - 30˚ z2 90˚ - 110˚ 50 For the speaker installation, connection, and setup methods of connected speakers and perform optimal settings for Audyssey DSX When 7.1ch (Surround back / Front height / Front wide speaker) installed FHL... FRANÇAIS ITALIANO ESPAÑOL NEDERLANDS SVENSKA Speaker installation/connection (Advanced connection) This section provides the installation, connection, and setup methods of speaker systems other than ear level. Procedure for speaker settings Install Connect (vpage 51) Set up speakers (vpage 54)...


