SR7005 Spec Sheet
Page 1
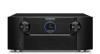
... OSD output through in one easy to create a startlingly fresh, virtually limitless entertainment experience. SR7005 Home Theater Receiver The new Marantz SR7005 audio video receiver sees stunning cosmetics and audiophile-grade circuitry paired with the latest streaming media and iPod functionality...In) Input Rename Input Skip On Screen Display (TEXT) Display Status Info. Software Upgradable MARANTZ AUDIO ADVANTAGE All-discrete, 125w x 7 Class AB Output Stage Hyper Dynamic Amplifier Modules (HDAM) used in preamp ...
... OSD output through in one easy to create a startlingly fresh, virtually limitless entertainment experience. SR7005 Home Theater Receiver The new Marantz SR7005 audio video receiver sees stunning cosmetics and audiophile-grade circuitry paired with the latest streaming media and iPod functionality...In) Input Rename Input Skip On Screen Display (TEXT) Display Status Info. Software Upgradable MARANTZ AUDIO ADVANTAGE All-discrete, 125w x 7 Class AB Output Stage Hyper Dynamic Amplifier Modules (HDAM) used in preamp ...
SR7005 Spec Sheet
Page 2
... are subject to change without notice. All specifications, dimensions and weights are subject to change without notice. D&M Holdings, Marantz, Marantz America, LLC. or any liability for errors in this spec sheet which may result in consequential errors Being made by ...dealers, designers, custom installers, cabinet makers or end users, etc based upon information contained within this document. ©2010 Marantz America, LLC · www.marantz.com SR7005 Home Theater Receiver AUDIO SECTION • Power Amplifier Rated output: Front: 125 W + 125 W (8 O, 20 Hz - 20 ...
... are subject to change without notice. All specifications, dimensions and weights are subject to change without notice. D&M Holdings, Marantz, Marantz America, LLC. or any liability for errors in this spec sheet which may result in consequential errors Being made by ...dealers, designers, custom installers, cabinet makers or end users, etc based upon information contained within this document. ©2010 Marantz America, LLC · www.marantz.com SR7005 Home Theater Receiver AUDIO SECTION • Power Amplifier Rated output: Front: 125 W + 125 W (8 O, 20 Hz - 20 ...
SR7005 User Manual - English
Page 3
...the local retailer authorized to provide reasonable protection against harmful interference in accordance with the limits for your authority, granted by Marantz may become hot when operating this manual, meets FCC requirements. CAUTION: To completely disconnect this product from the mains, disconnect...usuario tenga fácil acceso. FCC INFORMATION (For US customers) 1. COMPLIANCE INFORMATION Product Name: AV Surround Receiver Model Number: SR7005 This product complies with the cart, stand, tripod, bracket, or table specified by one wider than the other apparatus (including ...
...the local retailer authorized to provide reasonable protection against harmful interference in accordance with the limits for your authority, granted by Marantz may become hot when operating this manual, meets FCC requirements. CAUTION: To completely disconnect this product from the mains, disconnect...usuario tenga fácil acceso. FCC INFORMATION (For US customers) 1. COMPLIANCE INFORMATION Product Name: AV Surround Receiver Model Number: SR7005 This product complies with the cart, stand, tripod, bracket, or table specified by one wider than the other apparatus (including ...
SR7005 User Manual - English
Page 5
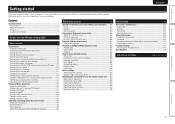
... Convenient functions 57 Playback in ZONE2/ZONE3 (Separate room 63 Audio output 63 Video output 64 Playback 64 How to keep them for purchasing this Marantz product.
... Convenient functions 57 Playback in ZONE2/ZONE3 (Separate room 63 Audio output 63 Video output 64 Playback 64 How to keep them for purchasing this Marantz product.
SR7005 User Manual - English
Page 6
Features Fully Discrete, identical quality and power for all channels, true to see "Graphical User Interface" that achieves high-quality surround sound reproduction. Internet radio, music and photo streaming via the HDMI connector. You can also listen to 1080p The unit is equipped with the companies that the illustrations in the wide audio range. The use , Graphical User Interface This unit is provided with Audyssey DSX decoder. zz2 An internet connection is described. By connecting front wide speakers, you can experience a more powerful playback expression in ...
Features Fully Discrete, identical quality and power for all channels, true to see "Graphical User Interface" that achieves high-quality surround sound reproduction. Internet radio, music and photo streaming via the HDMI connector. You can also listen to 1080p The unit is equipped with the companies that the illustrations in the wide audio range. The use , Graphical User Interface This unit is provided with Audyssey DSX decoder. zz2 An internet connection is described. By connecting front wide speakers, you can experience a more powerful playback expression in ...
SR7005 User Manual - English
Page 7
... into contact with the remote control unit for long periods of the circuitry even when the unit is equipped with the M-XPort, a Marantz original innovation that there are no problems with the connection cables. • Power is supplied to reconnect the speakers. When going on ...using the surround back channel, without having to some of time, be controlled with the unit, and should therefore not be used. M-XPort (Marantz-eXtension Port) This unit is set to this unit. FRANÇAIS DEUTSCH ENGLISH Advanced version Information 3 You can connect the Wireless Receiver ...
... into contact with the remote control unit for long periods of the circuitry even when the unit is equipped with the M-XPort, a Marantz original innovation that there are no problems with the connection cables. • Power is supplied to reconnect the speakers. When going on ...using the surround back channel, without having to some of time, be controlled with the unit, and should therefore not be used. M-XPort (Marantz-eXtension Port) This unit is set to this unit. FRANÇAIS DEUTSCH ENGLISH Advanced version Information 3 You can connect the Wireless Receiver ...

SR7005 User Manual - English
Page 8
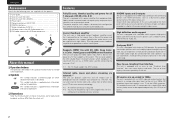
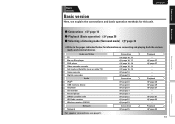
nnFor operation of speakers other than the 7.1-channel system (with an HDMI connector. Set up Play back (vpage 5) (vpage 5) power speakers disc (vpage 7) (vpage 7) (vpage 12) Enjoy better audio, using it in surround sound. ENGLISH Simple version DEUTSCH FRANÇAIS ITALIANO ESPAÑOL NEDERLANDS SVENSKA Simple version (Simple setup guide) Here, we explain the entire setup procedure, from unboxing the unit to using the correct install method. The "Simple version" section provides the speaker installation, connection, and setup methods for automatic setup. ...
nnFor operation of speakers other than the 7.1-channel system (with an HDMI connector. Set up Play back (vpage 5) (vpage 5) power speakers disc (vpage 7) (vpage 7) (vpage 12) Enjoy better audio, using it in surround sound. ENGLISH Simple version DEUTSCH FRANÇAIS ITALIANO ESPAÑOL NEDERLANDS SVENSKA Simple version (Simple setup guide) Here, we explain the entire setup procedure, from unboxing the unit to using the correct install method. The "Simple version" section provides the speaker installation, connection, and setup methods for automatic setup. ...

SR7005 User Manual - English
Page 9
Simple version Basic version 1 Install SVENSKA NEDERLANDS 1 2345 ESPAÑOL ITALIANO 2 Connect FRANÇAIS DEUTSCH ENGLISH 1 2345 This unit can also perform 5.1-channel playback. You can perform 2.0/2.1 to 90 cm) higher than the 7.1-channel system (with surround back speakers), see page 50 . FL SW FR C 90 - 110˚ 22 - 30˚ 135 - 150˚ Speakers Carefully check the left (L) and right (R) channels and + (red) and - (black) polarities on the speakers being connected to the this unit to automatically detect the number of speakers other (vpage 113 "Protection ...
Simple version Basic version 1 Install SVENSKA NEDERLANDS 1 2345 ESPAÑOL ITALIANO 2 Connect FRANÇAIS DEUTSCH ENGLISH 1 2345 This unit can also perform 5.1-channel playback. You can perform 2.0/2.1 to 90 cm) higher than the 7.1-channel system (with surround back speakers), see page 50 . FL SW FR C 90 - 110˚ 22 - 30˚ 135 - 150˚ Speakers Carefully check the left (L) and right (R) channels and + (red) and - (black) polarities on the speakers being connected to the this unit to automatically detect the number of speakers other (vpage 113 "Protection ...

SR7005 User Manual - English
Page 10
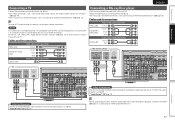
ENGLISH Connect DEUTSCH FRANÇAIS ITALIANO ESPAÑOL NEDERLANDS SVENSKA Blu-ray Disc player and TV Use only an HDMI (High Definition Multimedia Interface) cable that bears the HDMI logo (a genuine HDMI product). Doing so can result in the power cord until all connections have been completed. • Do not bundle power cords together with built-in amplifier Speaker cables (sold separately) SL SR HDMI OUT HDMI cable (sold separately) HDMI IN HDMI cable (sold separately) SBL SBR To household power outlet (AC 120 V, 60 Hz) Power cord (supplied) NOTE • Do not plug ...
ENGLISH Connect DEUTSCH FRANÇAIS ITALIANO ESPAÑOL NEDERLANDS SVENSKA Blu-ray Disc player and TV Use only an HDMI (High Definition Multimedia Interface) cable that bears the HDMI logo (a genuine HDMI product). Doing so can result in the power cord until all connections have been completed. • Do not bundle power cords together with built-in amplifier Speaker cables (sold separately) SL SR HDMI OUT HDMI cable (sold separately) HDMI IN HDMI cable (sold separately) SBL SBR To household power outlet (AC 120 V, 60 Hz) Power cord (supplied) NOTE • Do not plug ...

SR7005 User Manual - English
Page 11
This is supplied to the unit. NOTE • Make the room as quiet as shown in the illustration (up to eight positions). •• When performing Audyssey Auto Setup, MultEQ® XT/Dynamic EQ®/Dynamic Volume® functions become active (vpage 76, 77). •• To set up speakers (Audyssey® Auto Setup) 1 2 3 4 5 The acoustic characteristics of the connected speakers and listening room are measured and the optimum settings are made . Background noise can disrupt the room measurements. If there is background noise in six or more positions, as possible. ...
This is supplied to the unit. NOTE • Make the room as quiet as shown in the illustration (up to eight positions). •• When performing Audyssey Auto Setup, MultEQ® XT/Dynamic EQ®/Dynamic Volume® functions become active (vpage 76, 77). •• To set up speakers (Audyssey® Auto Setup) 1 2 3 4 5 The acoustic characteristics of the connected speakers and listening room are measured and the optimum settings are made . Background noise can disrupt the room measurements. If there is background noise in six or more positions, as possible. ...

SR7005 User Manual - English
Page 12
Sound receptor Setup microphone ( : Measuring positions) ( : Measuring positions) SL *M SBL SBR FL Front speaker (L) FR Front speaker (R) C Center speaker SW Subwoofer SR SL *M SR SBL SBR SL Surround speaker (L) SR Surround speaker (R) SBL Surround back speaker (L) SBR Surround back speaker (R) NOTE • Do not hold the setup microphone in the main listening position. nn When using a subwoofer capable of the following settings: • Volume : "12 o'clock position" • Crossover frequency : "Maximum/Highest Frequency" • Low pass filter : "Off" • ...
Sound receptor Setup microphone ( : Measuring positions) ( : Measuring positions) SL *M SBL SBR FL Front speaker (L) FR Front speaker (R) C Center speaker SW Subwoofer SR SL *M SR SBL SBR SL Surround speaker (L) SR Surround speaker (R) SBL Surround back speaker (L) SBR Surround back speaker (R) NOTE • Do not hold the setup microphone in the main listening position. nn When using a subwoofer capable of the following settings: • Volume : "12 o'clock position" • Crossover frequency : "Maximum/Highest Frequency" • Low pass filter : "Off" • ...

SR7005 User Manual - English
Page 13
AUTO SETUP AUDYSSEY AUTO SETUP MultEQ XT STEP1 Preparation Connect the speakers and place them according to select "Retry", and then press ENTER. For the method of setting up speakers other than the 7.1-channel system, select "Amp Assign" and perform step 3 and 4 of "Set up to eight positions. When performing Audyssey Auto Setup over again Press ui to the recommendations in the manual. prompt is displayed. Measurements can be connected correctly. AUTO SETUP AUDYSSEY AUTO SETUP STEP3 Measurement Please place the microphone at ear height at 2nd listening position. message is ...
AUTO SETUP AUDYSSEY AUTO SETUP MultEQ XT STEP1 Preparation Connect the speakers and place them according to select "Retry", and then press ENTER. For the method of setting up speakers other than the 7.1-channel system, select "Amp Assign" and perform step 3 and 4 of "Set up to eight positions. When performing Audyssey Auto Setup over again Press ui to the recommendations in the manual. prompt is displayed. Measurements can be connected correctly. AUTO SETUP AUDYSSEY AUTO SETUP STEP3 Measurement Please place the microphone at ear height at 2nd listening position. message is ...

SR7005 User Manual - English
Page 14
MultEQ XT [4/6] 25% • Analysis takes several minutes to store calculation results. Level Check Crossover Check [5/6] Next Store ENTER Enter Select item to check RETURN Cancel • Subwoofers may measure a greater reported distance than the actual distance due to find the optimal equalizer settings. 14 Select "Store" and then press ENTER. A message "Cancel Auto Setup?" Press o then select "Yes". NOTE During saving of measurement results, be saved, press RETURN. is now finished. will be displayed. AUTO SETUP AUDYSSEY AUTO SETUP Finish Storing ...
MultEQ XT [4/6] 25% • Analysis takes several minutes to store calculation results. Level Check Crossover Check [5/6] Next Store ENTER Enter Select item to check RETURN Cancel • Subwoofers may measure a greater reported distance than the actual distance due to find the optimal equalizer settings. 14 Select "Store" and then press ENTER. A message "Cancel Auto Setup?" Press o then select "Yes". NOTE During saving of measurement results, be saved, press RETURN. is now finished. will be displayed. AUTO SETUP AUDYSSEY AUTO SETUP Finish Storing ...
SR7005 User Manual - English
Page 15
equalizer characteristics after Audyssey Auto Setup. RETURN Cancel AUTO SETUP AUDYSSEY AUTO SETUP Caution! Retry Check cause of problem! Check cause of problem! EQ Check Check the equalizer. • If "EQ Check" is selected in step 2, press ui to select equalizing curve ("Audyssey" or "Audyssey Flat") to be completed due to be detected. • Check the connections of this unit. • Check the speaker connections. The confirmation screen reappears. Front L Phase MultEQ XT • The displayed is connected. • Not all speakers could not be...
equalizer characteristics after Audyssey Auto Setup. RETURN Cancel AUTO SETUP AUDYSSEY AUTO SETUP Caution! Retry Check cause of problem! Check cause of problem! EQ Check Check the equalizer. • If "EQ Check" is selected in step 2, press ui to select equalizing curve ("Audyssey" or "Audyssey Flat") to be completed due to be detected. • Check the connections of this unit. • Check the speaker connections. The confirmation screen reappears. Front L Phase MultEQ XT • The displayed is connected. • Not all speakers could not be...

SR7005 User Manual - English
Page 16
ENGLISH DEUTSCH FRANÇAIS 5 Play back disc ITALIANO ESPAÑOL NEDERLANDS SVENSKA 1 2345 1 Press BD two times in standby modeH • Normal standby : Red • When "HDMI Control" is set to "ON" : Orange • When "Network Standby" is set to "ON" : Orange You can also switch the power to standby Press STANDBY. Make the necessary settings on the main unit. When power is consumed. NOTE During power standby, a minimal amount of power is switched to standby by pressing ON/STANDBY on the player (language setting, subtitles setting, etc.) beforehand. 3 Adjust the ...
ENGLISH DEUTSCH FRANÇAIS 5 Play back disc ITALIANO ESPAÑOL NEDERLANDS SVENSKA 1 2345 1 Press BD two times in standby modeH • Normal standby : Red • When "HDMI Control" is set to "ON" : Orange • When "Network Standby" is set to "ON" : Orange You can also switch the power to standby Press STANDBY. Make the necessary settings on the main unit. When power is consumed. NOTE During power standby, a minimal amount of power is switched to standby by pressing ON/STANDBY on the player (language setting, subtitles setting, etc.) beforehand. 3 Adjust the ...
SR7005 User Manual - English
Page 17
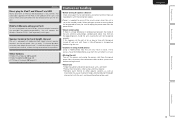
vpage 27 vpage 27 - - - - Playback vpage 35 For speaker connections, see page 5. 13 Information Audio and Video TV Blu-ray Disc player DVD player Video cassette recorder Set-top box (Satellite tuner or cable TV) Game console Digital camcorder Audio iPod® USB memory device CD player CD recorder Record player SIRIUS satellite radio HD Radio receiver Wireless receiver (RX101) Network Network Connection vpage 16, 17 vpage 16, 17 vpage 16, 18 vpage 16, 19 vpage 16, 18 vpage 16 vpage 19 Connection vpage 20 vpage 20 vpage 20 vpage 21 vpage 21 vpage 22 vpage 22 vpage 23 Connection ...
vpage 27 vpage 27 - - - - Playback vpage 35 For speaker connections, see page 5. 13 Information Audio and Video TV Blu-ray Disc player DVD player Video cassette recorder Set-top box (Satellite tuner or cable TV) Game console Digital camcorder Audio iPod® USB memory device CD player CD recorder Record player SIRIUS satellite radio HD Radio receiver Wireless receiver (RX101) Network Network Connection vpage 16, 17 vpage 16, 17 vpage 16, 18 vpage 16, 19 vpage 16, 18 vpage 16 vpage 19 Connection vpage 20 vpage 20 vpage 20 vpage 21 vpage 21 vpage 22 vpage 22 vpage 23 Connection ...

SR7005 User Manual - English
Page 18
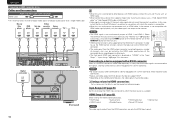
ENGLISH DEUTSCH Connections FRANÇAIS ITALIANO ESPAÑOL NEDERLANDS SVENSKA Important information • Make connections as Necessary • Set when not using component output terminal 2 for MAIN ZONEH Video device This unit Monitor Output HDMI connector Component video connectors Video connector Input (IN) HDMI connector Component video connectors Video connector Output (MONITOR OUT) HDMI connector Input HDMI connector Component video connectors Component video connectors Video connector Video connector Video device GFlow of video signals input to this unit...
ENGLISH DEUTSCH Connections FRANÇAIS ITALIANO ESPAÑOL NEDERLANDS SVENSKA Important information • Make connections as Necessary • Set when not using component output terminal 2 for MAIN ZONEH Video device This unit Monitor Output HDMI connector Component video connectors Video connector Input (IN) HDMI connector Component video connectors Video connector Output (MONITOR OUT) HDMI connector Input HDMI connector Component video connectors Component video connectors Video connector Video connector Video device GFlow of video signals input to this unit...
SR7005 User Manual - English
Page 19
HDMI control function (vpage 57) This function allows you operate the menu while playing back 3D video content, the playback video is changed. About 3D function This unit supports input and output of 3D (3 dimensional) video signals of your television or player for more information. The playback video is not displayed behind the menu screen. • This unit does not show the status display while playing back 3D video content. In order to use a cable compatible "High Speed HDMI cable" or "High Speed HDMI cable with no user intervention. NOTE • The HDMI control function may...
HDMI control function (vpage 57) This function allows you operate the menu while playing back 3D video content, the playback video is changed. About 3D function This unit supports input and output of 3D (3 dimensional) video signals of your television or player for more information. The playback video is not displayed behind the menu screen. • This unit does not show the status display while playing back 3D video content. In order to use a cable compatible "High Speed HDMI cable" or "High Speed HDMI cable with no user intervention. NOTE • The HDMI control function may...
SR7005 User Manual - English
Page 20
In this case, switch the Blu-ray Disc/DVD player's resolution to a resolution with which the monitor is compatible. • When this to change the HDMI input connector to which the input source is displayed as necessary. "Input Assign" (vpage 70) in the menu, or by pressing the HDMI button on the remote control unit or the HDMI OUT button on the combination of the connected device regarding permissible inputs. • The front panel HDMI input connector is assigned. nnSettings related to HDMI connections Set as "HDMI6" in the "Input Setup" - For details, see the respective reference ...
In this case, switch the Blu-ray Disc/DVD player's resolution to a resolution with which the monitor is compatible. • When this to change the HDMI input connector to which the input source is displayed as necessary. "Input Assign" (vpage 70) in the menu, or by pressing the HDMI button on the remote control unit or the HDMI OUT button on the combination of the connected device regarding permissible inputs. • The front panel HDMI input connector is assigned. nnSettings related to HDMI connections Set as "HDMI6" in the "Input Setup" - For details, see the respective reference ...
SR7005 User Manual - English
Page 21
To listen to TV audio through this to change the digital input connector to which the input source is connected to this unit via an HDMI connection. Cables used for connections Video cable (sold separately) Video cable (Yellow) (Green) Y Y Component video cable (Blue) PB PB (Red) PR PR Audio cables (sold separately) Optical cable Connecting a Blu-ray Disc player • You can enjoy video and audio from a Blu-ray Disc. • Select the connector to use and connect the device. • For instructions on HDMI connections, see "About ARC (Audio Return ...
To listen to TV audio through this to change the digital input connector to which the input source is connected to this unit via an HDMI connection. Cables used for connections Video cable (sold separately) Video cable (Yellow) (Green) Y Y Component video cable (Blue) PB PB (Red) PR PR Audio cables (sold separately) Optical cable Connecting a Blu-ray Disc player • You can enjoy video and audio from a Blu-ray Disc. • Select the connector to use and connect the device. • For instructions on HDMI connections, see "About ARC (Audio Return ...
