
User manual, English (US)
Page 1
READ YOUR QUICK GUIDE AND/OR OWNER'S MANUAL FIRST FOR QUICK TIPS THAT MAKE USING YOUR MAGNAVOX PRODUCT MORE ENJOYABLE. Editing Function Setup VCR Functions Others Español INSTRUCCIONES EN ESPAÑOL INCLUIDAS. © 2009 Funai Electric Co., ...? IF YOU HAVE READ YOUR INSTRUCTIONS AND STILL NEED ASSISTANCE, YOU MAY ACCESS OUR ONLINE HELP AT HTTP://WWW.MAGNAVOX.COM/SUPPORT OR CALL 1-800-605-8610 WHILE WITH YOUR PRODUCT. Introduction Connections Basic Setup Recording Playback Owner's Manual ZV427MG9 DIGITAL VIDEO DISC RECORDER & VIDEO CASSETTE RECORDER THANK YOU FOR CHOOSING...
READ YOUR QUICK GUIDE AND/OR OWNER'S MANUAL FIRST FOR QUICK TIPS THAT MAKE USING YOUR MAGNAVOX PRODUCT MORE ENJOYABLE. Editing Function Setup VCR Functions Others Español INSTRUCCIONES EN ESPAÑOL INCLUIDAS. © 2009 Funai Electric Co., ...? IF YOU HAVE READ YOUR INSTRUCTIONS AND STILL NEED ASSISTANCE, YOU MAY ACCESS OUR ONLINE HELP AT HTTP://WWW.MAGNAVOX.COM/SUPPORT OR CALL 1-800-605-8610 WHILE WITH YOUR PRODUCT. Introduction Connections Basic Setup Recording Playback Owner's Manual ZV427MG9 DIGITAL VIDEO DISC RECORDER & VIDEO CASSETTE RECORDER THANK YOU FOR CHOOSING...
User manual, English (US)
Page 2
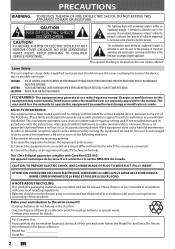
... Batteries should remove the cover or attempt to service this device, due to operate this equipment if an unauthorized change or modification is connected. 4) Consult the dealer or an experienced radio/TV technician for future reference. Contact your contribution to the environment!!! • Used ... Please dispose of the following measures: 1) Reorient or relocate the receiving antenna. 2) Increase the separation between the equipment and receiver. 3) Connect the equipment into an outlet on , the user is encouraged to try to which can dispose of them at the back of the cabinet...
... Batteries should remove the cover or attempt to service this device, due to operate this equipment if an unauthorized change or modification is connected. 4) Consult the dealer or an experienced radio/TV technician for future reference. Contact your contribution to the environment!!! • Used ... Please dispose of the following measures: 1) Reorient or relocate the receiving antenna. 2) Increase the separation between the equipment and receiver. 3) Connect the equipment into an outlet on , the user is encouraged to try to which can dispose of them at the back of the cabinet...
User manual, English (US)
Page 3
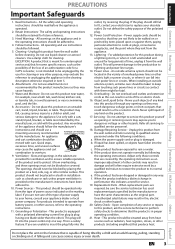
..., tripod, bracket, or table. When installing an outside antenna system should never be read before cleaning. Do not use liquid cleaners or aerosol cleaners. Introduction Connections Basic Setup Recording Playback PRECAUTIONS Important Safeguards 1. For products intended to keep from the type of the polarized plug. 12. Power supply cords should be...
..., tripod, bracket, or table. When installing an outside antenna system should never be read before cleaning. Do not use liquid cleaners or aerosol cleaners. Introduction Connections Basic Setup Recording Playback PRECAUTIONS Important Safeguards 1. For products intended to keep from the type of the polarized plug. 12. Power supply cords should be...
User manual, English (US)
Page 4
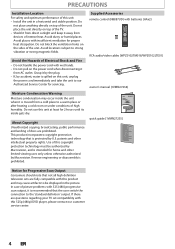
... subject to the 'standard definition' output. In case of picture problems with 525 (480) progressive scan output, it is recommended that the user switch the connection to strong vibration or strong magnetic fields. Do not block the ventilation holes on the sides of Electrical Shock and Fire • Do not handle...
... subject to the 'standard definition' output. In case of picture problems with 525 (480) progressive scan output, it is recommended that the user switch the connection to strong vibration or strong magnetic fields. Do not block the ventilation holes on the sides of Electrical Shock and Fire • Do not handle...
User manual, English (US)
Page 5
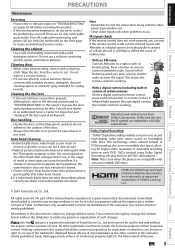
PRECAUTIONS Introduction Connections Basic Setup Recording Maintenance Servicing • Please refer to relevant topics on "TROUBLESHOOTING" on the front page to locate an Authorized Service Center. Turn off, ...
PRECAUTIONS Introduction Connections Basic Setup Recording Maintenance Servicing • Please refer to relevant topics on "TROUBLESHOOTING" on the front page to locate an Authorized Service Center. Turn off, ...
User manual, English (US)
Page 6
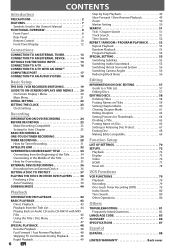
... 8 Front Panel 8 Rear Panel 9 Remote Control 10 Front Panel Display 12 Connections CONNECTION TO AN EXTERNAL TUNER 13 CONNECTION TO AN EXTERNAL DEVICE 14 SETTINGS FOR THE VIDEO INPUT 15 CONNECTION TO A TV 16 CONNECTION TO A TV WITH AN HDMI™ COMPATIBLE PORT 17 CONNECTION TO AN AUDIO SYSTEM 18 Basic Setup THE DVD / VCR RECORDER...
... 8 Front Panel 8 Rear Panel 9 Remote Control 10 Front Panel Display 12 Connections CONNECTION TO AN EXTERNAL TUNER 13 CONNECTION TO AN EXTERNAL DEVICE 14 SETTINGS FOR THE VIDEO INPUT 15 CONNECTION TO A TV 16 CONNECTION TO A TV WITH AN HDMI™ COMPATIBLE PORT 17 CONNECTION TO AN AUDIO SYSTEM 18 Basic Setup THE DVD / VCR RECORDER...
User manual, English (US)
Page 7
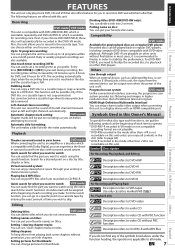
...RW/DVD-RW, which is not recordable on this unit. One-touch timer recording (OTR): You can enjoy clearer audio/video output when connecting this Owner's Manual To specify for what you want to watch using the index search/time search functions. Although DVD+R are offered with... media. Automatic chapter mark setting: DVD mode Chapter marks will be put the following features are playable on other than that . Introduction Connections Basic Setup FEATURES Recording Playback This unit not only plays back DVD, CD and VCR but also offers features for you to record on...
...RW/DVD-RW, which is not recordable on this unit. One-touch timer recording (OTR): You can enjoy clearer audio/video output when connecting this Owner's Manual To specify for what you want to watch using the index search/time search functions. Although DVD+R are offered with... media. Automatic chapter mark setting: DVD mode Chapter marks will be put the following features are playable on other than that . Introduction Connections Basic Setup FEATURES Recording Playback This unit not only plays back DVD, CD and VCR but also offers features for you to record on...
User manual, English (US)
Page 8
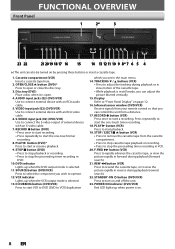
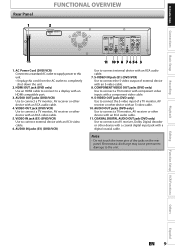
...VCR) Use to start the one -touch timer recording. 8. RECORD Ibutton (DVD) • Press once to start recording. • Press repeatedly to connect external device with an RCA audio cable. 5. Infrared sensor window (DVD/VCR) Receive signals from your remote control so that you wish to open . ...4. STOP / EJECT C A button (VCR) • Press to connect external device with an RCA video cable. 6. AUDIO input jacks (E2) (DVD/VCR) Use to remove the cassette tape from a distance. 17. POWER ON...
...VCR) Use to start the one -touch timer recording. 8. RECORD Ibutton (DVD) • Press once to start recording. • Press repeatedly to connect external device with an RCA audio cable. 5. Infrared sensor window (DVD/VCR) Receive signals from your remote control so that you wish to open . ...4. STOP / EJECT C A button (VCR) • Press to connect external device with an RCA video cable. 6. AUDIO input jacks (E2) (DVD/VCR) Use to remove the cassette tape from a distance. 17. POWER ON...
User manual, English (US)
Page 9
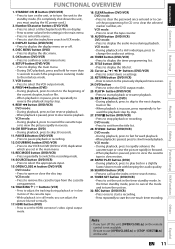
...AUDIO S-VIDEO COMPONENT S-VIDEO IN ---AUDIO---OUT OUT VIDEO OUT Y L L COAXIAL L OUT R PB /CB IN PR /CR R R IN ---VIDEO---OUT 1. AC Power Cord (DVD/VCR) Connect to a standard AC outlet to supply power to this unit. • Unplug this cord from the AC outlet to the unit. S-VIDEO IN jack (E1...) (DVD/VCR) Use to connect a TV monitor, AV receiver or other device with an S-video cable. 8. Note • Do not touch the inner pins of external device with an RCA...
...AUDIO S-VIDEO COMPONENT S-VIDEO IN ---AUDIO---OUT OUT VIDEO OUT Y L L COAXIAL L OUT R PB /CB IN PR /CR R R IN ---VIDEO---OUT 1. AC Power Cord (DVD/VCR) Connect to a standard AC outlet to supply power to this unit. • Unplug this cord from the AC outlet to the unit. S-VIDEO IN jack (E1...) (DVD/VCR) Use to connect a TV monitor, AV receiver or other device with an S-video cable. 8. Note • Do not touch the inner pins of external device with an RCA...
User manual, English (US)
Page 11
.... 5. Español EN 11 STOP C button (DVD/VCR) • Press to start VCR to DVD (DVD to forward the playback step by step. 9. Introduction Connections Basic Setup Recording Playback FUNCTIONAL OVERVIEW 1. Number/Character buttons (DVD/VCR) • Press to select a title/chapter/track/file on the unit, or to turn...
.... 5. Español EN 11 STOP C button (DVD/VCR) • Press to start VCR to DVD (DVD to forward the playback step by step. 9. Introduction Connections Basic Setup Recording Playback FUNCTIONAL OVERVIEW 1. Number/Character buttons (DVD/VCR) • Press to select a title/chapter/track/file on the unit, or to turn...
User manual, English (US)
Page 13
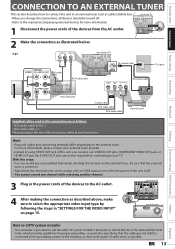
... • Signal from the external tuner can also use S-VIDEO OUT jack, COMPONENT VIDEO OUT jack, or HDMI OUT jack (no AUDIO OUT jack connection required) for more information, please contact your external tuner provider. • Instead of using VIDEO OUT jack of this unit HDMI OUT Editing Function Setup... x 1 • RCA video cable x 1 Please purchase the rest of the necessary cables at your local store. VHF / UHF • When you can be connected to the grounding system of the building, as close to the point of cable entry as possible. IN TV signal S-VIDEO VIDEO OUT OUT AUDIO...
... • Signal from the external tuner can also use S-VIDEO OUT jack, COMPONENT VIDEO OUT jack, or HDMI OUT jack (no AUDIO OUT jack connection required) for more information, please contact your external tuner provider. • Instead of using VIDEO OUT jack of this unit HDMI OUT Editing Function Setup... x 1 • RCA video cable x 1 Please purchase the rest of the necessary cables at your local store. VHF / UHF • When you can be connected to the grounding system of the building, as close to the point of cable entry as possible. IN TV signal S-VIDEO VIDEO OUT OUT AUDIO...
User manual, English (US)
Page 14
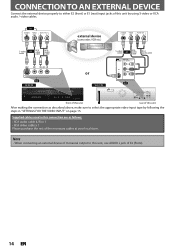
...as follows: • RCA audio cable (L/R) x 1 • RCA video cable x 1 Please purchase the rest of this unit After making the connection as described above, make sure to select the appropriate video input type by using S-video or RCA audio / video cables. Supplied cables used in "...SETTINGS FOR THE VIDEO INPUT" on page 15. CONNECTION TO AN EXTERNAL DEVICE Connect the external device properly to this unit, use AUDIO L jack of E2 (Front). 14 EN or S-VIDEO VIDEO OUT OUT AUDIO OUT R L...
...as follows: • RCA audio cable (L/R) x 1 • RCA video cable x 1 Please purchase the rest of this unit After making the connection as described above, make sure to select the appropriate video input type by using S-video or RCA audio / video cables. Supplied cables used in "...SETTINGS FOR THE VIDEO INPUT" on page 15. CONNECTION TO AN EXTERNAL DEVICE Connect the external device properly to this unit, use AUDIO L jack of E2 (Front). 14 EN or S-VIDEO VIDEO OUT OUT AUDIO OUT R L...
User manual, English (US)
Page 15
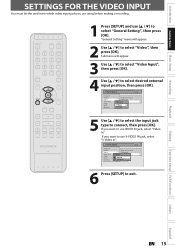
... Display Video Recording Clock HDMI Reset All Progressive Scan TV Aspect E1V(Rideeaor)InpVuidteo Input E1Vi(dReeoarIn) E2S-(VFirdoenot)In 6 Press [SETUP] to connect, then press [OK]. Introduction Connections Basic Setup Recording SETTINGS FOR THE VIDEO INPUT You must let the unit know which video input jack you want to use S-VIDEO...
... Display Video Recording Clock HDMI Reset All Progressive Scan TV Aspect E1V(Rideeaor)InpVuidteo Input E1Vi(dReeoarIn) E2S-(VFirdoenot)In 6 Press [SETUP] to connect, then press [OK]. Introduction Connections Basic Setup Recording SETTINGS FOR THE VIDEO INPUT You must let the unit know which video input jack you want to use S-VIDEO...
User manual, English (US)
Page 16
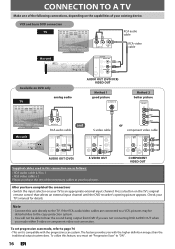
...scan mode, refer to page 76 • This unit is compatible with the higher definition images than the traditional output system does. Note • Connect this unit directly to an appropriate external input channel. Press a button on DVD only analog audio TV AUDIO OUT (DVD/VCR) VIDEO OUT Method ...EN To set "Progressive Scan" to hear the sound being output from DVD if you made either S-video or component video out connection. VCR and basic DVD connection TV RCA audio cable R L VIDEO AUDIO IN IN RCA video cable this unit HDMI OUT DIGITAL AUDIO OUT DVD DVD/VCR AUDIO...
...scan mode, refer to page 76 • This unit is compatible with the higher definition images than the traditional output system does. Note • Connect this unit directly to an appropriate external input channel. Press a button on DVD only analog audio TV AUDIO OUT (DVD/VCR) VIDEO OUT Method ...EN To set "Progressive Scan" to hear the sound being output from DVD if you made either S-video or component video out connection. VCR and basic DVD connection TV RCA audio cable R L VIDEO AUDIO IN IN RCA video cable this unit HDMI OUT DIGITAL AUDIO OUT DVD DVD/VCR AUDIO...
User manual, English (US)
Page 17
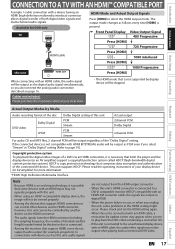
...Display Video Output Signal 480 Progressive Press [HDMI] 720 Progressive Press [HDMI] 1080 interlaced Press [HDMI] 1080 Progressive Press [HDMI] When connecting with an HDMI cable, the audio signal will not be output when playing back a commercial DVD-video. Cables not included. Recording Playback ... for example, projectors). Copyright protection system To play back the DVD-video containing a revocation list. • If the unit is connected to the unauthorized display device with an HDMI cable, the audio/video signal may not operate properly with this unit HDMI cable HDMI ...
...Display Video Output Signal 480 Progressive Press [HDMI] 720 Progressive Press [HDMI] 1080 interlaced Press [HDMI] 1080 Progressive Press [HDMI] When connecting with an HDMI cable, the audio signal will not be output when playing back a commercial DVD-video. Cables not included. Recording Playback ... for example, projectors). Copyright protection system To play back the DVD-video containing a revocation list. • If the unit is connected to the unauthorized display device with an HDMI cable, the audio/video signal may not operate properly with this unit HDMI cable HDMI ...
User manual, English (US)
Page 18
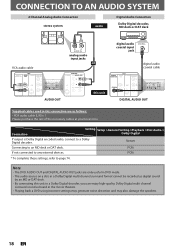
... as follows: • RCA audio cable (L/R) x 1 Please purchase the rest of the necessary cables at your local store. Stream Connecting to any external devices. PCM If not connected to an MD deck or DAT deck. Note • The DVD AUDIO OUT and DIGITAL AUDIO OUT jacks are as heard in... a Dolby Digital multi channel surround format cannot be recorded as digital sound by an MD or DAT deck. • By connecting this connection are only useful in DVD mode. • The audio source on a disc in the movie theaters. • Playing back a DVD using incorrect settings...
... as follows: • RCA audio cable (L/R) x 1 Please purchase the rest of the necessary cables at your local store. Stream Connecting to any external devices. PCM If not connected to an MD deck or DAT deck. Note • The DVD AUDIO OUT and DIGITAL AUDIO OUT jacks are as heard in... a Dolby Digital multi channel surround format cannot be recorded as digital sound by an MD or DAT deck. • By connecting this connection are only useful in DVD mode. • The audio source on a disc in the movie theaters. • Playing back a DVD using incorrect settings...
User manual, English (US)
Page 19
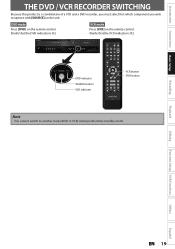
DVD mode Press [DVD] on the remote control. (Verify that the DVD indicator is lit.) VCR mode Press [VCR] on the unit. Introduction Connections Basic Setup THE DVD / VCR RECORDER SWITCHING Because this product is lit.) DVD indicator SOURCE button VCR indicator VCR button DVD button Note • You ...
DVD mode Press [DVD] on the remote control. (Verify that the DVD indicator is lit.) VCR mode Press [VCR] on the unit. Introduction Connections Basic Setup THE DVD / VCR RECORDER SWITCHING Because this product is lit.) DVD indicator SOURCE button VCR indicator VCR button DVD button Note • You ...
User manual, English (US)
Page 21
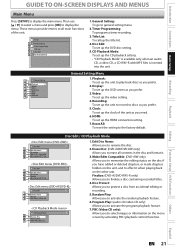
...5 Clock 26 HDMI Reset All 37 General Setting Menu 1. Video: To set up the video setting. 4. Recording: To set up the HDMI connection setting. 7. Reset All: To reset the setting to discs as you to select images or information on the menu screen by activating PBC (playback... or deleted chapters, or made chapters hidden on the other unit. Program Play: (audio CD/video CD only) Allows you prefer. 3. Introduction Connections Basic Setup Recording Playback GUIDE TO ON-SCREEN DISPLAYS AND MENUS Main Menu Press [SETUP] to activate the program playback feature. 7. Setup 1 General...
...5 Clock 26 HDMI Reset All 37 General Setting Menu 1. Video: To set up the video setting. 4. Recording: To set up the HDMI connection setting. 7. Reset All: To reset the setting to discs as you to select images or information on the menu screen by activating PBC (playback... or deleted chapters, or made chapters hidden on the other unit. Program Play: (audio CD/video CD only) Allows you prefer. 3. Introduction Connections Basic Setup Recording Playback GUIDE TO ON-SCREEN DISPLAYS AND MENUS Main Menu Press [SETUP] to activate the program playback feature. 7. Setup 1 General...
User manual, English (US)
Page 22
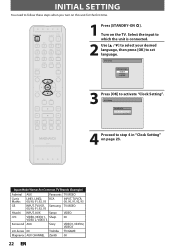
Select the input to which the unit is connected. 2 Use [K / L] to select your desired language, then press [OK] to activate "Clock Setting". Turn on page 23. Initial Setup Clock Setting -- : -- -- 4 Proceed to follow these ..., 93 Hitachi INPUT, AUX Sanyo VIDEO JVC VIDEO, VIDEO 1, Sharp 00 VIDEO 2, VIDEO 3 Kenwood AUX Sony VIDEO1, VIDEO2, VIDEO3 LXI-Series 00 Toshiba TV/GAME Magnavox AUX CHANNEL Zenith 00 22 EN Input Mode Names for the first time. 1 Press [STANDBY-ON y]. Initial Setup OSD Language English Français Espa...
Select the input to which the unit is connected. 2 Use [K / L] to select your desired language, then press [OK] to activate "Clock Setting". Turn on page 23. Initial Setup Clock Setting -- : -- -- 4 Proceed to follow these ..., 93 Hitachi INPUT, AUX Sanyo VIDEO JVC VIDEO, VIDEO 1, Sharp 00 VIDEO 2, VIDEO 3 Kenwood AUX Sony VIDEO1, VIDEO2, VIDEO3 LXI-Series 00 Toshiba TV/GAME Magnavox AUX CHANNEL Zenith 00 22 EN Input Mode Names for the first time. 1 Press [STANDBY-ON y]. Initial Setup OSD Language English Français Espa...
User manual, English (US)
Page 23
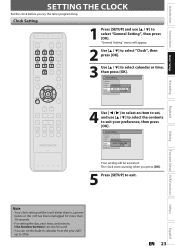
... 4 Use [{ / B] to select an item to set the built-in calendar from the year 2007 up to select calendar or time, then press [OK]. Introduction Connections Basic Setup Recording SETTING THE CLOCK Set the clock before you press [OK]. 5 Press [SETUP] to exit. General Setting Playback Display Video Clock Setting Recording...
... 4 Use [{ / B] to select an item to set the built-in calendar from the year 2007 up to select calendar or time, then press [OK]. Introduction Connections Basic Setup Recording SETTING THE CLOCK Set the clock before you press [OK]. 5 Press [SETUP] to exit. General Setting Playback Display Video Clock Setting Recording...


