

Owners Manual
Page 1
... refer to the back cover of this unit may access our online help fast? Introduction Connections Basic Setup Owner's Manual MDR533H MDR535H MDR537H HDD & DVD Recorder with your product. Need help at www.magnavox.com/support or call 1-800-605-8610 while with Digital Tuner Thank you may be found on the cabinet...
... refer to the back cover of this unit may access our online help fast? Introduction Connections Basic Setup Owner's Manual MDR533H MDR535H MDR537H HDD & DVD Recorder with your product. Need help at www.magnavox.com/support or call 1-800-605-8610 while with Digital Tuner Thank you may be found on the cabinet...

Owners Manual
Page 3
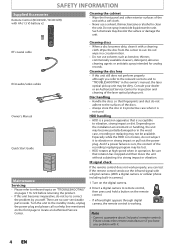
...or attempt to service this unit. If so, do not use a gas duster on the environment, the temperature of Rovi Corporation. www.magnavox.com Notice for a few hours until its inside gets dry. - patents and other than those specified herein may form inside of high ... unit in direct sunlight, near strong magnetic fields, or in the following conditions. This apparatus employs a laser. Introduction Connections Basic Setup Recording Playback SAFETY INFORMATION CAUTION: Danger of explosion if battery is capable of being tilted by a child and an adult leaning, pulling, standing...
...or attempt to service this unit. If so, do not use a gas duster on the environment, the temperature of Rovi Corporation. www.magnavox.com Notice for a few hours until its inside gets dry. - patents and other than those specified herein may form inside of high ... unit in direct sunlight, near strong magnetic fields, or in the following conditions. This apparatus employs a laser. Introduction Connections Basic Setup Recording Playback SAFETY INFORMATION CAUTION: Danger of explosion if battery is capable of being tilted by a child and an adult leaning, pulling, standing...
Owners Manual
Page 4
...be dirty. Depending on the remote control. • If infrared light appears through digital camera, the remote control is in the worst case, recording or replaying may become partially damaged or in motion, do not adhere to the surfaces of the discs. • Always store the disc ...2 Direct a digital camera to locate an Authorized Service Center. Consult your dealer or an Authorized Service Center for analog records. And if a power failure occurs, the content of the recording / replaying program may discolor the surface or damage the unit. Be sure that is not used. RF coaxial cable...
...be dirty. Depending on the remote control. • If infrared light appears through digital camera, the remote control is in the worst case, recording or replaying may become partially damaged or in motion, do not adhere to the surfaces of the discs. • Always store the disc ...2 Direct a digital camera to locate an Authorized Service Center. Consult your dealer or an Authorized Service Center for analog records. And if a power failure occurs, the content of the recording / replaying program may discolor the surface or damage the unit. Be sure that is not used. RF coaxial cable...
Owners Manual
Page 5
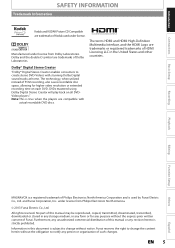
...any form or for higher video resolution or extended recording time on all DVDVideo players." The technology, when utilized instead of Dolby Laboratories. Basic Setup Recording Playback Editing Function Setup Others MAGNAVOX is a registered trademark of such changes. Dolby ...and the double-D symbol are trademarks of PCM recording, also saves recordable disc space, allowing for any person or ...
...any form or for higher video resolution or extended recording time on all DVDVideo players." The technology, when utilized instead of Dolby Laboratories. Basic Setup Recording Playback Editing Function Setup Others MAGNAVOX is a registered trademark of such changes. Dolby ...and the double-D symbol are trademarks of PCM recording, also saves recordable disc space, allowing for any person or ...

Owners Manual
Page 6
...INFORMATION ON RECORDING . . 41 BEFORE RECORDING 43 Make Recording Compatible 43 Setting for Auto Chapter 43 Recording the DTV Closed Caption 43 Recording from a Cable Box or Satellite 43 BASIC RECORDING & ONE-TOUCH TIMER RECORDING 44 AUTOSTART RECORDING 46 TIMER RECORDING 47 Hints for Timer Recording 51 SPECIAL RECORDING 52 ...the Middle of the Title 52 Hints for Overwriting 53 DUBBING 54 Information on Dubbing 54 Setting for an External Device 55 Recording from an External Device 57 Information on DV Dubbing 58 DVC to HDD / DVD Dubbing 59 Selected Title Dubbing 61 One...
...INFORMATION ON RECORDING . . 41 BEFORE RECORDING 43 Make Recording Compatible 43 Setting for Auto Chapter 43 Recording the DTV Closed Caption 43 Recording from a Cable Box or Satellite 43 BASIC RECORDING & ONE-TOUCH TIMER RECORDING 44 AUTOSTART RECORDING 46 TIMER RECORDING 47 Hints for Timer Recording 51 SPECIAL RECORDING 52 ...the Middle of the Title 52 Hints for Overwriting 53 DUBBING 54 Information on Dubbing 54 Setting for an External Device 55 Recording from an External Device 57 Information on DV Dubbing 58 DVC to HDD / DVD Dubbing 59 Selected Title Dubbing 61 One...

Owners Manual
Page 7
... Skip / Variable Replay 74 Rapid Playback 74 Step by Step Playback 75 Slow Forward / Slow Reverse Playback 75 Chasing Playback during Recording 75 Simultaneous Playback and Recording 75 Zoom 76 Marker Setting 76 Repeat Playback 77 Random Playback 77 Slide Show 77 Program Playback 78 Playing Back the Autostart... Recording 78 SEARCH 79 Title / Chapter Search 79 Track Search 79 Time Search 80 SELECTING THE FORMAT OF AUDIO AND VIDEO 81 Switching ...
... Skip / Variable Replay 74 Rapid Playback 74 Step by Step Playback 75 Slow Forward / Slow Reverse Playback 75 Chasing Playback during Recording 75 Simultaneous Playback and Recording 75 Zoom 76 Marker Setting 76 Repeat Playback 77 Random Playback 77 Slide Show 77 Program Playback 78 Playing Back the Autostart... Recording 78 SEARCH 79 Title / Chapter Search 79 Track Search 79 Time Search 80 SELECTING THE FORMAT OF AUDIO AND VIDEO 81 Switching ...

Owners Manual
Page 8
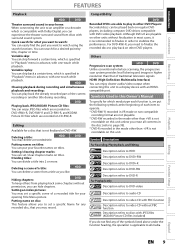
... DVC (digital video camcorder) to 1252 hours (with this unit, you prefer. RW (rewritable) and a DVD+R/-R (one -touch recording) 1 TB hard disk(MDR537H): This unit is equipped with SLP mode). Daily or weekly program recordings are currently watching, and you turn on this unit, this owner's manual. Automatic chapter mark setting: Chapter marks...
... DVC (digital video camcorder) to 1252 hours (with this unit, you prefer. RW (rewritable) and a DVD+R/-R (one -touch recording) 1 TB hard disk(MDR537H): This unit is equipped with SLP mode). Daily or weekly program recordings are currently watching, and you turn on this unit, this owner's manual. Automatic chapter mark setting: Chapter marks...
Owners Manual
Page 9
... Setup Others Español EN 9 Setting / clearing chapter marks: You can divide a title into 2 or more. Symbol Description For Recording, Playing Back, and Editing Description refers to HDD Description refers to DVD+RW Description refers to DVD+R Description refers to DVD-RW Description refers... it is recommended to finalize in order to stabilize the performance. Dividing titles: You can set / clear chapter marks on other DVD Players: Recorded discs can skip back a certain time, which is specified in "Playback" menu in advance, with one -touch while playback. compatible port. ...
... Setup Others Español EN 9 Setting / clearing chapter marks: You can divide a title into 2 or more. Symbol Description For Recording, Playing Back, and Editing Description refers to HDD Description refers to DVD+RW Description refers to DVD+R Description refers to DVD-RW Description refers... it is recommended to finalize in order to stabilize the performance. Dividing titles: You can set / clear chapter marks on other DVD Players: Recorded discs can skip back a certain time, which is specified in "Playback" menu in advance, with one -touch while playback. compatible port. ...
Owners Manual
Page 10
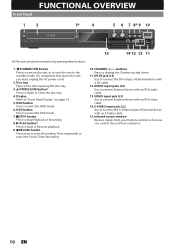
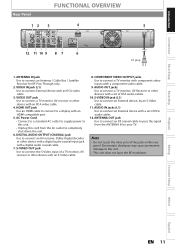
...turn the unit to select the HDD mode. 6. HDD button Press to the standby mode. (To completely shut down . 11. Press repeatedly to start a Recording. DV-IN jack (L3) Use to change the Channel up and down the unit, you can also be turned on page 14. 5. S-VIDEO input jack.... 9. Infrared sensor window Receive signals from a distance. 10 EN CSTOP button Press to select the DVD mode. 7. DVD button Press to stop Playback or Recording. 8. VIDEO input jack (L2) Use to Open or Close the disc tray. 4. AOPEN/CLOSE button* Press to connect External device with an RCA audio ...
...turn the unit to select the HDD mode. 6. HDD button Press to the standby mode. (To completely shut down . 11. Press repeatedly to start a Recording. DV-IN jack (L3) Use to change the Channel up and down the unit, you can also be turned on page 14. 5. S-VIDEO input jack.... 9. Infrared sensor window Receive signals from a distance. 10 EN CSTOP button Press to select the DVD mode. 7. DVD button Press to stop Playback or Recording. 8. VIDEO input jack (L2) Use to Open or Close the disc tray. 4. AOPEN/CLOSE button* Press to connect External device with an RCA audio ...
Owners Manual
Page 11
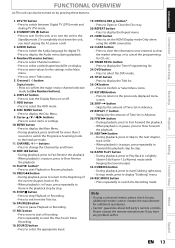
... jack Use an HDMI cable to connect to connect External device with a set of a TV monitor, AV receiver or other device with an S-Video cable. 8. Recording Playback Editing Function Setup Others Español EN 11 COMPONENT VIDEO OUTPUT jacks Use to your TV. ANTENNA OUT jack Use to connect an...
... jack Use an HDMI cable to connect to connect External device with a set of a TV monitor, AV receiver or other device with an S-Video cable. 8. Recording Playback Editing Function Setup Others Español EN 11 COMPONENT VIDEO OUTPUT jacks Use to your TV. ANTENNA OUT jack Use to connect an...
Owners Manual
Page 13
...REC MODE button • Press repeatedly to select the DVD mode. 25. REPLAY button • Replays by step. 32. Introduction Connections Basic Setup Recording FUNCTIONAL OVERVIEW (*) The unit can also be turned on by [the Number buttons]. 6. DTV/TV button • Press to enter Title names. ...3rd party's remote controls. DISC MENU button • Press to display the Title list. 26. REC button • Press once to start a Recording. • Press repeatedly to start Playback or Resume playback. 14.PREV H button • During playback, press to return to the Beginning of...
...REC MODE button • Press repeatedly to select the DVD mode. 25. REPLAY button • Replays by step. 32. Introduction Connections Basic Setup Recording FUNCTIONAL OVERVIEW (*) The unit can also be turned on by [the Number buttons]. 6. DTV/TV button • Press to enter Title names. ...3rd party's remote controls. DISC MENU button • Press to display the Title list. 26. REC button • Press once to start a Recording. • Press repeatedly to start Playback or Resume playback. 14.PREV H button • During playback, press to return to the Beginning of...
Owners Manual
Page 14
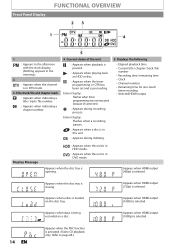
.../track/file and chapter mark : Appears when indicating a title / track / file number. : Appears when indicating a chapter number. 4. Entire Display: Flashes when a recording pauses. : Appears when a disc is in DTV mode. 3. Appears when HDMI output (720p) is selected. Appears when HDMI output (480p) is selected. Appears when... FUNCTIONAL OVERVIEW 23 1 PM DTV BS CS DR CD VCR 4 DB HDD DVD 5 1. Appears when HDMI output (1080i) is being recorded on the disc tray. Appears when HDMI output (1080p) is selected. 14 EN Appears when the PBC function is activated. (Video CD playback ...
.../track/file and chapter mark : Appears when indicating a title / track / file number. : Appears when indicating a chapter number. 4. Entire Display: Flashes when a recording pauses. : Appears when a disc is in DTV mode. 3. Appears when HDMI output (720p) is selected. Appears when HDMI output (480p) is selected. Appears when... FUNCTIONAL OVERVIEW 23 1 PM DTV BS CS DR CD VCR 4 DB HDD DVD 5 1. Appears when HDMI output (1080i) is being recorded on the disc tray. Appears when HDMI output (1080p) is selected. 14 EN Appears when the PBC function is activated. (Video CD playback ...
Owners Manual
Page 15
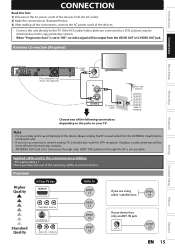
Antenna Connection (Required) Connections Basic Setup Recording Playback Editing rear of this unit VIDEO VIDEO IN OUT Y L L ANTENNA R IN R AUDIO IN (L1) S-VIDEO AUDIO OUT OUT S-VIDEO COAXIAL This connection is set -...
Antenna Connection (Required) Connections Basic Setup Recording Playback Editing rear of this unit VIDEO VIDEO IN OUT Y L L ANTENNA R IN R AUDIO IN (L1) S-VIDEO AUDIO OUT OUT S-VIDEO COAXIAL This connection is set -...

Owners Manual
Page 17
... purchase the rest of the necessary cables at your local store. RF coaxial cable ANTENNA Supplied cables used in this connection. Introduction Connections Basic Setup Recording CONNECTION Connecting to analog signals. • No audio connection is for TV pass through only VHF / UHF antenna Playback Editing Function Setup Others Españ...
... purchase the rest of the necessary cables at your local store. RF coaxial cable ANTENNA Supplied cables used in this connection. Introduction Connections Basic Setup Recording CONNECTION Connecting to analog signals. • No audio connection is for TV pass through only VHF / UHF antenna Playback Editing Function Setup Others Españ...
Owners Manual
Page 19
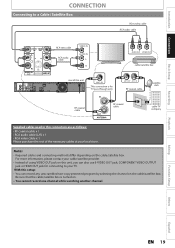
or cable TV company • Required cables and connecting methods differ depending on . • You cannot record one channel while watching another channel. With this setup: • You can also use S-VIDEO OUT jack, COMPONENT VIDEO OUTPUT jack or HDMI OUT jack ... cable (L/R) x 1 • RCA video cable x 1 Please purchase the rest of the necessary cables at your cable/satellite provider. • Instead of this unit, you can record any unscrambled non-copy protected program by selecting the channel on this unit ANT. Be sure that the cable/satellite box is for connecting to...
or cable TV company • Required cables and connecting methods differ depending on . • You cannot record one channel while watching another channel. With this setup: • You can also use S-VIDEO OUT jack, COMPONENT VIDEO OUTPUT jack or HDMI OUT jack ... cable (L/R) x 1 • RCA video cable x 1 Please purchase the rest of the necessary cables at your cable/satellite provider. • Instead of this unit, you can record any unscrambled non-copy protected program by selecting the channel on this unit ANT. Be sure that the cable/satellite box is for connecting to...
Owners Manual
Page 21
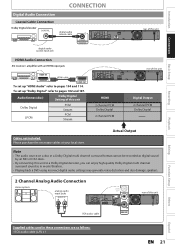
...Digital Cables not included. Actual Output Note • The audio source on a disc in a Dolby Digital multi channel surround format cannot be recorded as digital sound by an MD or DAT deck. • By connecting this unit to a Dolby Digital decoder, you can enjoy high-...follows: • RCA audio cable (L/R) x 1 EN 21 To set up "Dolby Digital" refer to pages 102 and 107. Introduction Connections Basic Setup Recording Digital Audio Connection CONNECTION Dolby Digital decoder COAXIAL digital audio coaxial cable COAXIAL VIDEO VIDEO IN OUT Y L L ANTENNA R IN R AUDIO IN (L1) ...
...Digital Cables not included. Actual Output Note • The audio source on a disc in a Dolby Digital multi channel surround format cannot be recorded as digital sound by an MD or DAT deck. • By connecting this unit to a Dolby Digital decoder, you can enjoy high-...follows: • RCA audio cable (L/R) x 1 EN 21 To set up "Dolby Digital" refer to pages 102 and 107. Introduction Connections Basic Setup Recording Digital Audio Connection CONNECTION Dolby Digital decoder COAXIAL digital audio coaxial cable COAXIAL VIDEO VIDEO IN OUT Y L L ANTENNA R IN R AUDIO IN (L1) ...

Owners Manual
Page 23
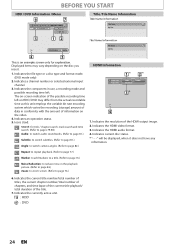
...2:59:44 / 3:31:31 CH 10 56 41 7:10AM 10:10AM 42 43 4 10:42AM 1. Starting time of the autostart recording 6. The progress of the autostart recording 2. Closed Caption (Indicates that the picture currently displayed on the screen is not provided. • In some cases, DTV closed captioning... line displayed) 2. Broadcast station Note • When the program guide is displayed in playback) HDMI Information (only for playing back, recording, or editing to suit your TV (Only if the unit is available in playback, or the HDMI status, etc. Audio Information (Indicates...
...2:59:44 / 3:31:31 CH 10 56 41 7:10AM 10:10AM 42 43 4 10:42AM 1. Starting time of the autostart recording 6. The progress of the autostart recording 2. Closed Caption (Indicates that the picture currently displayed on the screen is not provided. • In some cases, DTV closed captioning... line displayed) 2. Broadcast station Note • When the program guide is displayed in playback) HDMI Information (only for playing back, recording, or editing to suit your TV (Only if the unit is available in playback, or the HDMI status, etc. Audio Information (Indicates...
Owners Manual
Page 24
...data in conformity with the amount of the title. 7. Indicates a channel number or selected external input channel. 3. The on-screen indication of the possible recording time left . Icons Used: : for title / chapter search, track search and time search. (Refer to pages 79-80) Audio: to switch audio...Refer to page 77.) Marker: to add markers to a title. (Refer to page 76.) Noise Reduction: to reduce noise in use, a recording mode and possible recording time left on HDD / DVD may vary depending on the video. 4. Indicates the currently active unit. : HDD : DVD 24 EN Indicates current...
...data in conformity with the amount of the title. 7. Indicates a channel number or selected external input channel. 3. The on-screen indication of the possible recording time left . Icons Used: : for title / chapter search, track search and time search. (Refer to pages 79-80) Audio: to switch audio...Refer to page 77.) Marker: to add markers to a title. (Refer to page 76.) Noise Reduction: to reduce noise in use, a recording mode and possible recording time left on HDD / DVD may vary depending on the video. 4. Indicates the currently active unit. : HDD : DVD 24 EN Indicates current...

Owners Manual
Page 25
...: • To dub the content of the unit as you need. 6. General Setting Menu 1 General Setting 2 Playback 3 Display 4 Video Recording 5 Clock 26 Channel HDMI 37 Parental Lock Disc Audio Disc Menu Language Audio Language Subtitle Language Angle Icon Still Mode Variable Skip / Replay 1.... These menus provides entries to general setting menu. 2. Playback: To set up the unit to record to DVD or vice versa. • "Dubbing" is available only when a recordable disc is inserted into the unit. Introduction Connections Basic Setup BEFORE YOU START Main Menu Press ...
...: • To dub the content of the unit as you need. 6. General Setting Menu 1 General Setting 2 Playback 3 Display 4 Video Recording 5 Clock 26 Channel HDMI 37 Parental Lock Disc Audio Disc Menu Language Audio Language Subtitle Language Angle Icon Still Mode Variable Skip / Replay 1.... These menus provides entries to general setting menu. 2. Playback: To set up the unit to record to DVD or vice versa. • "Dubbing" is available only when a recordable disc is inserted into the unit. Introduction Connections Basic Setup BEFORE YOU START Main Menu Press ...

Owners Manual
Page 26
...Unprotected Titles 120 Delete All Titles Dubbing 111 HDD DVD 122 DVD HDD 1. Finalize: (DVD+R/DVD-RW/-R only) Allows you to finalize a disc containing recorded titles. 4. Slide Show: (JPEG/KODAK Picture CD files only) Allows you to select the display time of the slide show the effects when playing ... images or information on this unit, and to HDD. Erase Disc: (DVD+RW/DVD-RW only) Allows you to dub from accidental editing or recording. 5. Make Edits Compatible: (DVD+RW only) Allows you to memorize the editing status on the disc if you to delete all unprotected titles in...
...Unprotected Titles 120 Delete All Titles Dubbing 111 HDD DVD 122 DVD HDD 1. Finalize: (DVD+R/DVD-RW/-R only) Allows you to finalize a disc containing recorded titles. 4. Slide Show: (JPEG/KODAK Picture CD files only) Allows you to select the display time of the slide show the effects when playing ... images or information on this unit, and to HDD. Erase Disc: (DVD+RW/DVD-RW only) Allows you to dub from accidental editing or recording. 5. Make Edits Compatible: (DVD+RW only) Allows you to memorize the editing status on the disc if you to delete all unprotected titles in...


