

Owners Manual
Page 1
... Thank you may be found on the cabinet. Read your Quick Guide and/or Owner's Manual first for future reference. The model and serial numbers of the manual for choosing Magnavox. Model No.: Serial No.: Please refer to the back cover of this unit may access...You should record and retain those numbers for quick tips that make using your Magnavox product more Limited Warranty information. INSTRUCCIONES EN ESPAÑOL INCLUIDAS. Introduction Connections Basic Setup Owner's Manual MDR533H MDR535H MDR537H HDD & DVD Recorder with your product. If you have read your instructions...
... Thank you may be found on the cabinet. Read your Quick Guide and/or Owner's Manual first for future reference. The model and serial numbers of the manual for choosing Magnavox. Model No.: Serial No.: Please refer to the back cover of this unit may access...You should record and retain those numbers for quick tips that make using your Magnavox product more Limited Warranty information. INSTRUCCIONES EN ESPAÑOL INCLUIDAS. Introduction Connections Basic Setup Owner's Manual MDR533H MDR535H MDR537H HDD & DVD Recorder with your product. If you have read your instructions...

Owners Manual
Page 2
... the product's enclosure that produce heat. 9. Do not use caution when moving the cart/ apparatus combination to provide reasonable protection against harmful interference in the manual. Do not install near water. 6. Protect the power cord from that interference will not occur in use attachments/accessories specified by turning the equipment off...
... the product's enclosure that produce heat. 9. Do not use caution when moving the cart/ apparatus combination to provide reasonable protection against harmful interference in the manual. Do not install near water. 6. Protect the power cord from that interference will not occur in use attachments/accessories specified by turning the equipment off...
Owners Manual
Page 4
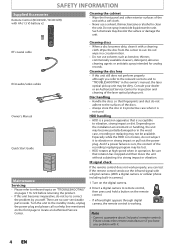
... • If infrared light appears through digital camera, the remote control is working. RF coaxial cable RCA audio/video cables Owner's Manual Owner's Manual Quick Start Guide Maintenance Servicing • Please refer to correct the problem by yourself. Turn the unit to vibration or strong impact or...strong impact or dirt. Wipe the disc from the center to strong impact or vibration. Cleaning the disc lens • If this owner's manual, the laser optical pickup unit may not be available. And if a power failure occurs, the content of the laser optical pickup unit. ...
... • If infrared light appears through digital camera, the remote control is working. RF coaxial cable RCA audio/video cables Owner's Manual Owner's Manual Quick Start Guide Maintenance Servicing • Please refer to correct the problem by yourself. Turn the unit to vibration or strong impact or...strong impact or dirt. Wipe the disc from the center to strong impact or vibration. Cleaning the disc lens • If this owner's manual, the laser optical pickup unit may not be available. And if a power failure occurs, the content of the laser optical pickup unit. ...
Owners Manual
Page 5
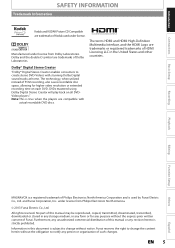
...purpose without notice. Dolby and the double-D symbol are trademarks of Dolby Laboratories. Furthermore, any unauthorized commercial distribution of this manual may be reproduced, copied, transmitted, disseminated, transcribed, downloaded or stored in any storage medium, in any revision hereto is...mastered using Dolby Digital Stereo Creator will play back on each DVD. Basic Setup Recording Playback Editing Function Setup Others MAGNAVOX is a registered trademark of Philips Electronics North America Corporation and is true when the players are compatible with stunning Dolby...
...purpose without notice. Dolby and the double-D symbol are trademarks of Dolby Laboratories. Furthermore, any unauthorized commercial distribution of this manual may be reproduced, copied, transmitted, disseminated, transcribed, downloaded or stored in any storage medium, in any revision hereto is...mastered using Dolby Digital Stereo Creator will play back on each DVD. Basic Setup Recording Playback Editing Function Setup Others MAGNAVOX is a registered trademark of Philips Electronics North America Corporation and is true when the players are compatible with stunning Dolby...

Owners Manual
Page 6
... INFORMATION 2 Safety Instructions 2 Supplied Accessories 4 Maintenance 4 Trademark Information 5 FEATURES 8 Features 8 Symbols Used in this Owner's Manual 9 FUNCTIONAL OVERVIEW 10 Front Panel 10 Rear Panel 11 Remote Control 12 Front Panel Display 14 Connections CONNECTION 15 Antenna Connection (...Auto Finalizing 66 CHANNEL SETTING 29 Auto Channel Scan 29 Adding / Deleting Channels 30 SETTING THE CLOCK 32 Auto Clock Setting 32 Manual Clock Setting 34 Daylight Saving Time 34 TUNER SETTINGS 35 Switching Analog Mode / Digital Mode 35 Channel Selection 35 Selecting TV Audio...
... INFORMATION 2 Safety Instructions 2 Supplied Accessories 4 Maintenance 4 Trademark Information 5 FEATURES 8 Features 8 Symbols Used in this Owner's Manual 9 FUNCTIONAL OVERVIEW 10 Front Panel 10 Rear Panel 11 Remote Control 12 Front Panel Display 14 Connections CONNECTION 15 Antenna Connection (...Auto Finalizing 66 CHANNEL SETTING 29 Auto Channel Scan 29 Adding / Deleting Channels 30 SETTING THE CLOCK 32 Auto Clock Setting 32 Manual Clock Setting 34 Daylight Saving Time 34 TUNER SETTINGS 35 Switching Analog Mode / Digital Mode 35 Channel Selection 35 Selecting TV Audio...

Owners Manual
Page 8
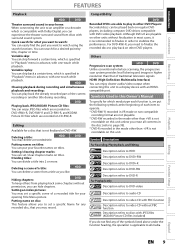
... main menu. You can record for 12 hours maximum at a time with timer recording. (6 hours when one -touch recording) 1 TB hard disk(MDR537H): This unit is equipped with a 500GB hard disk which allows you to record up to 604 hours (with a 1TB hard disk which allows you ... protection system called HDCP (high-bandwidth digital content protection system). Recording This unit allows you to HDD/DVD. 8 EN Dubbing With this owner's manual. One-touch timer recording (OTR): You can record the sound of the connected AV device. Left channel stereo recording: This unit can easily set...
... main menu. You can record for 12 hours maximum at a time with timer recording. (6 hours when one -touch recording) 1 TB hard disk(MDR537H): This unit is equipped with a 500GB hard disk which allows you to record up to 604 hours (with a 1TB hard disk which allows you ... protection system called HDCP (high-bandwidth digital content protection system). Recording This unit allows you to HDD/DVD. 8 EN Dubbing With this owner's manual. One-touch timer recording (OTR): You can record the sound of the connected AV device. Left channel stereo recording: This unit can easily set...
Owners Manual
Page 9
... DVD players. DVD Playing back JPEG/KODAK Picture CD files: You can hide chapters. Deleting a title: You may set / clear chapter marks on this Owner's Manual To specify for your opening Title Menu picture. Dividing titles: You can set a specific scene of a recorded title for which is specified in "Playback" menu...
... DVD players. DVD Playing back JPEG/KODAK Picture CD files: You can hide chapters. Deleting a title: You may set / clear chapter marks on this Owner's Manual To specify for your opening Title Menu picture. Dividing titles: You can set a specific scene of a recorded title for which is specified in "Playback" menu...

Owners Manual
Page 22
... 1, Sharp 00 VIDEO 2, VIDEO 3 Kenwood AUX Sony VIDEO1, VIDEO2, VIDEO3 LXI-Series 00 Toshiba TV/GAME Magnavox AUX CHANNEL Zenith 00 4 Proceed to step 2 in Standby mode before attempting to the TV's user Manual or "Input Mode Names for different brand's models of the TV -Locate the Input Mode in the... TV's Setup Menu. If more than 10 minutes has passed, you see the MAGNAVOX screen saver. The Device may try to access the Video...
... 1, Sharp 00 VIDEO 2, VIDEO 3 Kenwood AUX Sony VIDEO1, VIDEO2, VIDEO3 LXI-Series 00 Toshiba TV/GAME Magnavox AUX CHANNEL Zenith 00 4 Proceed to step 2 in Standby mode before attempting to the TV's user Manual or "Input Mode Names for different brand's models of the TV -Locate the Input Mode in the... TV's Setup Menu. If more than 10 minutes has passed, you see the MAGNAVOX screen saver. The Device may try to access the Video...

Owners Manual
Page 28
...]. This may automatically be displayed following the channel preset procedure. The unit will be performed and the correct clock will start getting channels available in "Manual Clock Setting" on page 34. Cable (Analog): (When using an Antenna) The channels broadcasted in "Finding the Viewing Channel on Your TV" on page 22...
...]. This may automatically be displayed following the channel preset procedure. The unit will be performed and the correct clock will start getting channels available in "Manual Clock Setting" on page 34. Cable (Analog): (When using an Antenna) The channels broadcasted in "Finding the Viewing Channel on Your TV" on page 22...

Owners Manual
Page 30
...or deleting Analog TV/Cable channels, go to DIGITAL to continue. 30 EN Instructions continue on the next page. Auto Channel Preset Manual Channel Preset TV Audio Select • If you are adding or deleting Digital TV/Cable channels, go to ANALOG to continue. ...will appear. 3 Use [K / L] to select "General Setting", then press [OK]. CHANNEL SETTING Adding / Deleting Channels This feature allows you to manually Add or Delete Channels for any adjustments to select "Manual Channel Preset", then press [OK]. "General Setting" menu will appear. 4 Use [K / L] to your Channel Lineup.
...or deleting Analog TV/Cable channels, go to DIGITAL to continue. 30 EN Instructions continue on the next page. Auto Channel Preset Manual Channel Preset TV Audio Select • If you are adding or deleting Digital TV/Cable channels, go to ANALOG to continue. ...will appear. 3 Use [K / L] to select "General Setting", then press [OK]. CHANNEL SETTING Adding / Deleting Channels This feature allows you to manually Add or Delete Channels for any adjustments to select "Manual Channel Preset", then press [OK]. "General Setting" menu will appear. 4 Use [K / L] to your Channel Lineup.

Owners Manual
Page 31
... setting will automatically switch to the next channel so that you perform the Auto Channel preset again. 7 Press [MENU] to activate "Manual Channel Preset". Playback Editing Function Setup Others Español EN 31 WARNING: • For the Digital TV channels, you cannot recover...selected "Delete" is checked and highlighted as a default. 6 Use [K / L] to select "Add" or "Delete", then press [OK]. Manual Channel Preset CH 2 Add Delete Your setting will be activated and it will be activated. Introduction Connections Basic Setup Recording CHANNEL SETTING ANALOG DIGITAL 5...
... setting will automatically switch to the next channel so that you perform the Auto Channel preset again. 7 Press [MENU] to activate "Manual Channel Preset". Playback Editing Function Setup Others Español EN 31 WARNING: • For the Digital TV channels, you cannot recover...selected "Delete" is checked and highlighted as a default. 6 Use [K / L] to select "Add" or "Delete", then press [OK]. Manual Channel Preset CH 2 Add Delete Your setting will be activated and it will be activated. Introduction Connections Basic Setup Recording CHANNEL SETTING ANALOG DIGITAL 5...

Owners Manual
Page 32
... cable TV connections are correct. • Channels are set the "Auto Clock Setting" to "OFF" in step 4 above and try "Manual Clock Setting" on page 34. Auto Clock Setting OFF Auto Manual 5 Press [MENU] to exit. 6 Press [STANDBY/ON y] to turn the unit to select "Auto", then press [OK]. This unit will... the clock is set the "Auto Clock Setting" to "OFF" at 12:00 am & 12:00 pm when unit is available in your area, follow "Manual Clock Setting" on page 34. 32 EN Note • The clock may be obtained depending on the broadcast information. SETTING THE CLOCK Auto Clock Setting...
... cable TV connections are correct. • Channels are set the "Auto Clock Setting" to "OFF" in step 4 above and try "Manual Clock Setting" on page 34. Auto Clock Setting OFF Auto Manual 5 Press [MENU] to exit. 6 Press [STANDBY/ON y] to turn the unit to select "Auto", then press [OK]. This unit will... the clock is set the "Auto Clock Setting" to "OFF" at 12:00 am & 12:00 pm when unit is available in your area, follow "Manual Clock Setting" on page 34. 32 EN Note • The clock may be obtained depending on the broadcast information. SETTING THE CLOCK Auto Clock Setting...

Owners Manual
Page 33
...this unit receives the antenna/cable signal and plug in step 4 above. "Clock" menu will appear. 2 Use [K / L] to select "Manual", then press [OK]. Editing Function Setup Others Español EN 33 This unit will no longer be obtained depending on the broadcast information. ... Press [K / L] to select "General Setting", then press [OK]. Set Channel No. Introduction Connections Basic Setup Recording Playback SETTING THE CLOCK Manual Auto Clock Setting If the unit chooses an incorrect PBS channel on Cable TV, set correctly, timer recording does not work properly. • ...
...this unit receives the antenna/cable signal and plug in step 4 above. "Clock" menu will appear. 2 Use [K / L] to select "Manual", then press [OK]. Editing Function Setup Others Español EN 33 This unit will no longer be obtained depending on the broadcast information. ... Press [K / L] to select "General Setting", then press [OK]. Set Channel No. Introduction Connections Basic Setup Recording Playback SETTING THE CLOCK Manual Auto Clock Setting If the unit chooses an incorrect PBS channel on Cable TV, set correctly, timer recording does not work properly. • ...

Owners Manual
Page 34
...press [OK]. 4 Use [K / L] to select "General Setting", then press [OK]. The clock starts counting when you finish setting all the contents. SETTING THE CLOCK Manual Clock Setting 1 Press [MENU] and use as the default. 2 Use [K / L] to select "General Setting", then press [OK]. Daylight Saving Time When "Daylight ...ON (MAR - NOV) ON (APR - Clock Setting JAN / 06 / 2012 ( FRI ) 12 : 00 AM 5 Use [{ / B] to select an item to set the clock manually. • For setting the day, year, hour, and minute, [the Number buttons] can set the built-in calendar from the year 2012 up to 2061...
...press [OK]. 4 Use [K / L] to select "General Setting", then press [OK]. The clock starts counting when you finish setting all the contents. SETTING THE CLOCK Manual Clock Setting 1 Press [MENU] and use as the default. 2 Use [K / L] to select "General Setting", then press [OK]. Daylight Saving Time When "Daylight ...ON (MAR - NOV) ON (APR - Clock Setting JAN / 06 / 2012 ( FRI ) 12 : 00 AM 5 Use [{ / B] to select an item to set the clock manually. • For setting the day, year, hour, and minute, [the Number buttons] can set the built-in calendar from the year 2012 up to 2061...
Owners Manual
Page 35
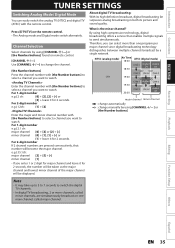
What is the minor channel? Channel Selection Select channels by using [CHANNEL / ] or [the Number buttons] found on remote control. [CHANNEL / ] Use [CHANNEL / ] to change manually by a single network. Playback Editing Function Setup Others Español EN 35 For 1-digit number e.g.) 2 ch: [0] + [2], [2] + [•] or [2] + leave it for 2 seconds, the number ...
What is the minor channel? Channel Selection Select channels by using [CHANNEL / ] or [the Number buttons] found on remote control. [CHANNEL / ] Use [CHANNEL / ] to change manually by a single network. Playback Editing Function Setup Others Español EN 35 For 1-digit number e.g.) 2 ch: [0] + [2], [2] + [•] or [2] + leave it for 2 seconds, the number ...

Owners Manual
Page 46
...) - Selecting following menus: "General Setting" ➔ "Display" ➔ "V-Chip" ➔ "Downloadable Rating" "General Setting" ➔ "Channel" ➔ "Auto Channel Preset" "General Setting" ➔ "Channel" ➔ "Manual Channel Preset" • The autostart recording will automatically resume for a new recording Note • In the autostart recording, when you display the DTV program information...
...) - Selecting following menus: "General Setting" ➔ "Display" ➔ "V-Chip" ➔ "Downloadable Rating" "General Setting" ➔ "Channel" ➔ "Auto Channel Preset" "General Setting" ➔ "Channel" ➔ "Manual Channel Preset" • The autostart recording will automatically resume for a new recording Note • In the autostart recording, when you display the DTV program information...

Owners Manual
Page 48
... Channel Number to select a Recording mode. For Digital mode, select both Major and Minor Channels. Refer to "How to the left and the right in "Manual Clock Setting" on page 34 before setting a Timer Programming. • Use [s / B] to move the cursor to Select a Channel Number for One program in the unit...
... Channel Number to select a Recording mode. For Digital mode, select both Major and Minor Channels. Refer to "How to the left and the right in "Manual Clock Setting" on page 34 before setting a Timer Programming. • Use [s / B] to move the cursor to Select a Channel Number for One program in the unit...
Owners Manual
Page 104
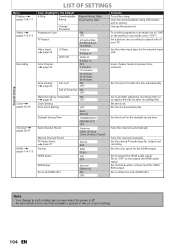
...picture size according to not output the HDMI audio signal. Insert chapter marks at a preset time interval's. Set the clock automatically. Tune the channels manually. Set the color space for the external input jack. Set to "OFF" to aspect ratio of Timer Rec ON OFF Make Recording Compatible ON page... 43 OFF Clock Setting Auto Clock Setting OFF Daylight Saving Time Auto Manual ON(MAR-NOV) Auto Channel Preset Manual Channel Preset TV Audio Select page 37 Format HDMI Audio ON(APR-OCT) OFF Antenna Cable (Analog) Cable (Analog / ...
...picture size according to not output the HDMI audio signal. Insert chapter marks at a preset time interval's. Set the clock automatically. Tune the channels manually. Set the color space for the external input jack. Set to "OFF" to aspect ratio of Timer Rec ON OFF Make Recording Compatible ON page... 43 OFF Clock Setting Auto Clock Setting OFF Daylight Saving Time Auto Manual ON(MAR-NOV) Auto Channel Preset Manual Channel Preset TV Audio Select page 37 Format HDMI Audio ON(APR-OCT) OFF Antenna Cable (Analog) Cable (Analog / ...

Owners Manual
Page 116
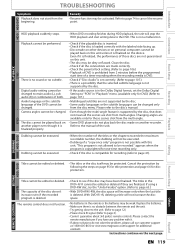
.... • Leave the unit unplugged for 20-30 min, plug the unit back in. Some simple checks or a minor adjustment on page 104 and try "Manual Clock time. Remedy • Check that , press [OPEN/CLOSE A] to take several hours. Do not disconnect the AC power cord before the timer recording. •...
.... • Leave the unit unplugged for 20-30 min, plug the unit back in. Some simple checks or a minor adjustment on page 104 and try "Manual Clock time. Remedy • Check that , press [OPEN/CLOSE A] to take several hours. Do not disconnect the AC power cord before the timer recording. •...
Owners Manual
Page 119
... to cancel the resume point. EN 119 DUBBING Editing EDITING Function Setup DVD Others REMOTE CONTROL Español Refer to page 74 to the manual of the DVD cannot be activated. Audio language or the subtitle language of the unit. Even if it . • If above solutions do not ...from the multi-angle. • Some DVD players do not solve the problem, please call our customer support at 1-800-605-8610 or visit www.magnavox.com/support for those discs are finalized. Dubbing cannot be dirty or flawed. Dubbing cannot be executed. • When the number of the titles or...
... to cancel the resume point. EN 119 DUBBING Editing EDITING Function Setup DVD Others REMOTE CONTROL Español Refer to page 74 to the manual of the DVD cannot be activated. Audio language or the subtitle language of the unit. Even if it . • If above solutions do not ...from the multi-angle. • Some DVD players do not solve the problem, please call our customer support at 1-800-605-8610 or visit www.magnavox.com/support for those discs are finalized. Dubbing cannot be dirty or flawed. Dubbing cannot be executed. • When the number of the titles or...


