
User manual, English (US)
Page 2
... SUCH AS VASES, SHALL BE PLACED ON THE APPARATUS. Read these instructions. 3. Do not use this apparatus near any heat sources such as power-supply cord or plug is required when the apparatus has been damaged in any ventilation openings. FCC WARNING This equipment may generate or use radio... REDUCE THE RISK OF FIRE OR ELECTRIC SHOCK, DO NOT EXPOSE THIS APPARATUS TO RAIN OR MOISTURE. Install in accordance with the apparatus. Protect the power cord from tip-over. 13. Use only with the cart, stand, tripod, bracket, or table specified by the manufacturer, or sold with the ...
... SUCH AS VASES, SHALL BE PLACED ON THE APPARATUS. Read these instructions. 3. Do not use this apparatus near any heat sources such as power-supply cord or plug is required when the apparatus has been damaged in any ventilation openings. FCC WARNING This equipment may generate or use radio... REDUCE THE RISK OF FIRE OR ELECTRIC SHOCK, DO NOT EXPOSE THIS APPARATUS TO RAIN OR MOISTURE. Install in accordance with the apparatus. Protect the power cord from tip-over. 13. Use only with the cart, stand, tripod, bracket, or table specified by the manufacturer, or sold with the ...
User manual, English (US)
Page 3
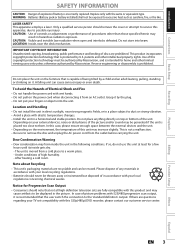
... Output • Consumers should remove the cover or attempt to service this copyright protection technology must be reused. Depending on the power cord when disconnecting it . Dew Condensation Warning • Dew condensation may result in a horizontal and stable position. If there ...television sets are prohibited. Reverse engineering or disassembly is moved from a cold place to remove the disc and unplug the AC power cord from an AC outlet. Notice for home and other limited viewing uses only unless otherwise authorized by U.S. IMPORTANT COPYRIGHT INFORMATION...
... Output • Consumers should remove the cover or attempt to service this copyright protection technology must be reused. Depending on the power cord when disconnecting it . Dew Condensation Warning • Dew condensation may result in a horizontal and stable position. If there ...television sets are prohibited. Reverse engineering or disassembly is moved from a cold place to remove the disc and unplug the AC power cord from an AC outlet. Notice for home and other limited viewing uses only unless otherwise authorized by U.S. IMPORTANT COPYRIGHT INFORMATION...
User manual, English (US)
Page 4
.... • If this unit becomes inoperative, do not subject it is working. 4 EN Turn the unit to the standby mode, unplug the power plug and please call our help to define the cause of the recording / replaying program may be available. Cleaning the disc lens • If...dirty. If infrared light appears through digital camera, the remote control is not used. There are no user-serviceable parts inside. And if a power failure occurs, the content of malfunction. Especially while the HDD is susceptible to "TROUBLESHOOTING" in this unit still does not perform properly although ...
.... • If this unit becomes inoperative, do not subject it is working. 4 EN Turn the unit to the standby mode, unplug the power plug and please call our help to define the cause of the recording / replaying program may be available. Cleaning the disc lens • If...dirty. If infrared light appears through digital camera, the remote control is not used. There are no user-serviceable parts inside. And if a power failure occurs, the content of malfunction. Especially while the HDD is susceptible to "TROUBLESHOOTING" in this unit still does not perform properly although ...
User manual, English (US)
Page 10
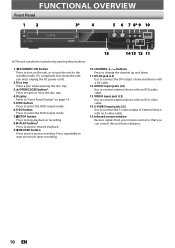
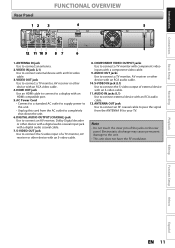
... Front Panel 1 2 3* 4 5 6 7 8* 9 10 15 14 13 12 11 (*) The unit can control the unit from your remote control so that you must unplug the AC power cord) 2.
... Front Panel 1 2 3* 4 5 6 7 8* 9 10 15 14 13 12 11 (*) The unit can control the unit from your remote control so that you must unplug the AC power cord) 2.
User manual, English (US)
Page 11
... to connect an RF coaxial cable to pass the signal from the AC outlet to completely shut down the unit. 6. AC Power Cord • Connect to a standard AC outlet to supply power to this unit. • Unplug this cord from the ANTENNA IN to a display with an S-video cable. 8. Introduction Connections Basic...
... to connect an RF coaxial cable to pass the signal from the AC outlet to completely shut down the unit. 6. AC Power Cord • Connect to a standard AC outlet to supply power to this unit. • Unplug this cord from the ANTENNA IN to a display with an S-video cable. 8. Introduction Connections Basic...
User manual, English (US)
Page 13
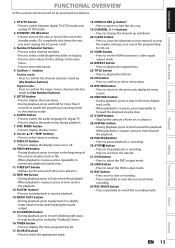
... reverse the playback. • When playback is in pause, press repeatedly to change the channel up and down the unit, you must unplug the AC power cord) 3. Confirm ( • ) button Analog mode: • Press to slow forward the playback. 29. OK button • Press to select the appropriate input. 18. DVD...
... reverse the playback. • When playback is in pause, press repeatedly to change the channel up and down the unit, you must unplug the AC power cord) 3. Confirm ( • ) button Analog mode: • Press to slow forward the playback. 29. OK button • Press to select the appropriate input. 18. DVD...
User manual, English (US)
Page 15
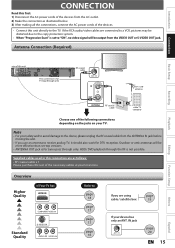
... the ANTENNA IN jack before moving the unit. • If you are as illustrated below. 3) After making all the connections, connect the AC power cords of the devices. • Connect this unit directly to "ON", no video signal will be output from the AC outlet. 2) Make the...be more effective than set-top versions. • ANTENNA OUT jack is for DTV reception. Introduction CONNECTION Read this first: 1) Disconnect the AC power cords of the devices from the VIDEO OUT or S-VIDEO OUT jack. Antenna Connection (Required) Connections Basic Setup Recording Playback Editing rear of the...
... the ANTENNA IN jack before moving the unit. • If you are as illustrated below. 3) After making all the connections, connect the AC power cords of the devices. • Connect this unit directly to "ON", no video signal will be output from the AC outlet. 2) Make the...be more effective than set-top versions. • ANTENNA OUT jack is for DTV reception. Introduction CONNECTION Read this first: 1) Disconnect the AC power cords of the devices from the VIDEO OUT or S-VIDEO OUT jack. Antenna Connection (Required) Connections Basic Setup Recording Playback Editing rear of the...
User manual, English (US)
Page 18
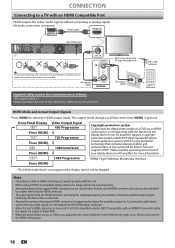
... audio output (for example, projectors). CONNECTION Connecting to a TV with an HDMI-DVI converter cable, the signals are output in digital RGB. • When the power failure occurs, or when you unplug the unit, some problems in this connection are as follows: • RF coaxial cable x 1 Please purchase the rest of...
... audio output (for example, projectors). CONNECTION Connecting to a TV with an HDMI-DVI converter cable, the signals are output in digital RGB. • When the power failure occurs, or when you unplug the unit, some problems in this connection are as follows: • RF coaxial cable x 1 Please purchase the rest of...
User manual, English (US)
Page 32
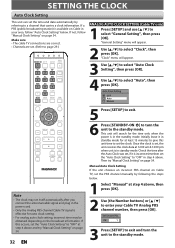
.... • For analog auto clock setting, incorrect time may be obtained depending on page 34. "Clock" menu will search for the time only when the power is set, the unit receives the clock data at least 15 minutes to give this occurs, set the PBS channel manually by referring to select... "Auto", then press [OK]. Check the time after you connect the antenna/cable signal and plug in the power cord. • Only the Analog PBS channel Cable TV signal is incorrect time then set , if it in your Cable TV Analog PBS channel number...
.... • For analog auto clock setting, incorrect time may be obtained depending on page 34. "Clock" menu will search for the time only when the power is set, the unit receives the clock data at least 15 minutes to give this occurs, set the PBS channel manually by referring to select... "Auto", then press [OK]. Check the time after you connect the antenna/cable signal and plug in the power cord. • Only the Analog PBS channel Cable TV signal is incorrect time then set , if it in your Cable TV Analog PBS channel number...
User manual, English (US)
Page 33
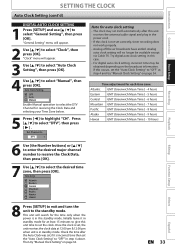
... 4 Use [K / L] to highlight "CH". Then try "Manual Clock Setting" on page 34. "General Setting" menu will search for the time only when the power is in step 4 above. Time adjustment for receiving the Clock Data and selecting your Time Zone below. 5 Press [{ ] to select "Manual", then press [OK]. ...on the broadcast information. "Clock" menu will no longer be obtained depending on page 34. Set Channel No. Initially leave it is in the power cord. • If the clock is set the "Auto Clock Setting" to the standby mode. Check the time after this unit time to...
... 4 Use [K / L] to highlight "CH". Then try "Manual Clock Setting" on page 34. "General Setting" menu will search for the time only when the power is in step 4 above. Time adjustment for receiving the Clock Data and selecting your Time Zone below. 5 Press [{ ] to select "Manual", then press [OK]. ...on the broadcast information. "Clock" menu will no longer be obtained depending on page 34. Set Channel No. Initially leave it is in the power cord. • If the clock is set the "Auto Clock Setting" to the standby mode. Check the time after this unit time to...
User manual, English (US)
Page 34
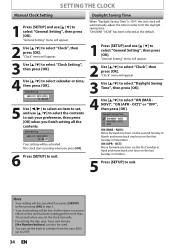
... pressing [OK] at step 5. • Your clock setting will appear. 2 Use [K / L] to select "Clock", then press [OK]. Daylight Saving Time When "Daylight Saving Time" is a power failure or this unit has been unplugged for more than 30 seconds when you set the clock manually. • For setting the day, year, hour...
... pressing [OK] at step 5. • Your clock setting will appear. 2 Use [K / L] to select "Clock", then press [OK]. Daylight Saving Time When "Daylight Saving Time" is a power failure or this unit has been unplugged for more than 30 seconds when you set the clock manually. • For setting the day, year, hour...
User manual, English (US)
Page 45
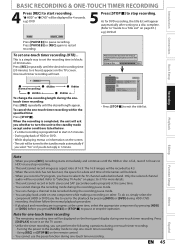
.../21/10 11:00AM CH12 SP NOV/21/10 0:20:44 2 EMPTY TITLE 1:41:17 SP (2Hr) • Press [STOP C] to restart recording. Turning the power to the standby mode to stop the operation. e.g.) DVD I 0h30m 0h30m (normal recording) 1h00m 6h00m 5h30m To change a channel to be blank. • When you...
.../21/10 11:00AM CH12 SP NOV/21/10 0:20:44 2 EMPTY TITLE 1:41:17 SP (2Hr) • Press [STOP C] to restart recording. Turning the power to the standby mode to stop the operation. e.g.) DVD I 0h30m 0h30m (normal recording) 1h00m 6h00m 5h30m To change a channel to be blank. • When you...
User manual, English (US)
Page 46
Turning the power to stop recording. Deleting titles (DVD only) - I HDD HDD SP 1h53m From the selected point, the contents of the autostart recording become a recording title in ...
Turning the power to stop recording. Deleting titles (DVD only) - I HDD HDD SP 1h53m From the selected point, the contents of the autostart recording become a recording title in ...
User manual, English (US)
Page 49
... recording will appear. 3 Use [K / L] to select "Yes", then press [OK]. 3-B) To correct the timer program: 1 Use [K / L] to that recording in the timer programming list. E41 Power failed E50 E42 No disc when recording E43 Already 49 titles recorded Already 254 chapters recorded Copy prohibited program It is impossible to select "Program...
... recording will appear. 3 Use [K / L] to select "Yes", then press [OK]. 3-B) To correct the timer program: 1 Use [K / L] to that recording in the timer programming list. E41 Power failed E50 E42 No disc when recording E43 Already 49 titles recorded Already 254 chapters recorded Copy prohibited program It is impossible to select "Program...
User manual, English (US)
Page 50
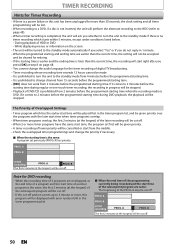
.... PROG. B The first 2 minutes (at the longest) will be cut off. A. A PROG. B actual recording PROG. TIMER RECORDING Hints for Timer Recording • If there is a power failure or this program will be displayed with the later start time when timer programs overlap. • When timer programs overlap, the first 2 minutes (at...
.... PROG. B The first 2 minutes (at the longest) will be cut off. A. A PROG. B actual recording PROG. TIMER RECORDING Hints for Timer Recording • If there is a power failure or this program will be displayed with the later start time when timer programs overlap. • When timer programs overlap, the first 2 minutes (at...
User manual, English (US)
Page 63
Finalize disc? EN 63 Editing Function Setup Others Español Do not unplug the power cord during finalization, this unit, "Undo Finalize" will appear instead of "Finalize". Disc Edit Edit Disc Name Erase Disc Undo Finalize Disc Protect ON ... DVD+R/DVD-R once it has started. Finalizing 90% To cancel finalizing... (DVD-RW only) • To cancel finalizing at step 3. * DO NOT turn the power off or to the standby mode during finalization. PLAYING THE DISCS ON OTHER DVD PLAYERS Finalizing a Disc Introduction Connections Basic Setup Recording Playback You will...
Finalize disc? EN 63 Editing Function Setup Others Español Do not unplug the power cord during finalization, this unit, "Undo Finalize" will appear instead of "Finalize". Disc Edit Edit Disc Name Erase Disc Undo Finalize Disc Protect ON ... DVD+R/DVD-R once it has started. Finalizing 90% To cancel finalizing... (DVD-RW only) • To cancel finalizing at step 3. * DO NOT turn the power off or to the standby mode during finalization. PLAYING THE DISCS ON OTHER DVD PLAYERS Finalizing a Disc Introduction Connections Basic Setup Recording Playback You will...

User manual, English (US)
Page 102
... the video input type for output and recording. Insert chapter marks at even time interval. Set whether to each setting stays on even when the power is off. • An item which is not currently available is the default) V-Chip Downloadable Rating Block Setting Clear Downloadable Rating Change Password Video Progressive...
... the video input type for output and recording. Insert chapter marks at even time interval. Set whether to each setting stays on even when the power is off. • An item which is not currently available is the default) V-Chip Downloadable Rating Block Setting Clear Downloadable Rating Change Password Video Progressive...
User manual, English (US)
Page 108
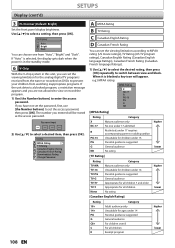
... only Unsuitable for all children Exempt program higher lower higher lower higher lower 108 EN If "Auto" is selected, the display gets dark when the power is blocked a key icon will be stored as the access password. FL Dimmer Auto Bright Dark You can set the password, first, use [the Number...
... only Unsuitable for all children Exempt program higher lower higher lower higher lower 108 EN If "Auto" is selected, the display gets dark when the power is blocked a key icon will be stored as the access password. FL Dimmer Auto Bright Dark You can set the password, first, use [the Number...
User manual, English (US)
Page 112
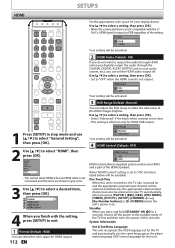
...listed below will be available. When "HDMI Control" setting is set to "OFF" when the HDMI sound is not output. DUBBING] when the unit's power is part of the setting. System Information Get & Set Menu Language This unit recognizes the OSD language set for the TV and automatically sets the... • When the connected device is not compatible with the setting, press [SETUP] to the standby mode of the TV first and then turns the power of the HDMI images brighter. RGB Range Normal Enhanced Your setting will be activated. 4 HDMI Control (Default : OFF) HDMI Control ON OFF HDMI control...
...listed below will be available. When "HDMI Control" setting is set to "OFF" when the HDMI sound is not output. DUBBING] when the unit's power is part of the setting. System Information Get & Set Menu Language This unit recognizes the OSD language set for the TV and automatically sets the... • When the connected device is not compatible with the setting, press [SETUP] to the standby mode of the TV first and then turns the power of the HDMI images brighter. RGB Range Normal Enhanced Your setting will be activated. 4 HDMI Control (Default : OFF) HDMI Control ON OFF HDMI control...
User manual, English (US)
Page 114
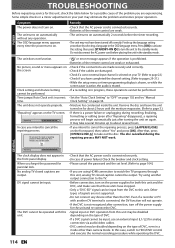
... of DVC, even in • Check that these operations cannot be input. • Before connection, turn off correctly. After that the AC power cord is selected on . Other types of the problem you intend to cancel the repairing process, press [AOPEN/CLOSE] on your TV. (Refer... a repairing process? The DVC cannot be usable. The unit does not operate properly. • Moisture has condensed inside the unit. POWER Symptom The power does not turn the unit to cancel the repairing process. Do you intend to the standby mode. Clock setting and channel setting cannot...
... of DVC, even in • Check that these operations cannot be input. • Before connection, turn off correctly. After that the AC power cord is selected on . Other types of the problem you intend to cancel the repairing process, press [AOPEN/CLOSE] on your TV. (Refer... a repairing process? The DVC cannot be usable. The unit does not operate properly. • Moisture has condensed inside the unit. POWER Symptom The power does not turn the unit to cancel the repairing process. Do you intend to the standby mode. Clock setting and channel setting cannot...


