User manual, English (US)
Page 1
READ YOUR QUICK GUIDE AND/OR OWNER'S MANUAL FIRST FOR QUICK TIPS THAT MAKE USING YOUR MAGNAVOX PRODUCT MORE ENJOYABLE. INSTRUCCIONES EN ESPAÑOL INCLUIDAS. © 2010 Funai Electric Co., Ltd. NEED HELP FAST? IF YOU HAVE READ YOUR INSTRUCTIONS... AND STILL NEED ASSISTANCE, YOU MAY ACCESS OUR ONLINE HELP AT WWW.MAGNAVOX.COM/SUPPORT OR CALL 1-800-605-8610 WHILE WITH YOUR PRODUCT. Editing Function Setup Others Español Introduction Connections Basic Setup Recording Playback Owner's Manual MDR513H / F7 HDD & DVD PLAYER / RECORDER WITH DIGITAL TUNER THANK YOU FOR...
READ YOUR QUICK GUIDE AND/OR OWNER'S MANUAL FIRST FOR QUICK TIPS THAT MAKE USING YOUR MAGNAVOX PRODUCT MORE ENJOYABLE. INSTRUCCIONES EN ESPAÑOL INCLUIDAS. © 2010 Funai Electric Co., Ltd. NEED HELP FAST? IF YOU HAVE READ YOUR INSTRUCTIONS... AND STILL NEED ASSISTANCE, YOU MAY ACCESS OUR ONLINE HELP AT WWW.MAGNAVOX.COM/SUPPORT OR CALL 1-800-605-8610 WHILE WITH YOUR PRODUCT. Editing Function Setup Others Español Introduction Connections Basic Setup Recording Playback Owner's Manual MDR513H / F7 HDD & DVD PLAYER / RECORDER WITH DIGITAL TUNER THANK YOU FOR...

User manual, English (US)
Page 2
... turning the equipment off when find trouble or not in use this equipment may cause harmful interference unless the modifications are expressly approved in the manual.
... turning the equipment off when find trouble or not in use this equipment may cause harmful interference unless the modifications are expressly approved in the manual.
User manual, English (US)
Page 4
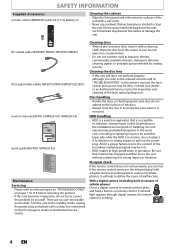
Do not spray insecticide liquid near the unit. RF coaxial cable (WPZ0901TM002 / WPZ0901TM005) RCA audio/video cables (WPZ0102TM018/WPZ0102LTE01) owner's manual (EN/FR) (1VMN29193/1VMN29194) quick guide (EN/FR) (1VMN29195) Maintenance Servicing • Please refer to the surfaces of the discs. •...• HDD rotates at high speed when in camera of the laser optical pickup unit. Cleaning the disc lens • If this owner's manual, the laser optical pickup unit may discolor the surface or damage the unit. Depending on the installation environment or handling, the unit may become...
Do not spray insecticide liquid near the unit. RF coaxial cable (WPZ0901TM002 / WPZ0901TM005) RCA audio/video cables (WPZ0102TM018/WPZ0102LTE01) owner's manual (EN/FR) (1VMN29193/1VMN29194) quick guide (EN/FR) (1VMN29195) Maintenance Servicing • Please refer to the surfaces of the discs. •...• HDD rotates at high speed when in camera of the laser optical pickup unit. Cleaning the disc lens • If this owner's manual, the laser optical pickup unit may discolor the surface or damage the unit. Depending on the installation environment or handling, the unit may become...
User manual, English (US)
Page 5
...in the United States and other trademarks used in this document is strictly prohibited. Furthermore, any unauthorized commercial distribution of this manual or any way without the obligation to change without the express prior written consent of Funai. Funai reserves the right to ...notify any storage medium, in this manual should be used herein remain the exclusive property of their respective owners. Dolby® Digital Stereo Creator "Dolby® Digital Stereo...
...in the United States and other trademarks used in this document is strictly prohibited. Furthermore, any unauthorized commercial distribution of this manual or any way without the obligation to change without the express prior written consent of Funai. Funai reserves the right to ...notify any storage medium, in this manual should be used herein remain the exclusive property of their respective owners. Dolby® Digital Stereo Creator "Dolby® Digital Stereo...
User manual, English (US)
Page 6
CONTENTS Introduction SAFETY INFORMATION 2 FEATURES 8 Symbols Used in this Owner's Manual 9 FUNCTIONAL OVERVIEW 10 Front Panel 10 Rear Panel 11 Remote Control 12 Front Panel Display 14 Connections CONNECTION 15 Antenna Connection (Required 15 Overview 15 ... Insert a Disc 27 INITIAL SETTING 28 CHANNEL SETTING 29 Auto Channel Scan 29 Adding / Deleting Channels 30 SETTING THE CLOCK 32 Auto Clock Setting 32 Manual Clock Setting 34 Daylight Saving Time 34 TUNER SETTINGS 35 Switching Analog Mode / Digital Mode 35 Channel Selection 35 Selecting TV Audio 36 DTV Closed...
CONTENTS Introduction SAFETY INFORMATION 2 FEATURES 8 Symbols Used in this Owner's Manual 9 FUNCTIONAL OVERVIEW 10 Front Panel 10 Rear Panel 11 Remote Control 12 Front Panel Display 14 Connections CONNECTION 15 Antenna Connection (Required 15 Overview 15 ... Insert a Disc 27 INITIAL SETTING 28 CHANNEL SETTING 29 Auto Channel Scan 29 Adding / Deleting Channels 30 SETTING THE CLOCK 32 Auto Clock Setting 32 Manual Clock Setting 34 Daylight Saving Time 34 TUNER SETTINGS 35 Switching Analog Mode / Digital Mode 35 Channel Selection 35 Selecting TV Audio 36 DTV Closed...
User manual, English (US)
Page 9
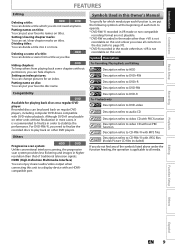
... above under the function heading, the operation is applicable to page 97). * DVD-R recorded in higher resolution than +VR is not recordable on this Owner's Manual To specify for an index. Others Progressive scan system: HDD DVD Unlike conventional interlace scanning, the progressive scan system provides less flickering and images in...
... above under the function heading, the operation is applicable to page 97). * DVD-R recorded in higher resolution than +VR is not recordable on this Owner's Manual To specify for an index. Others Progressive scan system: HDD DVD Unlike conventional interlace scanning, the progressive scan system provides less flickering and images in...
User manual, English (US)
Page 22
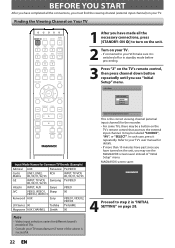
...'s remote control that accesses the external input channel. It may see "Initial Setup" menu. MAGNAVOX screen saver: 4 Proceed to your TV manufacturer if none of TVs. • Consult your TV's user manual for different brand's models of the above is switched off or in "INITIAL SETTING" on ...the TV's remote control, then press channel down button repeatedly until you see the MAGNAVOX screen saver instead of "Initial Setup" menu. In such...
...'s remote control that accesses the external input channel. It may see "Initial Setup" menu. MAGNAVOX screen saver: 4 Proceed to your TV manufacturer if none of TVs. • Consult your TV's user manual for different brand's models of the above is switched off or in "INITIAL SETTING" on ...the TV's remote control, then press channel down button repeatedly until you see the MAGNAVOX screen saver instead of "Initial Setup" menu. In such...
User manual, English (US)
Page 28
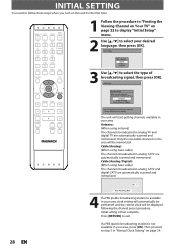
...;ol 3 Use [K / L] to step 5 in analog TV and digital TV are automatically scanned and memorized. Cable (Analog / Digital): (When using antenna) The channels broadcasted in "Manual Clock Setting" on page 34. 28 EN If a PBS (public broadcasting station) is then complete. INITIAL SETTING You need to exit. Press [RETURN] to follow...
...;ol 3 Use [K / L] to step 5 in analog TV and digital TV are automatically scanned and memorized. Cable (Analog / Digital): (When using antenna) The channels broadcasted in "Manual Clock Setting" on page 34. 28 EN If a PBS (public broadcasting station) is then complete. INITIAL SETTING You need to exit. Press [RETURN] to follow...
User manual, English (US)
Page 30
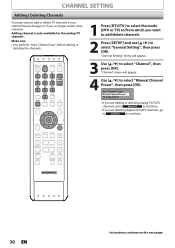
...are deleting digital TV/CATV channels, go to ANALOG to continue. • If you no longer watch some channels. Auto Channel Preset Manual Channel Preset TV Audio Select • If you are adding or deleting analog TV/CATV channels, go to DIGITAL to select "General Setting...", then press [OK]. "Channel" menu will appear. 3 Use [K / L] to select "Manual Channel Preset", then press [OK]. "General Setting" menu will appear. 4 Use [K / L] to select "Channel", then press [OK]. Make sure • You perform...
...are deleting digital TV/CATV channels, go to ANALOG to continue. • If you no longer watch some channels. Auto Channel Preset Manual Channel Preset TV Audio Select • If you are adding or deleting analog TV/CATV channels, go to DIGITAL to select "General Setting...", then press [OK]. "Channel" menu will appear. 3 Use [K / L] to select "Manual Channel Preset", then press [OK]. "General Setting" menu will appear. 4 Use [K / L] to select "Channel", then press [OK]. Make sure • You perform...
User manual, English (US)
Page 31
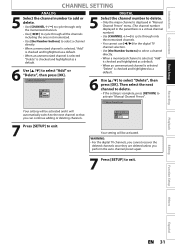
... as a default. • When an unmemorized channel is selected "Delete" is checked and highlighted as a default. 6 Use [K / L] to select "Delete", then press [OK]. Manual Channel Preset CH 2 Add Delete DIGITAL 5 Select the channel number to delete. • Only the major channel is displayed in... "Manual Channel Preset" menu. (The channel number displayed in the parenthesis is a virtual channel number) • Use [CHANNEL / ] to cycle through all the channels ...
... as a default. • When an unmemorized channel is selected "Delete" is checked and highlighted as a default. 6 Use [K / L] to select "Delete", then press [OK]. Manual Channel Preset CH 2 Add Delete DIGITAL 5 Select the channel number to delete. • Only the major channel is displayed in... "Manual Channel Preset" menu. (The channel number displayed in the parenthesis is a virtual channel number) • Use [CHANNEL / ] to cycle through all the channels ...
User manual, English (US)
Page 32
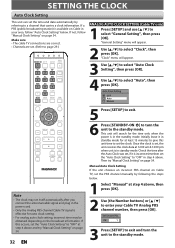
.../ L] to select "Auto", then press [OK]. Set Channel No. "Clock" menu will appear. 2 Use [K / L] to set the clock. Auto Clock Setting OFF Auto Manual 5 Press [SETUP] to exit. 6 Press [STANDBY-ON y] to turn the unit to the standby mode. CH 1 3 Press [SETUP] to exit and turn the unit to... may set itself automatically after the Auto Clock was set, if it in your Cable TV Analog PBS channel number, then press [OK]. Manual Auto Clock Setting If the unit chooses an incorrect PBS channel on the broadcast information. Make sure • The cable TV connections are correct...
.../ L] to select "Auto", then press [OK]. Set Channel No. "Clock" menu will appear. 2 Use [K / L] to set the clock. Auto Clock Setting OFF Auto Manual 5 Press [SETUP] to exit. 6 Press [STANDBY-ON y] to turn the unit to the standby mode. CH 1 3 Press [SETUP] to exit and turn the unit to... may set itself automatically after the Auto Clock was set, if it in your Cable TV Analog PBS channel number, then press [OK]. Manual Auto Clock Setting If the unit chooses an incorrect PBS channel on the broadcast information. Make sure • The cable TV connections are correct...
User manual, English (US)
Page 33
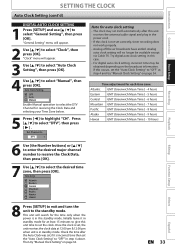
...mode. "Clock" menu will no longer be obtained depending on page 34. Try digital auto clock setting in this unit time to select "Manual", then press [OK]. If this unit receives the antenna/cable signal and plug in the power cord. • If the clock is in... 4 Use [K / L] to set the clock. Initially leave it is in standby mode. Press [K / L] to select "General Setting", then press [OK]. Then try "Manual Clock Setting" on page 34. Check the time after this occurs, set the "Auto Clock Setting" to highlight "CH". Time Zone Atlantic Eastern Central Mountain...
...mode. "Clock" menu will no longer be obtained depending on page 34. Try digital auto clock setting in this unit time to select "Manual", then press [OK]. If this unit receives the antenna/cable signal and plug in the power cord. • If the clock is in... 4 Use [K / L] to set the clock. Initially leave it is in standby mode. Press [K / L] to select "General Setting", then press [OK]. Then try "Manual Clock Setting" on page 34. Check the time after this occurs, set the "Auto Clock Setting" to highlight "CH". Time Zone Atlantic Eastern Central Mountain...
User manual, English (US)
Page 34
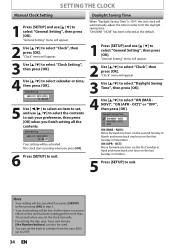
... selected as the default. 1 Press [SETUP] and use [K / L] to select the contents to suit your preference, then press [OK] when you set the clock manually. • For setting the day, year, hour, and minute, [the Number buttons] can set , and use [K / L] to fit the daylight saving time.... 5. • Your clock setting will be cancelled if you press [OK]. 6 Press [SETUP] to 2059. 34 EN NOV) ON (APR - SETTING THE CLOCK Manual Clock Setting 1 Press [SETUP] and use [K / L] to select "Clock", then press [OK]. "General Setting" menu will automatically adjust the time in calendar from...
... selected as the default. 1 Press [SETUP] and use [K / L] to select the contents to suit your preference, then press [OK] when you set the clock manually. • For setting the day, year, hour, and minute, [the Number buttons] can set , and use [K / L] to fit the daylight saving time.... 5. • Your clock setting will be cancelled if you press [OK]. 6 Press [SETUP] to 2059. 34 EN NOV) ON (APR - SETTING THE CLOCK Manual Clock Setting 1 Press [SETUP] and use [K / L] to select "Clock", then press [OK]. "General Setting" menu will automatically adjust the time in calendar from...
User manual, English (US)
Page 35
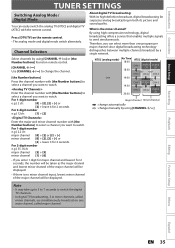
... CH4-1 CH4-2 CH4-3 CH4 19:00 19:30 20:00 CH4-1 smallest CH CH4-3 CH4-1 CH4-2 smallest CH major channel minor channel : change automatically : change manually by using high compression technology, digital broadcasting offers a service that enables multiple signals to watch . By using [CHANNEL / ] or [the Number buttons] found on remote...
... CH4-1 CH4-2 CH4-3 CH4 19:00 19:30 20:00 CH4-1 smallest CH CH4-3 CH4-1 CH4-2 smallest CH major channel minor channel : change automatically : change manually by using high compression technology, digital broadcasting offers a service that enables multiple signals to watch . By using [CHANNEL / ] or [the Number buttons] found on remote...
User manual, English (US)
Page 46
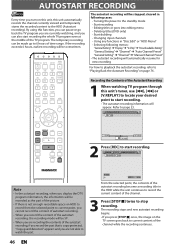
... in following menus: "General Setting" ➔ "Display" ➔ "V-Chip" ➔ "Downloadable Rating" "General Setting" ➔ "Channel" ➔ "Auto Channel Preset" "General Setting" ➔ "Channel" ➔ "Manual Channel Preset" • The autostart recording will automatically resume for new recording For how to playback the autostart recording, refer to "Playing Back the Autostart...
... in following menus: "General Setting" ➔ "Display" ➔ "V-Chip" ➔ "Downloadable Rating" "General Setting" ➔ "Channel" ➔ "Auto Channel Preset" "General Setting" ➔ "Channel" ➔ "Manual Channel Preset" • The autostart recording will automatically resume for new recording For how to playback the autostart recording, refer to "Playing Back the Autostart...
User manual, English (US)
Page 47
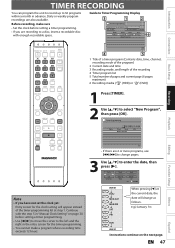
... setting will appear instead of pages and current page (6 pages maximum) 6 Recording media (" " (HDD) or " " (DVD)) 1 Press [TIMER]. 2 Use [K / L] to 36 programs within a month in "Manual Clock Setting" on the next page. Guide to Timer Programming Display 3 1 2 Timer Programming FEB/05/10 10:30 AM 69.1 SP SP (1:00) THU FEB...
... setting will appear instead of pages and current page (6 pages maximum) 6 Recording media (" " (HDD) or " " (DVD)) 1 Press [TIMER]. 2 Use [K / L] to 36 programs within a month in "Manual Clock Setting" on the next page. Guide to Timer Programming Display 3 1 2 Timer Programming FEB/05/10 10:30 AM 69.1 SP SP (1:00) THU FEB...

User manual, English (US)
Page 102
... Page 43 OFF Clock Clock Setting Pages 32-34 Auto Clock Setting OFF Daylight Saving Time Auto Manual ON(MAR-NOV) ON(APR-OCT) OFF Channel Pages 29-31 HDMI Page 112 Auto Channel Preset Manual Channel Preset TV Audio Select Page 37 Format HDMI Audio RGB Range HDMI Control Antenna Cable... your TV. LIST OF SETTINGS Setup Display Pages 107-109 Items (highlight is grayed in the settings. 102 EN Change the password. Tune the channels manually.
... Page 43 OFF Clock Clock Setting Pages 32-34 Auto Clock Setting OFF Daylight Saving Time Auto Manual ON(MAR-NOV) ON(APR-OCT) OFF Channel Pages 29-31 HDMI Page 112 Auto Channel Preset Manual Channel Preset TV Audio Select Page 37 Format HDMI Audio RGB Range HDMI Control Antenna Cable... your TV. LIST OF SETTINGS Setup Display Pages 107-109 Items (highlight is grayed in the settings. 102 EN Change the password. Tune the channels manually.
User manual, English (US)
Page 114
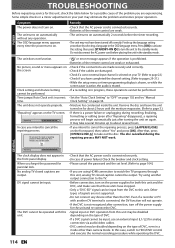
... DVC operation from the DVC to this unit. Press [OK] to activate the setting, then press [STANDBY-ON y] to turn on page 102 and try "Manual time. Do not disconnect the AC power cord before the timer recording. • The unit may eliminate the problem and restore proper operation. Remove the...
... DVC operation from the DVC to this unit. Press [OK] to activate the setting, then press [STANDBY-ON y] to turn on page 102 and try "Manual time. Do not disconnect the AC power cord before the timer recording. • The unit may eliminate the problem and restore proper operation. Remove the...
User manual, English (US)
Page 116
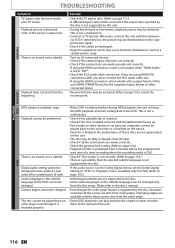
... used when the aspect ratio specified by the disc is not supported by the disc. • If the audio source is set to the disc's manual. • Even though the multi-angle feature is supported by the disc, that the selected subtitle language is not supported by this unit. • ... other connected device. • Resume function may be changed only from the beginning. Refer to cancel the resume point. Refer to page 72 to the manual of the DVD cannot be activated. Audio language or the subtitle language of the unit. Please refer to "OFF". • Check the RCA audio cable...
... used when the aspect ratio specified by the disc is not supported by the disc. • If the audio source is set to the disc's manual. • Even though the multi-angle feature is supported by the disc, that the selected subtitle language is not supported by this unit. • ... other connected device. • Resume function may be changed only from the beginning. Refer to cancel the resume point. Refer to page 72 to the manual of the DVD cannot be activated. Audio language or the subtitle language of the unit. Please refer to "OFF". • Check the RCA audio cable...


