User manual, English (US)
Page 4
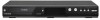
... try to locate an Authorized Service Center. Consult your dealer or an Authorized Service Center for analog records. SAFETY INFORMATION Supplied Accessories remote control (NB820UD) with AA (1.5 V) battery x2 Cleaning the cabinet • Wipe the front panel and other exterior surfaces of the ... cleaners, detergent, abrasive cleaning agents or antistatic spray intended for inspection and cleaning of cellular phone): Direct a digital camera to remote control, press and hold a button on the front page to correct the problem by yourself. Do not spray insecticide liquid near the...
... try to locate an Authorized Service Center. Consult your dealer or an Authorized Service Center for analog records. SAFETY INFORMATION Supplied Accessories remote control (NB820UD) with AA (1.5 V) battery x2 Cleaning the cabinet • Wipe the front panel and other exterior surfaces of the ... cleaners, detergent, abrasive cleaning agents or antistatic spray intended for inspection and cleaning of cellular phone): Direct a digital camera to remote control, press and hold a button on the front page to correct the problem by yourself. Do not spray insecticide liquid near the...
User manual, English (US)
Page 6
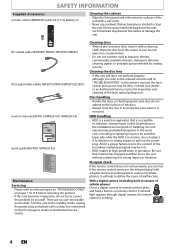
CONTENTS Introduction SAFETY INFORMATION 2 FEATURES 8 Symbols Used in this Owner's Manual 9 FUNCTIONAL OVERVIEW 10 Front Panel 10 Rear Panel 11 Remote Control 12 Front Panel Display 14 Connections CONNECTION 15 Antenna Connection (Required 15 Overview 15 Connecting to a TV Using Audio / Video Jacks 16 Connecting to a TV ...
CONTENTS Introduction SAFETY INFORMATION 2 FEATURES 8 Symbols Used in this Owner's Manual 9 FUNCTIONAL OVERVIEW 10 Front Panel 10 Rear Panel 11 Remote Control 12 Front Panel Display 14 Connections CONNECTION 15 Antenna Connection (Required 15 Overview 15 Connecting to a TV Using Audio / Video Jacks 16 Connecting to a TV ...
User manual, English (US)
Page 10
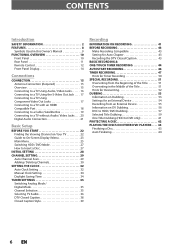
...12. HDD button Press to select the DVD output mode. 7. AUDIO input jacks (L2) Use to start a recording. Infrared sensor window Receive signals from your remote control so that you must unplug the AC power cord) 2. DVD button Press to select the HDD output mode. 6. Press repeatedly to stop playback or recording...10. ySTANDBY-ON button Press to turn on by pressing these buttons. 1. FUNCTIONAL OVERVIEW Front Panel 1 2 3* 4 5 6 7 8* 9 10 15 14 13 12 11 (*) The unit can control the unit from a distance. 10 EN Disc tray Place a disc when opening the disc tray. 3.
...12. HDD button Press to select the DVD output mode. 7. AUDIO input jacks (L2) Use to start a recording. Infrared sensor window Receive signals from your remote control so that you must unplug the AC power cord) 2. DVD button Press to select the HDD output mode. 6. Press repeatedly to stop playback or recording...10. ySTANDBY-ON button Press to turn on by pressing these buttons. 1. FUNCTIONAL OVERVIEW Front Panel 1 2 3* 4 5 6 7 8* 9 10 15 14 13 12 11 (*) The unit can control the unit from a distance. 10 EN Disc tray Place a disc when opening the disc tray. 3.
User manual, English (US)
Page 12
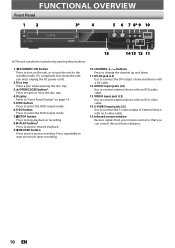
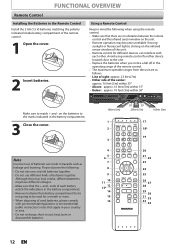
...* 19 20 21 22 23 24 25 26 27 28 29 30 31 32 33 34 12 EN Note Incorrect use different kinds of the remote control. • The maximum operable ranges from battery compartment that the + and - Line of the center: approx. 16 feet (5m) within 30&#...infrared sensor window on the infrared sensor window of the unit. • Remote control for other . Either side of sight: approx. 23 feet (7m) - Please observe the following when using remote control for different devices can result in the Remote Control Install the 2 AA (1.5 V) batteries matching the polarity indicated inside battery ...
...* 19 20 21 22 23 24 25 26 27 28 29 30 31 32 33 34 12 EN Note Incorrect use different kinds of the remote control. • The maximum operable ranges from battery compartment that the + and - Line of the center: approx. 16 feet (5m) within 30&#...infrared sensor window on the infrared sensor window of the unit. • Remote control for other . Either side of sight: approx. 23 feet (7m) - Please observe the following when using remote control for different devices can result in the Remote Control Install the 2 AA (1.5 V) batteries matching the polarity indicated inside battery ...
User manual, English (US)
Page 22
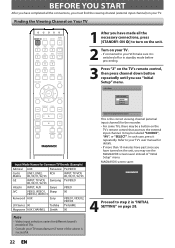
... button on your TV manufacturer if none of "Initial Setup" menu. MAGNAVOX screen saver: 4 Proceed to turn on the unit. 2 Turn on the TV's remote control, then press channel down button repeatedly until you see the MAGNAVOX screen saver instead of the above is the correct viewing channel (external ...REPLAY V.SKIP 1 After you have made all the connections, you must find the viewing channel (external input channel) on the TV's remote control that accesses the external input channel. Initial Setup OSD Language English Français Español RAPID PLAY D.DUBBING TIMER HDD DVD REC...
... button on your TV manufacturer if none of "Initial Setup" menu. MAGNAVOX screen saver: 4 Proceed to turn on the unit. 2 Turn on the TV's remote control, then press channel down button repeatedly until you see the MAGNAVOX screen saver instead of the above is the correct viewing channel (external ...REPLAY V.SKIP 1 After you have made all the connections, you must find the viewing channel (external input channel) on the TV's remote control that accesses the external input channel. Initial Setup OSD Language English Français Español RAPID PLAY D.DUBBING TIMER HDD DVD REC...
User manual, English (US)
Page 35
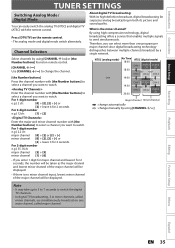
... switch the digital TV channels. • In digital TV broadcasting, 2 or more than one main channel, called minor channels, are simultaneously broadcast on remote control. [CHANNEL / ] Use [CHANNEL / ] to change manually by a single network. Enter the channel number with [the Number buttons] to select... channel [0] + [2], [2] + [•] or [2] + leave it for 2 seconds. For 2-digit number e.g.) 12ch: [1] + [2] Enter the major and minor channel number with the remote control. Press [DTV/TV] on the remote control. • The analog mode and digital mode switch alternately.
... switch the digital TV channels. • In digital TV broadcasting, 2 or more than one main channel, called minor channels, are simultaneously broadcast on remote control. [CHANNEL / ] Use [CHANNEL / ] to change manually by a single network. Enter the channel number with [the Number buttons] to select... channel [0] + [2], [2] + [•] or [2] + leave it for 2 seconds. For 2-digit number e.g.) 12ch: [1] + [2] Enter the major and minor channel number with the remote control. Press [DTV/TV] on the remote control. • The analog mode and digital mode switch alternately.
User manual, English (US)
Page 45
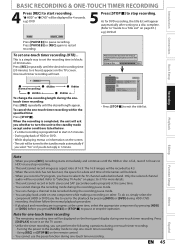
... recording. This is completed before you can play back a title on one -touch timer recording • The remaining recording time will be displayed on the remote control. • You cannot use for a date and time of 16:9. Recording Playback Editing Function Setup Others Note • When you press [REC], recording starts immediately...
... recording. This is completed before you can play back a title on one -touch timer recording • The remaining recording time will be displayed on the remote control. • You cannot use for a date and time of 16:9. Recording Playback Editing Function Setup Others Note • When you press [REC], recording starts immediately...
User manual, English (US)
Page 49
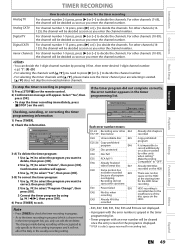
... changes made during recording will appear. Editing Function Setup Others Español EN 49 To stop the timer recording immediately, press [C STOP ] on the remote control. 2) Confirmation message will be decided as soon as only specific to that recording in the timer program list), you enter the channel number. Select "Yes...
... changes made during recording will appear. Editing Function Setup Others Español EN 49 To stop the timer recording immediately, press [C STOP ] on the remote control. 2) Confirmation message will be decided as soon as only specific to that recording in the timer program list), you enter the channel number. Select "Yes...
User manual, English (US)
Page 53
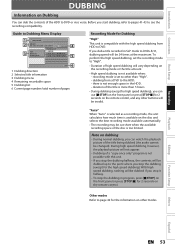
... not appear. • Dubbing of the title is not possible with the high speed dubbing from a DVD to page 42 for 2 seconds on the remote control. Note on the remote control, and any other buttons will be invalid. dubbing from HDD to the point where you dub a title recorded in the HDD. - Playback Editing...
... not appear. • Dubbing of the title is not possible with the high speed dubbing from a DVD to page 42 for 2 seconds on the remote control. Note on the remote control, and any other buttons will be invalid. dubbing from HDD to the point where you dub a title recorded in the HDD. - Playback Editing...
User manual, English (US)
Page 56
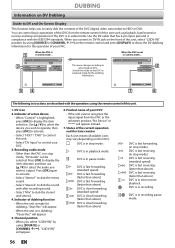
... sound with the IEEE1394 standards. DVC is 1 in recording. Product name of your DVC • If the unit cannot recognize the input signal from the remote control of the DVC (digital video camcorder) to HDD or DVD. Use the DV cable that has 4-pin input jack and is not in stop mode... press [DISPLAY] to show the DV dubbing information for the operation of this unit, select "L3(DV-IN)" position by using the remote control of your DVC. 3. When you select "L3(DV-IN)" by using [SOURCE] or [CHANNEL / ] on the front of this unit. 1. DVC is in recording pause ...
... sound with the IEEE1394 standards. DVC is 1 in recording. Product name of your DVC • If the unit cannot recognize the input signal from the remote control of the DVC (digital video camcorder) to HDD or DVD. Use the DV cable that has 4-pin input jack and is not in stop mode... press [DISPLAY] to show the DV dubbing information for the operation of this unit, select "L3(DV-IN)" position by using the remote control of your DVC. 3. When you select "L3(DV-IN)" by using [SOURCE] or [CHANNEL / ] on the front of this unit. 1. DVC is in recording pause ...
User manual, English (US)
Page 60
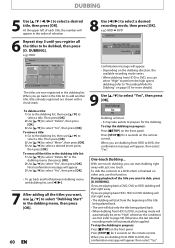
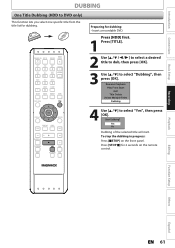
...6 Press 'D. During playback of selection . 6 Repeat step 5 until you want , use [K / L] to select "Dubbing Start" in progress: Press [CSTOP] on the remote control. DUBBING 5 Use [K / L / s / B] to select a desired recording mode, then press [OK]. To stop the dubbing in the dubbing menu, then press [OK... adding all the titles in the dubbing title list: 1 Use [K / L] to select "Delete All" in progress: Press [CSTOP] on the remote control. When you can select "High" to perform the high speed dubbing (refer to "Recording Mode for 2 seconds on the front panel. Then press ...
...6 Press 'D. During playback of selection . 6 Repeat step 5 until you want , use [K / L] to select "Dubbing Start" in progress: Press [CSTOP] on the remote control. DUBBING 5 Use [K / L / s / B] to select a desired recording mode, then press [OK]. To stop the dubbing in the dubbing menu, then press [OK... adding all the titles in the dubbing title list: 1 Use [K / L] to select "Delete All" in progress: Press [CSTOP] on the remote control. When you can select "High" to perform the high speed dubbing (refer to "Recording Mode for 2 seconds on the front panel. Then press ...
User manual, English (US)
Page 61
... function lets you select one specific title from the title list for dubbing. Start Dubbing? To stop the dubbing in progress: Press [CSTOP] on the remote control. Press [STOP C] for dubbing: • Insert a recordable DVD. OPEN/ STANDBY-ON DTV/TV SOURCE CLOSE .@/: ABC DEF GHI JKL MNO CHANNEL PQRS TUV WXYZ SPACE...
... function lets you select one specific title from the title list for dubbing. Start Dubbing? To stop the dubbing in progress: Press [CSTOP] on the remote control. Press [STOP C] for dubbing: • Insert a recordable DVD. OPEN/ STANDBY-ON DTV/TV SOURCE CLOSE .@/: ABC DEF GHI JKL MNO CHANNEL PQRS TUV WXYZ SPACE...

User manual, English (US)
Page 111
... when playing back a wide-screen picture. The feature provides you have a standard TV: Select "4:3 Letter Box", so that black bars appear on the unit or remote control within 15 seconds, then press [OK]. To utilize this feature, you have a widescreen TV: Select "16:9 Wide". 3) Use [K / L] to select "Yes" within 15 seconds at...
... when playing back a wide-screen picture. The feature provides you have a standard TV: Select "4:3 Letter Box", so that black bars appear on the unit or remote control within 15 seconds, then press [OK]. To utilize this feature, you have a widescreen TV: Select "16:9 Wide". 3) Use [K / L] to select "Yes" within 15 seconds at...
User manual, English (US)
Page 114
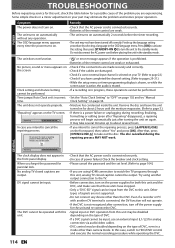
.... (Refer to page 22.) • Check if you are weak. • The unit turns on the TV screen. Other types of the remote control are using another DV terminal is connected, the DV function will begin automatically just after turning the unit on page 102 and try "Manual time... not have stopped. • Only a "DVC-SD" signal can be input from this unit may be disabled depending on the type of the remote control are not supported. • Do not connect any operation. Repairing GENERAL The clock display does not appear in the standby mode. After that these operations...
.... (Refer to page 22.) • Check if you are weak. • The unit turns on the TV screen. Other types of the remote control are using another DV terminal is connected, the DV function will begin automatically just after turning the unit on page 102 and try "Manual time... not have stopped. • Only a "DVC-SD" signal can be input from this unit may be disabled depending on the type of the remote control are not supported. • Do not connect any operation. Repairing GENERAL The clock display does not appear in the standby mode. After that these operations...
User manual, English (US)
Page 117
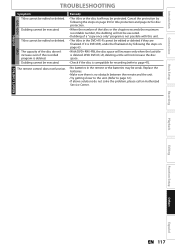
... • The titles in the remote or the batteries may be protected. Remedy • The titles or the disc itself may be edited or deleted if they are finalized. Dubbing cannot be executed. Dubbing cannot be executed. The remote control does not function. • No... batteries in the DVD+R/-R cannot be weak. DVD REMOTE CONTROL Basic Setup Recording Playback Editing Function Setup Others Español EN 117 With DVD-R/+R, ...
... • The titles in the remote or the batteries may be protected. Remedy • The titles or the disc itself may be edited or deleted if they are finalized. Dubbing cannot be executed. Dubbing cannot be executed. The remote control does not function. • No... batteries in the DVD+R/-R cannot be weak. DVD REMOTE CONTROL Basic Setup Recording Playback Editing Function Setup Others Español EN 117 With DVD-R/+R, ...
User manual, English (US)
Page 128
...void and of no effect if any other acts of original retail purchase. THIS WARRANTY DOES NOT COVER PACKING MATERIALS, ANY ACCESSORIES (EXCEPT REMOTE CONTROL), ANY COSMETIC PARTS, COMPLETE ASSEMBLY PARTS, DEMO OR FLOOR MODELS. THIS WARRANTY IS MADE IN LIEU OF ALL OTHER WARRANTIES, EXPRESS OR...will provide the labor without charge for general service inquiries, please contact us at: FUNAI SERVICE CORPORATION Tel: 1-800-605-8610 www.magnavox.com/support 2200 Spiegel Drive Groveport, OH 43125 E2S01UD 1VMN29193 Printed in shipment, or failures which are caused by repairs, alterations or ...
...void and of no effect if any other acts of original retail purchase. THIS WARRANTY DOES NOT COVER PACKING MATERIALS, ANY ACCESSORIES (EXCEPT REMOTE CONTROL), ANY COSMETIC PARTS, COMPLETE ASSEMBLY PARTS, DEMO OR FLOOR MODELS. THIS WARRANTY IS MADE IN LIEU OF ALL OTHER WARRANTIES, EXPRESS OR...will provide the labor without charge for general service inquiries, please contact us at: FUNAI SERVICE CORPORATION Tel: 1-800-605-8610 www.magnavox.com/support 2200 Spiegel Drive Groveport, OH 43125 E2S01UD 1VMN29193 Printed in shipment, or failures which are caused by repairs, alterations or ...

