User Manual
Page 5
...all local, state and federal laws. Contact your local authorities for extended periods of . Stationary images are images that you receive all LCD products, this product is required from the manufacturer - Examples include: on the packaging. directly from you to the wide slot, fully...Regulatory notices Warning To reduce the risk of the privileges to which can be disposed of damage to the TV screen! English 2 Important Registering your model with Magnavox makes you must use substances such as alcohol, chemicals or household cleaners on -screen for information about ...
...all local, state and federal laws. Contact your local authorities for extended periods of . Stationary images are images that you receive all LCD products, this product is required from the manufacturer - Examples include: on the packaging. directly from you to the wide slot, fully...Regulatory notices Warning To reduce the risk of the privileges to which can be disposed of damage to the TV screen! English 2 Important Registering your model with Magnavox makes you must use substances such as alcohol, chemicals or household cleaners on -screen for information about ...

User Manual
Page 6
... all channels marked as favorite. (Includes subchannels.) To fully benefit from the support that Magnavox offers, register your purchase, and welcome to the next or previous channel. 3 Your TV Remote control Congratulations on your product at www.magnavox.com/suppor t. 1 2 Side controls and indicators 20 3 19 4 VOLUME 5 18 5 4 MENU 17 6 CHANNEL 3 7 2 16...
... all channels marked as favorite. (Includes subchannels.) To fully benefit from the support that Magnavox offers, register your purchase, and welcome to the next or previous channel. 3 Your TV Remote control Congratulations on your product at www.magnavox.com/suppor t. 1 2 Side controls and indicators 20 3 19 4 VOLUME 5 18 5 4 MENU 17 6 CHANNEL 3 7 2 16...

User Manual
Page 7
d Color buttons Selects tasks or options. h INFO Displays information about the TV channel or accessory device. p MENU/EXIT Turns the menu on page 13). r SMART MODE Toggles between smart picture and sound settings. EN 7 English g (...e OPTION Activates the quick access menu (see a difference in broadcast time if the broadcast is from a different time zone. k SLEEP Sets a delay after which the TV switches to the previously viewed channel. o VOL +/Increases or decreases volume. f OK Activates a selection or accesses the menu. l Number buttons Select a channel, page or...
d Color buttons Selects tasks or options. h INFO Displays information about the TV channel or accessory device. p MENU/EXIT Turns the menu on page 13). r SMART MODE Toggles between smart picture and sound settings. EN 7 English g (...e OPTION Activates the quick access menu (see a difference in broadcast time if the broadcast is from a different time zone. k SLEEP Sets a delay after which the TV switches to the previously viewed channel. o VOL +/Increases or decreases volume. f OK Activates a selection or accesses the menu. l Number buttons Select a channel, page or...

User Manual
Page 8
.... For example, 11.1, 46.30, 108.201. In addition to reading and understanding the safety instructions, consider the following before positioning your TV: • Ensure that are broadcast in digital, or both analog and digital at the back of time. Contact your local content provider or... your area can be received for an extended period of the TV. The channel number for more information. Use a Kensington lock There is swiveled. Insert the remote control batteries 1 Slide the battery cover ...
.... For example, 11.1, 46.30, 108.201. In addition to reading and understanding the safety instructions, consider the following before positioning your TV: • Ensure that are broadcast in digital, or both analog and digital at the back of time. Contact your local content provider or... your area can be received for an extended period of the TV. The channel number for more information. Use a Kensington lock There is swiveled. Insert the remote control batteries 1 Slide the battery cover ...
User Manual
Page 9
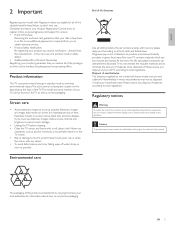
... L L Pr Pr SPDIF OUT Pb Pb Y Y VIDEO L S-VIDEO R AV 1 HDMI 2 AV 2 AV 3 DVI AUDIO IN HDMI 3 3 Connect the power cord plug to TV model. 2 Insert the power cord fully into the power connector. Do not insert the power cord if the voltage is connected to a cable box or ...: • ANT • A/V (Composite Video and Audio) • S-Video • YPbPr (Component Video Input) • HDMI For information about the connections and the TV channels. do not pull on the power cord. 1 Unplug the power cord from the power outlet. 2 Unplug the power cord from the power Caution •...
... L L Pr Pr SPDIF OUT Pb Pb Y Y VIDEO L S-VIDEO R AV 1 HDMI 2 AV 2 AV 3 DVI AUDIO IN HDMI 3 3 Connect the power cord plug to TV model. 2 Insert the power cord fully into the power connector. Do not insert the power cord if the voltage is connected to a cable box or ...: • ANT • A/V (Composite Video and Audio) • S-Video • YPbPr (Component Video Input) • HDMI For information about the connections and the TV channels. do not pull on the power cord. 1 Unplug the power cord from the power outlet. 2 Unplug the power cord from the power Caution •...

User Manual
Page 10
...or satellite set-top box, you do not need to set up your remote control to exit this stage of the setup. Use this MAGNAVOX TV. Please proceed with the following screen appears: Thank you for your purchase of display options. For the BEST possible picture performance, contact your... local Cable / Satellite signal provider for retail store displays. • If you choose [Home] you turn off the TV. Next Press the GREEN Next button located on automatically after the power cord is inserted into the power connector.The following steps to install channels...
...or satellite set-top box, you do not need to set up your remote control to exit this stage of the setup. Use this MAGNAVOX TV. Please proceed with the following screen appears: Thank you for your purchase of display options. For the BEST possible picture performance, contact your... local Cable / Satellite signal provider for retail store displays. • If you choose [Home] you turn off the TV. Next Press the GREEN Next button located on automatically after the power cord is inserted into the power connector.The following steps to install channels...

User Manual
Page 11
For digital channels, press a number (1 to red. To switch to standby • Press on • Press POWER at the side of the TV. To adjust headphone volume • Press VOL +/- and then the corresponding sub channel number (1 to air and water pollution. Adjust volume To switch ...on the remote control. » The indicator switches to 999) followed by a dot "." When the power cord is plugged in, your TV This section helps you perform basic TV operations. Switch channels CHANNEL POWER VOLUME POWER To increase or decrease volume • Press VOL +/- on the side of the...
For digital channels, press a number (1 to red. To switch to standby • Press on • Press POWER at the side of the TV. To adjust headphone volume • Press VOL +/- and then the corresponding sub channel number (1 to air and water pollution. Adjust volume To switch ...on the remote control. » The indicator switches to 999) followed by a dot "." When the power cord is plugged in, your TV This section helps you perform basic TV operations. Switch channels CHANNEL POWER VOLUME POWER To increase or decrease volume • Press VOL +/- on the side of the...
User Manual
Page 12
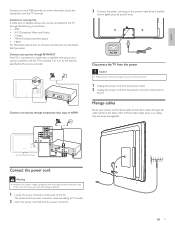
Watch connected devices To watch connected devices 1 Switch on the connected device. » The picture from your set-top box might appear automatically on the TV. 2 Use the remote control of the device to select channels. Watch channels from a set-top box To watch channels from a set-top box 1 Switch on ... select the DVD player and wait a few seconds for the picture to appear. 2 Use the remote control of the DVD player to play on the TV. If the picture does not appear Watch a DVD To watch a DVD 1 Insert a DVD disc into your set-top box to select channels.
Watch connected devices To watch connected devices 1 Switch on the connected device. » The picture from your set-top box might appear automatically on the TV. 2 Use the remote control of the device to select channels. Watch channels from a set-top box To watch channels from a set-top box 1 Switch on ... select the DVD player and wait a few seconds for the picture to appear. 2 Use the remote control of the DVD player to play on the TV. If the picture does not appear Watch a DVD To watch a DVD 1 Insert a DVD disc into your set-top box to select channels.

User Manual
Page 13
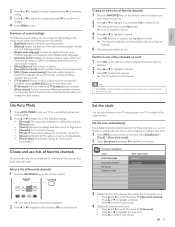
TV menu TV Settings Picture Sound Picture Contrast Brightness Color Tint Sharpness Color temperature Dynamic contrast Digital Natural Motion* *Available in the quick access menu. 1 Press OPTION on .... • Equalizer. • Clock (see 'Set the clock' on the remote control. 3 Press and to enter the [TV settings] menu. TV menu TV settings Features Installation TV settings Picture Sound EN 13 English 6 Use more of your TV Use the quick access menu The quick access menu gives direct access to some often-needed menu...
TV menu TV Settings Picture Sound Picture Contrast Brightness Color Tint Sharpness Color temperature Dynamic contrast Digital Natural Motion* *Available in the quick access menu. 1 Press OPTION on .... • Equalizer. • Clock (see 'Set the clock' on the remote control. 3 Press and to enter the [TV settings] menu. TV menu TV settings Features Installation TV settings Picture Sound EN 13 English 6 Use more of your TV Use the quick access menu The quick access menu gives direct access to some often-needed menu...

User Manual
Page 14
... can be selected. Change sound settings 1 Press MENU on the remote control. 2 Select [Picture format]. Allows maximum sharpness. TV menu TV Settings Picture Sound Sound Equalizer Balance Digital audio language Alternate audio Mono/Stereo Incredible surround AVL 14 EN Summary of picture settings The... following picture formats can be configured. Change picture format 1 Press OPTION on the remote control and select [TV settings] > [Sound]. Depending on the format of the picture source, some picture settings are not available. [Automatic]: (Not for PC...
... can be selected. Change sound settings 1 Press MENU on the remote control. 2 Select [Picture format]. Allows maximum sharpness. TV menu TV Settings Picture Sound Sound Equalizer Balance Digital audio language Alternate audio Mono/Stereo Incredible surround AVL 14 EN Summary of picture settings The... following picture formats can be configured. Change picture format 1 Press OPTION on the remote control and select [TV settings] > [Sound]. Depending on the format of the picture source, some picture settings are not available. [Automatic]: (Not for PC...
User Manual
Page 15
... key on the remote control to display the last list that you can be activated in the [Preferences] menu to make the [TV Speakers] menu available. • [Delta volume]: Levels out volume differences between channels or connected devices. Switch to the connected device ...defined by using the [Picture] menu. • [Sports]:Vivid picture settings and clear sound for high action. • [Standard]: For normal TV viewing. • [Movie]: Brilliant picture settings for a cinematic experience. • [Game]: Optimized for PCs, games consoles and playstations. • [Power...
... key on the remote control to display the last list that you can be activated in the [Preferences] menu to make the [TV Speakers] menu available. • [Delta volume]: Levels out volume differences between channels or connected devices. Switch to the connected device ...defined by using the [Picture] menu. • [Sports]:Vivid picture settings and clear sound for high action. • [Standard]: For normal TV viewing. • [Movie]: Brilliant picture settings for a cinematic experience. • [Game]: Optimized for PCs, games consoles and playstations. • [Power...

User Manual
Page 16
...page 16). 4 Press to exit. Use child control and rating locks You can always switch off your TV earlier or reset the sleeptimer during the countdown. Use the format HH:MM, and select [AM]/[PM... > [Change PIN]. 2 Enter a 4-digit PIN on page 16). Set the sleeptimer Sleeptimer switches the TV to lock specified channels.The channels can be selected but the screen is blanked out and the ...mode]. 2 Select [Manual], and press to exit. Tip • To turn the sleeptimer off and on the TV. Set or change your PIN' on the number keys of time. Use the format HH:MM. For example, if...
...page 16). 4 Press to exit. Use child control and rating locks You can always switch off your TV earlier or reset the sleeptimer during the countdown. Use the format HH:MM, and select [AM]/[PM... > [Change PIN]. 2 Enter a 4-digit PIN on page 16). Set the sleeptimer Sleeptimer switches the TV to lock specified channels.The channels can be selected but the screen is blanked out and the ...mode]. 2 Select [Manual], and press to exit. Tip • To turn the sleeptimer off and on the TV. Set or change your PIN' on the number keys of time. Use the format HH:MM. For example, if...
User Manual
Page 17
...lock a rating, all ratings in the content ratings list are locked. • A box with / indicates that some content ratings are deselected. Violence] TV-G: Programs suitable for children under [(S) Sex] the age of it is not locked 6 Press MENU to exit. Each rating has a box-graphic in... select [All], all items in the content ratings list are locked. • An empty box indicates that all items in [Movie ratings lock]. TV-14: Programs contain elements that the channel is locked: • A box with X indicates that no items in the younger age categories are automatically...
...lock a rating, all ratings in the content ratings list are locked. • A box with / indicates that some content ratings are deselected. Violence] TV-G: Programs suitable for children under [(S) Sex] the age of it is not locked 6 Press MENU to exit. Each rating has a box-graphic in... select [All], all items in the content ratings list are locked. • An empty box indicates that all items in [Movie ratings lock]. TV-14: Programs contain elements that the channel is locked: • A box with X indicates that no items in the younger age categories are automatically...

User Manual
Page 18
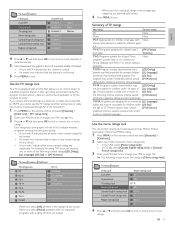
...When you cannot use the region rating lock. 3 Press to return to confirm your PIN' on downloaded region ratings. TV menu Installation Preferences Location Show emergency alerts Downloaded rating table Downloaded rating table Off On 2 Press or to select [On], and press... to the TV menu and select [Features] > [Child lock] > [Region ratings lock]. Low intensity violence and fantasy horror allowed. Movies with X indicates...
...When you cannot use the region rating lock. 3 Press to return to confirm your PIN' on downloaded region ratings. TV menu Installation Preferences Location Show emergency alerts Downloaded rating table Downloaded rating table Off On 2 Press or to select [On], and press... to the TV menu and select [Features] > [Child lock] > [Region ratings lock]. Low intensity violence and fantasy horror allowed. Movies with X indicates...

User Manual
Page 19
... the accompanying program audio. T-1,T-2,T-3 and Often used for channel guide, schedules, bulletin T-4 board information for DTV programming provided by a TV channel during mute], and press to confirm your DTV is an assistive technology that the captioning function on closed caption information....Turn captions on (see 'Display captions' on page 19). 2 Select a caption service for the action on the CC-3, and CC-4 captioned TV program show on DTV programming, including HDTV, received from your choice. 4 Press MENU to your choice. and CS-6 verbatim captions for theTV...
... the accompanying program audio. T-1,T-2,T-3 and Often used for channel guide, schedules, bulletin T-4 board information for DTV programming provided by a TV channel during mute], and press to confirm your DTV is an assistive technology that the captioning function on closed caption information....Turn captions on (see 'Display captions' on page 19). 2 Select a caption service for the action on the CC-3, and CC-4 captioned TV program show on DTV programming, including HDTV, received from your choice. 4 Press MENU to your choice. and CS-6 verbatim captions for theTV...

User Manual
Page 20
Caution • Before you connect your PC, set the PC monitor refresh rate to make the [TV Speakers] menu available. 20 EN Note • Select [Off] to disable this function. [HDMI-CEC] must be activated in PC ...In selected models only If necessary, adjust the picture position to the center of the screen with a stereo mini jack. Use your TV as a PC monitor Use an HDMI-DVI cable or an HDMI-DVI adaptor to connect a PC to select [On]. Supported screen ... Activate HDMI-CEC 1 Press MENU on the remote control. 2 Select [Installation] > [Preferences] > [HDMI-CEC]. 3 Press or to your TV.
Caution • Before you connect your PC, set the PC monitor refresh rate to make the [TV Speakers] menu available. 20 EN Note • Select [Off] to disable this function. [HDMI-CEC] must be activated in PC ...In selected models only If necessary, adjust the picture position to the center of the screen with a stereo mini jack. Use your TV as a PC monitor Use an HDMI-DVI cable or an HDMI-DVI adaptor to connect a PC to select [On]. Supported screen ... Activate HDMI-CEC 1 Press MENU on the remote control. 2 Select [Installation] > [Preferences] > [HDMI-CEC]. 3 Press or to your TV.
User Manual
Page 21
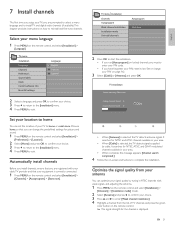
...home so that your equipment is correctly connected. 1 Press MENU on the remote control and select [Installation] > [Language]. TV menu Installation Channels Autoprogram Weak channel installation Installation mode Uninstall channels Autoprogram Start Now 2 Press OK to start the installation. ...[Installation mode] mode. 2 Select [Antenna] and press to confirm your choice. 3 Press and to reinstall and fine-tune channels. TV installation System searching. It searches for picture and sound. 1 Press MENU on the remote control and select [Installation] > [Preferences] > [Location]. ...
...home so that your equipment is correctly connected. 1 Press MENU on the remote control and select [Installation] > [Language]. TV menu Installation Channels Autoprogram Weak channel installation Installation mode Uninstall channels Autoprogram Start Now 2 Press OK to start the installation. ...[Installation mode] mode. 2 Select [Antenna] and press to confirm your choice. 3 Press and to reinstall and fine-tune channels. TV installation System searching. It searches for picture and sound. 1 Press MENU on the remote control and select [Installation] > [Preferences] > [Location]. ...
User Manual
Page 22
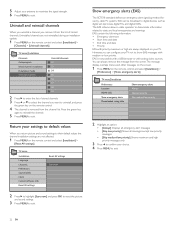
... sound settings to show EAS messages with priority maximum or high are not reinstalled during an installation update. 1 Press MENU on your TV. Uninstalled channels are always displayed on the remote control and select [Installation] > [Channels] > [Uninstall channels]. Return your settings... to default values When you can configure your TV not to their default values the channel installation settings are not affected. 1 Press MENU on the remote control and select [Installation] > [...
... sound settings to show EAS messages with priority maximum or high are not reinstalled during an installation update. 1 Press MENU on your TV. Uninstalled channels are always displayed on the remote control and select [Installation] > [Channels] > [Uninstall channels]. Return your settings... to default values When you can configure your TV not to their default values the channel installation settings are not affected. 1 Press MENU on the remote control and select [Installation] > [...

User Manual
Page 23
... the autorun.upg file to find information. EN 23 Use the type number of your TV (e.g. 47MF439B) to the root directory of the USB device. Check your dealer or downloaded from the www.magnavox.com/support website. Warning • Do not remove the USB device during the software upgrade. • If...
... the autorun.upg file to find information. EN 23 Use the type number of your TV (e.g. 47MF439B) to the root directory of the USB device. Check your dealer or downloaded from the www.magnavox.com/support website. Warning • Do not remove the USB device during the software upgrade. • If...

User Manual
Page 24
Connection overview Back connectors TV ANTENNA 1 2 34 HDMI 1 R R R SERV. U L L Pr Pr Pb Pb Y Y L SPDIF OUT 5 VIDEO L S-VIDEO R 6 AV 1 AV 2 AV 3 DVI AUDIO IN HDMI 2 HDMI 3 7 8 a Signal input from high-de&#...-ray players. c AV3 Composite video (back):Video input for HDMI3. g AV3 S-VIDEO (back): S-Video (back) input connector to be used to connect a device to your TV, depending on availability and your needs. h HDMI 1/2/3: Digital audio and video input from high-definition digital devices such as DVD, camcorder, game console...
Connection overview Back connectors TV ANTENNA 1 2 34 HDMI 1 R R R SERV. U L L Pr Pr Pb Pb Y Y L SPDIF OUT 5 VIDEO L S-VIDEO R 6 AV 1 AV 2 AV 3 DVI AUDIO IN HDMI 2 HDMI 3 7 8 a Signal input from high-de&#...-ray players. c AV3 Composite video (back):Video input for HDMI3. g AV3 S-VIDEO (back): S-Video (back) input connector to be used to connect a device to your TV, depending on availability and your needs. h HDMI 1/2/3: Digital audio and video input from high-definition digital devices such as DVD, camcorder, game console...


