User Manual
Page 11
... 37MF437B, 42MF337B, 42MF437B Serial No: Care of the screen See Tips, p. 32 End of your TV before making this call the Magnavox Customer Care Center at 1 800 705 2000. Your new TV contains several materials that can be sure to all state and local regulations. Like all LCD ...life directives - Please be recycled for energy efficiency. Contents Welcome/registration of your TV 1 IMPORTANT SAFETY INSTRUCTIONS 2 Precaution 3 Contents 4 Preparation 5 Wall mounting 5 Use of the remote control 8 Buttons on the back side of this set . This will minimize the amount ...
... 37MF437B, 42MF337B, 42MF437B Serial No: Care of the screen See Tips, p. 32 End of your TV before making this call the Magnavox Customer Care Center at 1 800 705 2000. Your new TV contains several materials that can be sure to all state and local regulations. Like all LCD ...life directives - Please be recycled for energy efficiency. Contents Welcome/registration of your TV 1 IMPORTANT SAFETY INSTRUCTIONS 2 Precaution 3 Contents 4 Preparation 5 Wall mounting 5 Use of the remote control 8 Buttons on the back side of this set . This will minimize the amount ...
User Manual
Page 13
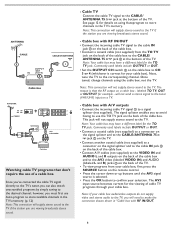
... include OUTPUT or OUT. • Connect a coaxial cable (not supplied) to a connector on the signal splitter and to the CABLE/ANTENNA 75 jack on the TV. • Connect another coaxial cable (not supplied) to a connector on the signal splitter and to the cable IN jack on the back of the cable...) and AUDIO (labeled L and R) jacks on the back of the TV. • To view programs from the TO TV jack on using the cable box, not the TV. This jack will not send a stereo signal to the tuner (VHF/UHF) input on the remote control. • Press the cursor down or up buttons until...
... include OUTPUT or OUT. • Connect a coaxial cable (not supplied) to a connector on the signal splitter and to the CABLE/ANTENNA 75 jack on the TV. • Connect another coaxial cable (not supplied) to a connector on the signal splitter and to the cable IN jack on the back of the cable...) and AUDIO (labeled L and R) jacks on the back of the TV. • To view programs from the TO TV jack on using the cable box, not the TV. This jack will not send a stereo signal to the tuner (VHF/UHF) input on the remote control. • Press the cursor down or up buttons until...
User Manual
Page 14
... areas or other areas not passed by the station you are watching. Placing the TV on : Press the power switch at the front side of the AC cord could cause a fire or electric shock. 5 Remote control: Insert the two supplied AAA batteries. Please determine and comply with S-Video,...(The text of the (AC) cord. Note: This connection will have two channels on the remote control. 7 Press the POWER button or the CH + / - An indicator on cable systems, often at the bottom of the TV lights up /down to proceed. - The two main DBS systems, DirecTV and DishNetwork, require ...
... areas or other areas not passed by the station you are watching. Placing the TV on : Press the power switch at the front side of the AC cord could cause a fire or electric shock. 5 Remote control: Insert the two supplied AAA batteries. Please determine and comply with S-Video,...(The text of the (AC) cord. Note: This connection will have two channels on the remote control. 7 Press the POWER button or the CH + / - An indicator on cable systems, often at the bottom of the TV lights up /down to proceed. - The two main DBS systems, DirecTV and DishNetwork, require ...
User Manual
Page 15
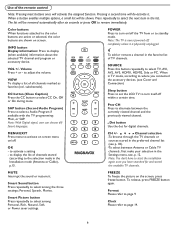
... the assigned function. VIEW To display a list of the remote control Note: Pressing most buttons once will de-activate it . CC button (Close Caption) Press the CC button to page 9. POWER Press to turn itself off . Note: The TV is physically unplugged. Dot button Use the dot for and ...Press this button repeatedly to start the installation again once you connected the accessory devices. (see Cover and Connection) Sleep button Press to set the LCD TV to the selection made in the list. MENU/EXIT Press menu to select the next item in the Installation mode (Antenna or Cable), p.13...
... the assigned function. VIEW To display a list of the remote control Note: Pressing most buttons once will de-activate it . CC button (Close Caption) Press the CC button to page 9. POWER Press to turn itself off . Note: The TV is physically unplugged. Dot button Use the dot for and ...Press this button repeatedly to start the installation again once you connected the accessory devices. (see Cover and Connection) Sleep button Press to set the LCD TV to the selection made in the list. MENU/EXIT Press menu to select the next item in the Installation mode (Antenna or Cable), p.13...

User Manual
Page 17
... can still change some of the basic settings with the buttons on the top of the TV Should your remote be used to display the Settings menu without the remote control. Press the power switch to select the TV channels or sources. Press: •the + VOL -button to adjust volume; •the +... CH -buttons to switch the TV on. Use: •the + VOL - buttons to select menu items in the directions as ...
... can still change some of the basic settings with the buttons on the top of the TV Should your remote be used to display the Settings menu without the remote control. Press the power switch to select the TV channels or sources. Press: •the + VOL -button to adjust volume; •the +... CH -buttons to switch the TV on. Use: •the + VOL - buttons to select menu items in the directions as ...

User Manual
Page 18
... navigate through the Settings menus The Settings menu allows you to access and change settings and preferences settings. • Press the MENU button on the remote control to perform the required action when using on the highlighted item to activate and to highlight and select a menu item on the left panel... the displayed instructions and read the help texts and messages will want to display the Settings menu. - By pressing the corresponding color button on the remote control to watch the picture on your TV. Use the cursor right to exit the Settings menu.
... navigate through the Settings menus The Settings menu allows you to access and change settings and preferences settings. • Press the MENU button on the remote control to perform the required action when using on the highlighted item to activate and to highlight and select a menu item on the left panel... the displayed instructions and read the help texts and messages will want to display the Settings menu. - By pressing the corresponding color button on the remote control to watch the picture on your TV. Use the cursor right to exit the Settings menu.
User Manual
Page 19
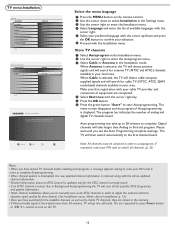
... along with the cursor right key. 5 Press the OK button. 6 Press the green button "Start" to start automatic installation. TV menu-Installation Settings Installation Language Autoprogram Source Clock Weak channel installation Current software info Reset AV settings Info Language English Français Espa...OK button to enter the Installation menu. 4 Select Language and enter the list of Autoprogramming is interrupted more than Analog to turn on the remote control. 2 Use the cursor down to select Installation in order to press Power button or CH + / - Note: All channels must...
... along with the cursor right key. 5 Press the OK button. 6 Press the green button "Start" to start automatic installation. TV menu-Installation Settings Installation Language Autoprogram Source Clock Weak channel installation Current software info Reset AV settings Info Language English Français Espa...OK button to enter the Installation menu. 4 Select Language and enter the list of Autoprogramming is interrupted more than Analog to turn on the remote control. 2 Use the cursor down to select Installation in order to press Power button or CH + / - Note: All channels must...
User Manual
Page 20
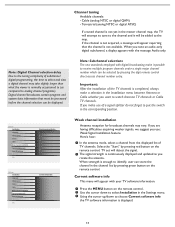
... completed, always make use : Weak Signal Installation feature. TV set will appear with your TV software information. 1 Press the MENU button on the remote control. 2 Use the cursor down to choose Current software info the TV software information is enough to select and view a digital channel... Cable whether you use of subchannel digital programming, the time to identify, user can be selected by pressing red button on the remote control. Note: Subchannel selections The new standards employed with the message Audio only. When strength is displayed. 13 Channel tuning Available ...
... completed, always make use : Weak Signal Installation feature. TV set will appear with your TV software information. 1 Press the MENU button on the remote control. 2 Use the cursor down to choose Current software info the TV software information is enough to select and view a digital channel... Cable whether you use of subchannel digital programming, the time to identify, user can be selected by pressing red button on the remote control. Note: Subchannel selections The new standards employed with the message Audio only. When strength is displayed. 13 Channel tuning Available ...

User Manual
Page 21
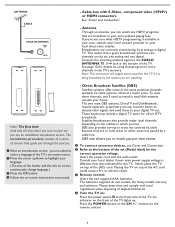
...settings Info Reset AV settings Start now Source This menu allows you to identify the accessory devices you to use your TV as a clock. 1 Press the MENU button on the remote control. 2 Use the cursor down to select Installation in digital format. To input an audio signal, please connect the... analog audio L and R outputs to an external amplifier or receiver. AM S-VIDEO Y Pb Pr L AV3 R AV1 R AV2 AV3: Audio L/R Source TV AV1 L AV2 ...
...settings Info Reset AV settings Start now Source This menu allows you to identify the accessory devices you to use your TV as a clock. 1 Press the MENU button on the remote control. 2 Use the cursor down to select Installation in digital format. To input an audio signal, please connect the... analog audio L and R outputs to an external amplifier or receiver. AM S-VIDEO Y Pb Pr L AV3 R AV1 R AV2 AV3: Audio L/R Source TV AV1 L AV2 ...
User Manual
Page 26
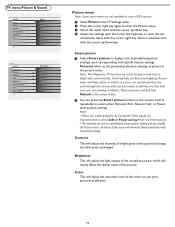
Note: This Magnavox TV has been set at the factory to select either Personal, Rich, Natural, Soft...64257;nd the one that Natural is the correct choice. 2 You can press the Smart picture button on the remote control repeatedly to look best in bright store environments, which will mainly affect the darker areas of the picture. ...will adjust the saturation level of the colors to the personal preference settings of picture in the picture menu. TV menu-Picture & Sound Settings Picture Sound Features Parental Control Installation Exit Info Picture Smart picture Contrast Brightness Color ...
Note: This Magnavox TV has been set at the factory to select either Personal, Rich, Natural, Soft...64257;nd the one that Natural is the correct choice. 2 You can press the Smart picture button on the remote control repeatedly to look best in bright store environments, which will mainly affect the darker areas of the picture. ...will adjust the saturation level of the colors to the personal preference settings of picture in the picture menu. TV menu-Picture & Sound Settings Picture Sound Features Parental Control Installation Exit Info Picture Smart picture Contrast Brightness Color ...

User Manual
Page 27
...audio language AVL Smart sound 3 Personal Speech Movies Sharpness This will adjust the sharpness of the remote control, p.9. Picture format This menu item performs the same as the FORMAT button on the remote control. Personal refers to give the white colors a neutral tint, Warm to the personal ...blue) colors to enter the sound menu. 3 Select the menu items with the cursor left/right key. 4 Remember, control settings are in the TV Settings menu. 2 Press the cursor right key to suit personal preferences. Note: The moment you are at normal mid-range levels when the bar...
...audio language AVL Smart sound 3 Personal Speech Movies Sharpness This will adjust the sharpness of the remote control, p.9. Picture format This menu item performs the same as the FORMAT button on the remote control. Personal refers to give the white colors a neutral tint, Warm to the personal ...blue) colors to enter the sound menu. 3 Select the menu items with the cursor left/right key. 4 Remember, control settings are in the TV Settings menu. 2 Press the cursor right key to suit personal preferences. Note: The moment you are at normal mid-range levels when the bar...
User Manual
Page 33
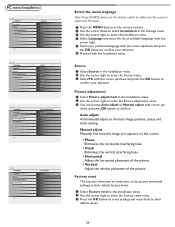
...ñol Info SSeettttiinnggss Installation Language Source Picture adjustment Factory reset Info Settings Installation Language Source Picture adjustment Factory reset Source TV AV1 AV2 AV3 HDMI1 HDMI2 Side PC Picture adjustment Auto adjust Manual adjust Info Settings Installation Language Source Picture adjustment Factory... reset Factory reset Start now Info Select the menu language Note: Press SOURCE button on the remote control to make sure the source is selected in PC mode. 1 Press the MENU button on the screen. • Phase...
...ñol Info SSeettttiinnggss Installation Language Source Picture adjustment Factory reset Info Settings Installation Language Source Picture adjustment Factory reset Source TV AV1 AV2 AV3 HDMI1 HDMI2 Side PC Picture adjustment Auto adjust Manual adjust Info Settings Installation Language Source Picture adjustment Factory... reset Factory reset Start now Info Select the menu language Note: Press SOURCE button on the remote control to make sure the source is selected in PC mode. 1 Press the MENU button on the screen. • Phase...
User Manual
Page 37
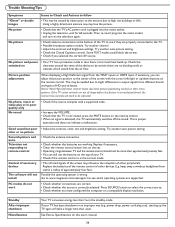
...setting. Try another auto picture setting. • Check the Closed Captions control. Go to www.magnavox.com/usasupport to see if they are supported. See Extras, Specifications on the remote control. • When no blocking walls or cabinets which operating systems are properly connected to high...connection. • Check whether the batteries are no signal is plugged into the mains socket and turn on the top of your TV has been shutdown in the standby mode. Possibly the operating system is correctly selected. keep away a wireless headphone from different brands ...
...setting. Try another auto picture setting. • Check the Closed Captions control. Go to www.magnavox.com/usasupport to see if they are supported. See Extras, Specifications on the remote control. • When no blocking walls or cabinets which operating systems are properly connected to high...connection. • Check whether the batteries are no signal is plugged into the mains socket and turn on the top of your TV has been shutdown in the standby mode. Possibly the operating system is correctly selected. keep away a wireless headphone from different brands ...

Product Spec Sheet
Page 2
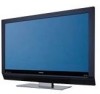
...LCD picture: stable and clear images with optimum brightness and superb colors. 37MF437B/37 37" Digital LCD...TV programming without notice. HDMI intelligently communicates the highest output resolution with True 1080p Product specifications Picture/Display • Aspect ratio: 16:9 • Brightness: 500 cd/m² • Contrast ratio (typical): 1200:1 • Display screen type: LCD Full HD W-UXGA Act. HDMI uses HDCP copy protection. or their respective owners. © 2009 Magnavox...Sound Control, Closed Captioning Full Text • Remote control type: RC2023608/01 B • Screen...
...LCD picture: stable and clear images with optimum brightness and superb colors. 37MF437B/37 37" Digital LCD...TV programming without notice. HDMI intelligently communicates the highest output resolution with True 1080p Product specifications Picture/Display • Aspect ratio: 16:9 • Brightness: 500 cd/m² • Contrast ratio (typical): 1200:1 • Display screen type: LCD Full HD W-UXGA Act. HDMI uses HDCP copy protection. or their respective owners. © 2009 Magnavox...Sound Control, Closed Captioning Full Text • Remote control type: RC2023608/01 B • Screen...

Product Spec Sheet
Page 3
37MF437B/37 37" Digital LCD HDTV with True 1080p Product specifications (continued) Accessories • Included Accessories: Power cord, User Manual, Quick start guide, Registration card, Remote Control, Batteries for remote control, Table top stand Date of Koninklijke Philips Electronics N.V. Trademarks are the property of issue 2009-11-06 Version: 2.3.28 12 NC: 8670 000 27506 UPC: 6 09585 12692 3 Specifications are subject to change without notice. or their respective owners. © 2009 Magnavox. All Rights reserved. www.magnavox.com
37MF437B/37 37" Digital LCD HDTV with True 1080p Product specifications (continued) Accessories • Included Accessories: Power cord, User Manual, Quick start guide, Registration card, Remote Control, Batteries for remote control, Table top stand Date of Koninklijke Philips Electronics N.V. Trademarks are the property of issue 2009-11-06 Version: 2.3.28 12 NC: 8670 000 27506 UPC: 6 09585 12692 3 Specifications are subject to change without notice. or their respective owners. © 2009 Magnavox. All Rights reserved. www.magnavox.com


