
User Manual
Page 1
......3 Technical Specifications* ...3 Automatic Power Saving ...4 Physical Specifications ...5 Product Views...5 Installing your LCD TV...6 Front View Product Description ...6 Rear View ...7 On-Screen Display ...8 Description of the On Screen Display 8 OSD Guide...8 TV Control ...12 Using Your Remote Control ...12 Troubleshooting ...14 Other Related Information ...15 For units set at 115 V :...15 Screen Modes ...17 Connecting to Your TV Antenna, PC, DVD/VCR etc 17 Accessory Pack ...17 Setting up and connecting your TV ...17 Using the Cable Management...19 To attach and remove back cover...
......3 Technical Specifications* ...3 Automatic Power Saving ...4 Physical Specifications ...5 Product Views...5 Installing your LCD TV...6 Front View Product Description ...6 Rear View ...7 On-Screen Display ...8 Description of the On Screen Display 8 OSD Guide...8 TV Control ...12 Using Your Remote Control ...12 Troubleshooting ...14 Other Related Information ...15 For units set at 115 V :...15 Screen Modes ...17 Connecting to Your TV Antenna, PC, DVD/VCR etc 17 Accessory Pack ...17 Setting up and connecting your TV ...17 Using the Cable Management...19 To attach and remove back cover...

User Manual
Page 2
... under warranty. Do not place the product in the LCD technology. Choose a site that the after the power has been switched off . Consult a service technician if the TV does not operate normally when the operating instructions given in locations exposed to shock, electrical hazards and/or mechanical hazards. Be aware, that falls within the following temperature and humidity ranges. Installation Locations •...
... under warranty. Do not place the product in the LCD technology. Choose a site that the after the power has been switched off . Consult a service technician if the TV does not operate normally when the operating instructions given in locations exposed to shock, electrical hazards and/or mechanical hazards. Be aware, that falls within the following temperature and humidity ranges. Installation Locations •...

User Manual
Page 3
... make better use the monitor. • On-Screen Display provides information on adjusting the settings on your monitor. • TV Control provides information on adjusting the settings for this document. Some warnings may appear in this monitor. • Installing Your Monitor describes the initial setup process and gives an overview of the warning is intended for anyone who uses the Magnavox LCD TV. It describes the features, setup, operation and other...
... make better use the monitor. • On-Screen Display provides information on adjusting the settings on your monitor. • TV Control provides information on adjusting the settings for this document. Some warnings may appear in this monitor. • Installing Your Monitor describes the initial setup process and gives an overview of the warning is intended for anyone who uses the Magnavox LCD TV. It describes the features, setup, operation and other...

User Manual
Page 5
OPTICAL CHARACTERISTICS • Contrast ratio • Brightness 600:1 (typ.) 450 cd/m2 (typ.) • Peak contrast angle • White Chromaticity • Viewing Angle (C/R >5) 6 o'clock x: 0.283 y: 0.297 (at 9300° K) x: 0.313 y: 0.329 (at 6500° K) x: 0.313 y: 0.329 (sRGB) Upper >85° (typ.) Lower >85° (typ.) Left >85° (typ.) Right >85° (typ.) • Response time
OPTICAL CHARACTERISTICS • Contrast ratio • Brightness 600:1 (typ.) 450 cd/m2 (typ.) • Peak contrast angle • White Chromaticity • Viewing Angle (C/R >5) 6 o'clock x: 0.283 y: 0.297 (at 9300° K) x: 0.313 y: 0.329 (at 6500° K) x: 0.313 y: 0.329 (sRGB) Upper >85° (typ.) Lower >85° (typ.) Left >85° (typ.) Right >85° (typ.) • Response time

User Manual
Page 7
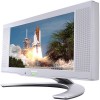
Installing your LCD TV Front View Product Description 1 SOURCE TV/Video source selection Increase or decrease the channel number 2 or up or down the highlighted function in OSD 3 MENU 4 VOL Open the OSD and select the highlighted function Increase or decrease the level of audio volume or move up or down the highlighted function in OSD 5 Power indicator 6 Power switch On/Off 7 Receiver for 'remote control' 6
Installing your LCD TV Front View Product Description 1 SOURCE TV/Video source selection Increase or decrease the channel number 2 or up or down the highlighted function in OSD 3 MENU 4 VOL Open the OSD and select the highlighted function Increase or decrease the level of audio volume or move up or down the highlighted function in OSD 5 Power indicator 6 Power switch On/Off 7 Receiver for 'remote control' 6
User Manual
Page 9
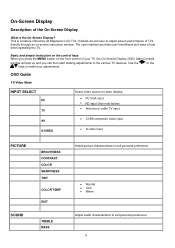
... making adjustments to make your TV, the On-Screen Display (OSD) Main Controls window will pop up and you press the MENU button on -screen instruction window. or the OSD Guide TV/Video Mode INPUT SELECT PC TV AV S-VIDEO Select video source for main display: • PC VGA input • HD input (See note below) • Antenna or cable TV input • CVBS composite video input • S-video input PICTURE SOUND BRIGHTNESS CONTRAST COLOR SHARPNESS TINT COLOR TEMP EXIT TREBLE BASS Adjust picture characteristics...
... making adjustments to make your TV, the On-Screen Display (OSD) Main Controls window will pop up and you press the MENU button on -screen instruction window. or the OSD Guide TV/Video Mode INPUT SELECT PC TV AV S-VIDEO Select video source for main display: • PC VGA input • HD input (See note below) • Antenna or cable TV input • CVBS composite video input • S-video input PICTURE SOUND BRIGHTNESS CONTRAST COLOR SHARPNESS TINT COLOR TEMP EXIT TREBLE BASS Adjust picture characteristics...
User Manual
Page 10
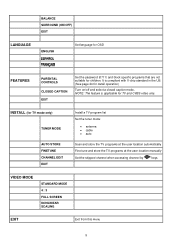
... PARENTAL CONTROLS CLOSED CAPTION EXIT Set the password (0711) and block specific programs that are not suitable for TV mode only) TUNER MODE AUTO STORE FINETUNE CHANNEL EDIT EXIT Install a TV program list Set the tuner mode: • antenna • cable • auto Scan and store the TV programs at the user location automatically Fine tune and store the TV programs at the user location manually Set the skipped channel when accessing channel by keys VIDEO MODE STANDARD MODE 4 : 3 FULL SCREEN NONLINEAR SCALING EXIT Exit from this menu 9 It is applicable for detail operation...
... PARENTAL CONTROLS CLOSED CAPTION EXIT Set the password (0711) and block specific programs that are not suitable for TV mode only) TUNER MODE AUTO STORE FINETUNE CHANNEL EDIT EXIT Install a TV program list Set the tuner mode: • antenna • cable • auto Scan and store the TV programs at the user location automatically Fine tune and store the TV programs at the user location manually Set the skipped channel when accessing channel by keys VIDEO MODE STANDARD MODE 4 : 3 FULL SCREEN NONLINEAR SCALING EXIT Exit from this menu 9 It is applicable for detail operation...
User Manual
Page 11
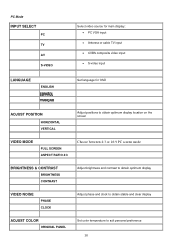
... VGA input • Antenna or cable TV input • CVBS composite video input • S-video input Set language for OSD ADJUST POSITION HORIZONTAL VERTICAL Adjust positions to obtain optimum display location on the screen VIDEO MODE FULL SCREEN ASPECT RATIO 4:3 Choose between 4:3 or 16:9 PC screen mode BRIGHTNESS & CONTRAST BRIGHTNESS CONTRAST Adjust brightness and contrast to obtain optimum display VIDEO NOISE PHASE CLOCK Adjust phase and clock to obtain stable and clear display ADJUST COLOR ORIGINAL PANEL Set color temperature...
... VGA input • Antenna or cable TV input • CVBS composite video input • S-video input Set language for OSD ADJUST POSITION HORIZONTAL VERTICAL Adjust positions to obtain optimum display location on the screen VIDEO MODE FULL SCREEN ASPECT RATIO 4:3 Choose between 4:3 or 16:9 PC screen mode BRIGHTNESS & CONTRAST BRIGHTNESS CONTRAST Adjust brightness and contrast to obtain optimum display VIDEO NOISE PHASE CLOCK Adjust phase and clock to obtain stable and clear display ADJUST COLOR ORIGINAL PANEL Set color temperature...
User Manual
Page 12
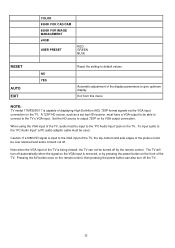
... power button on its VGA output connection. Note when the VGA input of the TV is being viewed, the TV can also turn off the TV. 11 The TV will turn off automatically when the signal on the VGA input is removed, or by the remote control. COLOR 9300K FOR CAD/CAM 6500K FOR IMAGE MANAGEMENT sRGB USER PRESET RED GREEN BLUE RESET NO YES AUTO EXIT Reset the setting to default values Automatic adjustment of the display...
... power button on its VGA output connection. Note when the VGA input of the TV is being viewed, the TV can also turn off the TV. 11 The TV will turn off automatically when the signal on the VGA input is removed, or by the remote control. COLOR 9300K FOR CAD/CAM 6500K FOR IMAGE MANAGEMENT sRGB USER PRESET RED GREEN BLUE RESET NO YES AUTO EXIT Reset the setting to default values Automatic adjustment of the display...

User Manual
Page 14
... standby mode. To adjust the sound level. For direct access to programs For a 2-digit program number, the 2nd digit must be entered within 2 seconds. 13 To disable or enable closed caption function. 1 Standby 2 Selecting TV programs 3 Closed Caption 4 Volume 5 Menu 6 Cursor 7 Sleep timer 8 Sound mode 9 AV source 10 Status 11 Mute 12 A/CH 13 Numerical keys To set will switch automatically to standby mode (up to 240 minutes) To choose MONO, Stereo and SAP (2nd audio program) Sound system To select TV/Video/PC sources...
... standby mode. To adjust the sound level. For direct access to programs For a 2-digit program number, the 2nd digit must be entered within 2 seconds. 13 To disable or enable closed caption function. 1 Standby 2 Selecting TV programs 3 Closed Caption 4 Volume 5 Menu 6 Cursor 7 Sleep timer 8 Sound mode 9 AV source 10 Status 11 Mute 12 A/CH 13 Numerical keys To set will switch automatically to standby mode (up to 240 minutes) To choose MONO, Stereo and SAP (2nd audio program) Sound system To select TV/Video/PC sources...

User Manual
Page 15
... Picture (Power LED is amber) (when using as PC monitor) • Make sure the computer is turned on. • Make sure the signal cable is properly connected to your dealer.) 14 Imaging Problems Display position is incorrect Image vibrates on . The screen is too bright or too dark • Adjust the contrast and brightness in OSD Main Controls. (The backlight of the TV. When the screen...
... Picture (Power LED is amber) (when using as PC monitor) • Make sure the computer is turned on. • Make sure the signal cable is properly connected to your dealer.) 14 Imaging Problems Display position is incorrect Image vibrates on . The screen is too bright or too dark • Adjust the contrast and brightness in OSD Main Controls. (The backlight of the TV. When the screen...

User Manual
Page 16
... An afterimage remains after the power has been turned off. TV and Audio Problems Poor TV signal reception No TV picture No sound • If an image remains on your PC or Video player. Check all connections. • Ensure that the audio cables are often the cause of picture or sound problems (sometimes the connectors can become half disconnected if the TV set at 115 V : Use a UL Listed Cord Set consisting of a minimum 18...
... An afterimage remains after the power has been turned off. TV and Audio Problems Poor TV signal reception No TV picture No sound • If an image remains on your PC or Video player. Check all connections. • Ensure that the audio cables are often the cause of picture or sound problems (sometimes the connectors can become half disconnected if the TV set at 115 V : Use a UL Listed Cord Set consisting of a minimum 18...

User Manual
Page 18
Connecting to PC computer 1. A) Connecting to Your TV Antenna, PC, DVD/VCR etc. Power cable Remote control & batteries Power adapter Setting up and connecting your TV Ensure that the power to AUDIO OUT terminal of the sound card on your PC. 17 Connect the 15-pin D-SUB of the video signal cable to the VGA connector on the back of the monitor Note: If you use an Apple MacitoshTM, you need to connect the special Mac adapter to...
Connecting to PC computer 1. A) Connecting to Your TV Antenna, PC, DVD/VCR etc. Power cable Remote control & batteries Power adapter Setting up and connecting your TV Ensure that the power to AUDIO OUT terminal of the sound card on your PC. 17 Connect the 15-pin D-SUB of the video signal cable to the VGA connector on the back of the monitor Note: If you use an Apple MacitoshTM, you need to connect the special Mac adapter to...

User Manual
Page 22
Note: This monitor accepts a 100mmx100mm VESA-Compliant mounting interface. The monitor supports VESA mounting standard for use with various VESA mounting devices. To install any VESA mounting devices, please follow the instructions given. 21 B) Attaching a wall or arm mounting device. 3) Remove the 4 screws and then remove the base from the LCD monitor. VESA Wall Mounting A) Remove the base 1) Remove the arm box's top cover. 2) Remove the hinge cape.
Note: This monitor accepts a 100mmx100mm VESA-Compliant mounting interface. The monitor supports VESA mounting standard for use with various VESA mounting devices. To install any VESA mounting devices, please follow the instructions given. 21 B) Attaching a wall or arm mounting device. 3) Remove the 4 screws and then remove the base from the LCD monitor. VESA Wall Mounting A) Remove the base 1) Remove the arm box's top cover. 2) Remove the hinge cape.

User Manual
Page 23
... further change COLOR TEMP setting. 5. Three options are 4 input sources: • PC • TV • AV • S-Video 4. Or, press MENU to activate the menu. 2. Press MENU to activate the control menu display. 2. Press MENU to activate the menu. 2. Use , to highlight the picture parameter to be selected. 5. Use MENU to select the item to be adjusted. There are available here: COOL (blue white), NORMAL (balanced) or WARM (red white). 4. Use , to highlight the sound...
... further change COLOR TEMP setting. 5. Three options are 4 input sources: • PC • TV • AV • S-Video 4. Or, press MENU to activate the menu. 2. Press MENU to activate the control menu display. 2. Press MENU to activate the menu. 2. Use , to highlight the picture parameter to be selected. 5. Use MENU to select the item to be adjusted. There are available here: COOL (blue white), NORMAL (balanced) or WARM (red white). 4. Use , to highlight the sound...

User Manual
Page 24
... as the 'master switch' for children under the age of programs should view these programs suitable for younger children. Use , to highlight the language to scroll the highlight LANGUAGE, and then press MENU. 3. Locking the set / Parental Controls Understanding Parental Controls The Parental Controls feature receives and processes the data that parents may be selected. You can also block individual channels or block programs on the basis of...
... as the 'master switch' for children under the age of programs should view these programs suitable for younger children. Use , to highlight the language to scroll the highlight LANGUAGE, and then press MENU. 3. Locking the set / Parental Controls Understanding Parental Controls The Parental Controls feature receives and processes the data that parents may be selected. You can also block individual channels or block programs on the basis of...

User Manual
Page 25
... development skills needed to distinguish between make-believe and reality. Setting up the Access Code Parental Controls allows parents to block out or 'censor' any channels you want to Parental Controls. Press MENU to highlight PARENTAL CONTROLS, and then press MENU. 4. Use , to activate the menu. 2. Enter your confidential access code. CONFIRM CODE will flash on the screen. 7. Enter your confidential access code. These types of program is used to block out or censor. 1. TV-14: (Parents Strongly...
... development skills needed to distinguish between make-believe and reality. Setting up the Access Code Parental Controls allows parents to block out or 'censor' any channels you want to Parental Controls. Press MENU to highlight PARENTAL CONTROLS, and then press MENU. 4. Use , to activate the menu. 2. Enter your confidential access code. CONFIRM CODE will flash on the screen. 7. Enter your confidential access code. These types of program is used to block out or censor. 1. TV-14: (Parents Strongly...
User Manual
Page 26
... confidential access code. CORRECT will flash very briefly and the Parental Controls menu will block programs with the settings you have been blocked. Turning the rating ON will be shown. 5. Use , to highlight EXIT and then press MENU to highlight BLOCK OPTIONS, and then press MENU. 6. Use , to exit from the menu. Press , to programs that have chosen. Viewing Blocked Programming Various on-screen messages will be viewed. Press MENU...
... confidential access code. CORRECT will flash very briefly and the Parental Controls menu will block programs with the settings you have been blocked. Turning the rating ON will be shown. 5. Use , to highlight EXIT and then press MENU to highlight BLOCK OPTIONS, and then press MENU. 6. Use , to exit from the menu. Press , to programs that have chosen. Viewing Blocked Programming Various on-screen messages will be viewed. Press MENU...

User Manual
Page 27
... a specific channel that has been blocked by hand. 1. Use , to activate it to view the channel. Press , keys to select your tuner: • Antenna: your TV is switched OFF. After several minutes, the INSTALL menu reappears automatically. 8. Use , to highlight EXIT and then press MENU to a cable network • Auto 5. The feature is switched back ON, all TV programs and product commercials are broadcast with Closed Captioning. Use , to highlight the mode to...
... a specific channel that has been blocked by hand. 1. Use , to activate it to view the channel. Press , keys to select your tuner: • Antenna: your TV is switched OFF. After several minutes, the INSTALL menu reappears automatically. 8. Use , to highlight EXIT and then press MENU to a cable network • Auto 5. The feature is switched back ON, all TV programs and product commercials are broadcast with Closed Captioning. Use , to highlight the mode to...

User Manual
Page 29
... repair of antenna systems outside of the product. • Product repair and/or part replacement because of improper installation, connections to improper voltage supply, abuse, neglect, misuse, accident, unauthorized repair or other cause not within ninety (90) days of the date of sale, the limitation on all countries where Magnavox officially distributes the product. A sales receipt or other document showing...
... repair of antenna systems outside of the product. • Product repair and/or part replacement because of improper installation, connections to improper voltage supply, abuse, neglect, misuse, accident, unauthorized repair or other cause not within ninety (90) days of the date of sale, the limitation on all countries where Magnavox officially distributes the product. A sales receipt or other document showing...


