User Manual
Page 3
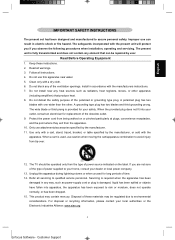
.... 2. Customer Support Install in electric shock or fire hazard. Refer all servicing to assure personal safety. Protect the power cord from the apparatus. 10. The TV should be regulated due to avoid injury from tip-over. 12. Read Before Operating Equipment 1. Do not defeat the safety purpose of the ventilation openings.
.... 2. Customer Support Install in electric shock or fire hazard. Refer all servicing to assure personal safety. Protect the power cord from the apparatus. 10. The TV should be regulated due to avoid injury from tip-over. 12. Read Before Operating Equipment 1. Do not defeat the safety purpose of the ventilation openings.
User Manual
Page 5
... procedures when installation, operating and servicing. Customer Support English TABLE OF CONTENT INSTRODUCTION WELCOME/REGISTRATION OF YOUR TV 2 IMPORTANT SAFETY INSTRUCTIONS 3 TABLE OF CONTENT 5 INSTALLATION PRESENTATION OF THE LCD TV 6-7 SUPPLIED ACCESSORIES 8 REMOTE CONTROL OPERATION 9 INSTALLING LCD TV ON THE WALL 10 GETTING STARTED 11 OSD SETTING 12 CONNECT VIDEO RECORDER 13 CONNECT CAMERA /CAMCORDER...
... procedures when installation, operating and servicing. Customer Support English TABLE OF CONTENT INSTRODUCTION WELCOME/REGISTRATION OF YOUR TV 2 IMPORTANT SAFETY INSTRUCTIONS 3 TABLE OF CONTENT 5 INSTALLATION PRESENTATION OF THE LCD TV 6-7 SUPPLIED ACCESSORIES 8 REMOTE CONTROL OPERATION 9 INSTALLING LCD TV ON THE WALL 10 GETTING STARTED 11 OSD SETTING 12 CONNECT VIDEO RECORDER 13 CONNECT CAMERA /CAMCORDER...
User Manual
Page 6
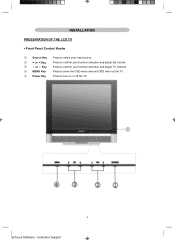
INSTALLATION PRESENTATION OF THE LCD TV ƒ Front Panel Control Knobs ķ Source Key Press to select your input source. ĸ > or < Key Press to confirm your function selection and adjust the volume Ĺ ġ or Ģ Key Press to confirm your function selection and adjust TV channel ĺ MENU Key Press to show the OSD menu and exit OSD menu at the TV. Ļ Power Key Press to turn on or off the TV. 6 Enfocus Software - Customer Support
INSTALLATION PRESENTATION OF THE LCD TV ƒ Front Panel Control Knobs ķ Source Key Press to select your input source. ĸ > or < Key Press to confirm your function selection and adjust the volume Ĺ ġ or Ģ Key Press to confirm your function selection and adjust TV channel ĺ MENU Key Press to show the OSD menu and exit OSD menu at the TV. Ļ Power Key Press to turn on or off the TV. 6 Enfocus Software - Customer Support
User Manual
Page 7
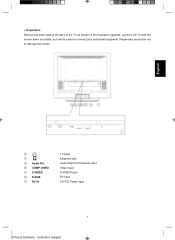
Please take precaution not to connect your peripheral equipment. English ķ ĸ Ĺ Audio R/L ĺ COMP VIDEO Ļ S-VIDEO ļ D-SUB Ľ DC IN TV input Earphone jack Audio Right /Left Channel input Video Input S-VIDEO Input PC Input 12V DC Power Input 7 Enfocus Software - Customer Support Lay the LCD TV with the screen down on the illustration opposite. ƒ Preparation Remove the back plate at the back of the TV as shown on a table, as it will be easier to damage the screen.
Please take precaution not to connect your peripheral equipment. English ķ ĸ Ĺ Audio R/L ĺ COMP VIDEO Ļ S-VIDEO ļ D-SUB Ľ DC IN TV input Earphone jack Audio Right /Left Channel input Video Input S-VIDEO Input PC Input 12V DC Power Input 7 Enfocus Software - Customer Support Lay the LCD TV with the screen down on the illustration opposite. ƒ Preparation Remove the back plate at the back of the TV as shown on a table, as it will be easier to damage the screen.
User Manual
Page 9
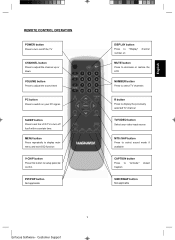
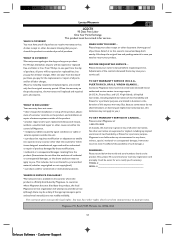
... Not applicable DISPLAY button Press to "Display" number on channel MUTE button Press to eliminate or restore the LCD NUMBER button Press to select TV channels R button Press to display the previously selected TV channel TV/VIDEO button Select your PC signal. MENU button Press repeatedly to display main menu and exit OSD function... Press to turn on your video input source MTS /SAP button Press to select sound mode if available CAPTION button Press to turn off the TV CHANNEL button Press to adjust the channel up or down.
... Not applicable DISPLAY button Press to "Display" number on channel MUTE button Press to eliminate or restore the LCD NUMBER button Press to select TV channels R button Press to display the previously selected TV channel TV/VIDEO button Select your PC signal. MENU button Press repeatedly to display main menu and exit OSD function... Press to turn on your video input source MTS /SAP button Press to select sound mode if available CAPTION button Press to turn off the TV CHANNEL button Press to adjust the channel up or down.
User Manual
Page 10
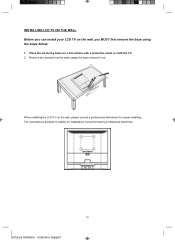
INSTALLING LCD TV ON THE WALL Before you can install your LCD TV on the wall, please consult a professional technician for installations not performed by professional technician. 10 Enfocus Software - When installing the LCD TV on the wall, you MUST first remove the base using the steps below: 1. The manufacture accepts no liability for proper installing. Place the set facing down on a flat surface with a protective sheet or cloth the TV. 2. Customer Support Remove two screws from the base, grasp the base and pull it out.
INSTALLING LCD TV ON THE WALL Before you can install your LCD TV on the wall, please consult a professional technician for installations not performed by professional technician. 10 Enfocus Software - When installing the LCD TV on the wall, you MUST first remove the base using the steps below: 1. The manufacture accepts no liability for proper installing. Place the set facing down on a flat surface with a protective sheet or cloth the TV. 2. Customer Support Remove two screws from the base, grasp the base and pull it out.
User Manual
Page 11
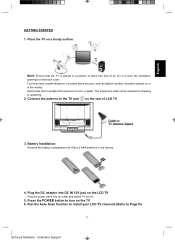
... 1. Plug the DC adaptor into DC IN 12V jack on the LCD TV Plug the power cable into an outlet and switch TV set on the back cover. Note: Ensure that the TV is placed in a position to the TV jack on a sturdy surface. Battery Installation: Remove the battery compartment ...lid. Avoid heat, direct sunlight and exposure to dripping or splashing. 2. Connect the antenna to allow free flow of LCD TV 3. Customer Support Do not cover the ventilation openings on . 5. Press the POWER button to Page15) 11 Enfocus Software - The equipment shall not...
... 1. Plug the DC adaptor into DC IN 12V jack on the LCD TV Plug the power cable into an outlet and switch TV set on the back cover. Note: Ensure that the TV is placed in a position to the TV jack on a sturdy surface. Battery Installation: Remove the battery compartment ...lid. Avoid heat, direct sunlight and exposure to dripping or splashing. 2. Connect the antenna to allow free flow of LCD TV 3. Customer Support Do not cover the ventilation openings on . 5. Press the POWER button to Page15) 11 Enfocus Software - The equipment shall not...
User Manual
Page 13
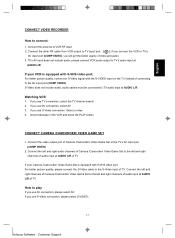
..., connect an S-Video signal with S-VHS video port: For better picture quality, please connect the S-Video cable to TV audio input at AUDIO L/R of Camera /Camcorder/ Video Game Set to TV input port ( ); Insert videotape in the VCR and press the PLAY button CONNECT CAMERA /CAMCORDER/ VIDEO GAME SET ...1. Customer Support Connect the left and right audio channels of Camera /Camcorder/ Video Game Set to the left and right channels of TV. if you connect the VCR to play If you use S-Video connection. Connect the left and right channels of Camera /Camcorder/ Video Game Set...
..., connect an S-Video signal with S-VHS video port: For better picture quality, please connect the S-Video cable to TV audio input at AUDIO L/R of Camera /Camcorder/ Video Game Set to TV input port ( ); Insert videotape in the VCR and press the PLAY button CONNECT CAMERA /CAMCORDER/ VIDEO GAME SET ...1. Customer Support Connect the left and right audio channels of Camera /Camcorder/ Video Game Set to the left and right channels of TV. if you connect the VCR to play If you use S-Video connection. Connect the left and right channels of Camera /Camcorder/ Video Game Set...
User Manual
Page 14
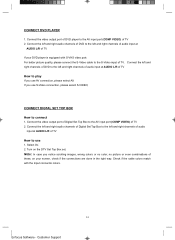
...colors. 14 Enfocus Software - CONNECT DVD PLAYER 1. Note: In case you notice scrolling images, wrong colors or no color, no picture or even combinations of TV. Select AV. 2. Customer Support Check if the cable colors match with S-VHS video port: For better picture quality, please connect the S-Video cable to the... AV input port (COMP VIDEO) of DVD player to play If you use 1. Connect the video output port of TV 2. If you use AV connection, please select AV; Connect the left and right channels of DVD to the left and right channels of audio input...
...colors. 14 Enfocus Software - CONNECT DVD PLAYER 1. Note: In case you notice scrolling images, wrong colors or no color, no picture or even combinations of TV. Select AV. 2. Customer Support Check if the cable colors match with S-VHS video port: For better picture quality, please connect the S-Video cable to the... AV input port (COMP VIDEO) of DVD player to play If you use 1. Connect the video output port of TV 2. If you use AV connection, please select AV; Connect the left and right channels of DVD to the left and right channels of audio input...
User Manual
Page 15
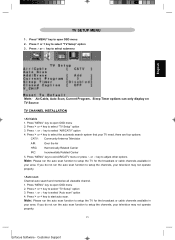
... ġ o rĢ key to select submenu English Note: Air/Cable, Auto Scan, Current ProgramˈSleep Timer options can only display on TV Source TV CHANNEL INSTALLATION ƒ Air/Cable 1. Note: Please run the auto scan function to setup the channels, your television may not operate properly. ƒ... area. Press > or < key to open OSD menu 2. Press" MENU'' key to start auto scan. Press ġ or Ģ key to select "TV Setup'' option 3. Press > or < key to setup the channels, your television may not operate properly. 15 Enfocus Software - Press > or < key to select...
... ġ o rĢ key to select submenu English Note: Air/Cable, Auto Scan, Current ProgramˈSleep Timer options can only display on TV Source TV CHANNEL INSTALLATION ƒ Air/Cable 1. Note: Please run the auto scan function to setup the channels, your television may not operate properly. ƒ... area. Press > or < key to open OSD menu 2. Press" MENU'' key to start auto scan. Press ġ or Ģ key to select "TV Setup'' option 3. Press > or < key to setup the channels, your television may not operate properly. 15 Enfocus Software - Press > or < key to select...
User Manual
Page 16
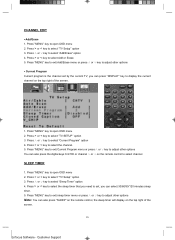
...Press > or < key to select the channel. 5. Customer Support Press > or < key to select "TV SETUP'' option 3. Press > or < key to select Add or Erase. 5. Press" MENU'' key to... OSD menu 2. Press > or < key to select the sleep timer that you need to set by the current TV, you can press "DISPLAY" key to adjust other options Note: You can also press the digital keys 0-9/100 or...120 minutes sleep timer. 5. Press > or < key to open OSD menu 2. Press" MENU'' key to select "TV Setup'' option 3. Press "MENU" key to exit Current Program menu or press ġ or Ģ key to ...
...Press > or < key to select the channel. 5. Customer Support Press > or < key to select "TV SETUP'' option 3. Press > or < key to select Add or Erase. 5. Press" MENU'' key to... OSD menu 2. Press > or < key to select the sleep timer that you need to set by the current TV, you can press "DISPLAY" key to adjust other options Note: You can also press the digital keys 0-9/100 or...120 minutes sleep timer. 5. Press > or < key to open OSD menu 2. Press" MENU'' key to select "TV Setup'' option 3. Press "MENU" key to exit Current Program menu or press ġ or Ģ key to ...
User Manual
Page 17
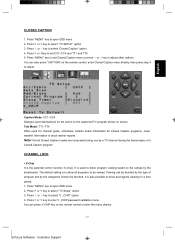
Press > or or < key to open OSD menu 2. Customer Support Press " MENU'' key to enter V _CHIP password validation menu. Press ġ or Ģ key to enter the menu directly. 17 Enfocus Software - You can press V-CHIP key on the remote control to select "Closed Caption" option 4. Press > or < key to select "TV SETUP'' option 3. English CLOSED CAPTION 1.
Press > or or < key to open OSD menu 2. Customer Support Press " MENU'' key to enter V _CHIP password validation menu. Press ġ or Ģ key to enter the menu directly. 17 Enfocus Software - You can press V-CHIP key on the remote control to select "Closed Caption" option 4. Press > or < key to select "TV SETUP'' option 3. English CLOSED CAPTION 1.
User Manual
Page 18
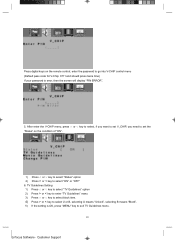
...the password to exit TV Guidelines menu. 18 Enfocus Software - After enter the V-CHIP menu, press ġ or Ģ key to select, if you want to set V_CHIP, you need to set the "Status" on the remote control; TV Guidelines Setting 1) Press ġ or Ģ key to select "TV Guidelines" option 2) ...Press > or < key to enter "TV Guidelines" menu 3) Press ġ or Ģ key to select block item. 4) Press > or < key to...
...the password to exit TV Guidelines menu. 18 Enfocus Software - After enter the V-CHIP menu, press ġ or Ģ key to select, if you want to set V_CHIP, you need to set the "Status" on the remote control; TV Guidelines Setting 1) Press ġ or Ģ key to select "TV Guidelines" option 2) ...Press > or < key to enter "TV Guidelines" menu 3) Press ġ or Ģ key to select block item. 4) Press > or < key to...

User Manual
Page 20
... also have an adjustment automatically. 20 Enfocus Software - When we select the Reset To Default in each function item under the signal source of AV/TV/S-VIDEO. Note: The reset to select any Setup options 3. ƒ Reset To Default 1. Press > or < key to default function in each function item is convenient...
... also have an adjustment automatically. 20 Enfocus Software - When we select the Reset To Default in each function item under the signal source of AV/TV/S-VIDEO. Note: The reset to select any Setup options 3. ƒ Reset To Default 1. Press > or < key to default function in each function item is convenient...

User Manual
Page 23
... select "Contrast" option. 4. Press ġ or Ģ key to select submenu. Note: Picture Setup menu can only be selected under the signal source of AV/TV/S-VIDEO. ƒ Brightness 1. Press > or < key to select "Hue" option. 4. Press "MENU" key to adjust others . 23 Enfocus Software - Press ġ or Ģ key to...
... select "Contrast" option. 4. Press ġ or Ģ key to select submenu. Note: Picture Setup menu can only be selected under the signal source of AV/TV/S-VIDEO. ƒ Brightness 1. Press > or < key to select "Hue" option. 4. Press "MENU" key to adjust others . 23 Enfocus Software - Press ġ or Ģ key to...
User Manual
Page 27
... materials which can dismantle the discarded LCD TV to concentrate the reusable materials and to minimize the amount of your TV or even damage to the TV, keep away your mobile telephone from the TV. When you replace your existing equipment, please find out about the local regulation regarding ... attention to be recycled and reused. Customer Support If the screen requires additional cleaning, use liquid cleaners or aerosol cleaners. Dust the TV by wiping the screen and the cabinet with anything hard as this may scratch, mar, or damage the screen permanently. English General ...
... materials which can dismantle the discarded LCD TV to concentrate the reusable materials and to minimize the amount of your TV or even damage to the TV, keep away your mobile telephone from the TV. When you replace your existing equipment, please find out about the local regulation regarding ... attention to be recycled and reused. Customer Support If the screen requires additional cleaning, use liquid cleaners or aerosol cleaners. Dust the TV by wiping the screen and the cabinet with anything hard as this may scratch, mar, or damage the screen permanently. English General ...
User Manual
Page 28
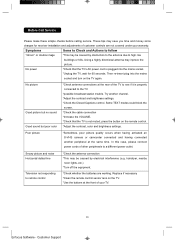
...electrical interference (e.g. No picture Good picture but no sound Good sound but poor color *Check antenna connections at the front of the TV to see if it is not muted; Snowy picture and noise Horizontal dotted line Television not responding to high rise buildings or hills.... the rear of your warranty. Customer Support Then re-insert plug into the mains socket. *Unplug the TV, wait for receiver installation and adjustments of other peripherals to the TV. *possible broadcast station trouble. In this case, please connect power cords of customer controls are working. ...
...electrical interference (e.g. No picture Good picture but no sound Good sound but poor color *Check antenna connections at the front of the TV to see if it is not muted; Snowy picture and noise Horizontal dotted line Television not responding to high rise buildings or hills.... the rear of your warranty. Customer Support Then re-insert plug into the mains socket. *Unplug the TV, wait for receiver installation and adjustments of other peripherals to the TV. *possible broadcast station trouble. In this case, please connect power cords of customer controls are working. ...

User Manual
Page 29
...improved picture resolution, sharpness, and clarity. Second Audio Program (SAP) Another or additional audio channel provided for use with the TV picture. RF Radio Frequency or modulated signal design used for television broadcasts. A monaural soundtrack included within the recorded or video signal...second language translation for user adjustments. Customer Support Audio output Provide sound output, it can set a time period after the TV turns off. 29 Enfocus Software - Multichannel Television sound (MTS) The broadcast standard that allow stereo sound to receive higher picture...
...improved picture resolution, sharpness, and clarity. Second Audio Program (SAP) Another or additional audio channel provided for use with the TV picture. RF Radio Frequency or modulated signal design used for television broadcasts. A monaural soundtrack included within the recorded or video signal...second language translation for user adjustments. Customer Support Audio output Provide sound output, it can set a time period after the TV turns off. 29 Enfocus Software - Multichannel Television sound (MTS) The broadcast standard that allow stereo sound to receive higher picture...
User Manual
Page 32
... purchase, all implied warranties, including implied warranties of merchantability and fitness for a particular purpose. When the warranty on Contact a Magnavox factory service center (see enclosed list) or the product expires, the warranty on the product, and installation or repair of antenna systems... and serial numbers found on the product. Warranty service is available in case you specific legal rights. LIMITED WARRANTY LCD TV 90 Days Free Labor One Year Parts Exchange This product must have other document showing that requires modification or adaptation...
... purchase, all implied warranties, including implied warranties of merchantability and fitness for a particular purpose. When the warranty on Contact a Magnavox factory service center (see enclosed list) or the product expires, the warranty on the product, and installation or repair of antenna systems... and serial numbers found on the product. Warranty service is available in case you specific legal rights. LIMITED WARRANTY LCD TV 90 Days Free Labor One Year Parts Exchange This product must have other document showing that requires modification or adaptation...
Product Spec Sheet
Page 1
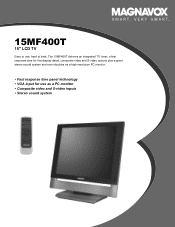
15MF400T 15" LCD TV Easy to use, hard to beat: The 15MF400T delivers an integrated TV tuner, a fast response time for fine display detail, composite video and S-video options plus a great stereo sound system and even doubles as a high resolution PC monitor. • Fast response time panel technology • VGA input for use as a PC monitor • Composite video and S-video inputs • Stereo sound system
15MF400T 15" LCD TV Easy to use, hard to beat: The 15MF400T delivers an integrated TV tuner, a fast response time for fine display detail, composite video and S-video options plus a great stereo sound system and even doubles as a high resolution PC monitor. • Fast response time panel technology • VGA input for use as a PC monitor • Composite video and S-video inputs • Stereo sound system


