User Manual
Page 3
... 3 Enfocus Software - Protect the power cord from the apparatus. 10. Use only with the apparatus. Customer Support English IMPORTANT SAFETY INSTRUCTIONS The present set had been designed and manufactured to environmental considerations. The wide blade or third prong is used, use can be repaired by user. Only use this apparatus during lightning storms or when unused for replacement of the ventilation openings. Servicing is...
... 3 Enfocus Software - Protect the power cord from the apparatus. 10. Use only with the apparatus. Customer Support English IMPORTANT SAFETY INSTRUCTIONS The present set had been designed and manufactured to environmental considerations. The wide blade or third prong is used, use can be repaired by user. Only use this apparatus during lightning storms or when unused for replacement of the ventilation openings. Servicing is...
User Manual
Page 4
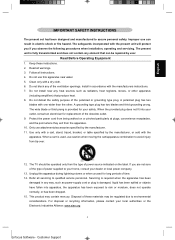
... be serviced by applying excessive pull force to rain; Customer Support See Figure below. or C. An outdoor antenna should be mounted to operate normally or exhibits a marked change in performance; Outdoor Antenna Grounding - EXAMPLE OF ANTENNA GROUNDING AS PER NATIONAL ELECTRICAL CODE Note to the CATV system installer: This reminder is grounded so as to the point of the set and...
... be serviced by applying excessive pull force to rain; Customer Support See Figure below. or C. An outdoor antenna should be mounted to operate normally or exhibits a marked change in performance; Outdoor Antenna Grounding - EXAMPLE OF ANTENNA GROUNDING AS PER NATIONAL ELECTRICAL CODE Note to the CATV system installer: This reminder is grounded so as to the point of the set and...
User Manual
Page 5
... use can be repaired by user. English TABLE OF CONTENT INSTRODUCTION WELCOME/REGISTRATION OF YOUR TV 2 IMPORTANT SAFETY INSTRUCTIONS 3 TABLE OF CONTENT 5 INSTALLATION PRESENTATION OF THE LCD TV 6-7 SUPPLIED ACCESSORIES 8 REMOTE CONTROL OPERATION 9 INSTALLING LCD TV ON THE WALL 10 GETTING STARTED 11 OSD SETTING 12 CONNECT VIDEO RECORDER 13 CONNECT CAMERA /CAMCORDER/ VIDEO GAME SET 13 CONNECT DVD PLAYER 14 CONNECT DIGTAL SET TOP BOX 14 TV SETUP MENU TV CHANNEL INSTALLATION 15 CHANNEL EDIT 16 SLEEP TIMER 16 CLOSED CAPTION 17 CHANNEL LOCK 17-20 SOUND SETUP MENU 21-22 PICTURE...
... use can be repaired by user. English TABLE OF CONTENT INSTRODUCTION WELCOME/REGISTRATION OF YOUR TV 2 IMPORTANT SAFETY INSTRUCTIONS 3 TABLE OF CONTENT 5 INSTALLATION PRESENTATION OF THE LCD TV 6-7 SUPPLIED ACCESSORIES 8 REMOTE CONTROL OPERATION 9 INSTALLING LCD TV ON THE WALL 10 GETTING STARTED 11 OSD SETTING 12 CONNECT VIDEO RECORDER 13 CONNECT CAMERA /CAMCORDER/ VIDEO GAME SET 13 CONNECT DVD PLAYER 14 CONNECT DIGTAL SET TOP BOX 14 TV SETUP MENU TV CHANNEL INSTALLATION 15 CHANNEL EDIT 16 SLEEP TIMER 16 CLOSED CAPTION 17 CHANNEL LOCK 17-20 SOUND SETUP MENU 21-22 PICTURE...
User Manual
Page 6
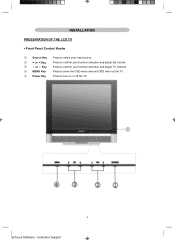
INSTALLATION PRESENTATION OF THE LCD TV ƒ Front Panel Control Knobs ķ Source Key Press to select your input source. ĸ > or < Key Press to confirm your function selection and adjust the volume Ĺ ġ or Ģ Key Press to confirm your function selection and adjust TV channel ĺ MENU Key Press to show the OSD menu and exit OSD menu at the TV. Ļ Power Key Press to turn on or off the TV. 6 Enfocus Software - Customer Support
INSTALLATION PRESENTATION OF THE LCD TV ƒ Front Panel Control Knobs ķ Source Key Press to select your input source. ĸ > or < Key Press to confirm your function selection and adjust the volume Ĺ ġ or Ģ Key Press to confirm your function selection and adjust TV channel ĺ MENU Key Press to show the OSD menu and exit OSD menu at the TV. Ļ Power Key Press to turn on or off the TV. 6 Enfocus Software - Customer Support
User Manual
Page 7
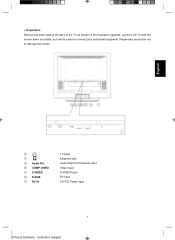
Lay the LCD TV with the screen down on a table, as shown on the illustration opposite. Customer Support English ķ ĸ Ĺ Audio R/L ĺ COMP VIDEO Ļ S-VIDEO ļ D-SUB Ľ DC IN TV input Earphone jack Audio Right /Left Channel input Video Input S-VIDEO Input PC Input 12V DC Power Input 7 Enfocus Software - ƒ Preparation Remove the back plate at the back of the TV as it will be easier to damage the screen. Please take precaution not to connect your peripheral equipment.
Lay the LCD TV with the screen down on a table, as shown on the illustration opposite. Customer Support English ķ ĸ Ĺ Audio R/L ĺ COMP VIDEO Ļ S-VIDEO ļ D-SUB Ľ DC IN TV input Earphone jack Audio Right /Left Channel input Video Input S-VIDEO Input PC Input 12V DC Power Input 7 Enfocus Software - ƒ Preparation Remove the back plate at the back of the TV as it will be easier to damage the screen. Please take precaution not to connect your peripheral equipment.
User Manual
Page 9
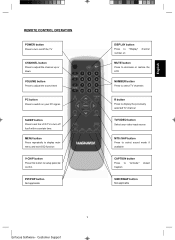
... the LCD NUMBER button Press to select TV channels R button Press to display the previously selected TV channel TV/VIDEO button Select your PC signal. VOLUME button Press to adjust the sound level PC button Press to switch on your video input source MTS /SAP button Press to select sound mode if available CAPTION button Press to setup parental control. SLEEP button Press to set the LCD TV to adjust the channel up or down. English REMOTE CONTROL OPERATION POWER button Press to turn on/off the TV CHANNEL button Press to turn off Itself within a certain time. MENU button...
... the LCD NUMBER button Press to select TV channels R button Press to display the previously selected TV channel TV/VIDEO button Select your PC signal. VOLUME button Press to adjust the sound level PC button Press to switch on your video input source MTS /SAP button Press to select sound mode if available CAPTION button Press to setup parental control. SLEEP button Press to set the LCD TV to adjust the channel up or down. English REMOTE CONTROL OPERATION POWER button Press to turn on/off the TV CHANNEL button Press to turn off Itself within a certain time. MENU button...
User Manual
Page 10
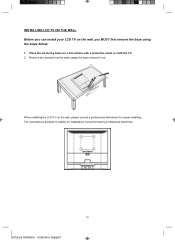
When installing the LCD TV on the wall, please consult a professional technician for installations not performed by professional technician. 10 Enfocus Software - Customer Support Place the set facing down on the wall, you MUST first remove the base using the steps below: 1. INSTALLING LCD TV ON THE WALL Before you can install your LCD TV on a flat surface with a protective sheet or cloth the TV. 2. The manufacture accepts no liability for proper installing. Remove two screws from the base, grasp the base and pull it out.
When installing the LCD TV on the wall, please consult a professional technician for installations not performed by professional technician. 10 Enfocus Software - Customer Support Place the set facing down on the wall, you MUST first remove the base using the steps below: 1. INSTALLING LCD TV ON THE WALL Before you can install your LCD TV on a flat surface with a protective sheet or cloth the TV. 2. The manufacture accepts no liability for proper installing. Remove two screws from the base, grasp the base and pull it out.
User Manual
Page 11
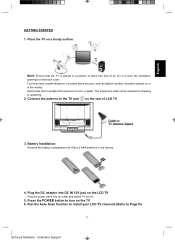
... situations, no naked flame sources, such as lighted candles, should be exposed to rain or water. Press the POWER button to Page15) 11 Enfocus Software - Run the Auto Scan function to install your LCD TV channels (Refer to turn on or in the remote. 4. Do not cover the ventilation openings on a sturdy surface. Connect the antenna to allow free flow of LCD TV 3. Customer Support Note: Ensure that the...
... situations, no naked flame sources, such as lighted candles, should be exposed to rain or water. Press the POWER button to Page15) 11 Enfocus Software - Run the Auto Scan function to install your LCD TV channels (Refer to turn on or in the remote. 4. Do not cover the ventilation openings on a sturdy surface. Connect the antenna to allow free flow of LCD TV 3. Customer Support Note: Ensure that the...
User Manual
Page 13
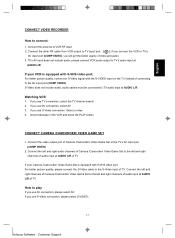
... PLAY button CONNECT CAMERA /CAMCORDER/ VIDEO GAME SET 1. Connect the left and right audio channels of Camera /Camcorder/ Video Game Set to the left and right channels of audio input at AUDIO L/R If your Camera /Camcorder/ Video Game Set is equipped with S-VHS video port: For better picture quality, connect an S-Video signal with S-VHS video port: For better picture quality, please connect the S-Video cable to TV audio input at AUDIO L/R Watching VCR 1. Select s-video 4. If you use S-Video connection, please select S-VIDEO; 13 Enfocus Software - please connect VCR audio...
... PLAY button CONNECT CAMERA /CAMCORDER/ VIDEO GAME SET 1. Connect the left and right audio channels of Camera /Camcorder/ Video Game Set to the left and right channels of audio input at AUDIO L/R If your Camera /Camcorder/ Video Game Set is equipped with S-VHS video port: For better picture quality, connect an S-Video signal with S-VHS video port: For better picture quality, please connect the S-Video cable to TV audio input at AUDIO L/R Watching VCR 1. Select s-video 4. If you use S-Video connection, please select S-VIDEO; 13 Enfocus Software - please connect VCR audio...
User Manual
Page 14
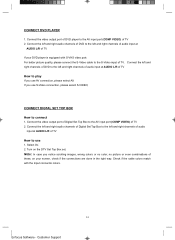
... Set Top Box set. Turn on your DVD player is equipped with the Input connector colors. 14 Enfocus Software - Connect the left and right audio channels of Digital Set Top Box to use 1. Select AV. 2. Customer Support If you use S-Video connection, please select S-VIDEO; Connect the left and right channels of DVD to play If you use AV connection, please select AV; Check if the cable colors match with S-VHS video port: For better picture quality, please connect the S-Video cable to the S-Video input of TV...
... Set Top Box set. Turn on your DVD player is equipped with the Input connector colors. 14 Enfocus Software - Connect the left and right audio channels of Digital Set Top Box to use 1. Select AV. 2. Customer Support If you use S-Video connection, please select S-VIDEO; Connect the left and right channels of DVD to play If you use AV connection, please select AV; Check if the cable colors match with S-VHS video port: For better picture quality, please connect the S-Video cable to the S-Video input of TV...
User Manual
Page 15
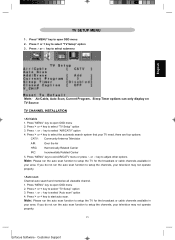
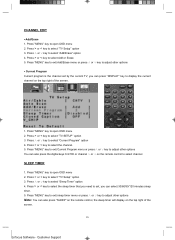
... auto scan function to select submenu English Note: Air/Cable, Auto Scan, Current ProgramˈSleep Timer options can only display on TV Source TV CHANNEL INSTALLATION ƒ Air/Cable 1. Press > or < key to open OSD menu 2. If you do not run the auto scan function to select "TV Setup'' option 3. Press" MENU'' key to start auto scan. Press ġ or Ģ key to select the automatic search system that your television may not operate...
... auto scan function to select submenu English Note: Air/Cable, Auto Scan, Current ProgramˈSleep Timer options can only display on TV Source TV CHANNEL INSTALLATION ƒ Air/Cable 1. Press > or < key to open OSD menu 2. If you do not run the auto scan function to select "TV Setup'' option 3. Press" MENU'' key to start auto scan. Press ġ or Ģ key to select the automatic search system that your television may not operate...
User Manual
Page 16
... "TV Setup'' option 3. Press "MENU" key to exit sleep timer menu or press ġ or Ģ key to select "Add/Erase" option 4. Press > or < key to select "Sleep Timer" option 4. Press ġ or Ģ key to adjust other options You can press "DISPLAY" key to display the current channel on the remote control to set by the current TV, you can also press "SLEEP" on the remote control, the sleep timer...
... "TV Setup'' option 3. Press "MENU" key to exit sleep timer menu or press ġ or Ģ key to select "Add/Erase" option 4. Press > or < key to select "Sleep Timer" option 4. Press ġ or Ģ key to adjust other options You can press "DISPLAY" key to display the current channel on the remote control to set by the current TV, you can also press "SLEEP" on the remote control, the sleep timer...
User Manual
Page 17
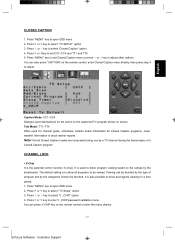
Press > or or < key to select "TV SETUP'' option 3. Press > or < key to enter V _CHIP password validation menu. Press " MENU'' key to enter the menu directly. 17 Enfocus Software - You can press V-CHIP key on the remote control to open OSD menu 2. Customer Support Press ġ or Ģ key to select "Closed Caption" option 4. English CLOSED CAPTION 1.
Press > or or < key to select "TV SETUP'' option 3. Press > or < key to enter V _CHIP password validation menu. Press " MENU'' key to enter the menu directly. 17 Enfocus Software - You can press V-CHIP key on the remote control to open OSD menu 2. Customer Support Press ġ or Ģ key to select "Closed Caption" option 4. English CLOSED CAPTION 1.

User Manual
Page 20
... Default" option. 4. Reset To Default is the same under the PC signal source, it not only recall all settings in the user OSD to recall to default data, but also have an adjustment automatically. 20 Enfocus Software - Press ġ or Ģ key to reset. Customer Support When we select the Reset To Default in each function item under the signal source of AV/TV/S-VIDEO. Press "MENU" key to select any Setup...
... Default" option. 4. Reset To Default is the same under the PC signal source, it not only recall all settings in the user OSD to recall to default data, but also have an adjustment automatically. 20 Enfocus Software - Press ġ or Ģ key to reset. Customer Support When we select the Reset To Default in each function item under the signal source of AV/TV/S-VIDEO. Press "MENU" key to select any Setup...

User Manual
Page 26
... to open OSD menu. 2. Press > or or < key to adjust Red/Green/Blue data 4) Press MENU TO exit to Color menu 5) Press ġ or Ģ key to select other adjustment items, then press MENU to adjust Phase data 5. Press > or or < key to exit 26 Enfocus Software - Press "MENU" key to adjust others . ƒ Auto Adjustment 1. ƒ Clock 1. Press "MENU" key to select "PC Setup" option 3. Press...
... to open OSD menu. 2. Press > or or < key to adjust Red/Green/Blue data 4) Press MENU TO exit to Color menu 5) Press ġ or Ģ key to select other adjustment items, then press MENU to adjust Phase data 5. Press > or or < key to exit 26 Enfocus Software - Press "MENU" key to adjust others . ƒ Auto Adjustment 1. ƒ Clock 1. Press "MENU" key to select "PC Setup" option 3. Press...
User Manual
Page 28
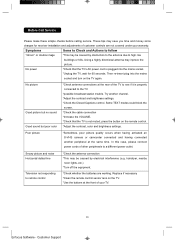
... covered under your TV. 28 Enfocus Software - Replace if necessary *Clean the remote control sensor lens on the TV. *Use the buttons at the rear of customer controls are working. No power *Check that the TV is plugged into the mains socket and turn on the remote control. *Adjust the contrast, color and brightness settings. Some TEXT modes could block the screen. *Check the cable connection *Increase the VOLUME. *Check that the TV's AC power cord is not muted...
... covered under your TV. 28 Enfocus Software - Replace if necessary *Clean the remote control sensor lens on the TV. *Use the buttons at the rear of customer controls are working. No power *Check that the TV is plugged into the mains socket and turn on the remote control. *Adjust the contrast, color and brightness settings. Some TEXT modes could block the screen. *Check the cable connection *Increase the VOLUME. *Check that the TV's AC power cord is not muted...

User Manual
Page 29
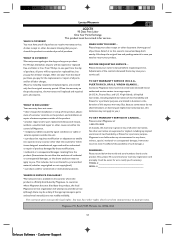
... type plug) are used as DVD player, digital TV, etc, provides improved picture resolution, sharpness and clarity. RF Radio Frequency or modulated signal design used for the input of high-resolution video sources, such as a Super VHS videocassette recorder, Laser Disc player, etc. S-Video Input Allow directly connection of audio and video signals. Composite Input Allows direct connector of feature control shows on -screen listing of high-resolution video sources, such as the carrier for television broadcasts. Menu An on the TV screen...
... type plug) are used as DVD player, digital TV, etc, provides improved picture resolution, sharpness and clarity. RF Radio Frequency or modulated signal design used for the input of high-resolution video sources, such as a Super VHS videocassette recorder, Laser Disc player, etc. S-Video Input Allow directly connection of audio and video signals. Composite Input Allows direct connector of feature control shows on -screen listing of high-resolution video sources, such as the carrier for television broadcasts. Menu An on the TV screen...
User Manual
Page 32
... purchase. TO GET WARRANTY SERVICE IN U.S.A., All parts, including repaired and replaced parts, are not readily available). Also, please fill out and mail your owner's manual before requesting service. You may not apply to state/province. When the warranty on Contact a Magnavox factory service center (see enclosed list) or the product expires, the warranty on the product, and installation or repair of antenna systems outside the unit...
... purchase. TO GET WARRANTY SERVICE IN U.S.A., All parts, including repaired and replaced parts, are not readily available). Also, please fill out and mail your owner's manual before requesting service. You may not apply to state/province. When the warranty on Contact a Magnavox factory service center (see enclosed list) or the product expires, the warranty on the product, and installation or repair of antenna systems outside the unit...
Product Spec Sheet
Page 1
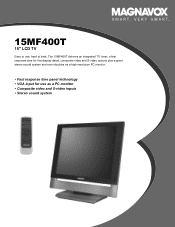
15MF400T 15" LCD TV Easy to use, hard to beat: The 15MF400T delivers an integrated TV tuner, a fast response time for fine display detail, composite video and S-video options plus a great stereo sound system and even doubles as a high resolution PC monitor. • Fast response time panel technology • VGA input for use as a PC monitor • Composite video and S-video inputs • Stereo sound system
15MF400T 15" LCD TV Easy to use, hard to beat: The 15MF400T delivers an integrated TV tuner, a fast response time for fine display detail, composite video and S-video options plus a great stereo sound system and even doubles as a high resolution PC monitor. • Fast response time panel technology • VGA input for use as a PC monitor • Composite video and S-video inputs • Stereo sound system
Product Spec Sheet
Page 2
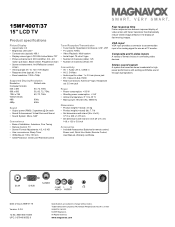
... Sound • Sound System: Mono, SAP Convenience • Ease of Installation: Autostore, Fine Tuning • Remote Control: TV • Screen Format Adjustments: 4:3, 4:3 HD • User convenience: Sleep Timer • VESA Mount: 100 x 100 mm • Child Protection: Child Lock+Parental Control Tuner/Reception/Transmission • Tuner bands: Hyperband, S-Channel, UHF, VHF • TV system: NTSC • Video Playback: Multi-system • Aerial Input: 75 ohm F-type • Number of channels (cable): 125 • Number of channels (off-air): 69 Connectivity...
... Sound • Sound System: Mono, SAP Convenience • Ease of Installation: Autostore, Fine Tuning • Remote Control: TV • Screen Format Adjustments: 4:3, 4:3 HD • User convenience: Sleep Timer • VESA Mount: 100 x 100 mm • Child Protection: Child Lock+Parental Control Tuner/Reception/Transmission • Tuner bands: Hyperband, S-Channel, UHF, VHF • TV system: NTSC • Video Playback: Multi-system • Aerial Input: 75 ohm F-type • Number of channels (cable): 125 • Number of channels (off-air): 69 Connectivity...


