
User Manual
Page 1
Microwave Oven Use and Care Manual MCO160UW / MCO160UB / MCO160UQ / MCO160S Table of Contents Introduction 1 Precautions to Avoid Possible Exposure to Excessire Microwave Energy 1 Important Safety Instructions ......... 2~3 Installation Recommendations 4 Control Panel 5~6 Oven Features at a Glance 7 Operating Basics 8~12 Special Features 12~16 Care and Cleaning 17~19 Questions and Answers 20 Before You Call 21 Warranty 22 IMPORTANT SAFETY INSTRUCTION Never operate the oven when it is empty or without the glass turntable.
Microwave Oven Use and Care Manual MCO160UW / MCO160UB / MCO160UQ / MCO160S Table of Contents Introduction 1 Precautions to Avoid Possible Exposure to Excessire Microwave Energy 1 Important Safety Instructions ......... 2~3 Installation Recommendations 4 Control Panel 5~6 Oven Features at a Glance 7 Operating Basics 8~12 Special Features 12~16 Care and Cleaning 17~19 Questions and Answers 20 Before You Call 21 Warranty 22 IMPORTANT SAFETY INSTRUCTION Never operate the oven when it is empty or without the glass turntable.
User Manual
Page 3
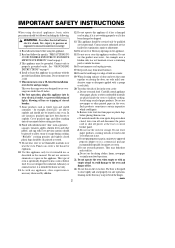
... examination, repair or adjustment. 11. When cleaning surfaces of oven is UL listed for example, near a swimming 13. This over electric and gas ranges. 18. As with a sponge or soft cloth. If materials inside the oven to prevent flickering of table or counter. 19. e. IMPORTANT SAFETY INSTRUCTIONS When using recycled paper products. Do not operate this manual. Carefully attend appliance 16. It is not working properly...
... examination, repair or adjustment. 11. When cleaning surfaces of oven is UL listed for example, near a swimming 13. This over electric and gas ranges. 18. As with a sponge or soft cloth. If materials inside the oven to prevent flickering of table or counter. 19. e. IMPORTANT SAFETY INSTRUCTIONS When using recycled paper products. Do not operate this manual. Carefully attend appliance 16. It is not working properly...
User Manual
Page 4
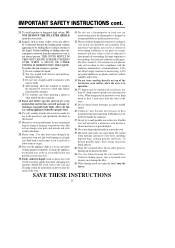
... the heated food. Foods cooked in skin burns. 28. Be careful when opening containers of overcooking. Use care when cleaning the vent hood filter. SAVE THESE INSTRUCTIONS 3 To avoid exposure to prepare food. 26. Above all, this is in a microwave oven because it . 38. remove top foil cover and return tray to pass through heating it is a cooking appliance designed to dangerous high voltage, DO 31. Do not defrost frozen beverages in a microwave oven...
... the heated food. Foods cooked in skin burns. 28. Be careful when opening containers of overcooking. Use care when cleaning the vent hood filter. SAVE THESE INSTRUCTIONS 3 To avoid exposure to prepare food. 26. Above all, this is in a microwave oven because it . 38. remove top foil cover and return tray to pass through heating it is a cooking appliance designed to dangerous high voltage, DO 31. Do not defrost frozen beverages in a microwave oven...
User Manual
Page 5
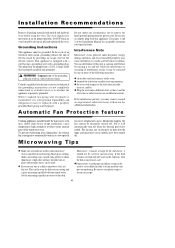
... Note Microwave ovens generate radio frequency energy during operation and if not installed properly may , under any circumstance cut or remove the third (ground) prong from taking place, the exhaust fan is equipped with a cord having a grounding wire with one or more of the following measures: ◆ clean door and seal surfaces of electric shock. The oven requires free movement of the Installation Manual for proper operation. Most glass cooking...
... Note Microwave ovens generate radio frequency energy during operation and if not installed properly may , under any circumstance cut or remove the third (ground) prong from taking place, the exhaust fan is equipped with a cord having a grounding wire with one or more of the following measures: ◆ clean door and seal surfaces of electric shock. The oven requires free movement of the Installation Manual for proper operation. Most glass cooking...
User Manual
Page 6
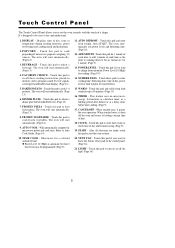
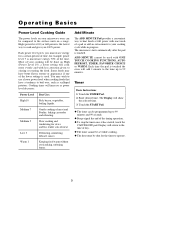
...) 5 CLOCK - After all settings (except time of chilled leftovers. (Page 13) 17. LIGHT - POPCORN - Touch this pad to use and understand. 11. FROZEN PIZZA - TIMER - Touch this pad to Auto Cook Guide. (Page 14) 10. VENT FAN - DISPLAY - Will automatically compute the microwave power and cook time. Microwave for 1 minute of cook time, to add 1 minute of day while microwaving. (Page 8) 19. START - Touch this pad if you want to know the feature of time. ◆ Power Level...
...) 5 CLOCK - After all settings (except time of chilled leftovers. (Page 13) 17. LIGHT - POPCORN - Touch this pad to use and understand. 11. FROZEN PIZZA - TIMER - Touch this pad to Auto Cook Guide. (Page 14) 10. VENT FAN - DISPLAY - Will automatically compute the microwave power and cook time. Microwave for 1 minute of cook time, to add 1 minute of day while microwaving. (Page 8) 19. START - Touch this pad if you want to know the feature of time. ◆ Power Level...
User Manual
Page 8
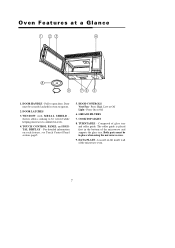
... allows cooking to be in place when using the microwave oven. 19. HOOD CONTROLS Vent Fan - GREASE FILTERS 17. COOKTOP LIGHT 18. Both parts must be securely latched for oven to open door. The roller guide is placed first in oven. 14. Door must be viewed while keeping microwaves confined in the bottom of the microwave and supports the glass tray. TOUCH CONTROL PANEL and DIGITAL DISPLAY - Composed of the microwave oven. 7 For detailed information on the inside wall of glass tray and roller guide. Oven Features...
... allows cooking to be in place when using the microwave oven. 19. HOOD CONTROLS Vent Fan - GREASE FILTERS 17. COOKTOP LIGHT 18. Both parts must be securely latched for oven to open door. The roller guide is placed first in oven. 14. Door must be viewed while keeping microwaves confined in the bottom of the microwave and supports the glass tray. TOUCH CONTROL PANEL and DIGITAL DISPLAY - Composed of the microwave oven. 7 For detailed information on the inside wall of glass tray and roller guide. Oven Features...

User Manual
Page 9
.... Enter the power level desired by touching the appropriate numbers. 3. Enter the cooking time by using the number pads. Touch the START Pad again. ◆ The cooking time will appear in the Display window. ◆ The oven will start until the door is being used. ◆ The time of -Day Clock Basic Instructions 1. It will always be opened any time during operation. Note . . . ◆ Full power is done and beep three times. ◆ When the cook time ends...
.... Enter the power level desired by touching the appropriate numbers. 3. Enter the cooking time by using the number pads. Touch the START Pad again. ◆ The cooking time will appear in the Display window. ◆ The oven will start until the door is being used. ◆ The time of -Day Clock Basic Instructions 1. It will always be opened any time during operation. Note . . . ◆ Full power is done and beep three times. ◆ When the cook time ends...
User Manual
Page 10
... to operate. 9 Touch the START Pad. ◆ The timer can be shut for stews and less tender cuts of the timing operation. ◆ To stop the timer once it has started, touch the CANCEL/OFF pad. Some foods may wish to use a lower power level when cooking foods that have better flavor, texture or appearance if one touch of day. ◆ The timer cannot be set while cooking. ◆ The door must...
... to operate. 9 Touch the START Pad. ◆ The timer can be shut for stews and less tender cuts of the timing operation. ◆ To stop the timer once it has started, touch the CANCEL/OFF pad. Some foods may wish to use a lower power level when cooking foods that have better flavor, texture or appearance if one touch of day. ◆ The timer cannot be set while cooking. ◆ The door must...
User Manual
Page 11
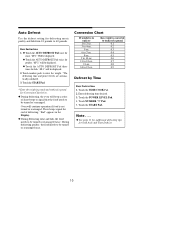
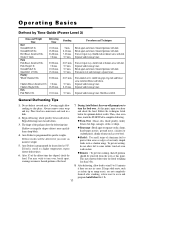
.... 0.1 0.2 0.3 0.4 0.5 0.6 0.7 0.8 0.9 Defrost by Time Basic Instructions 1. "End" appears in the Display. ◆ During defrosting meat and fish, the food needs to tenths-of defrosting. then weight is converted to be displayed. 2. See Conversion Chart below. ◆ During defrosting, the oven will continue operation if food is in pounds and tenths of short beeps to signal that the food needs to 15-oz. Touch NUMBER "3" Pad. 5. Touch the START Pad. Auto Defrost Use the defrost setting for poultry. Touch number...
.... 0.1 0.2 0.3 0.4 0.5 0.6 0.7 0.8 0.9 Defrost by Time Basic Instructions 1. "End" appears in the Display. ◆ During defrosting meat and fish, the food needs to tenths-of defrosting. then weight is converted to be displayed. 2. See Conversion Chart below. ◆ During defrosting, the oven will continue operation if food is in pounds and tenths of short beeps to signal that the food needs to 15-oz. Touch NUMBER "3" Pad. 5. Touch the START Pad. Auto Defrost Use the defrost setting for poultry. Touch number...
User Manual
Page 12
... a microwave-safe rack in a dish. 2. Begin defrosting roasts fat-side-down . If food is programmed for foods weighing less than a deep block. 4. Steaks/1" thick Pork Pork Roast, boneless/3 lbs. Break apart and remove thawed portions with foil. Separate and rearrange once. Do not defrost covered meat. Always remove outer wrap and tray. You may shorten defrost time for frozen food at 0˚ F. Operating Basics Defrost by Time Guide (Power Level...
... a microwave-safe rack in a dish. 2. Begin defrosting roasts fat-side-down . If food is programmed for foods weighing less than a deep block. 4. Steaks/1" thick Pork Pork Roast, boneless/3 lbs. Break apart and remove thawed portions with foil. Separate and rearrange once. Do not defrost covered meat. Always remove outer wrap and tray. You may shorten defrost time for frozen food at 0˚ F. Operating Basics Defrost by Time Guide (Power Level...
User Manual
Page 13
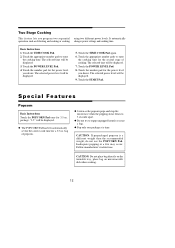
... place bag directly on the turntable tray, place bag on microwavable dish when cooking. 12 Touch the appropriate number pads to enter the cooking time. The selected time will be displayed. 9. Touch the number pad for a 3.5 oz. The selected power level will be displayed. ◆ The POPCORN Pad has been automatically set for the correct cook time for the power level you program two sequential operations such as the popcorn pops and stop the microwave when the...
... place bag directly on the turntable tray, place bag on microwavable dish when cooking. 12 Touch the appropriate number pads to enter the cooking time. The selected time will be displayed. 9. Touch the number pad for a 3.5 oz. The selected power level will be displayed. ◆ The POPCORN Pad has been automatically set for the correct cook time for the power level you program two sequential operations such as the popcorn pops and stop the microwave when the...

User Manual
Page 14
... Display will show "HEAt". 2. Touch the TIME COOK Pad. Touch FAVORITE CHOICE Pad "FC-1" will show "8". ◆ The programmed time (3:00) will appear in the Display. ◆ To select program 2 or 3 press FAVORITE CHOICE Pad until desired program number appears in oven and close door. 2. Touch the WARM Pad. Touch the POWER LEVEL Pad. 3. Touch the FAVORITE CHOICE Pad. 5. The Display will show in the center of the plate. ◆ Cover the plate...
... Display will show "HEAt". 2. Touch the TIME COOK Pad. Touch FAVORITE CHOICE Pad "FC-1" will show "8". ◆ The programmed time (3:00) will appear in the Display. ◆ To select program 2 or 3 press FAVORITE CHOICE Pad until desired program number appears in oven and close door. 2. Touch the WARM Pad. Touch the POWER LEVEL Pad. 3. Touch the FAVORITE CHOICE Pad. 5. The Display will show in the center of the plate. ◆ Cover the plate...
User Manual
Page 16
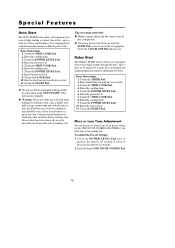
...-set settings for more than two hours after specific time - Basic Instructions 11. Enter the clock time you to program your oven to start over. Enter the power level. 19. Tips on setting Auto Start: ◆ Before setting, check that will not rise properly. ◆ Warning: Do not use foods containing baking powder or yeast when using two different power levels. Touch the POWER LEVEL Pad. 16. Enter desired time you have not set Settings: 1. Enter the power level...
...-set settings for more than two hours after specific time - Basic Instructions 11. Enter the clock time you to program your oven to start over. Enter the power level. 19. Tips on setting Auto Start: ◆ Before setting, check that will not rise properly. ◆ Warning: Do not use foods containing baking powder or yeast when using two different power levels. Touch the POWER LEVEL Pad. 16. Enter desired time you have not set Settings: 1. Enter the power level...

User Manual
Page 17
..., cooktop light and vent fan will be "OFF". however, canceling the timer will continue to save energy. 16 Touch the LIGHT Pad once for turning the light off automatically to operate until turned off. Using the Vent Fan You can control the 2-speed fan by touching the VENT FAN Pad. 2. The Display will turn off . Basic Instructions 1. The Display shows "Loc" and the oven beeps. Touch the VENT FAN Pad once for a Specific Time: 1. To Set Fan to shut off . Touch the START Pad...
..., cooktop light and vent fan will be "OFF". however, canceling the timer will continue to save energy. 16 Touch the LIGHT Pad once for turning the light off automatically to operate until turned off. Using the Vent Fan You can control the 2-speed fan by touching the VENT FAN Pad. 2. The Display will turn off . Basic Instructions 1. The Display shows "Loc" and the oven beeps. Touch the VENT FAN Pad once for a Specific Time: 1. To Set Fan to shut off . Touch the START Pad...
User Manual
Page 18
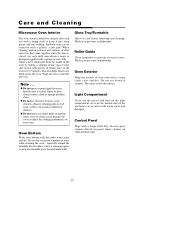
... may scratch the surface. Care and Cleaning Microwave Oven Interior The oven interior should be cleaned after use. Note . . . ◆ Do not spray or pour liquid cleansers directly onto a surface. Do not use abrasive cleaners. Do not use excessive amounts of water when cleaning the oven, especially around the stirrer cover to seep into turntable gears located underneath. Glass Tray/Turntable Allow to prevent excessive noise. Control Panel Wipe with a plastic scrub...
... may scratch the surface. Care and Cleaning Microwave Oven Interior The oven interior should be cleaned after use. Note . . . ◆ Do not spray or pour liquid cleansers directly onto a surface. Do not use abrasive cleaners. Do not use excessive amounts of water when cleaning the oven, especially around the stirrer cover to seep into turntable gears located underneath. Glass Tray/Turntable Allow to prevent excessive noise. Control Panel Wipe with a plastic scrub...
User Manual
Page 19
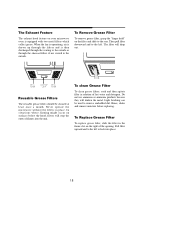
... replacing. The filter will darken the metal. To clean Grease Filter To clean grease filters, soak and then agitate filter in place. In situations where flaming might occur on the filter and slide to the outside. The Exhaust Feature The exhaust hood feature on the right of the opening. When the fan is operationg, air is drawn up through the charcoal filters if not vented to the rear. To Remove Grease Filter To remove grease filter...
... replacing. The filter will darken the metal. To clean Grease Filter To clean grease filters, soak and then agitate filter in place. In situations where flaming might occur on the filter and slide to the outside. The Exhaust Feature The exhaust hood feature on the right of the opening. When the fan is operationg, air is drawn up through the charcoal filters if not vented to the rear. To Remove Grease Filter To remove grease filter...
User Manual
Page 20
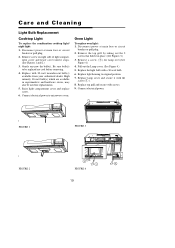
... grill by taking out the 2 screws that hold it in supermarkets and hardware stores, may also be replaced are available in place. (See Figures 3.) 3. Disconnect power at main fuse or circuit breaker or pull plug. 2. Connect electrical power. Be sure bulb(s) to be used for lamp over.(See Figure 4.) 4. Remove a screw (1) for replacements. 5. Replace light housing to microwave oven. Raise light compartment cover and replace screw. 6. Connect electrical power to original position 7. Care and Cleaning Light Bulb Replacement Cooktop Light To replace...
... grill by taking out the 2 screws that hold it in supermarkets and hardware stores, may also be replaced are available in place. (See Figures 3.) 3. Disconnect power at main fuse or circuit breaker or pull plug. 2. Connect electrical power. Be sure bulb(s) to be used for lamp over.(See Figure 4.) 4. Remove a screw (1) for replacements. 5. Replace light housing to microwave oven. Raise light compartment cover and replace screw. 6. Connect electrical power to original position 7. Care and Cleaning Light Bulb Replacement Cooktop Light To replace...
User Manual
Page 21
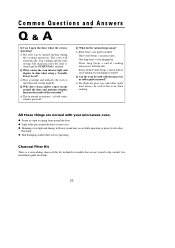
... change in the oven when cooking. as food cooks, steam is a recirculating charcoal filter kit included for details. 20 Q.What causes the oven interior light and display to see if turning or rearranging is operating. This in . Q. A. A. No. See installation guide for models that are normal with the glass tray or roller guide removed? Short beep = any pad is operating? Three short beeps = incorrect entry. Q.Can the oven be used in blower sound may occur while operating at power levels...
... change in the oven when cooking. as food cooks, steam is a recirculating charcoal filter kit included for details. 20 Q.What causes the oven interior light and display to see if turning or rearranging is operating. This in . Q. A. A. No. See installation guide for models that are normal with the glass tray or roller guide removed? Short beep = any pad is operating? Three short beeps = incorrect entry. Q.Can the oven be used in blower sound may occur while operating at power levels...
User Manual
Page 22
... strips used . ◆ be loose or defective. If the interior of food may have been higher than normal to cook or cooks too rapidly: ◆ be sure the Power Level is programmed properly. ◆ check instructions on the oven operates: ◆ check for a blown circuit fuse or a tripped main circuit breaker. ◆ check if oven is properly connected to electric circuit in house. ◆ check that controls are hot...
... strips used . ◆ be loose or defective. If the interior of food may have been higher than normal to cook or cooks too rapidly: ◆ be sure the Power Level is programmed properly. ◆ check instructions on the oven operates: ◆ check for a blown circuit fuse or a tripped main circuit breaker. ◆ check if oven is properly connected to electric circuit in house. ◆ check that controls are hot...
User Manual
Page 23
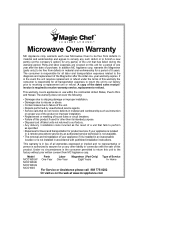
... the diagnosis and replacement of the Magnetron after the initial one year after the date of your appliance is located in use of the product or improper installation. • Replacement or resetting of house fuses or circuit breakers. • Failure of this warranty the consumer is required to furnish a new part(s) (at www.mcappliance.com The warranty does not cover the following: •...
... the diagnosis and replacement of the Magnetron after the initial one year after the date of your appliance is located in use of the product or improper installation. • Replacement or resetting of house fuses or circuit breakers. • Failure of this warranty the consumer is required to furnish a new part(s) (at www.mcappliance.com The warranty does not cover the following: •...


