User Manual
Page 3
... 3-9 Power Management in Windows OS 3-11 Energy Saving Tips...3-13 Basic Operations ...3-14 Safety and Comfort Tips...3-14 Having a Good Work Habit...3-15 Knowing the Keyboard ...3-16 Knowing the Touchpad ...3-23 About Hard Disk Drive...3-26 Connecting the External Devices 3-27 Using the External Optical Storage Device 3-27 Connecting the Peripheral...
... 3-9 Power Management in Windows OS 3-11 Energy Saving Tips...3-13 Basic Operations ...3-14 Safety and Comfort Tips...3-14 Having a Good Work Habit...3-15 Knowing the Keyboard ...3-16 Knowing the Touchpad ...3-23 About Hard Disk Drive...3-26 Connecting the External Devices 3-27 Using the External Optical Storage Device 3-27 Connecting the Peripheral...
User Manual
Page 24
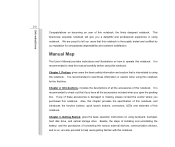
... of this notebook. Chapter 3, Getting Started, gives the basic operation instructions on becoming an user of installing and uninstalling the battery; Introductions 2-2 Congratulations on using keyboard, touchpad, hard disk drive, and optical storage drive.
... of this notebook. Chapter 3, Getting Started, gives the basic operation instructions on becoming an user of installing and uninstalling the battery; Introductions 2-2 Congratulations on using keyboard, touchpad, hard disk drive, and optical storage drive.
User Manual
Page 30
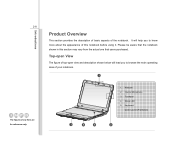
... will help you to know more about the appearance of the notebook. Internal Microphone 3. 2-8 The figures show here are for reference only. Webcam 2. Status LED 5. Keyboard / Quick Launch [Fn] Buttons 3 4 5 2 Touchpad 4. It will lead you to browse the main operating area of your notebook. 1 1.
... will help you to know more about the appearance of the notebook. Internal Microphone 3. 2-8 The figures show here are for reference only. Webcam 2. Status LED 5. Keyboard / Quick Launch [Fn] Buttons 3 4 5 2 Touchpad 4. It will lead you to browse the main operating area of your notebook. 1 1.
User Manual
Page 33
...the function status. Š Note that the functions listed here may vary depending on . Quick Launch [Fn] Buttons Use the [Fn] buttons on the keyboard to learn the Webcam function status. + ECO Engine (Power Saving) + Bluetooth/ WLAN/ WiMax (optional) Š While using the battery power, press and... hold the Fn button, and then press the F11 button repeatedly to turn the Webcam function on the model users purchased. 2-11 Introductions 5. Keyboard The built-in chapter 3 of this manual for the detailed information of this ECO Engine, Power Saving Function. Š Press and hold the...
...the function status. Š Note that the functions listed here may vary depending on . Quick Launch [Fn] Buttons Use the [Fn] buttons on the keyboard to learn the Webcam function status. + ECO Engine (Power Saving) + Bluetooth/ WLAN/ WiMax (optional) Š While using the battery power, press and... hold the Fn button, and then press the F11 button repeatedly to turn the Webcam function on the model users purchased. 2-11 Introductions 5. Keyboard The built-in chapter 3 of this manual for the detailed information of this ECO Engine, Power Saving Function. Š Press and hold the...
User Manual
Page 36
USB Port The USB port allows you to connect a LAN cable for network connection. Introductions 2-14 3. RJ-45 Connector The Ethernet connector is used to connect USB-interface peripheral devices, such as the mouse, keyboard, modem, portable hard disk module, printer and more. 4.
USB Port The USB port allows you to connect a LAN cable for network connection. Introductions 2-14 3. RJ-45 Connector The Ethernet connector is used to connect USB-interface peripheral devices, such as the mouse, keyboard, modem, portable hard disk module, printer and more. 4.

User Manual
Page 57
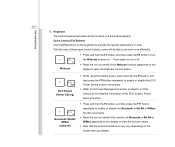
Cursor keys / Function keys Getting Started 3-16 Knowing the Keyboard This notebook provides a full-functioned keyboard. This keyboard can be divided into four categories: Typewriter keys, Cursor keys, Numeric keys and Function keys. Typewriter keys Numeric keys The keyboard shown here may vary from the actual one, depending on which county users purchase the notebook.
Cursor keys / Function keys Getting Started 3-16 Knowing the Keyboard This notebook provides a full-functioned keyboard. This keyboard can be divided into four categories: Typewriter keys, Cursor keys, Numeric keys and Function keys. Typewriter keys Numeric keys The keyboard shown here may vary from the actual one, depending on which county users purchase the notebook.
User Manual
Page 58
... used under DOS. Getting Started 3-17 Typewriter Keys In addition to providing the major function of the keyboard, these numeric keys to enter numbers and calculations. Numeric Keys Find the numeric keys among the keyboard, and activate the Num Lock function to use the numeric keys that are pressed, the corresponding LEDs...
... used under DOS. Getting Started 3-17 Typewriter Keys In addition to providing the major function of the keyboard, these numeric keys to enter numbers and calculations. Numeric Keys Find the numeric keys among the keyboard, and activate the Num Lock function to use the numeric keys that are pressed, the corresponding LEDs...

User Manual
Page 60
... menu and launching the shortcut menu. For more information of the cursor and move the following text left for one Application Logo key ( ) on the keyboard, which are use for one space.
... menu and launching the shortcut menu. For more information of the cursor and move the following text left for one Application Logo key ( ) on the keyboard, which are use for one space.
User Manual
Page 69
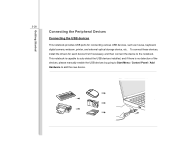
... to Start Menu / Control Panel / Add Hardware to the notebook. To connect these devices, install the drivers for connecting various USB devices, such as mouse, keyboard, digital camera, webcam, printer, and external optical storage device, etc. Getting Started 3-28 Connecting the Peripheral Devices Connecting the USB devices This notebook provides USB...
... to Start Menu / Control Panel / Add Hardware to the notebook. To connect these devices, install the drivers for connecting various USB devices, such as mouse, keyboard, digital camera, webcam, printer, and external optical storage device, etc. Getting Started 3-28 Connecting the Peripheral Devices Connecting the USB devices This notebook provides USB...
User Manual
Page 79
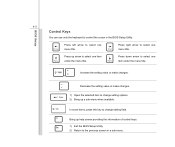
... key to change setting options. 2) Bring up arrow to select one item under the menu title. BIOS Setup 4-3 Control Keys You can use only the keyboard to control the cursor in a sub-menu. Press left arrow to select one menu title. Press right arrow to select one menu title.
... key to change setting options. 2) Bring up arrow to select one item under the menu title. BIOS Setup 4-3 Control Keys You can use only the keyboard to control the cursor in a sub-menu. Press left arrow to select one menu title. Press right arrow to select one menu title.
User Manual
Page 84
BIOS Setup 4-8 Š USB Configuration Select this item to enter the sub-menu: Legacy USB Support Selecting Enabled allows users to boot the system by USB device. or allows users to use USB devices, such as mouse, keyboard, or portable disk, in DOS system; Setting options: Enabled, Disabled and Auto.
BIOS Setup 4-8 Š USB Configuration Select this item to enter the sub-menu: Legacy USB Support Selecting Enabled allows users to boot the system by USB device. or allows users to use USB devices, such as mouse, keyboard, or portable disk, in DOS system; Setting options: Enabled, Disabled and Auto.


