User Manual
Page 24
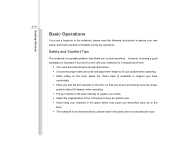
... the various external devices, communication devices, and so on, are proud to read these accessories is recommended to operate this notebook. Beside, the steps of these information or caution when using this notebook for unsurpassed dependability and customer satisfaction. Chapter 1, Preface, gives users the basic safety information and caution that if you...
... the various external devices, communication devices, and so on, are proud to read these accessories is recommended to operate this notebook. Beside, the steps of these information or caution when using this notebook for unsurpassed dependability and customer satisfaction. Chapter 1, Preface, gives users the basic safety information and caution that if you...
User Manual
Page 25
... may change without notice. If any item contained is damaged or missing, please contact your local dealer immediately. The package should contain the following items: Notebook Quick Start Manual High-capacity Li-ion battery AC/DC adapter and AC power cord Carry bag (optional) All-in the future. Introductions Chapter 4, BIOS...
... may change without notice. If any item contained is damaged or missing, please contact your local dealer immediately. The package should contain the following items: Notebook Quick Start Manual High-capacity Li-ion battery AC/DC adapter and AC power cord Carry bag (optional) All-in the future. Introductions Chapter 4, BIOS...
User Manual
Page 26
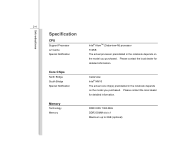
2-4 Introductions Specification CPU Support Processor L2 Cache Special Notification Intel® AtomTM (Cedarview-M) processor 512KB The actual processor preinstalled in the notebook depends on the model you purchased. Memory Technology Memory DDR3 800/ 1066 MHz DDR3 DIMM slot x 1 Maximum up to 2GB (optional) Please ... for detailed information. Core Chips North Bridge South Bridge Special Notification Cedarview Intel® NM10 The actual core chip(s) preinstalled in the notebook depends on the model you purchased. Please contact the local dealer for detailed information.
2-4 Introductions Specification CPU Support Processor L2 Cache Special Notification Intel® AtomTM (Cedarview-M) processor 512KB The actual processor preinstalled in the notebook depends on the model you purchased. Memory Technology Memory DDR3 800/ 1066 MHz DDR3 DIMM slot x 1 Maximum up to 2GB (optional) Please ... for detailed information. Core Chips North Bridge South Bridge Special Notification Cedarview Intel® NM10 The actual core chip(s) preinstalled in the notebook depends on the model you purchased. Please contact the local dealer for detailed information.
User Manual
Page 30
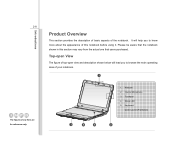
... 4. Webcam 2. Introductions Product Overview This section provides the description of basic aspects of this section may vary from the actual one that the notebook shown in this notebook before using it. Please be aware that users purchased. Keyboard / Quick Launch [Fn] Buttons 3 4 5 2 Status LED 5. Internal Microphone 3. It will lead you to browse...
... 4. Webcam 2. Introductions Product Overview This section provides the description of basic aspects of this section may vary from the actual one that the notebook shown in this notebook before using it. Please be aware that users purchased. Keyboard / Quick Launch [Fn] Buttons 3 4 5 2 Status LED 5. Internal Microphone 3. It will lead you to browse...

User Manual
Page 31
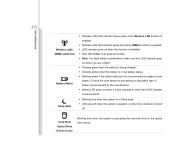
Status LED Bluetooth Š Bluetooth LED indicator glows blue when Bluetooth function is the pointing device of the notebook. 4. Touchpad This is enabled. Š Warning: For flight safety consideration, make sure this LED indicator goes out when you are in flight. Š Contact the ...
Status LED Bluetooth Š Bluetooth LED indicator glows blue when Bluetooth function is the pointing device of the notebook. 4. Touchpad This is enabled. Š Warning: For flight safety consideration, make sure this LED indicator goes out when you are in flight. Š Contact the ...
User Manual
Page 32
... a new battery. Hard Disk/ Optical Drive Device In-use Blinking blue when the system is turned off when the system is awaked, or when the notebook is accessing the hard disk drive or the optical drive device. Introductions 2-10 Wireless LAN / WiMax (optional) Battery Status Sleep State Š Wireless LAN LED...
... a new battery. Hard Disk/ Optical Drive Device In-use Blinking blue when the system is turned off when the system is awaked, or when the notebook is accessing the hard disk drive or the optical drive device. Introductions 2-10 Wireless LAN / WiMax (optional) Battery Status Sleep State Š Wireless LAN LED...
User Manual
Page 37
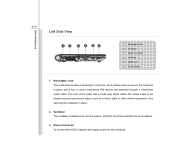
...cable has a small loop which allows users to be looped around a permanent object, such as a heavy table or other similar equipment, thus securing the notebook in place with a key or some mechanical PIN device and attached through a rubberised metal cable. DO NOT block the ventilator for the... notebook. Power Switch 1. Power Connector To connect the AC/DC adapter and supply power for air circulation. 3. Ventilator The ventilator is designed to cool the ...
...cable has a small loop which allows users to be looped around a permanent object, such as a heavy table or other similar equipment, thus securing the notebook in place with a key or some mechanical PIN device and attached through a rubberised metal cable. DO NOT block the ventilator for the... notebook. Power Switch 1. Power Connector To connect the AC/DC adapter and supply power for air circulation. 3. Ventilator The ventilator is designed to cool the ...

User Manual
Page 38
Power Switch Š Slide the power switch to the right to turn the notebook power ON or OFF. Š Slide the power switch to connect an external monitor or other standard VGA-compatible device (such as a projector) for PCs, ... Interface) is a new interface standard for a great view of the computer display. 5. VGA Port The 15-pin D-sub VGA port allows you to awake the notebook from the sleep state. Introductions 2-16 4.
Power Switch Š Slide the power switch to the right to turn the notebook power ON or OFF. Š Slide the power switch to connect an external monitor or other standard VGA-compatible device (such as a projector) for PCs, ... Interface) is a new interface standard for a great view of the computer display. 5. VGA Port The 15-pin D-sub VGA port allows you to awake the notebook from the sleep state. Introductions 2-16 4.

User Manual
Page 39
Introductions 2-17 Rear Side View 1 1. Battery Pack This notebook will be powered by the battery pack when the AC/DC adapter is disconnected. Battery Pack 1.
Introductions 2-17 Rear Side View 1 1. Battery Pack This notebook will be powered by the battery pack when the AC/DC adapter is disconnected. Battery Pack 1.

User Manual
Page 40
Battery Release Button It is disconnected. Battery Release Button 2. Battery Lock/ Unlock Button 1. Battery Pack This notebook will be powered by the battery pack when the AC/DC adapter is a bounce-back device as a preparation for releasing the battery pack. Battery Pack 3. Introductions 2-18 Bottom Side View 1 2 3 1. Slide it with one hand and pull the battery pack carefully with the other. 2.
Battery Release Button It is disconnected. Battery Release Button 2. Battery Lock/ Unlock Button 1. Battery Pack This notebook will be powered by the battery pack when the AC/DC adapter is a bounce-back device as a preparation for releasing the battery pack. Battery Pack 3. Introductions 2-18 Bottom Side View 1 2 3 1. Slide it with one hand and pull the battery pack carefully with the other. 2.

User Manual
Page 43
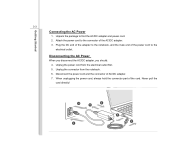
... that the AC/DC adapter included in the package is strongly recommended to connect the AC/DC adapter to it may damage either the notebook or other adapter model may produce a certain heat while in use . Getting Started 3-2 Power Management Connecting the AC power It is approved for the first ...
... that the AC/DC adapter included in the package is strongly recommended to connect the AC/DC adapter to it may damage either the notebook or other adapter model may produce a certain heat while in use . Getting Started 3-2 Power Management Connecting the AC power It is approved for the first ...
User Manual
Page 44
... When you disconnect the AC/DC adapter, you should: 4. Unpack the package to the connector of AC/DC adapter. 7. Unplug the power cord from the notebook. 6. Unplug the connector from the electrical outlet first. 5. Never pull the cord directly! 4 6 2 3 5 3 When unplugging the power cord, always hold... the connector part of the power cord to the notebook, and the male end of the cord. Plug the DC end of the adapter to the electrical outlet. Disconnect the power cord and the connector...
... When you disconnect the AC/DC adapter, you should: 4. Unpack the package to the connector of AC/DC adapter. 7. Unplug the power cord from the notebook. 6. Unplug the connector from the electrical outlet first. 5. Never pull the cord directly! 4 6 2 3 5 3 When unplugging the power cord, always hold... the connector part of the power cord to the notebook, and the male end of the cord. Plug the DC end of the adapter to the electrical outlet. Disconnect the power cord and the connector...
User Manual
Page 45
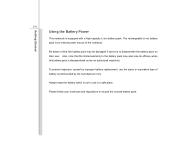
... may also lose its efficacy when this battery pack is not in a safe place. Getting Started 3-4 Using the Battery Power This notebook is an internal power source of the notebook. To prevent explosion caused by an authorized machinist. The rechargeable Li-ion battery pack is equipped with a high-capacity Li-ion battery...
... may also lose its efficacy when this battery pack is not in a safe place. Getting Started 3-4 Using the Battery Power This notebook is an internal power source of the notebook. To prevent explosion caused by an authorized machinist. The rechargeable Li-ion battery pack is equipped with a high-capacity Li-ion battery...
User Manual
Page 47
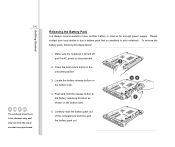
... to your local dealer to buy a battery pack that users purchased. Locate the battery release button on the bottom side. 5. Please contact your notebook. Make sure the notebook is turned off, and the AC power is disconnected. 2. Carefully slide the battery pack out of the compartment and then pull the battery pack...
... to your local dealer to buy a battery pack that users purchased. Locate the battery release button on the bottom side. 5. Please contact your notebook. Make sure the notebook is turned off, and the AC power is disconnected. 2. Carefully slide the battery pack out of the compartment and then pull the battery pack...
User Manual
Page 49
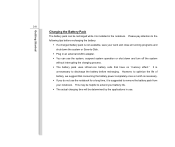
...138; If a charged battery pack is not available, save your battery life. Š The actual charging time will be determined by the applications in the notebook. It is unnecessary to -Disk. Š Plug in an external AC/DC adapter. Š You can be helpful to remove the battery pack from your... notebook. Please pay attention to the following tips before recharging. However, to optimize the life of battery, we suggest that have no "memory effect." This ...
...138; If a charged battery pack is not available, save your battery life. Š The actual charging time will be determined by the applications in the notebook. It is unnecessary to -Disk. Š Plug in an external AC/DC adapter. Š You can be helpful to remove the battery pack from your... notebook. Please pay attention to the following tips before recharging. However, to optimize the life of battery, we suggest that have no "memory effect." This ...
User Manual
Page 50
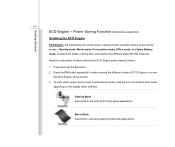
... ECO Engine power saving function: 1. Gaming Mode Select this mode while playing multimedia applications Getting Started 3-9 ECO Engine -- Read the instructions bellow to turn this notebook. Press and hold the Fn button. 2. Movie Mode Select this mode while performing game applications. Power Saving Function (Optionally supported) Enabling the ECO Engine ECO...
... ECO Engine power saving function: 1. Gaming Mode Select this mode while playing multimedia applications Getting Started 3-9 ECO Engine -- Read the instructions bellow to turn this notebook. Press and hold the Fn button. 2. Movie Mode Select this mode while performing game applications. Power Saving Function (Optionally supported) Enabling the ECO Engine ECO...
User Manual
Page 55
... comfortable during the operations. However, choosing a good workspace is an electrical device, please treat it with your notebook for a long period of the LCD panel to have an optimal view. Š Avoid using your notebook in the space where may cause you discomfort (such as on the bed). Š The... notebook is important if you are a beginner to the notebook, please read the following instructions to assure your wrists. Š Adjust the ...
... comfortable during the operations. However, choosing a good workspace is an electrical device, please treat it with your notebook for a long period of the LCD panel to have an optimal view. Š Avoid using your notebook in the space where may cause you discomfort (such as on the bed). Š The... notebook is important if you are a beginner to the notebook, please read the following instructions to assure your wrists. Š Adjust the ...

User Manual
Page 56
Please keep a good posture. 3 5. Getting Started 3-15 1. Sit straight and keep the following tips in mind when operating. Š Change your notebook for a period of LCD panel. 3. Adjust the angle and position of time. otherwise, it may cause discomfort or injury to you body regularly. Š Remember ...
Please keep a good posture. 3 5. Getting Started 3-15 1. Sit straight and keep the following tips in mind when operating. Š Change your notebook for a period of LCD panel. 3. Adjust the angle and position of time. otherwise, it may cause discomfort or injury to you body regularly. Š Remember ...

User Manual
Page 57
Typewriter keys Numeric keys The keyboard shown here may vary from the actual one, depending on which county users purchase the notebook. Cursor keys / Function keys This keyboard can be divided into four categories: Typewriter keys, Cursor keys, Numeric keys and Function keys. Getting Started 3-16 Knowing the Keyboard This notebook provides a full-functioned keyboard.
Typewriter keys Numeric keys The keyboard shown here may vary from the actual one, depending on which county users purchase the notebook. Cursor keys / Function keys This keyboard can be divided into four categories: Typewriter keys, Cursor keys, Numeric keys and Function keys. Getting Started 3-16 Knowing the Keyboard This notebook provides a full-functioned keyboard.
User Manual
Page 64
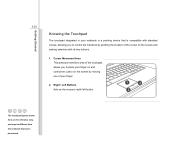
... the screen by pointing the location of the cursor on the screen and making selection with standard mouse, allowing you to control the notebook by moving one of your notebook is compatible with its two buttons. 1. Right / Left Buttons Acts as the mouse's right/ left button. 1 2 2 The touchpad figures shown here are...
... the screen by pointing the location of the cursor on the screen and making selection with standard mouse, allowing you to control the notebook by moving one of your notebook is compatible with its two buttons. 1. Right / Left Buttons Acts as the mouse's right/ left button. 1 2 2 The touchpad figures shown here are...


