User Guide
Page 6
... the product. • Do not store this battery into a municipal waste system. Reverse insertion of any "dead" batteries because they can result in the instruction manual. Check with metal objects when handling the battery. Released electrolyte is rechargeable and can cause burns or irritation to recharge the battery cell by heating...
... the product. • Do not store this battery into a municipal waste system. Reverse insertion of any "dead" batteries because they can result in the instruction manual. Check with metal objects when handling the battery. Released electrolyte is rechargeable and can cause burns or irritation to recharge the battery cell by heating...
User Guide
Page 26
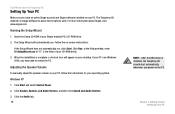
... If the Setup Wizard does not automatically run . Click the Audio tab. 16 NOTE: After the USB driver is the letter of your PC. Insert the Setup CD-ROM in your operating system. Chapter ....exe (if "D" is installed, the Telephony Kit should start automatically whenever you may need to place Internet phone calls. Click Sounds, Speech, and Audio Devices, and then click Sound and Audio Devices. 3. Dual-Mode... CD-ROM drive. 2. Adjusting the Speaker Volume To manually adjust the speaker volume on -screen instructions. Windows XP 1. Click Start and select Control Panel. 2.
... If the Setup Wizard does not automatically run . Click the Audio tab. 16 NOTE: After the USB driver is the letter of your PC. Insert the Setup CD-ROM in your operating system. Chapter ....exe (if "D" is installed, the Telephony Kit should start automatically whenever you may need to place Internet phone calls. Click Sounds, Speech, and Audio Devices, and then click Sound and Audio Devices. 3. Dual-Mode... CD-ROM drive. 2. Adjusting the Speaker Volume To manually adjust the speaker volume on -screen instructions. Windows XP 1. Click Start and select Control Panel. 2.
User Guide
Page 29
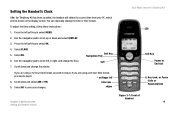
... Power or End Call #, Key Lock, or Pause Calls or Speakerphone Chapter 3: Getting Started Setting the Handset's Clock Figure 3-7: Front of Handset 19 You can manually change the hour. 7.
... Power or End Call #, Key Lock, or Pause Calls or Speakerphone Chapter 3: Getting Started Setting the Handset's Clock Figure 3-7: Front of Handset 19 You can manually change the hour. 7.
User Guide
Page 62
... be shown on the navigation pad, and change the time or time format. Select OK. 6. Dual-Mode Internet Telephony Kit Customizing the Handset You can manually change the hour. 7. Select CLOCK. 5. Press down and change the minute. To adjust the time setting, follow these instructions: 1.
... be shown on the navigation pad, and change the time or time format. Select OK. 6. Dual-Mode Internet Telephony Kit Customizing the Handset You can manually change the hour. 7. Select CLOCK. 5. Press down and change the minute. To adjust the time setting, follow these instructions: 1.
User Guide
Page 76
... so you make an outgoing call , you can set it will be used as a prefix of any outgoing number. 7. For example, if you have to manually dial "9" first anymore. 1. Select ADVANCED. 3. Dual-Mode Internet Telephony Kit 5. Select OK. 66 Chapter 4: Using the Dual-Mode Internet Telephony Kit Using Advanced Features...
... so you make an outgoing call , you can set it will be used as a prefix of any outgoing number. 7. For example, if you have to manually dial "9" first anymore. 1. Select ADVANCED. 3. Dual-Mode Internet Telephony Kit 5. Select OK. 66 Chapter 4: Using the Dual-Mode Internet Telephony Kit Using Advanced Features...