User Guide
Page 1
CIT300 User Guide Dual-Mode Internet Telephony Kit Voice Model No.
CIT300 User Guide Dual-Mode Internet Telephony Kit Voice Model No.
User Guide
Page 3
...Sample Figure Description Figure numbers and descriptions can also be found in the U.S. Dual-Mode Internet Telephony Kit CIT300-UG-60519A DF Other brands and product names are subject to while using the Dual-Mode Internet Telephony Kit. and/or its affiliates in the "List of Figures"... Also, each figure (diagram, screenshot, or other countries. Look for technical terms that could damage your property or Dual-Mode Internet Telephony Kit. Linksys is something you should pay special attention to change without notice. This checkmark means there is a note of interest and...
...Sample Figure Description Figure numbers and descriptions can also be found in the U.S. Dual-Mode Internet Telephony Kit CIT300-UG-60519A DF Other brands and product names are subject to while using the Dual-Mode Internet Telephony Kit. and/or its affiliates in the "List of Figures"... Also, each figure (diagram, screenshot, or other countries. Look for technical terms that could damage your property or Dual-Mode Internet Telephony Kit. Linksys is something you should pay special attention to change without notice. This checkmark means there is a note of interest and...
User Guide
Page 7
Table of Contents Chapter 1: Introduction Welcome What's in This User Guide? Chapter 2: Getting to Know the Dual-Mode Internet Telephony Kit Overview The Charger The USB Base Station The Handset's Front Panel The Handset's Side Panel The Handset's Back Panel The Handset's Display ... Overview Before You Begin Getting Started with the Handset Getting Started with the USB Base Station Powering On the Handset Setting Up Your PC Using the Telephony Kit Setting the Handset's Clock Chapter 4: Using the Dual-Mode Internet Telephony Kit Overview Dual-Mode Internet Telephony Kit 1 1 2 3 3 3 4 5 6 7 8 ...
Table of Contents Chapter 1: Introduction Welcome What's in This User Guide? Chapter 2: Getting to Know the Dual-Mode Internet Telephony Kit Overview The Charger The USB Base Station The Handset's Front Panel The Handset's Side Panel The Handset's Back Panel The Handset's Display ... Overview Before You Begin Getting Started with the Handset Getting Started with the USB Base Station Powering On the Handset Setting Up Your PC Using the Telephony Kit Setting the Handset's Clock Chapter 4: Using the Dual-Mode Internet Telephony Kit Overview Dual-Mode Internet Telephony Kit 1 1 2 3 3 3 4 5 6 7 8 ...

User Guide
Page 8
Dual-Mode Internet Telephony Kit Using the Handset 21 Making Skype Calls 24 Making Landline Calls 27 Making Skype or Landline Calls 29 Using the Phonebook 31 ...
Dual-Mode Internet Telephony Kit Using the Handset 21 Making Skype Calls 24 Making Landline Calls 27 Making Skype or Landline Calls 29 Using the Phonebook 31 ...
User Guide
Page 9
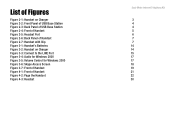
List of Figures Figure 2-1: Handset on Charger Figure 2-2: Front Panel of USB Base Station Figure 2-3: Back Panel of USB Base Station Figure 2-4: Front of Handset Figure 2-5: Headset Port Figure 2-6: Back Panel of Handset Figure 2-7: Handset with Clip Figure 3-1: Handset's Batteries Figure 3-2: Handset on Charger ... 2000 Figure 3-5: Volume Control for Windows 2000 Figure 3-6: Skype Access Screen Figure 3-7: Front of Handset Figure 4-1: Front of Handset Figure 4-2: Page the Handset Figure 4-3: Headset Dual-Mode Internet Telephony Kit 3 4 4 5 6 7 7 14 14 15 17 17 18 19 21 22 30
List of Figures Figure 2-1: Handset on Charger Figure 2-2: Front Panel of USB Base Station Figure 2-3: Back Panel of USB Base Station Figure 2-4: Front of Handset Figure 2-5: Headset Port Figure 2-6: Back Panel of Handset Figure 2-7: Handset with Clip Figure 3-1: Handset's Batteries Figure 3-2: Handset on Charger ... 2000 Figure 3-5: Volume Control for Windows 2000 Figure 3-6: Skype Access Screen Figure 3-7: Front of Handset Figure 4-1: Front of Handset Figure 4-2: Page the Handset Figure 4-3: Headset Dual-Mode Internet Telephony Kit 3 4 4 5 6 7 7 14 14 15 17 17 18 19 21 22 30
User Guide
Page 11
...handset can hit the mute button for choosing the Linksys Dual-Mode Internet Telephony Kit. The Telephony Kit also supports SkypeOut™ dialing and works as a regular phone. With the Skype application running on its charger, and a USB base station. The Telephony Kit gives you cordless ...don't have a Skype, SkypeIn™, or landline call coming in, and it provides caller ID. The Linksys Dual-Mode Internet Telephony Kit gives you to make phone calls using USB, and then connect its LINE port to a telephone wall jack. Chapter 1: Introduction Welcome Thank you for ...
...handset can hit the mute button for choosing the Linksys Dual-Mode Internet Telephony Kit. The Telephony Kit also supports SkypeOut™ dialing and works as a regular phone. With the Skype application running on its charger, and a USB base station. The Telephony Kit gives you cordless ...don't have a Skype, SkypeIn™, or landline call coming in, and it provides caller ID. The Linksys Dual-Mode Internet Telephony Kit gives you to make phone calls using USB, and then connect its LINE port to a telephone wall jack. Chapter 1: Introduction Welcome Thank you for ...
User Guide
Page 12
...8226; Chapter 3: Getting Started This chapter explains how to connect and set up the Telephony Kit. • Chapter 4: Using the Dual-Mode Internet Telephony Kit This chapter discusses how to make calls and configure different features of the Telephony Kit. • Appendix A: Troubleshooting ... information regarding the Telephony Kit. • Appendix E: Contact Information This appendix provides contact information for a variety of Linksys resources, including Technical Support. 2 Chapter 1: Introduction What's in This User Guide? Dual-Mode Internet Telephony Kit What's in This User Guide?
...8226; Chapter 3: Getting Started This chapter explains how to connect and set up the Telephony Kit. • Chapter 4: Using the Dual-Mode Internet Telephony Kit This chapter discusses how to make calls and configure different features of the Telephony Kit. • Appendix A: Troubleshooting ... information regarding the Telephony Kit. • Appendix E: Contact Information This appendix provides contact information for a variety of Linksys resources, including Technical Support. 2 Chapter 1: Introduction What's in This User Guide? Dual-Mode Internet Telephony Kit What's in This User Guide?
User Guide
Page 13
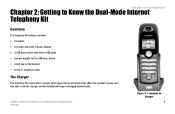
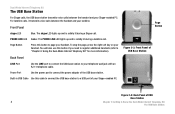
... Figure 2-1: Handset on Charger 3 Chapter 2: Getting to Know the Dual-Mode Internet Telephony Kit Overview The Telephony Kit includes six items: • A handset • A charger with built-in power adapter • A USB base station with built-in USB cable • A power adapter for the USB base station • A belt clip for the handset • An...
... Figure 2-1: Handset on Charger 3 Chapter 2: Getting to Know the Dual-Mode Internet Telephony Kit Overview The Telephony Kit includes six items: • A handset • A charger with built-in power adapter • A USB base station with built-in USB cable • A power adapter for the USB base station • A belt clip for the handset • An...
User Guide
Page 14
... soft key on your handset. Front Panel skype LED Blue. PHONE LINE LED Amber. The PHONE LINE LED lights up and is solidly lit during a Skype call . You will also use this cable to connect the USB base station to "Chapter 4: Using the Dual-Mode Internet Telephony Kit" for more information). Back Panel LINE Port...
... soft key on your handset. Front Panel skype LED Blue. PHONE LINE LED Amber. The PHONE LINE LED lights up and is solidly lit during a Skype call . You will also use this cable to connect the USB base station to "Chapter 4: Using the Dual-Mode Internet Telephony Kit" for more information). Back Panel LINE Port...
User Guide
Page 15
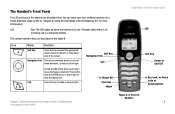
... menus in this key to make or answer calls. * or Ringer Off Intercom skype Dual-Mode Internet Telephony Kit LED Soft Key Power or End Call #, Key Lock, or Pause Calls or Speakerphone Chapter ...2: Getting to Know the Dual-Mode Internet Telephony Kit The Handset's Front Panel Figure 2-4: Front of Handset 5 The Handset's Front Panel...The LED lights up to four cordless handsets for a single USB base station (refer to "Chapter 4: Using the Dual-Mode Internet Telephony Kit" for more information). It flashes when there is in use.
... menus in this key to make or answer calls. * or Ringer Off Intercom skype Dual-Mode Internet Telephony Kit LED Soft Key Power or End Call #, Key Lock, or Pause Calls or Speakerphone Chapter ...2: Getting to Know the Dual-Mode Internet Telephony Kit The Handset's Front Panel Figure 2-4: Front of Handset 5 The Handset's Front Panel...The LED lights up to four cordless handsets for a single USB base station (refer to "Chapter 4: Using the Dual-Mode Internet Telephony Kit" for more information). It flashes when there is in use.
User Guide
Page 16
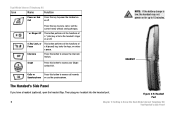
... keys, or enters a pause. The Handset's Side Panel If you have a headset (optional), open the headset flap. Figure 2-5: Headset Port 6 Chapter 2: Getting to Know the Dual-Mode Internet Telephony Kit The Handset's Side Panel Dual-Mode Internet Telephony Kit Icon Name Function Power or End Press this button to access the intercom feature.
... keys, or enters a pause. The Handset's Side Panel If you have a headset (optional), open the headset flap. Figure 2-5: Headset Port 6 Chapter 2: Getting to Know the Dual-Mode Internet Telephony Kit The Handset's Side Panel Dual-Mode Internet Telephony Kit Icon Name Function Power or End Press this button to access the intercom feature.
User Guide
Page 17
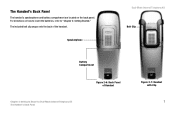
The Handset's Back Panel The handset's speakerphone and battery compartment are located on how to insert the batteries, refer to Know the Dual-Mode Internet Telephony Kit The Handset's Back Panel Figure 2-6: Back Panel of the handset. Speakerphone Dual-Mode Internet Telephony Kit Belt Clip Battery Compartment Chapter 2: Getting to "Chapter 3: Getting Started." For directions on the back panel. The included belt clip snaps onto the back of Handset Figure 2-7: Handset with Clip 7
The Handset's Back Panel The handset's speakerphone and battery compartment are located on how to insert the batteries, refer to Know the Dual-Mode Internet Telephony Kit The Handset's Back Panel Figure 2-6: Back Panel of the handset. Speakerphone Dual-Mode Internet Telephony Kit Belt Clip Battery Compartment Chapter 2: Getting to "Chapter 3: Getting Started." For directions on the back panel. The included belt clip snaps onto the back of Handset Figure 2-7: Handset with Clip 7
User Guide
Page 18
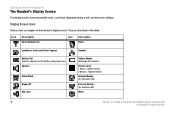
... volume 5 blocks = highest volume Internal Melody (for intercom calls) External Melody (for settings. Display Screen Icons Various icons can appear on the handset's display screen. Dual-Mode Internet Telephony Kit The Handset's Display Screen The display screen shows descriptive icons, a call timer (displayed during a call), and menus for landline calls...
... volume 5 blocks = highest volume Internal Melody (for intercom calls) External Melody (for settings. Display Screen Icons Various icons can appear on the handset's display screen. Dual-Mode Internet Telephony Kit The Handset's Display Screen The display screen shows descriptive icons, a call timer (displayed during a call), and menus for landline calls...
User Guide
Page 19
Chapter 2: Getting to Know the Dual-Mode Internet Telephony Kit The Handset's Display Screen Dual-Mode Internet Telephony Kit 9 Icon Description Home Phone/Landline Icon Description Volume Mobile Phone Display Contrast Gender Office Phone Address (Country, State/Province, City) Birthday USB Base Station/Skype Melody Language Landline Voicemail Online Status Skype Voicemail/Retrieved Skype Voicemail Skype Call in Progress New Skype Voicemail Skype ID Time Call Timer When you are on a call, the call timer shows the duration of your current call.
Chapter 2: Getting to Know the Dual-Mode Internet Telephony Kit The Handset's Display Screen Dual-Mode Internet Telephony Kit 9 Icon Description Home Phone/Landline Icon Description Volume Mobile Phone Display Contrast Gender Office Phone Address (Country, State/Province, City) Birthday USB Base Station/Skype Melody Language Landline Voicemail Online Status Skype Voicemail/Retrieved Skype Voicemail Skype Call in Progress New Skype Voicemail Skype ID Time Call Timer When you are on a call, the call timer shows the duration of your current call.
User Guide
Page 20
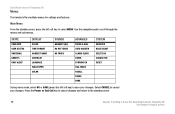
Main Menu From the standby screen, press the left soft key) to Know the Dual-Mode Internet Telephony Kit The Handset's Display Screen Dual-Mode Internet Telephony Kit Menus The handset offers multiple menus for settings and features. Select CANCEL to select MENU. Press the Power or End Call ...HANDSET (HS) HS KEY TONES HS TONES ADVANCED TOUCH & DIAL AUTO ANSWER ALARM CLOCK TIMER STOPWATCH DIAL MODE RECALL PAUSE PABX SYSTEM REGISTER BASE SELECT DELETE HS CHANGE PIN RESET During menu mode, select OK or SAVE (press the left soft key to cancel your changes. Use the navigation pad to...
Main Menu From the standby screen, press the left soft key) to Know the Dual-Mode Internet Telephony Kit The Handset's Display Screen Dual-Mode Internet Telephony Kit Menus The handset offers multiple menus for settings and features. Select CANCEL to select MENU. Press the Power or End Call ...HANDSET (HS) HS KEY TONES HS TONES ADVANCED TOUCH & DIAL AUTO ANSWER ALARM CLOCK TIMER STOPWATCH DIAL MODE RECALL PAUSE PABX SYSTEM REGISTER BASE SELECT DELETE HS CHANGE PIN RESET During menu mode, select OK or SAVE (press the left soft key to cancel your changes. Use the navigation pad to...
User Guide
Page 21
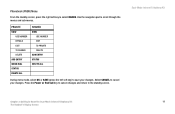
... TO SHARED DELETE ADD ENTRY QUICK DIAL STATUS DELETE ALL SHARED VIEW USE NUMBER EDIT TO PRIVATE DELETE ADD ENTRY STATUS DELETE ALL During menu mode, select OK or SAVE (press the left soft key) to cancel your changes. Select CANCEL to save your changes. Phonebook (PHBK) Menu From the standby...
... TO SHARED DELETE ADD ENTRY QUICK DIAL STATUS DELETE ALL SHARED VIEW USE NUMBER EDIT TO PRIVATE DELETE ADD ENTRY STATUS DELETE ALL During menu mode, select OK or SAVE (press the left soft key) to cancel your changes. Select CANCEL to save your changes. Phonebook (PHBK) Menu From the standby...

User Guide
Page 22
... TO SHARED DELETE TO PRIVATE TO SHARED DELETE CLEAR ALL DELETE CALLS MISSED DIALED RECEIVED VMWI (VoiceMail Waiting Indication) ALL CALLS During menu mode, select OK or SAVE (press the left soft key) to the standby screen. Proceed to "Chapter 3: Getting Started." 12 Chapter ... Getting to scroll through the menus and sub-menus. Use the navigation pad to Know the Dual-Mode Internet Telephony Kit The Handset's Display Screen Select CANCEL to access the call records. Dual-Mode Internet Telephony Kit Call Records Menu Press the Calls or Speakerphone button to cancel your changes....
... TO SHARED DELETE TO PRIVATE TO SHARED DELETE CLEAR ALL DELETE CALLS MISSED DIALED RECEIVED VMWI (VoiceMail Waiting Indication) ALL CALLS During menu mode, select OK or SAVE (press the left soft key) to the standby screen. Proceed to "Chapter 3: Getting Started." 12 Chapter ... Getting to scroll through the menus and sub-menus. Use the navigation pad to Know the Dual-Mode Internet Telephony Kit The Handset's Display Screen Select CANCEL to access the call records. Dual-Mode Internet Telephony Kit Call Records Menu Press the Calls or Speakerphone button to cancel your changes....
User Guide
Page 23
...with the following: • Windows 2000 or XP • Skype software (www.skype.com) • High-speed Internet connection • Available USB port If you have an available telephone wall jack. Chapter 3: Getting Started Overview Run the Setup Wizard on the Setup CD-ROM for installation of... the Telephony Kit. If you wish, you have traditional phone service (a landline), make sure you can follow the instructions in this chapter and run the Setup Wizard when instructed to do so. Dual-Mode Internet Telephony Kit Chapter 3: Getting Started 13 Overview
...with the following: • Windows 2000 or XP • Skype software (www.skype.com) • High-speed Internet connection • Available USB port If you have an available telephone wall jack. Chapter 3: Getting Started Overview Run the Setup Wizard on the Setup CD-ROM for installation of... the Telephony Kit. If you wish, you have traditional phone service (a landline), make sure you can follow the instructions in this chapter and run the Setup Wizard when instructed to do so. Dual-Mode Internet Telephony Kit Chapter 3: Getting Started 13 Overview
User Guide
Page 24
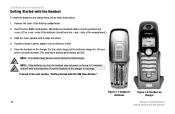
... If the batteries are correct. (The + and - Place the handset on Charger 14 Chapter 3: Getting Started Getting Started with the USB Base Station." Make sure the polarities are low, the handset may become warm during the initial charge. slots of the batteries should be...included). NOTE: The handset may not power on the charger. Slide the cover upward until it snaps into an electrical outlet. 5. Dual-Mode Internet Telephony Kit Getting Started with the Handset To insert the batteries and charge them, follow these instructions: 1. This maximizes battery performance ...
... If the batteries are correct. (The + and - Place the handset on Charger 14 Chapter 3: Getting Started Getting Started with the USB Base Station." Make sure the polarities are low, the handset may become warm during the initial charge. slots of the batteries should be...included). NOTE: The handset may not power on the charger. Slide the cover upward until it snaps into an electrical outlet. 5. Dual-Mode Internet Telephony Kit Getting Started with the Handset To insert the batteries and charge them, follow these instructions: 1. This maximizes battery performance ...
User Guide
Page 25
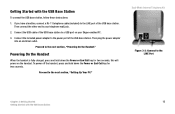
... included power adapter to the power port of the USB base station. Then plug the power adapter into an electrical outlet. Dual-Mode Internet Telephony Kit Figure 3-3: Connect to the next section, "Setting Up Your PC." Getting Started with the USB Base Station Powering On the Handset When the handset is...If you have a landline, connect a RJ-11 telephone cable (included) to a USB port on the handset. Proceed to your Skype-enabled PC. 3. Connect the USB cable of the USB base station to the LINE port of the USB base station. To power off the handset, press and hold down the Power or...
... included power adapter to the power port of the USB base station. Then plug the power adapter into an electrical outlet. Dual-Mode Internet Telephony Kit Figure 3-3: Connect to the next section, "Setting Up Your PC." Getting Started with the USB Base Station Powering On the Handset When the handset is...If you have a landline, connect a RJ-11 telephone cable (included) to a USB port on the handset. Proceed to your Skype-enabled PC. 3. Connect the USB cable of the USB base station to the LINE port of the USB base station. To power off the handset, press and hold down the Power or...