User Guide
Page 5
... placed near or over a radiator or heat register. • This product should be abused by persons with pacemakers. • Due to the radio signals between base station and handset, wearers of hearing aids may experience interference in the vicinity of the leak. • Do not use this product on the power...
... placed near or over a radiator or heat register. • This product should be abused by persons with pacemakers. • Due to the radio signals between base station and handset, wearers of hearing aids may experience interference in the vicinity of the leak. • Do not use this product on the power...
User Guide
Page 7
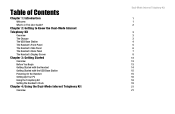
... Panel The Handset's Back Panel The Handset's Display Screen Chapter 3: Getting Started Overview Before You Begin Getting Started with the Handset Getting Started with the USB Base Station Powering On the Handset Setting Up Your PC Using the Telephony Kit Setting the Handset's Clock Chapter 4: Using the Dual-Mode Internet Telephony Kit...
... Panel The Handset's Back Panel The Handset's Display Screen Chapter 3: Getting Started Overview Before You Begin Getting Started with the Handset Getting Started with the USB Base Station Powering On the Handset Setting Up Your PC Using the Telephony Kit Setting the Handset's Clock Chapter 4: Using the Dual-Mode Internet Telephony Kit...
User Guide
Page 9
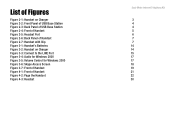
List of Figures Figure 2-1: Handset on Charger Figure 2-2: Front Panel of USB Base Station Figure 2-3: Back Panel of USB Base Station Figure 2-4: Front of Handset Figure 2-5: Headset Port Figure 2-6: Back Panel of Handset Figure 2-7: Handset with Clip Figure 3-1: Handset's Batteries Figure 3-2: Handset on Charger Figure 3-3: ...
List of Figures Figure 2-1: Handset on Charger Figure 2-2: Front Panel of USB Base Station Figure 2-3: Back Panel of USB Base Station Figure 2-4: Front of Handset Figure 2-5: Headset Port Figure 2-6: Back Panel of Handset Figure 2-7: Handset with Clip Figure 3-1: Handset's Batteries Figure 3-2: Handset on Charger Figure 3-3: ...
User Guide
Page 11
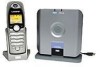
... 1: Introduction Welcome Thank you to make phone calls using USB, and then connect its LINE port to let everyone join in. With the Skype application running on your computer, the handset can hit the mute button for choosing the Linksys Dual-Mode Internet Telephony Kit. It rings...a handset, its display. The Telephony Kit also supports SkypeOut™ dialing and works as a regular phone. You can display your contact list on its charger, and a USB base station. The Linksys Dual-Mode Internet Telephony Kit gives you all the functionality of your contact, press the Skype button, ...
... 1: Introduction Welcome Thank you to make phone calls using USB, and then connect its LINE port to let everyone join in. With the Skype application running on your computer, the handset can hit the mute button for choosing the Linksys Dual-Mode Internet Telephony Kit. It rings...a handset, its display. The Telephony Kit also supports SkypeOut™ dialing and works as a regular phone. You can display your contact list on its charger, and a USB base station. The Linksys Dual-Mode Internet Telephony Kit gives you all the functionality of your contact, press the Skype button, ...
User Guide
Page 13
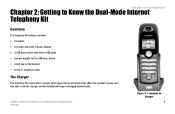
... Internet Telephony Kit Overview The Telephony Kit includes six items: • A handset • A charger with built-in power adapter • A USB base station with built-in USB cable • A power adapter for the USB base station • A belt clip for the handset • An RJ-11 telephone cable The Charger The Telephony Kit comes with...
... Internet Telephony Kit Overview The Telephony Kit includes six items: • A handset • A charger with built-in power adapter • A USB base station with built-in USB cable • A power adapter for the USB base station • A belt clip for the handset • An RJ-11 telephone cable The Charger The Telephony Kit comes with...
User Guide
Page 14
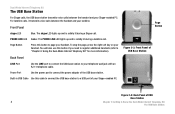
...your telephone wall jack with an RJ-11 telephone cable. PHONE LINE LED Amber. Back Panel LINE Port Use the LINE port to connect the USB base station to Know the Dual-Mode Internet Telephony Kit The USB Base Station Power Port Use the power port to connect the power... adapter of USB Base Station 4 Chapter 2: Getting to your landline. Page Button Figure 2-2: Front Panel of USB Base Station Figure 2-3: Back Panel of the USB base station. The PHONE LINE LED lights up and is...
...your telephone wall jack with an RJ-11 telephone cable. PHONE LINE LED Amber. Back Panel LINE Port Use the LINE port to connect the USB base station to Know the Dual-Mode Internet Telephony Kit The USB Base Station Power Port Use the power port to connect the power... adapter of USB Base Station 4 Chapter 2: Getting to your landline. Page Button Figure 2-2: Front Panel of USB Base Station Figure 2-3: Back Panel of the USB base station. The PHONE LINE LED lights up and is...
User Guide
Page 15
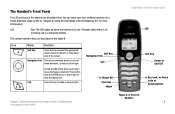
... view the DIALED list. The Handset's Front Panel The LED and keys of the screen. The LED lights up to four cordless handsets for a single USB base station (refer to right. LED Red. or right-hand side of the handset are described in up or down directions, as well as left to...
... view the DIALED list. The Handset's Front Panel The LED and keys of the screen. The LED lights up to four cordless handsets for a single USB base station (refer to right. LED Red. or right-hand side of the handset are described in up or down directions, as well as left to...
User Guide
Page 18
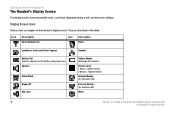
... landline calls) Mode 8 Chapter 2: Getting to Know the Dual-Mode Internet Telephony Kit The Handset's Display Screen They are described in this table: Icon Description Base/Handset Link Icon Description Name Landline or Intercom Call in Progress Number Battery Full (This bar shortens as the battery charge runs low.) Speaker Alarm...
... landline calls) Mode 8 Chapter 2: Getting to Know the Dual-Mode Internet Telephony Kit The Handset's Display Screen They are described in this table: Icon Description Base/Handset Link Icon Description Name Landline or Intercom Call in Progress Number Battery Full (This bar shortens as the battery charge runs low.) Speaker Alarm...
User Guide
Page 19
Icon Description Home Phone/Landline Icon Description Volume Mobile Phone Display Contrast Gender Office Phone Address (Country, State/Province, City) Birthday USB Base Station/Skype Melody Language Landline Voicemail Online Status Skype Voicemail/Retrieved Skype Voicemail Skype Call in Progress New Skype Voicemail Skype ID Time Call Timer When you are on a call, the call timer shows the duration of your current call. Chapter 2: Getting to Know the Dual-Mode Internet Telephony Kit The Handset's Display Screen Dual-Mode Internet Telephony Kit 9
Icon Description Home Phone/Landline Icon Description Volume Mobile Phone Display Contrast Gender Office Phone Address (Country, State/Province, City) Birthday USB Base Station/Skype Melody Language Landline Voicemail Online Status Skype Voicemail/Retrieved Skype Voicemail Skype Call in Progress New Skype Voicemail Skype ID Time Call Timer When you are on a call, the call timer shows the duration of your current call. Chapter 2: Getting to Know the Dual-Mode Internet Telephony Kit The Handset's Display Screen Dual-Mode Internet Telephony Kit 9
User Guide
Page 20
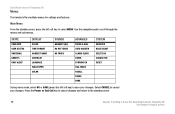
... COLOR SOUNDS HANDSET (HS) HS KEY TONES HS TONES ADVANCED TOUCH & DIAL AUTO ANSWER ALARM CLOCK TIMER STOPWATCH DIAL MODE RECALL PAUSE PABX SYSTEM REGISTER BASE SELECT DELETE HS CHANGE PIN RESET During menu mode, select OK or SAVE (press the left soft key to select MENU. Press the Power or...
... COLOR SOUNDS HANDSET (HS) HS KEY TONES HS TONES ADVANCED TOUCH & DIAL AUTO ANSWER ALARM CLOCK TIMER STOPWATCH DIAL MODE RECALL PAUSE PABX SYSTEM REGISTER BASE SELECT DELETE HS CHANGE PIN RESET During menu mode, select OK or SAVE (press the left soft key to select MENU. Press the Power or...
User Guide
Page 24
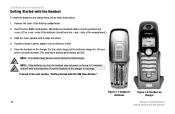
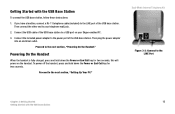
Dual-Mode Internet Telephony Kit Getting Started with the USB Base Station." Slide the cover upward until it snaps into an electrical outlet. 5. Place the handset on Charger 14 Chapter 3: Getting Started Getting Started with the ...
Dual-Mode Internet Telephony Kit Getting Started with the USB Base Station." Slide the cover upward until it snaps into an electrical outlet. 5. Place the handset on Charger 14 Chapter 3: Getting Started Getting Started with the ...
User Guide
Page 25
... "Powering On the Handset." Then connect the other end to the LINE Port Chapter 3: Getting Started 15 Getting Started with the USB Base Station To connect the USB base station, follow these instructions: 1. this will power on your telephone wall jack. 2. To power off the handset, press and ... to your Skype-enabled PC. 3. Connect the included power adapter to the LINE port of the USB base station. Proceed to the next section, "Setting Up Your PC." Getting Started with the USB Base Station If you have a landline, connect a RJ-11 telephone cable (included) to the power ...
... "Powering On the Handset." Then connect the other end to the LINE Port Chapter 3: Getting Started 15 Getting Started with the USB Base Station To connect the USB base station, follow these instructions: 1. this will power on your telephone wall jack. 2. To power off the handset, press and ... to your Skype-enabled PC. 3. Connect the included power adapter to the LINE port of the USB base station. Proceed to the next section, "Setting Up Your PC." Getting Started with the USB Base Station If you have a landline, connect a RJ-11 telephone cable (included) to the power ...
User Guide
Page 28
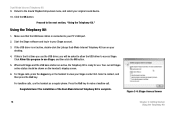
... Telephony Kit is not active, double-click the Linksys Dual-Mode Internet Telephony Kit icon on the handset to the Sound Playback drop-down menu, and select your PC's USB port. 2. Make sure that the USB base station is connected to use the USB driver, you use Skype, and then click the... OK button. 5. For landline calls, use . Click Allow this is ready for use the handset as a regular phone. When both Skype and the USB base station are active, the Telephony Kit is the first time you will be shown on the handset's display screen. 6. If this program ...
... Telephony Kit is not active, double-click the Linksys Dual-Mode Internet Telephony Kit icon on the handset to the Sound Playback drop-down menu, and select your PC's USB port. 2. Make sure that the USB base station is connected to use the USB driver, you use Skype, and then click the... OK button. 5. For landline calls, use . Click Allow this is ready for use the handset as a regular phone. When both Skype and the USB base station are active, the Telephony Kit is the first time you will be shown on the handset's display screen. 6. If this program ...
User Guide
Page 32
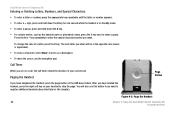
... # key. Press the 0 or * key repeatedly to stop the page. Call Timer When you have located the handset, press the right soft key on the USB base station.
... # key. Press the 0 or * key repeatedly to stop the page. Call Timer When you have located the handset, press the right soft key on the USB base station.
User Guide
Page 33
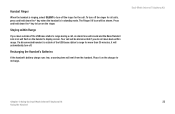
... to turn off the ringer for more than 30 minutes, it on the handset's display screen. Handset Ringer When the handset is outside of the USB base station's range for the call. Press and hold down the * key to turn on the ringer. Recharging the Handset's Batteries If the handset's battery ...be disconnected if you do not move back within Range If you move outside of the USB base station's range during a call will emit from the handset. Your call , an alarm tone will sound and the Base/Handset Link icon will automatically turn off the ringer for all calls, press and hold down...
... to turn off the ringer for more than 30 minutes, it on the handset's display screen. Handset Ringer When the handset is outside of the USB base station's range for the call. Press and hold down the * key to turn on the ringer. Recharging the Handset's Batteries If the handset's battery ...be disconnected if you do not move back within Range If you move outside of the USB base station's range during a call will emit from the handset. Your call , an alarm tone will sound and the Base/Handset Link icon will automatically turn off the ringer for all calls, press and hold down...
User Guide
Page 41
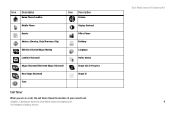
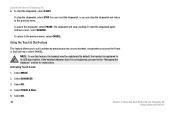
... Skype contact list cannot be connected to select the phonebook you want , PRIVATE or SHARED. 3. Accessing the Phonebook 1. Use the navigation pad to the USB base station in the USB base station, so its own private phonebook. Select ADD ENTRY and then select OK. 5. A handset must be saved to select the phonebook you want...
... Skype contact list cannot be connected to select the phonebook you want , PRIVATE or SHARED. 3. Accessing the Phonebook 1. Use the navigation pad to the USB base station in the USB base station, so its own private phonebook. Select ADD ENTRY and then select OK. 5. A handset must be saved to select the phonebook you want...
User Guide
Page 60
... the paging melody. The other handsets will play a paging melody. The keypad will be unlocked. If nothing is powered off or on that USB base station will still ring. Then select OK. Paging a Handset If you have misplaced a handset, press and release the page button on the...the external call comes in , the keypad will stop the paging melody. If you have multiple handsets, press and release the page button on the USB base station. The number of credits you have remaining will be displayed. 6. Using the Key Lock Feature During standby mode, press and hold the # key...
... the paging melody. The other handsets will play a paging melody. The keypad will be unlocked. If nothing is powered off or on that USB base station will still ring. Then select OK. Paging a Handset If you have misplaced a handset, press and release the page button on the...the external call comes in , the keypad will stop the paging melody. If you have multiple handsets, press and release the page button on the USB base station. The number of credits you have remaining will be displayed. 6. Using the Key Lock Feature During standby mode, press and hold the # key...
User Guide
Page 72
... the handset indicates that it is registered to the previous menu. To pause the stopwatch, select PAUSE. To stop the stopwatch and return to its USB base station. To return to the "Managing the Handsets" section for instructions. NOTE: To use this feature, the handset must be registered. By default, the handset...
... the handset indicates that it is registered to the previous menu. To pause the stopwatch, select PAUSE. To stop the stopwatch and return to its USB base station. To return to the "Managing the Handsets" section for instructions. NOTE: To use this feature, the handset must be registered. By default, the handset...
User Guide
Page 77
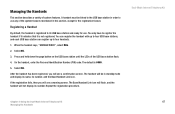
... Telephony Kit Chapter 4: Using the Dual-Mode Internet Telephony Kit 67 Managing the Handsets Managing the Handsets This section describes a variety of the USB base station flash. 4. On the handset, enter the Personal Identification Number (PIN) code. After the handset has been registered, you will see ...a warning screen. A handset must be in this section, except for use. You only have to its USB base station and ready for the registration feature. Registering a Handset By default, the handset is registered to register the handset if it indicates ...
... Telephony Kit Chapter 4: Using the Dual-Mode Internet Telephony Kit 67 Managing the Handsets Managing the Handsets This section describes a variety of the USB base station flash. 4. On the handset, enter the Personal Identification Number (PIN) code. After the handset has been registered, you will see ...a warning screen. A handset must be in this section, except for use. You only have to its USB base station and ready for the registration feature. Registering a Handset By default, the handset is registered to register the handset if it indicates ...
User Guide
Page 78
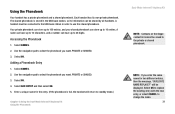
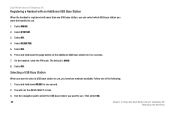
...Telephony Kit Managing the Handsets Select SYSTEM. 3. The default is registered with an Additional USB Base Station When the handset is 0000. 8. Use the navigation pad to select the USB base station you want the handset to use. 1. Dual-Mode Internet Telephony Kit Registering ...a Handset with more than one USB base station, you can select which USB base station you want to use. Select REGISTER. 5. Select OK. 6. Follow one second. 2. Selecting a USB Base Station When you want to select a USB base station to use, you have two methods available....
...Telephony Kit Managing the Handsets Select SYSTEM. 3. The default is registered with an Additional USB Base Station When the handset is 0000. 8. Use the navigation pad to select the USB base station you want the handset to use. 1. Dual-Mode Internet Telephony Kit Registering ...a Handset with more than one USB base station, you can select which USB base station you want to use. Select REGISTER. 5. Select OK. 6. Follow one second. 2. Selecting a USB Base Station When you want to select a USB base station to use, you have two methods available....