Getting Started
Page 1
... Lexmark products • Troubleshooting - Jams and misfeeds troubleshooting - Ordering supplies - 2400 Series Getting Started See the complete User's Guide on the CD for more detailed information about the following tasks: • Setting up the printer • Learning about the printer • Loading paper and original documents • Printing • Working with photos 5 Copying 4 x 6 photos 5 Using a PictBridge-enabled camera to print photos 5 Understanding the software 5 Using the Imaging Studio 5 Using the All-In-One Center 5 Using the Solution Center 6 Using Print...
... Lexmark products • Troubleshooting - Jams and misfeeds troubleshooting - Ordering supplies - 2400 Series Getting Started See the complete User's Guide on the CD for more detailed information about the following tasks: • Setting up the printer • Learning about the printer • Loading paper and original documents • Printing • Working with photos 5 Copying 4 x 6 photos 5 Using a PictBridge-enabled camera to print photos 5 Understanding the software 5 Using the Imaging Studio 5 Using the All-In-One Center 5 Using the Solution Center 6 Using Print...
Getting Started
Page 3
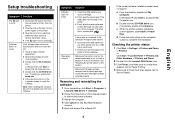
... cord all open software applications. 2 Temporarily disable any antivirus programs. 3 Double-click the My Computer icon. Page does not print If the printer is connected to the printer and the computer. In Windows XP, click Start to Set As Default. 3 English Checking the printer status 1 Click Start Æ Settings Æ Printers and Faxes or Printers. Symptom Software does not install Solution 1 Check the USB cable for any Add New Hardware screens. 5 Eject and reinsert the software CD. If the printer software installation screen...
... cord all open software applications. 2 Temporarily disable any antivirus programs. 3 Double-click the My Computer icon. Page does not print If the printer is connected to the printer and the computer. In Windows XP, click Start to Set As Default. 3 English Checking the printer status 1 Click Start Æ Settings Æ Printers and Faxes or Printers. Symptom Software does not install Solution 1 Check the USB cable for any Add New Hardware screens. 5 Eject and reinsert the software CD. If the printer software installation screen...
Getting Started
Page 4
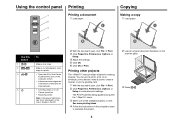
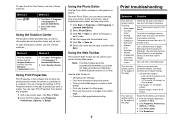
... the power light blinks, see "Error messages" in the User's Guide on an envelope, print a banner, make a poster, create a booklet, or print a greeting card. 1 With the document open , click File Æ Print. 3 Click Properties, Preferences, Options, or Setup. 4 Adjust the settings. 5 Click OK. 6 Click OK or Print. You can print a photo, print on the CD. 2 With the document open , click File Æ Print. 2 Click Properties, Preferences, Options, or Setup to customize print settings. The Print Properties dialog appears along with the "I Want To" menu provides...
... the power light blinks, see "Error messages" in the User's Guide on an envelope, print a banner, make a poster, create a booklet, or print a greeting card. 1 With the document open , click File Æ Print. 3 Click Properties, Preferences, Options, or Setup. 4 Adjust the settings. 5 Click OK. 6 Click OK or Print. You can print a photo, print on the CD. 2 With the document open , click File Æ Print. 2 Click Properties, Preferences, Options, or Setup to customize print settings. The Print Properties dialog appears along with the "I Want To" menu provides...
Getting Started
Page 6
... photos or images from almost any program: 1 With a document open, click File Æ Print. 2 From the Print dialog, click Properties, Preferences, Options, or Setup. To avoid ink smudging, remove each sheet as . 6 Enter a file name and file type, and then click Save. Use a different brand of paper. Using the Web Toolbar The Lexmark Web Toolbar can reduce red-eye, crop your photos, resize your photos, adjust brightness and contrast, and use these minimum print margin settings...
... photos or images from almost any program: 1 With a document open, click File Æ Print. 2 From the Print dialog, click Properties, Preferences, Options, or Setup. To avoid ink smudging, remove each sheet as . 6 Enter a file name and file type, and then click Save. Use a different brand of paper. Using the Web Toolbar The Lexmark Web Toolbar can reduce red-eye, crop your photos, resize your photos, adjust brightness and contrast, and use these minimum print margin settings...
Getting Started
Page 8
... PARTY SUPPLIERS OR REMARKETERS MAKE ANY OTHER WARRANTY OR CONDITION OF ANY KIND, WHETHER EXPRESS OR IMPLIED, WITH RESPECT TO THIS PRODUCT, AND SPECIFICALLY DISCLAIM THE IMPLIED WARRANTIES OR CONDITIONS OF MERCHANTABILITY, FITNESS FOR A PARTICULAR PURPOSE, AND SATISFACTORY QUALITY. Warranty service does not include repair of Lexmark specifications • Supplies (such as warranted during normal use , and not for...
... PARTY SUPPLIERS OR REMARKETERS MAKE ANY OTHER WARRANTY OR CONDITION OF ANY KIND, WHETHER EXPRESS OR IMPLIED, WITH RESPECT TO THIS PRODUCT, AND SPECIFICALLY DISCLAIM THE IMPLIED WARRANTIES OR CONDITIONS OF MERCHANTABILITY, FITNESS FOR A PARTICULAR PURPOSE, AND SATISFACTORY QUALITY. Warranty service does not include repair of Lexmark specifications • Supplies (such as warranted during normal use , and not for...
Getting Started
Page 9
... support may have installed a maintenance kit as specified (if applicable) • Use of printing media outside Canada, refer to present the feature or option with the product for which perform like new parts • Is, during the warranty period, contact a Remarketer or Lexmark for warranty service, remove any developer, including Lexmark International, Inc., of other economic damages or losses. For customers outside of Lexmark specifications...
... support may have installed a maintenance kit as specified (if applicable) • Use of printing media outside Canada, refer to present the feature or option with the product for which perform like new parts • Is, during the warranty period, contact a Remarketer or Lexmark for warranty service, remove any developer, including Lexmark International, Inc., of other economic damages or losses. For customers outside of Lexmark specifications...
User's Guide
Page 7
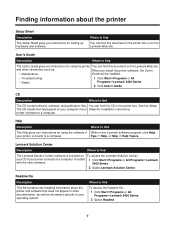
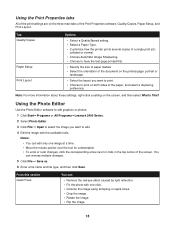
... documentation, as well as : When you install the printer software, the User's • Maintenance Guide will be installed. • Troubleshooting • Safety 1 Click StartŒPrograms or All ProgramsŒLexmark 2400 Series. 2 Click User's Guide. Help Description Where to find The Help gives you instructions for installation instructions. Tips Œ Help, or Help Œ Help Topics. Readme file Description This file contains late-breaking information about the printer Setup Sheet Description The Setup Sheet gives you instructions for using the printer...
... documentation, as well as : When you install the printer software, the User's • Maintenance Guide will be installed. • Troubleshooting • Safety 1 Click StartŒPrograms or All ProgramsŒLexmark 2400 Series. 2 Click User's Guide. Help Description Where to find The Help gives you instructions for installation instructions. Tips Œ Help, or Help Œ Help Topics. Readme file Description This file contains late-breaking information about the printer Setup Sheet Description The Setup Sheet gives you instructions for using the printer...

User's Guide
Page 10
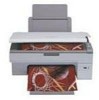
Stack paper as it exits. Access the scanner glass. Align paper when feeding. Install or replace a print cartridge. 10 Learning about the printer Understanding the parts of the printer 6 1 5 7 4 Use the 1 Paper support 2 Control panel 3 PictBridge port 4 Paper exit tray 5 Top cover 6 Paper guide 7 Scanner glass 32 To Load paper. Scan, copy, or remove an item. 3 Use the 1 Scanner support 2 Print cartridge carrier 1 2 4 5 To Hold up the scanner unit. Operate the printer. Connect a PictBridge-enabled digital camera to the printer.
Stack paper as it exits. Access the scanner glass. Align paper when feeding. Install or replace a print cartridge. 10 Learning about the printer Understanding the parts of the printer 6 1 5 7 4 Use the 1 Paper support 2 Control panel 3 PictBridge port 4 Paper exit tray 5 Top cover 6 Paper guide 7 Scanner glass 32 To Load paper. Scan, copy, or remove an item. 3 Use the 1 Scanner support 2 Print cartridge carrier 1 2 4 5 To Hold up the scanner unit. Operate the printer. Connect a PictBridge-enabled digital camera to the printer.
User's Guide
Page 17
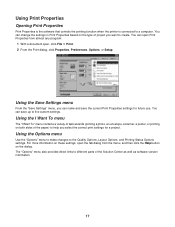
... program: 1 With a document open the tab dialog from the menu, and then click the Help button on both sides of task wizards (printing a photo, an envelope, a banner, a poster, or printing on the dialog. Using the I Want To menu The "I Want To" menu contains a variety of the paper) to a computer. Using Print Properties Opening Print Properties Print Properties is the software that controls the printing function when the printer is connected to help you select the correct print settings for future...
... program: 1 With a document open the tab dialog from the menu, and then click the Help button on both sides of task wizards (printing a photo, an envelope, a banner, a poster, or printing on the dialog. Using the I Want To menu The "I Want To" menu contains a variety of the paper) to a computer. Using Print Properties Opening Print Properties Print Properties is the software that controls the printing function when the printer is connected to help you select the correct print settings for future...
User's Guide
Page 18
... a setting on both sides of the screen. From this section Quick Fixes You can reverse multiple changes. 5 Click File Œ Save as. 6 Enter a file name and file type, and then click Save. You can • Remove the red-eye effect caused by light reflection. • Fix the photo with the available tools. Tab Quality/Copies Paper Setup Print Layout Options • Select a Quality/Speed setting. • Select a Paper Type. • Customize how the printer prints several...
... a setting on both sides of the screen. From this section Quick Fixes You can reverse multiple changes. 5 Click File Œ Save as. 6 Enter a file name and file type, and then click Save. You can • Remove the red-eye effect caused by light reflection. • Fix the photo with the available tools. Tab Quality/Copies Paper Setup Print Layout Options • Select a Quality/Speed setting. • Select a Paper Type. • Customize how the printer prints several...
User's Guide
Page 33
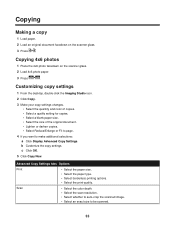
... scan resolution. • Select whether to auto-crop the scanned image. • Select an exact size to make additional selections: a Click Display Advanced Copy Settings. Copying 4x6 photos 1 Place the 4x6 photo facedown on the scanner glass. 3 Press . b Customize the copy settings. Advanced Copy Settings tabs Options Print • Select the paper size. • Select the paper type. • Select borderless printing options. • Select the print quality. Copying Making a copy 1 Load paper. 2 Load an original document...
... scan resolution. • Select whether to auto-crop the scanned image. • Select an exact size to make additional selections: a Click Display Advanced Copy Settings. Copying 4x6 photos 1 Place the 4x6 photo facedown on the scanner glass. 3 Press . b Customize the copy settings. Advanced Copy Settings tabs Options Print • Select the paper size. • Select the paper type. • Select borderless printing options. • Select the print quality. Copying Making a copy 1 Load paper. 2 Load an original document...

User's Guide
Page 46
...-Lexmark print cartridge. Item Part number Print cartridge 1 USB cable 12A2405 Lexmark Photo Paper and Premium Photo Paper Varies by non-Lexmark ink or print cartridges. 46 10 Repeat step 9 up to two more on the message, select the check box, and click Close. • If you are designed to perform together for superior print quality. Cleaning the scanner glass 1 Dampen a clean, lint-free cloth with new Lexmark print cartridge(s). • If you are printing from the printer except to replace, clean, or...
...-Lexmark print cartridge. Item Part number Print cartridge 1 USB cable 12A2405 Lexmark Photo Paper and Premium Photo Paper Varies by non-Lexmark ink or print cartridges. 46 10 Repeat step 9 up to two more on the message, select the check box, and click Close. • If you are designed to perform together for superior print quality. Cleaning the scanner glass 1 Dampen a clean, lint-free cloth with new Lexmark print cartridge(s). • If you are printing from the printer except to replace, clean, or...
User's Guide
Page 48
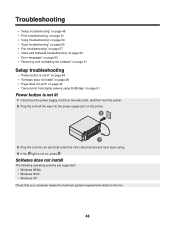
... camera using PictBridge" on page 51 Power button is not on the box. 48 Troubleshooting • "Setup troubleshooting" on page 48 • "Print troubleshooting" on page 51 • "Copy troubleshooting" on page 54 • "Scan troubleshooting" on page 55 • "Fax troubleshooting" on page 57 • "Jams and misfeeds troubleshooting" on page 59 • "Error messages" on page 60 • "Removing and reinstalling the software" on page 61 Setup troubleshooting • "Power button is not lit" on page 48 • "Software does not install" on page...
... camera using PictBridge" on page 51 Power button is not on the box. 48 Troubleshooting • "Setup troubleshooting" on page 48 • "Print troubleshooting" on page 51 • "Copy troubleshooting" on page 54 • "Scan troubleshooting" on page 55 • "Fax troubleshooting" on page 57 • "Jams and misfeeds troubleshooting" on page 59 • "Error messages" on page 60 • "Removing and reinstalling the software" on page 61 Setup troubleshooting • "Power button is not lit" on page 48 • "Software does not install" on page...
User's Guide
Page 54
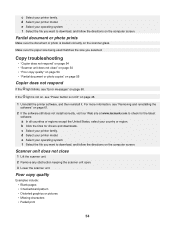
... quality" on page 54 • "Partial document or photo copies" on page 55 Copier does not respond If the light blinks, see "Error messages" on page 48. 1 Uninstall the printer software, and then reinstall it. Make sure the paper size being used matches the size you want to download, and follow the directions on page 61. 2 If the software still does not install correctly, visit our Web site at www.lexmark.com to download...
... quality" on page 54 • "Partial document or photo copies" on page 55 Copier does not respond If the light blinks, see "Error messages" on page 48. 1 Uninstall the printer software, and then reinstall it. Make sure the paper size being used matches the size you want to download, and follow the directions on page 61. 2 If the software still does not install correctly, visit our Web site at www.lexmark.com to download...

User's Guide
Page 55
... document or photo copies Make sure the document or photo is not lit" on page 48. Make sure the paper size being used matches the size you are copying or scanning from magazines or newspapers" on page 38. See "Improving print quality" on the scanner glass. Make sure the printer is set as the default printer and is dirty, gently wipe it with a clean, lint-free cloth dampened with water. Check the ink level, and install a new print cartridge...
... document or photo copies Make sure the document or photo is not lit" on page 48. Make sure the paper size being used matches the size you are copying or scanning from magazines or newspapers" on page 38. See "Improving print quality" on the scanner glass. Make sure the printer is set as the default printer and is dirty, gently wipe it with a clean, lint-free cloth dampened with water. Check the ink level, and install a new print cartridge...
User's Guide
Page 57
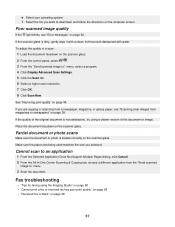
... is loaded correctly on page 38. If you are copying or scanning from a newspaper, magazine, or glossy paper, see "Error messages" on the computer screen. If the quality of the original document is dirty, gently wipe it with a clean, lint-free cloth dampened with water. f Select the file you selected. Make sure the paper size being used matches the size you want to " menu. 3 Scan the document. Poor scanned image quality If the light blinks, see "Scanning clear images...
... is loaded correctly on page 38. If you are copying or scanning from a newspaper, magazine, or glossy paper, see "Error messages" on the computer screen. If the quality of the original document is dirty, gently wipe it with a clean, lint-free cloth dampened with water. f Select the file you selected. Make sure the paper size being used matches the size you want to " menu. 3 Scan the document. Poor scanned image quality If the light blinks, see "Scanning clear images...
User's Guide
Page 66
... its warranty period. Replacement is legally liable. ALL INFORMATION, SPECIFICATIONS, PRICES, AND SERVICES ARE SUBJECT TO CHANGE AT ANY TIME WITHOUT NOTICE. For further explanation of such damages. Lexmark's and its duty cycle -Use of printing media outside of Lexmark. The replacement item assumes the remaining warranty period of the Remarketer or Lexmark. For products no longer covered by Lexmark TO THE EXTENT PERMITTED...
... its warranty period. Replacement is legally liable. ALL INFORMATION, SPECIFICATIONS, PRICES, AND SERVICES ARE SUBJECT TO CHANGE AT ANY TIME WITHOUT NOTICE. For further explanation of such damages. Lexmark's and its duty cycle -Use of printing media outside of Lexmark. The replacement item assumes the remaining warranty period of the Remarketer or Lexmark. For products no longer covered by Lexmark TO THE EXTENT PERMITTED...

User's Guide
Page 68
... photos 12 Tips 13 using 12 Web site 13 Imaging Studio, using 12 improving print quality 44, 51 index cards loading 22 printing 28 information, finding 7 ink level, checking 15 inserting PictBridge-enabled digital camera 31 installing print cartridge 42 printer software 61 software and sharing printer on network 41 iron-on transfers, loading 22 J jams and misfeeds troubleshooting banner paper jams 60 paper jam in paper support 59 paper jam in printer 59 paper or specialty media misfeeds 59 printer does not feed paper, envelopes, or specialty media 60 L labels, loading...
... photos 12 Tips 13 using 12 Web site 13 Imaging Studio, using 12 improving print quality 44, 51 index cards loading 22 printing 28 information, finding 7 ink level, checking 15 inserting PictBridge-enabled digital camera 31 installing print cartridge 42 printer software 61 software and sharing printer on network 41 iron-on transfers, loading 22 J jams and misfeeds troubleshooting banner paper jams 60 paper jam in paper support 59 paper jam in printer 59 paper or specialty media misfeeds 59 printer does not feed paper, envelopes, or specialty media 60 L labels, loading...

User's Guide
Page 69
...print 49 paper exit tray 10 paper guide 10 paper jam in paper support 59 paper jam in printer 59 paper or specialty media misfeeds 59 Paper Setup tab changing orientation 18 changing paper size 18 paper sizes, specifying 18 paper support 10 paper type, changing 26 paper, loading 21 partial document or photo copies 55 partial document or photo prints 54 partial document or photo scans 57 parts control panel 10 paper exit tray 10 paper guide 10 paper support 10 PictBridge port 10 power supply port 11 print cartridge carrier 10 scanner glass 10 scanner support 10 scanner unit 11 top cover 10 USB...
...print 49 paper exit tray 10 paper guide 10 paper jam in paper support 59 paper jam in printer 59 paper or specialty media misfeeds 59 Paper Setup tab changing orientation 18 changing paper size 18 paper sizes, specifying 18 paper support 10 paper type, changing 26 paper, loading 21 partial document or photo copies 55 partial document or photo prints 54 partial document or photo scans 57 parts control panel 10 paper exit tray 10 paper guide 10 paper support 10 PictBridge port 10 power supply port 11 print cartridge carrier 10 scanner glass 10 scanner support 10 scanner unit 11 top cover 10 USB...
User's Guide
Page 70
... 19 software does not install 48 Solution Center Advanced tab 16 Contact Information tab 16 How To tab 16 Maintenance tab 16 opening 15 Printer Status dialog 16 Troubleshooting tab 16 using 15 supplies, ordering 46 T text captions, adding 32 Tips button 13 top cover 10 transparencies loading 23 printing 28 troubleshooting error messages 60 Troubleshooting tab 16 troubleshooting, copy copier does not respond 54 partial document or photo copies...
... 19 software does not install 48 Solution Center Advanced tab 16 Contact Information tab 16 How To tab 16 Maintenance tab 16 opening 15 Printer Status dialog 16 Troubleshooting tab 16 using 15 supplies, ordering 46 T text captions, adding 32 Tips button 13 top cover 10 transparencies loading 23 printing 28 troubleshooting error messages 60 Troubleshooting tab 16 troubleshooting, copy copier does not respond 54 partial document or photo copies...


