

Technical Reference
Page 68
...Intervention Required - Photoconductor Exposure Warning 40025 Intervention Required - Remove Paper 40019 Intervention Required - Check Paper Guide 4100x Intervention Required - 41xy Incorrect Media Intervention Required - 41xyy Change Request Printer model Return string X463de...Standard Bin Photoconductor X X exposure warning Check X X orientation or guides Check X X Paper Guide Paper changes X X needed Change X Appendix B: PJL support 68 Check Orientation or Guides 4100x Intervention Required - Remove Paper From 40019 Intervention Required - ...
...Intervention Required - Photoconductor Exposure Warning 40025 Intervention Required - Remove Paper 40019 Intervention Required - Check Paper Guide 4100x Intervention Required - 41xy Incorrect Media Intervention Required - 41xyy Change Request Printer model Return string X463de...Standard Bin Photoconductor X X exposure warning Check X X orientation or guides Check X X Paper Guide Paper changes X X needed Change X Appendix B: PJL support 68 Check Orientation or Guides 4100x Intervention Required - Remove Paper From 40019 Intervention Required - ...

User Guide
Page 1
X46x Series User's Guide February 2009 Machine type(s): 7014, 4569, 4570 Model(s): 431, 636, 63W, n01, n02, g01, g02, n11, n12, g11, g12, hn1, hn2, wh1, wh2 www.lexmark.com
X46x Series User's Guide February 2009 Machine type(s): 7014, 4569, 4570 Model(s): 431, 636, 63W, n01, n02, g01, g02, n11, n12, g11, g12, hn1, hn2, wh1, wh2 www.lexmark.com

User Guide
Page 17
...will meet your operating system. And if you for choosing this printer! For updates, check our Web site at www.lexmark.com/publications/. Click to perform basic tasks. We're committed to delivering performance and value with the printer software. &#...Guide is also available on your suggestions help you get the most out of your printer model • Configuring printer settings • Viewing and printing documents and photos • Setting up and using printer software • Setting up and configuring the printer on a network, depending on the Lexmark Web site at www.lexmark...
...will meet your operating system. And if you for choosing this printer! For updates, check our Web site at www.lexmark.com/publications/. Click to perform basic tasks. We're committed to delivering performance and value with the printer software. &#...Guide is also available on your suggestions help you get the most out of your printer model • Configuring printer settings • Viewing and printing documents and photos • Setting up and using printer software • Setting up and configuring the printer on a network, depending on the Lexmark Web site at www.lexmark...

User Guide
Page 40
Angle the ISP over the plastic tee, and then approach the plastic tee so that any overhanging connectors will pass through the ISP opening in the system board, and then press downward until the ISP is seated between the guides of the tee has latched completely, and that the tee is seated firmly onto the system board. 6 Install the ISP onto the plastic tee. Be sure each post of the plastic tee. 5 Align the posts of the plastic tee to the holes in the system board cage. 7 Lower the ISP toward the plastic tee until the tee snaps into place. Additional printer setup 40
Angle the ISP over the plastic tee, and then approach the plastic tee so that any overhanging connectors will pass through the ISP opening in the system board, and then press downward until the ISP is seated between the guides of the tee has latched completely, and that the tee is seated firmly onto the system board. 6 Install the ISP onto the plastic tee. Be sure each post of the plastic tee. 5 Align the posts of the plastic tee to the holes in the system board cage. 7 Lower the ISP toward the plastic tee until the tee snaps into place. Additional printer setup 40
User Guide
Page 55
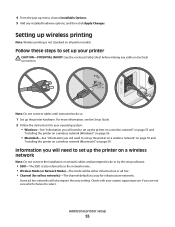
... CAUTION-POTENTIAL INJURY: See the enclosed Safety Sheet before making any installed hardware options, and then click Apply Changes. For more information, see the Setup Guide. 2 Follow the instructions for your system support person if you will need to auto for ad hoc networks)-The channel defaults to set up the...
... CAUTION-POTENTIAL INJURY: See the enclosed Safety Sheet before making any installed hardware options, and then click Apply Changes. For more information, see the Setup Guide. 2 Follow the instructions for your system support person if you will need to auto for ad hoc networks)-The channel defaults to set up the...
User Guide
Page 56
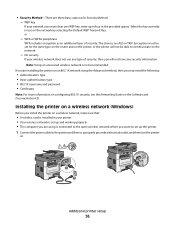
.... Select the key currently in use any security information. No security If your network uses more information on configuring 802.1X security, see the Networking Guide on the network by selecting the Default WEP Transmit Key.
.... Select the key currently in use any security information. No security If your network uses more information on configuring 802.1X security, see the Networking Guide on the network by selecting the Default WEP Transmit Key.
User Guide
Page 59
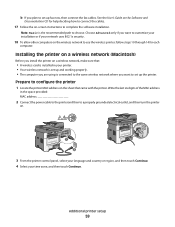
See the User's Guide on a wireless network, make sure that came with the printer. Installing the printer on a wireless network (Macintosh) Before you install the printer on the Software ...
See the User's Guide on a wireless network, make sure that came with the printer. Installing the printer on a wireless network (Macintosh) Before you install the printer on the Software ...
User Guide
Page 78
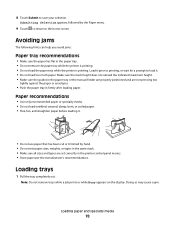
Make sure the stack height does not exceed the indicated maximum height. • Make sure the guides in the paper tray or the manual feeder are properly positioned and are set correctly in the printer control panel menus. • Store paper per ...
Make sure the stack height does not exceed the indicated maximum height. • Make sure the guides in the paper tray or the manual feeder are properly positioned and are set correctly in the printer control panel menus. • Store paper per ...

User Guide
Page 79
Loading paper and specialty media 79 For long paper like A4 or legal, squeeze and slide the length guide backwards to the correct position for the paper size you are loading. 2 Squeeze and slide the guides to accommodate the length of paper you are loading.
Loading paper and specialty media 79 For long paper like A4 or legal, squeeze and slide the length guide backwards to the correct position for the paper size you are loading. 2 Squeeze and slide the guides to accommodate the length of paper you are loading.

User Guide
Page 80
... the tray holds only 150 sheets of the tray as shown with the recommended print side facedown. Note: Use the size indicators on the width guide indicates the maximum height for loading A6-size paper. Note: The maximum fill line on the bottom of the tray to help position the... a stack of the tray to the A5 size position. If you are loading A6-size paper: a Squeeze and slide the length guide toward the back of A6-size paper. Notes: • The standard tray accommodates only 150 sheets of A6-size paper. Do not load A6-size ...
... the tray holds only 150 sheets of the tray as shown with the recommended print side facedown. Note: Use the size indicators on the width guide indicates the maximum height for loading A6-size paper. Note: The maximum fill line on the bottom of the tray to help position the... a stack of the tray to the A5 size position. If you are loading A6-size paper: a Squeeze and slide the length guide toward the back of A6-size paper. Notes: • The standard tray accommodates only 150 sheets of A6-size paper. Do not load A6-size ...

User Guide
Page 81
1 1 Maximum fill line Load letterhead with the top edge of the sheet toward the front of the stack. 1 2 Loading paper and specialty media 81 LETTERHEAD 5 Squeeze and slide the guides to lightly touch the side of the tray and the design facedown.
1 1 Maximum fill line Load letterhead with the top edge of the sheet toward the front of the stack. 1 2 Loading paper and specialty media 81 LETTERHEAD 5 Squeeze and slide the guides to lightly touch the side of the tray and the design facedown.

User Guide
Page 83
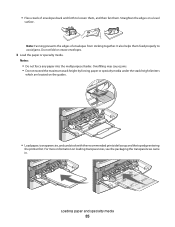
2 Grasp the raised handle, and pull the extension forward. 3 Grasp the handle, and pull the extension so it flips forward. 4 Guide the extension down gently so the multipurpose feeder is extended fully and open. Loading paper and specialty media 83
2 Grasp the raised handle, and pull the extension forward. 3 Grasp the handle, and pull the extension so it flips forward. 4 Guide the extension down gently so the multipurpose feeder is extended fully and open. Loading paper and specialty media 83

User Guide
Page 84
Do not fold or crease the paper or labels. Be careful not to loosen them, and then fan them. Note: Avoid touching the print side of paper or paper labels back and forth to scratch them . Loading paper and specialty media 84 Straighten the edges on a level surface. Straighten the edges on a level surface. • Hold transparencies by the edges, and then fan them . Loading the multipurpose feeder 1 Squeeze the tab located on the right width guide, and move the guides out fully. 2 Prepare the paper or specialty media for loading. • Flex sheets of the transparencies.
Do not fold or crease the paper or labels. Be careful not to loosen them, and then fan them. Note: Avoid touching the print side of paper or paper labels back and forth to scratch them . Loading paper and specialty media 84 Straighten the edges on a level surface. Straighten the edges on a level surface. • Hold transparencies by the edges, and then fan them . Loading the multipurpose feeder 1 Squeeze the tab located on the right width guide, and move the guides out fully. 2 Prepare the paper or specialty media for loading. • Flex sheets of the transparencies.
User Guide
Page 85
Loading paper and specialty media 85 • Flex a stack of envelopes from sticking together. For more information on the guides. • Load paper, transparencies, and card stock with the recommended print side faceup and the top edge entering the printer first. Overfilling may cause jams. &#...
Loading paper and specialty media 85 • Flex a stack of envelopes from sticking together. For more information on the guides. • Load paper, transparencies, and card stock with the recommended print side faceup and the top edge entering the printer first. Overfilling may cause jams. &#...

User Guide
Page 86
... and the stamp location in the position shown. These envelopes may severely damage the printer. 4 Squeeze the tab located on the right width guide to adjust the guides to illustrate the proper orientation for loading envelopes. The stamp and address are shown to lightly touch the sides of the stack. • Load...
... and the stamp location in the position shown. These envelopes may severely damage the printer. 4 Squeeze the tab located on the right width guide to adjust the guides to illustrate the proper orientation for loading envelopes. The stamp and address are shown to lightly touch the sides of the stack. • Load...
User Guide
Page 90
...these characteristics when evaluating new paper stock. Note: For detailed information on card stock and labels, see the Card Stock & Label Guide available on the Lexmark Web site at its original wrapper in its edges. For paper smaller than 60 g/m2 (16 lb) might not be stiff enough... Sheffield points produces the best print quality. Extend the time several days if the storage or transportation environment is time to curl at www.lexmark.com/publications. Paper lighter than 182 x 257 mm (7.2 x 10.1 in its original wrapper until it properly. Condition paper before buying large...
...these characteristics when evaluating new paper stock. Note: For detailed information on card stock and labels, see the Card Stock & Label Guide available on the Lexmark Web site at its original wrapper in its edges. For paper smaller than 60 g/m2 (16 lb) might not be stiff enough... Sheffield points produces the best print quality. Extend the time several days if the storage or transportation environment is time to curl at www.lexmark.com/publications. Paper lighter than 182 x 257 mm (7.2 x 10.1 in its original wrapper until it properly. Condition paper before buying large...
User Guide
Page 93
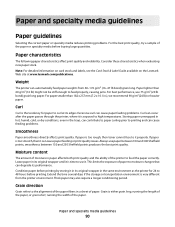
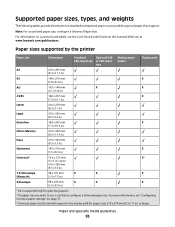
Supported paper sizes, types, and weights The following tables provide information on the Lexmark Web site at www.lexmark.com/publications. For information on card stock and labels, see "Configuring Universal paper settings" on page 77. 3 Universal paper size has limited support in the ... larger. Note: For an unlisted paper size, configure a Universal Paper Size. Paper and specialty media guidelines 93 For more information, see the Card Stock & Label Guide on standard and optional paper sources and the types of paper they support.
Supported paper sizes, types, and weights The following tables provide information on the Lexmark Web site at www.lexmark.com/publications. For information on card stock and labels, see "Configuring Universal paper settings" on page 77. 3 Universal paper size has limited support in the ... larger. Note: For an unlisted paper size, configure a Universal Paper Size. Paper and specialty media guidelines 93 For more information, see the Card Stock & Label Guide on standard and optional paper sources and the types of paper they support.
User Guide
Page 95
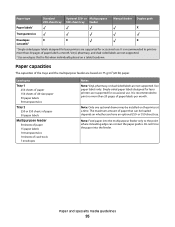
...amount of paper labels a month. or 550-sheet tray. Paper type Paper labels1 Standard Optional 250- Single-sided paper labels designed for laser printers are not supported. or Multipurpose 250-sheet tray 550-sheet tray feeder Manual feeder Duplex path X Transparencies Envelopes X X X (...smooth)2 1 Single-sided paper labels designed for laser printers are not supported. 2 Use envelopes that can contact the paper guides. It is recommended to the point where its leading edge can be installed on whether you have...
...amount of paper labels a month. or 550-sheet tray. Paper type Paper labels1 Standard Optional 250- Single-sided paper labels designed for laser printers are not supported. or Multipurpose 250-sheet tray 550-sheet tray feeder Manual feeder Duplex path X Transparencies Envelopes X X X (...smooth)2 1 Single-sided paper labels designed for laser printers are not supported. 2 Use envelopes that can contact the paper guides. It is recommended to the point where its leading edge can be installed on whether you have...
User Guide
Page 98
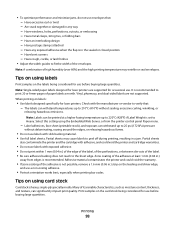
...hazardous fumes. • Do not use labels with slick backing material. • Use full label sheets. Print samples on the card stock being considered for laser printers. Have postage stamps attached - It is recommended to fit the width of its variable characteristics, such as moisture content, thickness, and texture, can withstand... of the label, of the perforations, or between die-cuts of paper labels a month. Have rough, cockle, or laid finishes • Adjust the width guides to print 20 or fewer pages of the label. • Be sure adhesive backing does not reach to Heavy.
...hazardous fumes. • Do not use labels with slick backing material. • Use full label sheets. Print samples on the card stock being considered for laser printers. Have postage stamps attached - It is recommended to fit the width of its variable characteristics, such as moisture content, thickness, and texture, can withstand... of the label, of the perforations, or between die-cuts of paper labels a month. Have rough, cockle, or laid finishes • Adjust the width guides to print 20 or fewer pages of the label. • Be sure adhesive backing does not reach to Heavy.
User Guide
Page 105
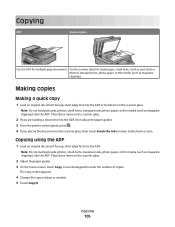
Making copies Making a quick copy 1 Load an original document faceup, short edge first into the ADF or facedown on the scanner glass. 2 Adjust the paper guides. 3 On the home screen, touch Copy, or use the keypad to the home screen. Copying using the ADF 1 Load an original document faceup, short edge ...first into the ADF, then adjust the paper guides. 3 From the printer control panel, press . 4 If you placed the document on the scanner glass, then touch Finish the Job to return to enter ...
Making copies Making a quick copy 1 Load an original document faceup, short edge first into the ADF or facedown on the scanner glass. 2 Adjust the paper guides. 3 On the home screen, touch Copy, or use the keypad to the home screen. Copying using the ADF 1 Load an original document faceup, short edge ...first into the ADF, then adjust the paper guides. 3 From the printer control panel, press . 4 If you placed the document on the scanner glass, then touch Finish the Job to return to enter ...


