Getting Started
Page 3
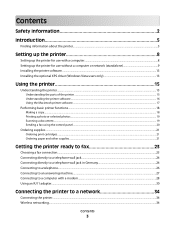
......18 Making a copy...18 Printing a photo or selected photos...19 Scanning a document ...19 Sending a fax using the control panel ...20 Ordering supplies...21 Ordering print cartridges ...21 Ordering paper and other supplies...21 Getting the printer ready to fax 23 Choosing a fax connection...23 Connecting directly to a telephone wall jack...24...
......18 Making a copy...18 Printing a photo or selected photos...19 Scanning a document ...19 Sending a fax using the control panel ...20 Ordering supplies...21 Ordering print cartridges ...21 Ordering paper and other supplies...21 Getting the printer ready to fax 23 Choosing a fax connection...23 Connecting directly to a telephone wall jack...24...
Getting Started
Page 9
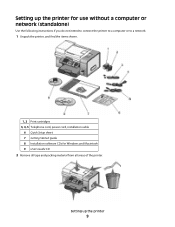
Setting up the printer for use without a computer or network (standalone) Use the following instructions if you do not intend to connect the printer to a computer or to a network. 1 Unpack the printer, and find the items shown. 1, 2 Print cartridges 3, 4, 5 Telephone cord, power cord, installation cable 6 Quick Setup sheet 7 Getting Started guide 8 Installation software CDs for Windows and Macintosh 9 User's Guide CD 2 Remove all tape and packing material from all areas of the printer. Setting up the printer 9
Setting up the printer for use without a computer or network (standalone) Use the following instructions if you do not intend to connect the printer to a computer or to a network. 1 Unpack the printer, and find the items shown. 1, 2 Print cartridges 3, 4, 5 Telephone cord, power cord, installation cable 6 Quick Setup sheet 7 Getting Started guide 8 Installation software CDs for Windows and Macintosh 9 User's Guide CD 2 Remove all tape and packing material from all areas of the printer. Setting up the printer 9
Getting Started
Page 11
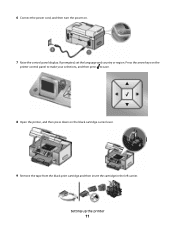
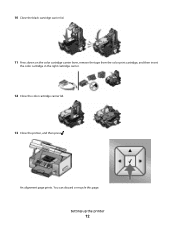
If prompted, set the language and country or region. 6 Connect the power cord, and then turn the power on the black cartridge carrier lever. 9 Remove the tape from the black print cartridge and then insert the cartridge in the left carrier. Setting up the printer 11 Press the arrow keys on the printer control panel to make your selections, and then press to save. 8 Open the printer, and then press down on . 7 Raise the control panel display.
If prompted, set the language and country or region. 6 Connect the power cord, and then turn the power on the black cartridge carrier lever. 9 Remove the tape from the black print cartridge and then insert the cartridge in the left carrier. Setting up the printer 11 Press the arrow keys on the printer control panel to make your selections, and then press to save. 8 Open the printer, and then press down on . 7 Raise the control panel display.
Getting Started
Page 12
You can discard or recycle this page. An alignment page prints. 10 Close the black cartridge carrier lid. 11 Press down on the color cartridge carrier lever, remove the tape from the color print cartridge, and then insert the color cartridge in the right cartridge carrier. 12 Close the color cartridge carrier lid. 13 Close the printer, and then press . Setting up the printer 12
You can discard or recycle this page. An alignment page prints. 10 Close the black cartridge carrier lid. 11 Press down on the color cartridge carrier lever, remove the tape from the color print cartridge, and then insert the color cartridge in the right cartridge carrier. 12 Close the color cartridge carrier lid. 13 Close the printer, and then press . Setting up the printer 12
Getting Started
Page 16
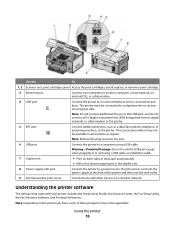
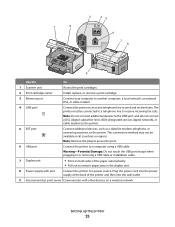
install, replace, or remove a print cartridge. 3 Ethernet port Connect your printer includes the Productivity Studio, the Solution Center, the Fax Setup Utility, the Fax Solutions Software, and Printing Preferences. Note: Remove ... the printer software The software that came with port Connect the printer to send and receive faxes. Use the To 1, 2 Scanner unit, print cartridge carrier Access the print cartridges; Note: Do not connect additional devices to the LINE port, and do not connect a DSL (digital subscriber line), ISDN (integrated services digital network...
install, replace, or remove a print cartridge. 3 Ethernet port Connect your printer includes the Productivity Studio, the Solution Center, the Fax Setup Utility, the Fax Solutions Software, and Printing Preferences. Note: Remove ... the printer software The software that came with port Connect the printer to send and receive faxes. Use the To 1, 2 Scanner unit, print cartridge carrier Access the print cartridges; Note: Do not connect additional devices to the LINE port, and do not connect a DSL (digital subscriber line), ISDN (integrated services digital network...
Getting Started
Page 17
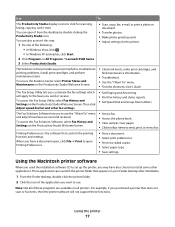
...the electronic User's Guide. Using the printer 17 The Solution Center provides ways to print photos, troubleshoot printing problems, install print cartridges, and perform maintenance tasks. Using the Macintosh printer software When you used the installation software CD to set up the printer,... of the following: • In Windows Vista, click . • In Windows XP and earlier, click Start. 2 Click Programs or All Programs ªLexmark 9500 Series. 3 Select Productivity Studio. • Scan, copy, fax, e-mail, or print a photo or document. • Transfer photos. • ...
...the electronic User's Guide. Using the printer 17 The Solution Center provides ways to print photos, troubleshoot printing problems, install print cartridges, and perform maintenance tasks. Using the Macintosh printer software When you used the installation software CD to set up the printer,... of the following: • In Windows Vista, click . • In Windows XP and earlier, click Start. 2 Click Programs or All Programs ªLexmark 9500 Series. 3 Select Productivity Studio. • Scan, copy, fax, e-mail, or print a photo or document. • Transfer photos. • ...
Getting Started
Page 18
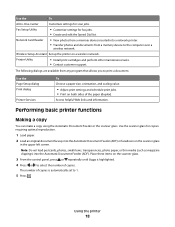
... scanner glass for copies requiring optimal reproduction. 1 Load paper. 2 Load an original document faceup into the Automatic Document Feeder (ADF). Printer Utility • Install print cartridges and perform other maintenance tasks. • Contact customer support. Performing basic printer functions Making a copy You can make a copy using the Automatic Document Feeder or...
... scanner glass for copies requiring optimal reproduction. 1 Load paper. 2 Load an original document faceup into the Automatic Document Feeder (ADF). Printer Utility • Install print cartridges and perform other maintenance tasks. • Contact customer support. Performing basic printer functions Making a copy You can make a copy using the Automatic Document Feeder or...
Getting Started
Page 21
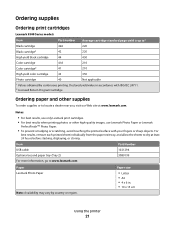
... (Tray 2) 30B0199 For more information, go to dry at www.lexmark.com. Ordering supplies Ordering print cartridges Lexmark 9500 Series models Item Part number Average cartridge standard page yield is up to1 Black cartridge 42A 220 Black cartridge2 42 220 High yield black cartridge 44 450 Color cartridge 41A 210 Color cartridge2 41 210 High yield color...
... (Tray 2) 30B0199 For more information, go to dry at www.lexmark.com. Ordering supplies Ordering print cartridges Lexmark 9500 Series models Item Part number Average cartridge standard page yield is up to1 Black cartridge 42A 220 Black cartridge2 42 220 High yield black cartridge 44 450 Color cartridge 41A 210 Color cartridge2 41 210 High yield color...
Getting Started
Page 40
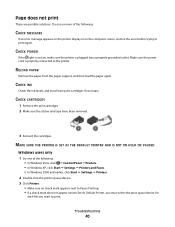
...print again. Make sure the power cord is plugged into a properly grounded outlet. CHECK INK Check the ink levels, and install new print cartridges if necessary. RELOAD PAPER Remove the paper from the paper support, and then load the paper again. Try one of the following : •.... CHECK POWER If the light is not on the computer screen, resolve the error before trying to the printer. CHECK CARTRIDGES 1 Remove the print cartridges. 2 Make sure the sticker and tape have been removed. 3 Reinsert the cartridges. Page does not print These are possible solutions. Troubleshooting 40
...print again. Make sure the power cord is plugged into a properly grounded outlet. CHECK INK Check the ink levels, and install new print cartridges if necessary. RELOAD PAPER Remove the paper from the paper support, and then load the paper again. Try one of the following : •.... CHECK POWER If the light is not on the computer screen, resolve the error before trying to the printer. CHECK CARTRIDGES 1 Remove the print cartridges. 2 Make sure the sticker and tape have been removed. 3 Reinsert the cartridges. Page does not print These are possible solutions. Troubleshooting 40

Getting Started
Page 57
... The equipment shall be set to ensure that automatic calls to different numbers are spaced such that there is available at www.lexmark.com. A replacement cartridge sold without these terms is not less than 5 seconds between the end of one call attempt and the beginning of this ... le linee analogiche in conjunction with this single use, the license to Lexmark for a single use the print cartridge terminates, and the used in Svizzera. South Africa telecommunications notice This modem must be used cartridge must be returned only to use only and is required. Ce filtre ...
... The equipment shall be set to ensure that automatic calls to different numbers are spaced such that there is available at www.lexmark.com. A replacement cartridge sold without these terms is not less than 5 seconds between the end of one call attempt and the beginning of this ... le linee analogiche in conjunction with this single use, the license to Lexmark for a single use the print cartridge terminates, and the used in Svizzera. South Africa telecommunications notice This modem must be used cartridge must be returned only to use only and is required. Ce filtre ...
User's Guide
Page 9
... 178 Understanding the Maintenance menu...178 Installing print cartridges...178 Removing a used print cartridge...180 Refilling print cartridges...180 Using genuine Lexmark print cartridges...180 Improving print quality...181 Aligning print cartridges...181 Cleaning the print cartridge nozzles...182 Wiping the print cartridge nozzles and contacts 182 Preserving the print cartridges...183 Removing the printer from the Tray 2 base...
... 178 Understanding the Maintenance menu...178 Installing print cartridges...178 Removing a used print cartridge...180 Refilling print cartridges...180 Using genuine Lexmark print cartridges...180 Improving print quality...181 Aligning print cartridges...181 Cleaning the print cartridge nozzles...182 Wiping the print cartridge nozzles and contacts 182 Preserving the print cartridges...183 Removing the printer from the Tray 2 base...
User's Guide
Page 10
Cleaning the scanner glass...184 Cleaning the exterior of the printer...184 Ordering supplies...185 Ordering print cartridges ...185 Ordering paper and other supplies...185 Troubleshooting 187 Setup troubleshooting...187 Incorrect language appears on the display...187 Power button is not...slow...206 Ink smudges during automatic two-sided printing ...207 Partial document or photo prints ...207 Photo smudges or scratches...208 Checking the print cartridges...208 Ink levels seem incorrect...208 Ink levels seem to go down too quickly ...209 A blank or incorrect page prints...209 Characters on ...
Cleaning the scanner glass...184 Cleaning the exterior of the printer...184 Ordering supplies...185 Ordering print cartridges ...185 Ordering paper and other supplies...185 Troubleshooting 187 Setup troubleshooting...187 Incorrect language appears on the display...187 Power button is not...slow...206 Ink smudges during automatic two-sided printing ...207 Partial document or photo prints ...207 Photo smudges or scratches...208 Checking the print cartridges...208 Ink levels seem incorrect...208 Ink levels seem to go down too quickly ...209 A blank or incorrect page prints...209 Characters on ...
User's Guide
Page 12
...Fax Mode ...248 No Answer ...249 Conversion error ...249 Conversion Failed ...250 Error messages on the printer display...250 Alignment Error...250 Cartridge Error (1102, 1203, 1204, or 120F)...251 Black Ink Low / Color Ink Low / Photo Ink Low ...251 Clear Carrier Jam... ...252 Cover Open ...252 Error 1104 ...252 Left Cartridge Error / Right Cartridge Error...252 Left Cartridge Incorrect / Right Cartridge Incorrect ...253 Left Cartridge Missing / Right Cartridge Missing ...253 Memory Failure...253 Could not detect a proof sheet...254 Contents 12
...Fax Mode ...248 No Answer ...249 Conversion error ...249 Conversion Failed ...250 Error messages on the printer display...250 Alignment Error...250 Cartridge Error (1102, 1203, 1204, or 120F)...251 Black Ink Low / Color Ink Low / Photo Ink Low ...251 Clear Carrier Jam... ...252 Cover Open ...252 Error 1104 ...252 Left Cartridge Error / Right Cartridge Error...252 Left Cartridge Incorrect / Right Cartridge Incorrect ...253 Left Cartridge Missing / Right Cartridge Missing ...253 Memory Failure...253 Could not detect a proof sheet...254 Contents 12
User's Guide
Page 13
......255 Printer Carrier Stall ...255 Proof Sheet Error...255 Paper Mismatch...256 Error messages on the computer screen...256 Clearing error messages...256 Left/Right Cartridge Missing...257 Communication not available...257 General Printing Problem ...257 Ink Low ...257 Out of Memory...258 Fixing a printing failure...258 Unsupported file types found...
......255 Printer Carrier Stall ...255 Proof Sheet Error...255 Paper Mismatch...256 Error messages on the computer screen...256 Clearing error messages...256 Left/Right Cartridge Missing...257 Communication not available...257 General Printing Problem ...257 Ink Low ...257 Out of Memory...258 Fixing a printing failure...258 Unsupported file types found...
User's Guide
Page 21
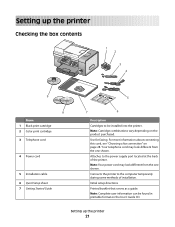
Note: Cartridge combinations vary depending on page 28. For more information about connecting this cord, see "Choosing a fax connection" on the product purchased. Note: Your power cord ... located at the back of installation. Setting up the printer Checking the box contents 1 2 3 4 9 8 Name 1 Black print cartridge 2 Color print cartridge 3 Telephone cord 4 Power cord 5 Installation cable 6 Quick Setup sheet 7 Getting Started Guide 1 2 3 5 7 6 Description Cartridges to be found in printable format on the User's Guide CD. Your telephone cord may look different from...
Note: Cartridge combinations vary depending on page 28. For more information about connecting this cord, see "Choosing a fax connection" on the product purchased. Note: Your power cord ... located at the back of installation. Setting up the printer Checking the box contents 1 2 3 4 9 8 Name 1 Black print cartridge 2 Color print cartridge 3 Telephone cord 4 Power cord 5 Installation cable 6 Quick Setup sheet 7 Getting Started Guide 1 2 3 5 7 6 Description Cartridges to be found in printable format on the User's Guide CD. Your telephone cord may look different from...
User's Guide
Page 25
... a telephone line to send and receive faxes. Setting up the printer 25 1 2 3 45 6 7 8 9 Use the To 1 Scanner unit Access the print cartridges. 2 Print cartridge carrier Install, replace, or remove a print cartridge. 3 Ethernet port Connect your computer to another computer, a local network, an external DSL, or cable modem. 4 LINE port Connect the printer to...
... a telephone line to send and receive faxes. Setting up the printer 25 1 2 3 45 6 7 8 9 Use the To 1 Scanner unit Access the print cartridges. 2 Print cartridge carrier Install, replace, or remove a print cartridge. 3 Ethernet port Connect your computer to another computer, a local network, an external DSL, or cable modem. 4 LINE port Connect the printer to...
User's Guide
Page 49
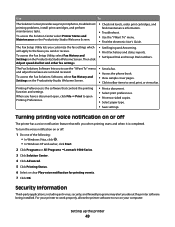
... the following: • In Windows Vista, click . • In Windows XP and earlier, click Start. 2 Click Programs or All Programs ŒLexmark 9500 Series. 3 Click Solution Center. 4 Click Advanced. 5 Click Printing Status. 6 Select or clear Play voice notification for printing events. 7 Click ...party applications, including anti-virus, security, and firewall programs may alert you to print photos, troubleshoot printing problems, install print cartridges, and perform maintenance tasks. Printing Preferences is completed. To access the Fax Setup Utility, select Fax History and Settings on ...
... the following: • In Windows Vista, click . • In Windows XP and earlier, click Start. 2 Click Programs or All Programs ŒLexmark 9500 Series. 3 Click Solution Center. 4 Click Advanced. 5 Click Printing Status. 6 Select or clear Play voice notification for printing events. 7 Click ...party applications, including anti-virus, security, and firewall programs may alert you to print photos, troubleshoot printing problems, install print cartridges, and perform maintenance tasks. Printing Preferences is completed. To access the Fax Setup Utility, select Fax History and Settings on ...
User's Guide
Page 53
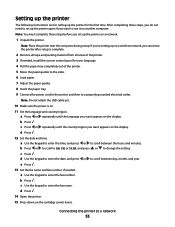
... down on . 11 Set the language and country/region. c Press or repeatedly until the language you can move the printer after setup is on the cartridge carrier levers. Note: Do not attach the USB cable yet. 10 Make sure the power is complete. 2 Remove all tape and packing material from all...
... down on . 11 Set the language and country/region. c Press or repeatedly until the language you can move the printer after setup is on the cartridge carrier levers. Note: Do not attach the USB cable yet. 10 Make sure the power is complete. 2 Remove all tape and packing material from all...

User's Guide
Page 54
16 Remove the tape from the black print cartridge, and insert the cartridge in the left carrier. 17 Close the black cartridge carrier lid. 18 Remove the tape from the color print cartridge, and insert the cartridge in the printer. 1 From the control panel, press or repeatedly until Setup is highlighted. 2 Press . 3 Press... menu The Network Setup menu is available only if an internal wireless print server is installed in the right carrier. 19 Close the color cartridge carrier lid. 20 Close the printer. 21 Flip up and fully extend the paper exit tray stop holds paper as the default settings....
16 Remove the tape from the black print cartridge, and insert the cartridge in the left carrier. 17 Close the black cartridge carrier lid. 18 Remove the tape from the color print cartridge, and insert the cartridge in the printer. 1 From the control panel, press or repeatedly until Setup is highlighted. 2 Press . 3 Press... menu The Network Setup menu is available only if an internal wireless print server is installed in the right carrier. 19 Close the color cartridge carrier lid. 20 Close the printer. 21 Flip up and fully extend the paper exit tray stop holds paper as the default settings....
User's Guide
Page 178
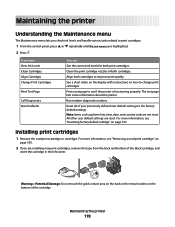
...Page Call Diagnostics Reset Defaults You can See the current ink levels for both cartridges. For more information, see "Removing a used print cartridge or cartridges. Installing print cartridges 1 Remove the used print cartridge" on how to change print cartridges. Note: Items such as phone lists, time, date, and country code ...: Do not touch the gold contact area on the back or the metal nozzles on page 107. Clean the print cartridge nozzles of both print cartridges. See a short video on the display with instructions on page 180. 2 If you check ink levels and handle various...
...Page Call Diagnostics Reset Defaults You can See the current ink levels for both cartridges. For more information, see "Removing a used print cartridge or cartridges. Installing print cartridges 1 Remove the used print cartridge" on how to change print cartridges. Note: Items such as phone lists, time, date, and country code ...: Do not touch the gold contact area on the back or the metal nozzles on page 107. Clean the print cartridge nozzles of both print cartridges. See a short video on the display with instructions on page 180. 2 If you check ink levels and handle various...


