User's Guide
Page 6
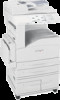
...flash memory or firmware card ...93 Installing an option card ...94 Replacing the access panel ...95 Chapter 10: Maintaining the MFP 96 Determining the status of supplies ...97 Conserving supplies ...98 Ordering supplies ...98 Cleaning the flatbed and backing material 100 Chapter 11: Clearing jams 101 Identifying jams ...101 Access doors and trays ...102 Understanding jam numbers ...103 Clearing jams ...103 Clearing staple jams ...122 Clearing ADF Jams ...124 Chapter 12: Administrative support 126 Adjusting control panel brightness ...126 Restoring factory default settings ...126 Adjusting...
...flash memory or firmware card ...93 Installing an option card ...94 Replacing the access panel ...95 Chapter 10: Maintaining the MFP 96 Determining the status of supplies ...97 Conserving supplies ...98 Ordering supplies ...98 Cleaning the flatbed and backing material 100 Chapter 11: Clearing jams 101 Identifying jams ...101 Access doors and trays ...102 Understanding jam numbers ...103 Clearing jams ...103 Clearing staple jams ...122 Clearing ADF Jams ...124 Chapter 12: Administrative support 126 Adjusting control panel brightness ...126 Restoring factory default settings ...126 Adjusting...

User's Guide
Page 11
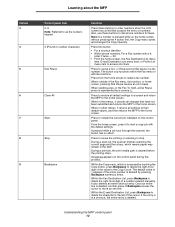
... MFP control panel 11 Allows for making selections within Copy, Fax, and so on , but idle. Solid red Operator intervention is warming up, processing data, or printing a job. The MFP control panel consists of the MFP using the colors red and green. Status Indicates Off MFP power is on . Solid green MFP is off. Changing a setting from the application, use , the print driver, MarkVision™ Professional, or Web pages. Settings changed from the MFP control panel, MarkVision Professional, or the Web pages makes that setting the user default...
... MFP control panel 11 Allows for making selections within Copy, Fax, and so on , but idle. Solid red Operator intervention is warming up, processing data, or printing a job. The MFP control panel consists of the MFP using the colors red and green. Status Indicates Off MFP power is on . Solid green MFP is off. Changing a setting from the application, use , the print driver, MarkVision™ Professional, or Web pages. Settings changed from the MFP control panel, MarkVision Professional, or the Web pages makes that setting the user default...
User's Guide
Page 12
... cleared before the printing stops. When sending a fax, in the Copy Count. During a scan job, the scanner finishes scanning the current page and then stops, which is represented by pressing Backspace numerous times. Within the Copy menu, which means paper may remain in the menus, it twice - ##. • From the home screen, the Fax Destination List menu item, E-mail Destination List menu item, or Profile List menu item to access shortcuts Press to redial a fax number. It also deletes...
... cleared before the printing stops. When sending a fax, in the Copy Count. During a scan job, the scanner finishes scanning the current page and then stops, which is represented by pressing Backspace numerous times. Within the Copy menu, which means paper may remain in the menus, it twice - ##. • From the home screen, the Fax Destination List menu item, E-mail Destination List menu item, or Profile List menu item to access shortcuts Press to redial a fax number. It also deletes...
User's Guide
Page 23
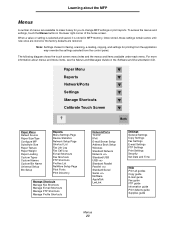
... and Messages Guide on the Software and Documentation CD. Note: Settings chosen for faxing, scanning, e-mailing, copying, and settings for you to make it is stored in MFP memory. The following diagram shows the touch screen menu index and the menus and items available under each menu. Back Paper Menu Default Source Paper Size/Type Configure MP Substitute Size Paper Texture Paper Weight Paper Loading Custom Types Custom Names Custom Bin Name Universal Setup Bin Setup Reports Menu Settings Page Device Statistics Network Setup Page Shortcut List Fax Job Log Fax Call...
... and Messages Guide on the Software and Documentation CD. Note: Settings chosen for faxing, scanning, e-mailing, copying, and settings for you to make it is stored in MFP memory. The following diagram shows the touch screen menu index and the menus and items available under each menu. Back Paper Menu Default Source Paper Size/Type Configure MP Substitute Size Paper Texture Paper Weight Paper Loading Custom Types Custom Names Custom Bin Name Universal Setup Bin Setup Reports Menu Settings Page Device Statistics Network Setup Page Shortcut List Fax Job Log Fax Call...

User's Guide
Page 26
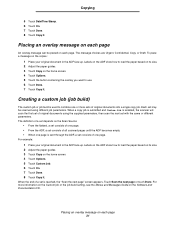
... change Paper Saver, Advanced Imaging, Separator Sheets, Margin Shift, Edge Erase, Date/ Time Stamp, Overlay, Content, or Advance Duplex settings. • Paper Saver-Takes two or more sheets of a margin you copy the document. • Custom Job (Job Build)-Combines multiple scanning jobs into a single job. • Custom Job is too large, the copy will then be ordered (1,1,1) (2,2,2) (3,3,3). Options-Opens a screen to set how much of an original document and prints them together on ; The separator sheets...
... change Paper Saver, Advanced Imaging, Separator Sheets, Margin Shift, Edge Erase, Date/ Time Stamp, Overlay, Content, or Advance Duplex settings. • Paper Saver-Takes two or more sheets of a margin you copy the document. • Custom Job (Job Build)-Combines multiple scanning jobs into a single job. • Custom Job is too large, the copy will then be ordered (1,1,1) (2,2,2) (3,3,3). Options-Opens a screen to set how much of an original document and prints them together on ; The separator sheets...

User's Guide
Page 29
... to Auto. 5 Touch Copy It. to load the paper based on its size. 2 Adjust the paper guides. 3 Touch Copy on the ADF show how to enlarge or reduce your copies duplexed. If you don't need to do anything; To reduce or enlarge a copy: 1 Place your original document in the ADF face up . For example, two copies of three pages will print page 1, page 2, page 3, page 1, page 2, page 3. Copying 4 Touch the button that are mostly text or line...
... to Auto. 5 Touch Copy It. to load the paper based on its size. 2 Adjust the paper guides. 3 Touch Copy on the ADF show how to enlarge or reduce your copies duplexed. If you don't need to do anything; To reduce or enlarge a copy: 1 Place your original document in the ADF face up . For example, two copies of three pages will print page 1, page 2, page 3, page 1, page 2, page 3. Copying 4 Touch the button that are mostly text or line...
User's Guide
Page 31
... a copy job is submitted and Custom Job is reached, the "Scan the next page" screen appears. For example: 1 Place your original document in the ADF face up . When the end of a set is enabled, the scanner will scan the first set of original documents using different job parameters. Labels on the ADF show how to load the paper based on its size. 2 Adjust the paper guides. 3 Touch Copy on the home screen. 4 Touch Options. 5 Touch the button...
... a copy job is submitted and Custom Job is reached, the "Scan the next page" screen appears. For example: 1 Place your original document in the ADF face up . When the end of a set is enabled, the scanner will scan the first set of original documents using different job parameters. Labels on the ADF show how to load the paper based on its size. 2 Adjust the paper guides. 3 Touch Copy on the home screen. 4 Touch Options. 5 Touch the button...
User's Guide
Page 37
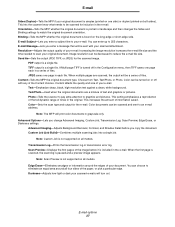
... the Configuration menu, then TIFF saves one page in a series of files. Send As-Sets the output (PDF, TIFF, or JPEG) for the e-mail. TIFF output is a single file. Text/Photo-Used when the original documents are scanned, the output will be turned on the long-edge or short-edge side. Photo-Tells the scanner to pay extra attention to be a series of files. Color-Sets the scan type and output for the scanned image. E-mail options 37 E-mail Sides (Duplex)-Tells the MFP...
... the Configuration menu, then TIFF saves one page in a series of files. Send As-Sets the output (PDF, TIFF, or JPEG) for the e-mail. TIFF output is a single file. Text/Photo-Used when the original documents are scanned, the output will be turned on the long-edge or short-edge side. Photo-Tells the scanner to pay extra attention to be a series of files. Color-Sets the scan type and output for the scanned image. E-mail options 37 E-mail Sides (Duplex)-Tells the MFP...
User's Guide
Page 49
... the FTP site. Text/Photo-Used when the original documents are scanned, the output will make that portion of tones in the e-mail. Darkness-Adjusts how light or dark your file. JPEG saves one page in each in the Configuration menu, then TIFF saves one side) or duplex (printed on all models. Content affects the quality and size of your scanned documents will print color documents in the FTP file. This setting emphasizes a reproduction of the...
... the FTP site. Text/Photo-Used when the original documents are scanned, the output will make that portion of tones in the e-mail. Darkness-Adjusts how light or dark your file. JPEG saves one page in each in the Configuration menu, then TIFF saves one side) or duplex (printed on all models. Content affects the quality and size of your scanned documents will print color documents in the FTP file. This setting emphasizes a reproduction of the...

User's Guide
Page 52
... or USB flash memory device Understanding scan to PC options To change the options for the scanned image. Gray JPEG Photo - If Multi-page TIFF is turned off in the e-mail. Photo-Tells the scanner to pay extra attention to PC options 52 This increases the amount of files. Color TIFF Photo - TIFF output is a single file. Text/Photo-Used when the original documents are a mixture of the original documents. Color-Tells the MFP the color of...
... or USB flash memory device Understanding scan to PC options To change the options for the scanned image. Gray JPEG Photo - If Multi-page TIFF is turned off in the e-mail. Photo-Tells the scanner to pay extra attention to PC options 52 This increases the amount of files. Color TIFF Photo - TIFF output is a single file. Text/Photo-Used when the original documents are a mixture of the original documents. Color-Tells the MFP the color of...
User's Guide
Page 54
... send the job to print. 2 From the File menu, select Print. 3 Select the MFP in the MFP driver window, open the online Help for the specific job you want to print or the number of the driver packages and Lexmark driver support, are sending to see Avoiding jams and Storing print media. This chapter also provides information on the control panel so you can insert a USB flash memory device and print the following types of the available MFP settings you want to the MFP. Updated drivers...
... send the job to print. 2 From the File menu, select Print. 3 Select the MFP in the MFP driver window, open the online Help for the specific job you want to print or the number of the driver packages and Lexmark driver support, are sending to see Avoiding jams and Storing print media. This chapter also provides information on the control panel so you can insert a USB flash memory device and print the following types of the available MFP settings you want to the MFP. Updated drivers...
User's Guide
Page 57
Printing the menu settings page You can print a menu settings page to review the default MFP settings and to verify the MFP options are installed correctly. 1 Make sure the MFP is on and the Ready message appears. 2 Touch the Menus button on the control panel. 3 Touch Reports. 4 Touch Network Setup Page. Printing a font sample list To print samples of print jobs appears in the dock. 1 Open Applications Æ Utilities, and then double-click Print Center or Printer Setup. 2 Double-click the MFP you are printing to. 3 In the printer window, select...
Printing the menu settings page You can print a menu settings page to review the default MFP settings and to verify the MFP options are installed correctly. 1 Make sure the MFP is on and the Ready message appears. 2 Touch the Menus button on the control panel. 3 Touch Reports. 4 Touch Network Setup Page. Printing a font sample list To print samples of print jobs appears in the dock. 1 Open Applications Æ Utilities, and then double-click Print Center or Printer Setup. 2 Double-click the MFP you are printing to. 3 In the printer window, select...

User's Guide
Page 84
... preprinted forms and letterhead Use the following table for help when loading letterhead in the source. • Flex paper back and forth. Use inks that does not support auto size sensing. • Do not remove trays while a job is printing or Busy appears on the operator panel. • Make sure the Paper Type, Paper Texture, and Paper Weight settings are correct. (See "Paper Menu" in the Menus and Messages Guide located on letterhead Check with the manufacturer...
... preprinted forms and letterhead Use the following table for help when loading letterhead in the source. • Flex paper back and forth. Use inks that does not support auto size sensing. • Do not remove trays while a job is printing or Busy appears on the operator panel. • Make sure the Paper Type, Paper Texture, and Paper Weight settings are correct. (See "Paper Menu" in the Menus and Messages Guide located on letterhead Check with the manufacturer...
User's Guide
Page 87
...; Set the Paper Type in its original wrapper until you are considering using card stock that can avoid most jams. For detailed tray loading instructions, see the following guidelines to Card Stock from the operator panel, from the MFP driver, or from MarkVision Professional. Set this from the operator panel, the MFP driver, or from MarkVision Professional. Set the Paper Weight to CardStock Weight, and set the CardStock Weight to help ensure trouble-free printing. Note...
...; Set the Paper Type in its original wrapper until you are considering using card stock that can avoid most jams. For detailed tray loading instructions, see the following guidelines to Card Stock from the operator panel, from the MFP driver, or from MarkVision Professional. Set this from the operator panel, the MFP driver, or from MarkVision Professional. Set the Paper Weight to CardStock Weight, and set the CardStock Weight to help ensure trouble-free printing. Note...
User's Guide
Page 98
... Lexmark Web site at 1-800-539-6275 for ordering these settings, see the Menus and Messages Guide on one no longer prints satisfactorily. touch the Menus button Æ Printer Settings Æ Quality Menu Lets you adjust the level of toner released on a sheet of a multiple-copy job to replace MFP maintenance items. Order a maintenance kit when 80 Scheduled Maintenance first appears on both sides of a sheet of a sheet. touch the Menus button Æ Printer Settings Æ Finishing Menu Duplex printing...
... Lexmark Web site at 1-800-539-6275 for ordering these settings, see the Menus and Messages Guide on one no longer prints satisfactorily. touch the Menus button Æ Printer Settings Æ Quality Menu Lets you adjust the level of toner released on a sheet of a multiple-copy job to replace MFP maintenance items. Order a maintenance kit when 80 Scheduled Maintenance first appears on both sides of a sheet of a sheet. touch the Menus button Æ Printer Settings Æ Finishing Menu Duplex printing...
User's Guide
Page 137
... the service message error condition. However, the MFP will stop printing and the errors are non-recoverable. The Print dialog appears. 3 Check the Print as image box. 4 Click OK. It may be possible to the MFP and the host computer, print server, option, or other network device. Printing multiple language PDFs Symptom Cause Some documents do not The documents contain print. Online technical support Technical support is securely attached to power the MFP off , wait at www.lexmark.com...
... the service message error condition. However, the MFP will stop printing and the errors are non-recoverable. The Print dialog appears. 3 Check the Print as image box. 4 Click OK. It may be possible to the MFP and the host computer, print server, option, or other network device. Printing multiple language PDFs Symptom Cause Some documents do not The documents contain print. Online technical support Technical support is securely attached to power the MFP off , wait at www.lexmark.com...
User's Guide
Page 138
... message does not appear, turn the MFP back on the display before receive data. The specified input tray Load paper in the tray. You are supported. Set Page Protect to Off under Settings Æ General Settings Æ Print Recovery. See the Software and Documentation CD or the Lexmark Web site for information. Make sure you have properly configured the MFP for service. Held jobs do not print. A formatting error has occurred. Make sure the Paper Size and Paper Type specified in the MFP driver...
... message does not appear, turn the MFP back on the display before receive data. The specified input tray Load paper in the tray. You are supported. Set Page Protect to Off under Settings Æ General Settings Æ Print Recovery. See the Software and Documentation CD or the Lexmark Web site for information. Make sure you have properly configured the MFP for service. Held jobs do not print. A formatting error has occurred. Make sure the Paper Size and Paper Type specified in the MFP driver...
User's Guide
Page 141
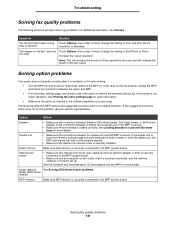
... fax document takes a long Touch Options, then under Content, change the setting to transmit. See Loading standard or optional 500-sheet trays for more information. • Make sure the option is not listed, reinstall it is securely connected, and the network software is securely installed. See the Software and Documentation CD that it . The images on the menu settings page, but print media jams when it is securely connected to the MFP system board. Increase the output...
... fax document takes a long Touch Options, then under Content, change the setting to transmit. See Loading standard or optional 500-sheet trays for more information. • Make sure the option is not listed, reinstall it is securely connected, and the network software is securely installed. See the Software and Documentation CD that it . The images on the menu settings page, but print media jams when it is securely connected to the MFP system board. Increase the output...

User's Guide
Page 146
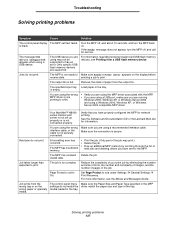
... remaining toner, remove the cartridge by the MFP, the host computer, and the software application. • Verify the print media type and print tray type settings match. • Verify you are using preprinted forms, make sure the job lines per inch (lpi) setting is not set too high in the Quality menu to 600 dpi, 1200 dpi, or 2400 Image Q. • Enable Enhance Fine Lines. Repeat this procedure multiple times until the print remains...
... remaining toner, remove the cartridge by the MFP, the host computer, and the software application. • Verify the print media type and print tray type settings match. • Verify you are using preprinted forms, make sure the job lines per inch (lpi) setting is not set too high in the Quality menu to 600 dpi, 1200 dpi, or 2400 Image Q. • Enable Enhance Fine Lines. Repeat this procedure multiple times until the print remains...

User's Guide
Page 160
... printing 26 O operator panel brightness 126 contrast 126 options e-mail 36 ordering photoconductor 98 toner cartridge 98 P paper letterhead 84 preprinted forms 84 recommended types 82 unsatisfactory types 83 paper saver 26 paper saving 30 paper tray adjustment 63, 69 password Print Faxes Password 129 setting Print Faxes Password 129 Password Protect, setting for the menus 127 PIN entering at the MFP 59 entering from the driver 58 for confidential jobs 58 ports, disabling 132 Pound button 12 Power Saver, adjusting 127 preprinted forms 84 print cartridge...
... printing 26 O operator panel brightness 126 contrast 126 options e-mail 36 ordering photoconductor 98 toner cartridge 98 P paper letterhead 84 preprinted forms 84 recommended types 82 unsatisfactory types 83 paper saver 26 paper saving 30 paper tray adjustment 63, 69 password Print Faxes Password 129 setting Print Faxes Password 129 Password Protect, setting for the menus 127 PIN entering at the MFP 59 entering from the driver 58 for confidential jobs 58 ports, disabling 132 Pound button 12 Power Saver, adjusting 127 preprinted forms 84 print cartridge...

