User's Guide
Page 12
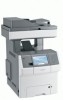
Printer configurations Basic model 1 2 3 6 1 Automatic Document Feeder (ADF) 2 ADF input tray 3 Standard exit bin 4 Printer control panel 5 Standard 550-sheet tray (Tray 1) 6 Multipurpose feeder 4 5 Learning about the printer 12
Printer configurations Basic model 1 2 3 6 1 Automatic Document Feeder (ADF) 2 ADF input tray 3 Standard exit bin 4 Printer control panel 5 Standard 550-sheet tray (Tray 1) 6 Multipurpose feeder 4 5 Learning about the printer 12
User's Guide
Page 13
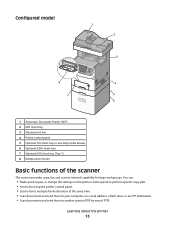
Configured model 1 2 3 8 4 7 5 6 1 Automatic Document Feeder (ADF) 2 ADF input tray 3 Standard exit bin 4 Printer control panel 5 Optional 550-sheet tray or specialty media drawer 6 Optional 2,000-sheet tray 7 Standard 550-sheet tray (Tray 1) 8 Multipurpose feeder Basic functions of the scanner The scanner provides copy, fax, and scan-to another printer (PDF by way of ...
Configured model 1 2 3 8 4 7 5 6 1 Automatic Document Feeder (ADF) 2 ADF input tray 3 Standard exit bin 4 Printer control panel 5 Optional 550-sheet tray or specialty media drawer 6 Optional 2,000-sheet tray 7 Standard 550-sheet tray (Tray 1) 8 Multipurpose feeder Basic functions of the scanner The scanner provides copy, fax, and scan-to another printer (PDF by way of ...
User's Guide
Page 59
... to Black Only. Choose scanning You can avoid making multiple copies of a document: • Use the Lexmark preview feature, which you can select from the Print dialog, the Lexmark Toolbar, or the printer display, to see what the document will look like before the first page is printed.... • The printer enters Power Saver mode after one minute of inactivity. • When the printer enters Power Saver mode, the printer control panel display and the standard exit bin...
... to Black Only. Choose scanning You can avoid making multiple copies of a document: • Use the Lexmark preview feature, which you can select from the Print dialog, the Lexmark Toolbar, or the printer display, to see what the document will look like before the first page is printed.... • The printer enters Power Saver mode after one minute of inactivity. • When the printer enters Power Saver mode, the printer control panel display and the standard exit bin...
User's Guide
Page 62
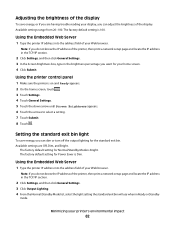
...IP section. 2 Click Settings, and then click General Settings. 3 Click Output Lighting. 4 From the Normal/Standby Mode list, select the light setting the standard exit bin will use when in the brightness percentage you can adjust the brightness of the display. Using the Embedded Web Server 1 Type the printer IP address...Standby Mode is Dim. Using the Embedded Web Server 1 Type the printer IP address into the address field of your Web browser. Setting the standard exit bin light To save energy, or if you are Off, Dim, and Bright. Note: If you do not know the IP address of the ...
...IP section. 2 Click Settings, and then click General Settings. 3 Click Output Lighting. 4 From the Normal/Standby Mode list, select the light setting the standard exit bin will use when in the brightness percentage you can adjust the brightness of the display. Using the Embedded Web Server 1 Type the printer IP address...Standby Mode is Dim. Using the Embedded Web Server 1 Type the printer IP address into the address field of your Web browser. Setting the standard exit bin light To save energy, or if you are Off, Dim, and Bright. Note: If you do not know the IP address of the ...
User's Guide
Page 63
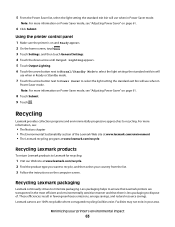
... www.lexmark.com/environment • The Lexmark recycling program at www.lexmark.com/recycle Recycling Lexmark products To return Lexmark products to Lexmark for recycling: 1 Visit our Web site at www.lexmark.com/recycle. 2 Find the product type you want to select the light setting the standard exit bin will use when in Power Saver mode. Recycling Lexmark packaging Lexmark continually...
... www.lexmark.com/environment • The Lexmark recycling program at www.lexmark.com/recycle Recycling Lexmark products To return Lexmark products to Lexmark for recycling: 1 Visit our Web site at www.lexmark.com/recycle. 2 Find the product type you want to select the light setting the standard exit bin will use when in Power Saver mode. Recycling Lexmark packaging Lexmark continually...
User's Guide
Page 183
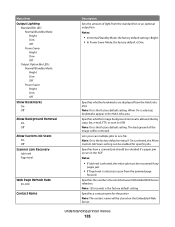
Specifies whether bookmarks are displayed from the standard bin or an optional output bin Notes: • In Normal/Standby Mode, the factory default setting is Bright. • In Power Saver Mode, the factory default is Dim. Specifies a contact name ... entire job must be reloaded if a paper jam occurs in the Held Jobs area. Menu item Output Lighting Standard Bin LED Normal/Standby Mode Bright Dim Off Power Saver Bright Dim Off Output Option Bin LEDs Normal/Standby Mode Bright Dim Off Power Saver Bright Dim Off Show Bookmarks On Off Allow Background...
Specifies whether bookmarks are displayed from the standard bin or an optional output bin Notes: • In Normal/Standby Mode, the factory default setting is Bright. • In Power Saver Mode, the factory default is Dim. Specifies a contact name ... entire job must be reloaded if a paper jam occurs in the Held Jobs area. Menu item Output Lighting Standard Bin LED Normal/Standby Mode Bright Dim Off Power Saver Bright Dim Off Output Option Bin LEDs Normal/Standby Mode Bright Dim Off Power Saver Bright Dim Off Show Bookmarks On Off Allow Background...
User's Guide
Page 196
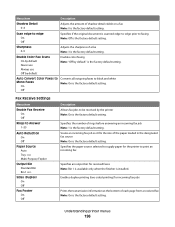
... setting. Specifies the number of a fax Note: 3 is the factory default setting. Enables duplex printing (two-sided printing) for received faxes Note: Bin 1 is available only when the finisher is installed. Understanding printer menus 196 Enables color faxing Note: "Off by default Auto Convert Color Faxes to Mono... item Enable Fax Receive On Off Rings to Answer 1-25 Auto Reduction On Off Paper Source Auto Tray Multi-Purpose Feeder Output Bin Standard Bin Bin 1 Sides (Duplex) On Off Fax Footer On Off Description Allows fax jobs to print an incoming fax Specifies an output...
... setting. Specifies the number of a fax Note: 3 is the factory default setting. Enables duplex printing (two-sided printing) for received faxes Note: Bin 1 is available only when the finisher is installed. Understanding printer menus 196 Enables color faxing Note: "Off by default Auto Convert Color Faxes to Mono... item Enable Fax Receive On Off Rings to Answer 1-25 Auto Reduction On Off Paper Source Auto Tray Multi-Purpose Feeder Output Bin Standard Bin Bin 1 Sides (Duplex) On Off Fax Footer On Off Description Allows fax jobs to print an incoming fax Specifies an output...

User's Guide
Page 198
...Log Paper Source Tray Manual Feeder Logs Display Remote Station Name Dialed Number Enable Job Log On Off Enable Call Log On Off Log Output Bin Standard Bin Bin Speaker Settings Menu item Speaker Mode Always Off On until Connected Always On Speaker Volume High Low Ringer Volume On Off Distinctive Rings Menu ... the dialed number or the station name returned Enables access to the Fax Job log Enables access to the Fax Call log Specifies the output bin where fax logs are printed Description Notes: • Always Off turns the speaker off. • On until the fax connection is the factory default...
...Log Paper Source Tray Manual Feeder Logs Display Remote Station Name Dialed Number Enable Job Log On Off Enable Call Log On Off Log Output Bin Standard Bin Bin Speaker Settings Menu item Speaker Mode Always Off On until Connected Always On Speaker Volume High Low Ringer Volume On Off Distinctive Rings Menu ... the dialed number or the station name returned Enables access to the Fax Job log Enables access to the Fax Call log Specifies the output bin where fax logs are printed Description Notes: • Always Off turns the speaker off. • On until the fax connection is the factory default...
User's Guide
Page 229
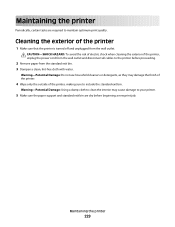
Warning-Potential Damage: Do not use household cleaners or detergents, as they may cause damage to include the standard exit bin. Warning-Potential Damage: Using a damp cloth to clean the interior may damage the finish of the printer. 4 Wipe only the outside of the printer, making... sure to your printer. 5 Make sure the paper support and standard exit bin are required to the printer before beginning a new print job. Maintaining the printer 229 CAUTION-SHOCK HAZARD: To avoid the risk of electric shock when...
Warning-Potential Damage: Do not use household cleaners or detergents, as they may cause damage to include the standard exit bin. Warning-Potential Damage: Using a damp cloth to clean the interior may damage the finish of the printer. 4 Wipe only the outside of the printer, making... sure to your printer. 5 Make sure the paper support and standard exit bin are required to the printer before beginning a new print job. Maintaining the printer 229 CAUTION-SHOCK HAZARD: To avoid the risk of electric shock when...

User's Guide
Page 259
... restarted. Scan Document Too Long The scan job exceeds the maximum number of paper from standard output bin Remove the stack of pages. Touch Continue to print the fax job. Troubleshooting 259 Remove paper from the standard exit bin. An error occurred on the printer hard disk. • Touch Do not restore if you...
... restarted. Scan Document Too Long The scan job exceeds the maximum number of paper from standard output bin Remove the stack of pages. Touch Continue to print the fax job. Troubleshooting 259 Remove paper from the standard exit bin. An error occurred on the printer hard disk. • Touch Do not restore if you...
User's Guide
Page 272
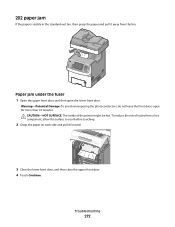
... the photoconductors, do not leave the front doors open the lower front door. Troubleshooting 272 202 paper jam If the paper is visible in the standard exit bin, then grasp the paper and pull it away from a hot component, allow the surface to cool before touching. 2 Grasp the paper on each side... it forward. 3 Close the lower front door, and then close the upper front door. 4 Touch Continue. CAUTION-HOT SURFACE: The inside of injury from the bin. Paper jam under the fuser 1 Open the upper front door, and then open for more than 10 minutes.
... the photoconductors, do not leave the front doors open the lower front door. Troubleshooting 272 202 paper jam If the paper is visible in the standard exit bin, then grasp the paper and pull it away from a hot component, allow the surface to cool before touching. 2 Grasp the paper on each side... it forward. 3 Close the lower front door, and then close the upper front door. 4 Touch Continue. CAUTION-HOT SURFACE: The inside of injury from the bin. Paper jam under the fuser 1 Open the upper front door, and then open for more than 10 minutes.
User's Guide
Page 273
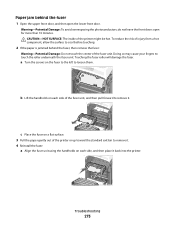
... remove it back into the printer. c Place the fuser on a flat surface. 3 Pull the paper gently out of the printer or up toward the standard exit bin to remove it. 4 Reinstall the fuser: a Align the fuser unit using the handholds on each side of the fuser unit, and then pull forward to...
... remove it back into the printer. c Place the fuser on a flat surface. 3 Pull the paper gently out of the printer or up toward the standard exit bin to remove it. 4 Reinstall the fuser: a Align the fuser unit using the handholds on each side of the fuser unit, and then pull forward to...
User's Guide
Page 274
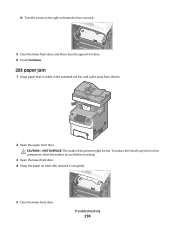
CAUTION-HOT SURFACE: The inside of injury from the bin. 2 Open the upper front door. Troubleshooting 274 To reduce the risk of the printer might be hot. b Turn the screws to the right to fasten the fuser securely. 5 Close the lower front door, and then close the upper front door. 6 Touch Continue. 203 paper jam 1 Grasp paper that is visible in the standard exit bin, and pull it away from a hot component, allow the surface to cool before touching. 3 Open the lower front door. 4 Grasp the paper on each side, and pull it out gently. 5 Close the lower front door.
CAUTION-HOT SURFACE: The inside of injury from the bin. 2 Open the upper front door. Troubleshooting 274 To reduce the risk of the printer might be hot. b Turn the screws to the right to fasten the fuser securely. 5 Close the lower front door, and then close the upper front door. 6 Touch Continue. 203 paper jam 1 Grasp paper that is visible in the standard exit bin, and pull it away from a hot component, allow the surface to cool before touching. 3 Open the lower front door. 4 Grasp the paper on each side, and pull it out gently. 5 Close the lower front door.

User's Guide
Page 281
... a job to the network. For more information about installing a network printer, click View User's Guide and Documentation on the Lexmark Web site at www.lexmark.com. For more information, see the setup documentation that the status shows Connected. MAKE SURE PRINTER CABLES ARE SECURELY CONNECTED Check...print server is Not Connected, check the network cables, and then try printing the network setup page again. Copies of paper from the standard exit bin. Jobs do not print These are also available on the Software and Documentation CD. • Print a network setup page and check...
... a job to the network. For more information about installing a network printer, click View User's Guide and Documentation on the Lexmark Web site at www.lexmark.com. For more information, see the setup documentation that the status shows Connected. MAKE SURE PRINTER CABLES ARE SECURELY CONNECTED Check...print server is Not Connected, check the network cables, and then try printing the network setup page again. Copies of paper from the standard exit bin. Jobs do not print These are also available on the Software and Documentation CD. • Print a network setup page and check...
User's Guide
Page 332
conservation settings brightness, adjusting 62 Eco-Mode 59 Power Saver 61 Quiet Mode 60 standard exit bin lighting 62 conserving supplies 58 contacting Customer Support 311 control panel, printer 16 copy quality adjusting 97 improving 104 copy screen options 101, 102, 103 ..., 322 enlarging a copy 96 envelopes loading 68 tips 83 environmental settings 58 brightness, adjusting 62 Eco-Mode 59 Power Saver 61 Quiet Mode 60 standard exit bin lighting 62 Ethernet networking Macintosh 51 Windows 51 Ethernet port 42 Index 332 exterior of the printer cleaning 229 e-mail canceling 109 disabling 43, 256...
conservation settings brightness, adjusting 62 Eco-Mode 59 Power Saver 61 Quiet Mode 60 standard exit bin lighting 62 conserving supplies 58 contacting Customer Support 311 control panel, printer 16 copy quality adjusting 97 improving 104 copy screen options 101, 102, 103 ..., 322 enlarging a copy 96 envelopes loading 68 tips 83 environmental settings 58 brightness, adjusting 62 Eco-Mode 59 Power Saver 61 Quiet Mode 60 standard exit bin lighting 62 Ethernet networking Macintosh 51 Windows 51 Ethernet port 42 Index 332 exterior of the printer cleaning 229 e-mail canceling 109 disabling 43, 256...
User's Guide
Page 333
... job interrupt 100 L labels, paper tips 84 letterhead copying to 94 loading, 2000-sheet tray 71 tips on using 82 LexLink menu 167 light standard exit bin 62 light, indicator 16 linking trays 74 Load with 258 Load manual feeder with 259 loading 2000-sheet tray 71 envelopes 68 letterhead in 2000...
... job interrupt 100 L labels, paper tips 84 letterhead copying to 94 loading, 2000-sheet tray 71 tips on using 82 LexLink menu 167 light standard exit bin 62 light, indicator 16 linking trays 74 Load with 258 Load manual feeder with 259 loading 2000-sheet tray 71 envelopes 68 letterhead in 2000...
User's Guide
Page 336
...disk 259 printer options troubleshooting flash memory card 293 hard disk with 259 Memory full, cannot print faxes 259 Remove paper from standard output bin 259 Restore Held Jobs? 259 Scan Document Too Long 259 SMTP server not set up 258 Load with 258 Load manual feeder...217 Quiet Mode 60 print quality troubleshooting 298 R recycled paper using 58, 77 recycling Lexmark packaging 63 Lexmark products 63 toner cartridges 64 WEEE statement 315 reducing a copy 96 Remove paper from standard output bin 259 Repeat print jobs 85 printing from Macintosh computer 86 printing from Windows 85 reports ...
...disk 259 printer options troubleshooting flash memory card 293 hard disk with 259 Memory full, cannot print faxes 259 Remove paper from standard output bin 259 Restore Held Jobs? 259 Scan Document Too Long 259 SMTP server not set up 258 Load with 258 Load manual feeder...217 Quiet Mode 60 print quality troubleshooting 298 R recycled paper using 58, 77 recycling Lexmark packaging 63 Lexmark products 63 toner cartridges 64 WEEE statement 315 reducing a copy 96 Remove paper from standard output bin 259 Repeat print jobs 85 printing from Macintosh computer 86 printing from Windows 85 reports ...
User's Guide
Page 337
Contact system administrator. 259 SMTP Setup menu 162 standard exit bin light 62 Standard Network menu 160 Standard USB menu 167 Standard USB menu 167 status of supplies, checking 237 storing paper 79 supplies 236 subject and message information adding to e-mail 108 Substitute Size menu 150 ...
Contact system administrator. 259 SMTP Setup menu 162 standard exit bin light 62 Standard Network menu 160 Standard USB menu 167 Standard USB menu 167 status of supplies, checking 237 storing paper 79 supplies 236 subject and message information adding to e-mail 108 Substitute Size menu 150 ...


