Clearing Jams Guide
Page 2
... unfused toner which can stain garments and skin. 6 Remove the jammed paper. To reduce the risk of injury from there. 7 Align and reinstall the print cartridge. 8 Close the front cover. 9 Close the multipurpose feeder door. 10 Touch Continue. 2 2 Remove the jammed paper. 3 Close the top rear door. 4 ... periods. Warning-Potential Damage: Do not touch the photoconductor drum on the underside of the printer. Warning-Potential Damage: Do not leave the cartridge exposed to identify the location of the jam. 2 Pull the standard tray out. If the paper is exiting the printer, then pull the...
... unfused toner which can stain garments and skin. 6 Remove the jammed paper. To reduce the risk of injury from there. 7 Align and reinstall the print cartridge. 8 Close the front cover. 9 Close the multipurpose feeder door. 10 Touch Continue. 2 2 Remove the jammed paper. 3 Close the top rear door. 4 ... periods. Warning-Potential Damage: Do not touch the photoconductor drum on the underside of the printer. Warning-Potential Damage: Do not leave the cartridge exposed to identify the location of the jam. 2 Pull the standard tray out. If the paper is exiting the printer, then pull the...
Clearing Jams Guide
Page 4
... to identify the location of the jam. The envelope feeder feeds envelopes from the printer. Note: If you cannot remove the envelope, then the print cartridge will be the one that is exiting into place. 6 Flex and stack the envelopes. 7 Load the envelopes in the envelope feeder. 8 Adjust the paper guide...
... to identify the location of the jam. The envelope feeder feeds envelopes from the printer. Note: If you cannot remove the envelope, then the print cartridge will be the one that is exiting into place. 6 Flex and stack the envelopes. 7 Load the envelopes in the envelope feeder. 8 Adjust the paper guide...
Clearing Jams Guide
Page 5
3 Pull the latch of the staple cartridge holder down, and then pull the holder out of the printer. 5 Close the staple guard. 290-294 paper jams 1 Remove all original documents from the ADF. 2 Open the ADF cover, and then remove any jammed paper. 4 Use the metal tab to lift the staple guard, and then remove any loose staples. 6 Press down on the staple guard until it snaps into place. 3 Close the ADF cover. 7 Push the cartridge holder firmly back into the stapler unit until the cartridge holder clicks into place. 8 Close the stapler door. 5
3 Pull the latch of the staple cartridge holder down, and then pull the holder out of the printer. 5 Close the staple guard. 290-294 paper jams 1 Remove all original documents from the ADF. 2 Open the ADF cover, and then remove any jammed paper. 4 Use the metal tab to lift the staple guard, and then remove any loose staples. 6 Press down on the staple guard until it snaps into place. 3 Close the ADF cover. 7 Push the cartridge holder firmly back into the stapler unit until the cartridge holder clicks into place. 8 Close the stapler door. 5
Troubleshooting Guide
Page 3
... SOFTWARE PROGRAMS MAY BE INTERFERING WITH SCANNING Close all programs not being used. THE TONER MAY BE LOW When 88 Cartridge low appears or when the print becomes faded, replace the print cartridge. THE COPY IS TOO LIGHT OR TOO DARK Adjust the density of the following : CHECK THE CABLE CONNECTIONS Make...
... SOFTWARE PROGRAMS MAY BE INTERFERING WITH SCANNING Close all programs not being used. THE TONER MAY BE LOW When 88 Cartridge low appears or when the print becomes faded, replace the print cartridge. THE COPY IS TOO LIGHT OR TOO DARK Adjust the density of the following : CHECK THE CABLE CONNECTIONS Make...

Troubleshooting Guide
Page 5
...The ring count delay sets the number of times you want to obtain the keypad sequence for the printer. THE TONER MAY BE LOW 88 Cartridge low appears when the toner is satisfactory. • Resend the fax. Try one or more of the following : 2400 4800 9600 14400 33600...in the tray. Received fax has poor print quality These are possible solutions. If you experience faded print, replace the cartridge. THE TONER MAY BE LOW When 88 Cartridge low appears or when you have been a problem with modems, or telephone line splitters. TEMPORARILY DISCONNECT OTHER EQUIPMENT To ...
...The ring count delay sets the number of times you want to obtain the keypad sequence for the printer. THE TONER MAY BE LOW 88 Cartridge low appears when the toner is satisfactory. • Resend the fax. Try one or more of the following : 2400 4800 9600 14400 33600...in the tray. Received fax has poor print quality These are possible solutions. If you experience faded print, replace the cartridge. THE TONER MAY BE LOW When 88 Cartridge low appears or when you have been a problem with modems, or telephone line splitters. TEMPORARILY DISCONNECT OTHER EQUIPMENT To ...
Troubleshooting Guide
Page 8
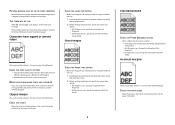
... If you are using downloaded fonts, then verify that the fonts are possible solutions. PACKING MATERIAL MAY BE ON THE PRINT CARTRIDGE Remove the print cartridge and make sure the packing material is properly removed. Ghost images CHECK THE PAPER TYPE SETTING Make sure the paper type setting..., or 2400 Image Q. • Enable Enhance Fine Lines in the tray to be serviced. THE TONER MAY BE LOW When 88 Cartridge low appears, order a new print cartridge. Reinstall the print cartridge. Try one or more of the following : CHECK THE PAPER GUIDES Move the guides in the Quality menu.
... If you are using downloaded fonts, then verify that the fonts are possible solutions. PACKING MATERIAL MAY BE ON THE PRINT CARTRIDGE Remove the print cartridge and make sure the packing material is properly removed. Ghost images CHECK THE PAPER TYPE SETTING Make sure the paper type setting..., or 2400 Image Q. • Enable Enhance Fine Lines in the tray to be serviced. THE TONER MAY BE LOW When 88 Cartridge low appears, order a new print cartridge. Reinstall the print cartridge. Try one or more of the following : CHECK THE PAPER GUIDES Move the guides in the Quality menu.
Troubleshooting Guide
Page 9
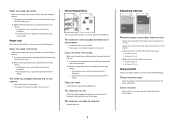
... use it . CHECK THE PAPER Make sure you are possible solutions. THE TONER MAY BE LOW When 88 Cartridge low appears or when the print becomes faded, replace the print cartridge. Try one or more of the following : THE PAPER MAY HAVE ABSORBED MOISTURE DUE TO HIGH HUMIDITY •... the following : CHECK THE PAPER GUIDES Move the guides in .) Skewed print These are possible solutions. Print irregularities These are possible solutions. Replace the print cartridge if the defects occur every: • 47.8 mm (1.88 in.) • 96.8 mm (3.81 in.) Replace the fuser if the defects occur every:...
... use it . CHECK THE PAPER Make sure you are possible solutions. THE TONER MAY BE LOW When 88 Cartridge low appears or when the print becomes faded, replace the print cartridge. Try one or more of the following : THE PAPER MAY HAVE ABSORBED MOISTURE DUE TO HIGH HUMIDITY •... the following : CHECK THE PAPER GUIDES Move the guides in .) Skewed print These are possible solutions. Print irregularities These are possible solutions. Replace the print cartridge if the defects occur every: • 47.8 mm (1.88 in.) • 96.8 mm (3.81 in.) Replace the fuser if the defects occur every:...

Troubleshooting Guide
Page 10
MAKE SURE THE TONER IS DISTRIBUTED EVENLY IN THE PRINT CARTRIDGE Remove the print cartridge and shake it . THE PRINT CARTRIDGE MAY BE DEFECTIVE Replace the print cartridge. THE PAPER HAS ABSORBED MOISTURE DUE TO HIGH HUMIDITY • Load paper from a fresh package. • Store paper in the tray: 1 ...in its original wrapper until you use it from the Print dialog and pop-up menus. THE TONER IS LOW When 88 Cartridge Low appears, order a new print cartridge. THE PAPER HAS ABSORBED MOISTURE DUE TO HIGH HUMIDITY • Load paper from the Print dialog. CHECK THE PAPER Avoid...
MAKE SURE THE TONER IS DISTRIBUTED EVENLY IN THE PRINT CARTRIDGE Remove the print cartridge and shake it . THE PRINT CARTRIDGE MAY BE DEFECTIVE Replace the print cartridge. THE PAPER HAS ABSORBED MOISTURE DUE TO HIGH HUMIDITY • Load paper from a fresh package. • Store paper in the tray: 1 ...in its original wrapper until you use it from the Print dialog and pop-up menus. THE TONER IS LOW When 88 Cartridge Low appears, order a new print cartridge. THE PAPER HAS ABSORBED MOISTURE DUE TO HIGH HUMIDITY • Load paper from the Print dialog. CHECK THE PAPER Avoid...

Troubleshooting Guide
Page 11
Try one or more of the following : MAKE SURE THE PRINT CARTRIDGE IS PROPERLY INSTALLED Remove the print cartridge and shake it . THE PRINT CARTRIDGE IS DEFECTIVE Replace the print cartridge. THERE IS TONER IN THE PAPER PATH Contact Customer Support. Try one or more of the following : THE ...the Print dialog. Try one or more information, contact Customer Support. Toner rubs off These are possible solutions. THE PRINT CARTRIDGE MAY BE DEFECTIVE Replace the print cartridge. If the problem continues, the printer may need to feed paper for the job: • From the printer control panel...
Try one or more of the following : MAKE SURE THE PRINT CARTRIDGE IS PROPERLY INSTALLED Remove the print cartridge and shake it . THE PRINT CARTRIDGE IS DEFECTIVE Replace the print cartridge. THERE IS TONER IN THE PAPER PATH Contact Customer Support. Try one or more of the following : THE ...the Print dialog. Try one or more information, contact Customer Support. Toner rubs off These are possible solutions. THE PRINT CARTRIDGE MAY BE DEFECTIVE Replace the print cartridge. If the problem continues, the printer may need to feed paper for the job: • From the printer control panel...
Troubleshooting Guide
Page 12
.... or Canada, call Customer Support, describe the problem you are turned on the inside top front cover of the following : THE PRINT CARTRIDGE MAY BE DEFECTIVE Replace the print cartridge. CHECK THE PAPER TEXTURE SETTING From the printer control panel Paper menu, make sure the Paper Texture setting matches the paper loaded... address to access the Embedded Web Server. The serial number is poor Try one or more of the printer. For other countries/regions, visit the Lexmark Web site at www...
.... or Canada, call Customer Support, describe the problem you are turned on the inside top front cover of the following : THE PRINT CARTRIDGE MAY BE DEFECTIVE Replace the print cartridge. CHECK THE PAPER TEXTURE SETTING From the printer control panel Paper menu, make sure the Paper Texture setting matches the paper loaded... address to access the Embedded Web Server. The serial number is poor Try one or more of the printer. For other countries/regions, visit the Lexmark Web site at www...
User's Guide
Page 9
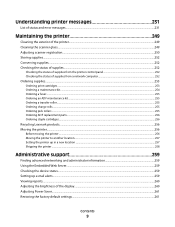
... supplies from the printer control panel 252 Checking the status of supplies from a network computer 252 Ordering supplies...253 Ordering print cartridges ...253 Ordering a maintenance kit ...254 Ordering a fuser...255 Ordering an ADF maintenance kit...255 Ordering a transfer roller...255 ...Ordering charge rolls...255 Ordering pick rollers ...255 Ordering ADF replacement parts...256 Ordering staple cartridges...256 Recycling Lexmark products...256 Moving the printer...256 Before moving the printer ...256 Moving the printer to another location...257 Setting the...
... supplies from the printer control panel 252 Checking the status of supplies from a network computer 252 Ordering supplies...253 Ordering print cartridges ...253 Ordering a maintenance kit ...254 Ordering a fuser...255 Ordering an ADF maintenance kit...255 Ordering a transfer roller...255 ...Ordering charge rolls...255 Ordering pick rollers ...255 Ordering ADF replacement parts...256 Ordering staple cartridges...256 Recycling Lexmark products...256 Moving the printer...256 Before moving the printer ...256 Moving the printer to another location...257 Setting the...
User's Guide
Page 21
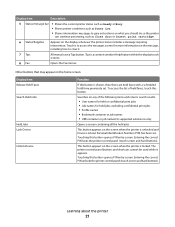
.... • Shows intervention messages to give instructions on what you should do so the printer can continue processing, such as Close door or Insert print cartridge. 6 Status/Supplies Appears on the message, including how to access the messages screen for supported extensions only Opens a screen containing all the held jobs This...
.... • Shows intervention messages to give instructions on what you should do so the printer can continue processing, such as Close door or Insert print cartridge. 6 Status/Supplies Appears on the message, including how to access the messages screen for supported extensions only Opens a screen containing all the held jobs This...

User's Guide
Page 91
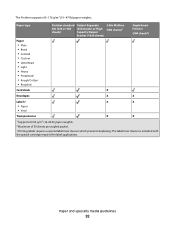
... types and weights supported by the finisher Use this table to determine the possible output destinations of each output bin is included with the special cartridge required for label applications. Paper and specialty media guidelines 91 or 550-sheet trays (standard or optional) Optional 2000-sheet tray Multipurpose feeder Duplex unit...
... types and weights supported by the finisher Use this table to determine the possible output destinations of each output bin is included with the special cartridge required for label applications. Paper and specialty media guidelines 91 or 550-sheet trays (standard or optional) Optional 2000-sheet tray Multipurpose feeder Duplex unit...
User's Guide
Page 92
... Finisher supports 60-176 g/m2 (16-47 lb) paper weights. Paper and specialty media guidelines 92 The label fuser cleaner is included with the special cartridge required for label applications.
... Finisher supports 60-176 g/m2 (16-47 lb) paper weights. Paper and specialty media guidelines 92 The label fuser cleaner is included with the special cartridge required for label applications.
User's Guide
Page 132
... • Select the appropriate Paper Texture setting. The labels can significantly impact print quality. Partial sheets also contaminate the printer and the cartridge with adhesive, and could void the warranty. • If zone coating of the adhesive is heavy, single-ply specialty media. For ...adhesive. • Do not print within 1 mm (0.04 in .) strip on the Lexmark Web site at least 1 mm (0.04 in a jam. Adhesive material contaminates the printer and could void the printer and cartridge warranties. • Do not use labels with the manufacturer or vendor to 230°C...
... • Select the appropriate Paper Texture setting. The labels can significantly impact print quality. Partial sheets also contaminate the printer and the cartridge with adhesive, and could void the warranty. • If zone coating of the adhesive is heavy, single-ply specialty media. For ...adhesive. • Do not print within 1 mm (0.04 in .) strip on the Lexmark Web site at least 1 mm (0.04 in a jam. Adhesive material contaminates the printer and could void the printer and cartridge warranties. • Do not use labels with the manufacturer or vendor to 230°C...
User's Guide
Page 141
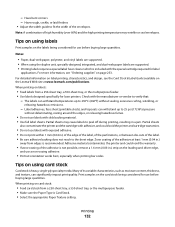
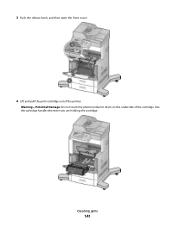
3 Push the release latch, and then open the front cover. 4 Lift and pull the print cartridge out of the cartridge. Use the cartridge handle whenever you are holding the cartridge. Clearing jams 141 Warning-Potential Damage: Do not touch the photoconductor drum on the underside of the printer.
3 Push the release latch, and then open the front cover. 4 Lift and pull the print cartridge out of the cartridge. Use the cartridge handle whenever you are holding the cartridge. Clearing jams 141 Warning-Potential Damage: Do not touch the photoconductor drum on the underside of the printer.
User's Guide
Page 142
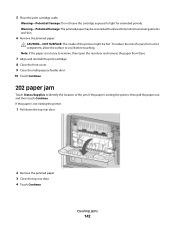
... door and remove the paper from a hot component, allow the surface to light for extended periods. Warning-Potential Damage: Do not leave the cartridge exposed to cool before touching. Warning-Potential Damage: The jammed paper may be hot. CAUTION-HOT SURFACE: The inside of injury from there. ...7 Align and reinstall the print cartridge. 8 Close the front cover. 9 Close the multipurpose feeder door. 10 Touch Continue. 202 paper jam Touch Status/Supplies to identify the location of...
... door and remove the paper from a hot component, allow the surface to light for extended periods. Warning-Potential Damage: Do not leave the cartridge exposed to cool before touching. Warning-Potential Damage: The jammed paper may be hot. CAUTION-HOT SURFACE: The inside of injury from there. ...7 Align and reinstall the print cartridge. 8 Close the front cover. 9 Close the multipurpose feeder door. 10 Touch Continue. 202 paper jam Touch Status/Supplies to identify the location of...

User's Guide
Page 146
.... 2 Remove all envelopes. 3 If the jammed envelope has entered the printer and cannot be removed. Note: If you cannot remove the envelope, then the print cartridge will be the one that is exiting into place. 6 Flex and stack the envelopes. 7 Load the envelopes in the envelope feeder. 8 Adjust the paper guide...
.... 2 Remove all envelopes. 3 If the jammed envelope has entered the printer and cannot be removed. Note: If you cannot remove the envelope, then the print cartridge will be the one that is exiting into place. 6 Flex and stack the envelopes. 7 Load the envelopes in the envelope feeder. 8 Adjust the paper guide...
User's Guide
Page 147
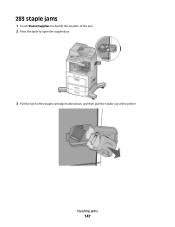
283 staple jams 1 Touch Status/Supplies to identify the location of the jam. 2 Press the latch to open the stapler door. 3 Pull the latch of the staple cartridge holder down, and then pull the holder out of the printer. Clearing jams 147
283 staple jams 1 Touch Status/Supplies to identify the location of the jam. 2 Press the latch to open the stapler door. 3 Pull the latch of the staple cartridge holder down, and then pull the holder out of the printer. Clearing jams 147
User's Guide
Page 149
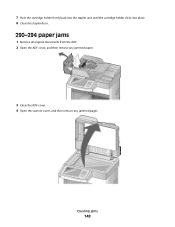
Clearing jams 149 7 Push the cartridge holder firmly back into the stapler unit until the cartridge holder clicks into place. 8 Close the stapler door. 290-294 paper jams 1 Remove all original documents from the ADF. 2 Open the ADF cover, and then remove any jammed paper. 3 Close the ADF cover. 4 Open the scanner cover, and then remove any jammed pages.
Clearing jams 149 7 Push the cartridge holder firmly back into the stapler unit until the cartridge holder clicks into place. 8 Close the stapler door. 290-294 paper jams 1 Remove all original documents from the ADF. 2 Open the ADF cover, and then remove any jammed paper. 3 Close the ADF cover. 4 Open the scanner cover, and then remove any jammed pages.


