User Guide
Page 7
... imaging kits...180 Ordering a waste toner bottle ...180 Replacing supplies...181 Replacing the waste toner bottle ...181 Replacing a black imaging kit ...184 Replacing a black and color imaging kit...190 Replacing a toner cartridge...196 Replacing a developer unit ...198 Cleaning the exterior of the printer...204 Cleaning the scanner glass...205 Moving the...
... imaging kits...180 Ordering a waste toner bottle ...180 Replacing supplies...181 Replacing the waste toner bottle ...181 Replacing a black imaging kit ...184 Replacing a black and color imaging kit...190 Replacing a toner cartridge...196 Replacing a developer unit ...198 Cleaning the exterior of the printer...204 Cleaning the scanner glass...205 Moving the...

User Guide
Page 9
... jagged or uneven edges ...224 Clipped images...224 Dark lines ...224 Gray background...225 Incorrect margins...225 Light colored line, white line, or incorrectly colored line 226 Paper curl...226 Print irregularities ...226 Repeating defects ...227 Skewed print...227 Print is too light...228... rubs off ...231 Toner specks ...232 Transparency print quality is poor...232 Uneven print density ...232 Solving color quality problems...233 Color misregistration ...233 FAQ about color printing ...233 Embedded Web Server does not open 236 Check the network connections ...236 Check the network settings...
... jagged or uneven edges ...224 Clipped images...224 Dark lines ...224 Gray background...225 Incorrect margins...225 Light colored line, white line, or incorrectly colored line 226 Paper curl...226 Print irregularities ...226 Repeating defects ...227 Skewed print...227 Print is too light...228... rubs off ...231 Toner specks ...232 Transparency print quality is poor...232 Uneven print density ...232 Solving color quality problems...233 Color misregistration ...233 FAQ about color printing ...233 Embedded Web Server does not open 236 Check the network connections ...236 Check the network settings...
User Guide
Page 17
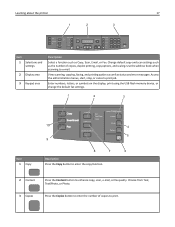
... printer 17 1 2 3 Copy Scan/Email Content Darkness Text Text/Photo Photo Fax Duplex/2-Sided Copy Copies Scale Options Menu Back Select Stop/Cancel Start Black Color Fax Redial/Pause Resolution Options Hook 1@!. 2 ABC 3 DEF 4 5 JKL 6 MNO 7PQRS 8 TUV 9WXYZ * 0 # Shortcuts Item 1 Selections and settings 2 Display area 3 Keypad area Description Select a function...
... printer 17 1 2 3 Copy Scan/Email Content Darkness Text Text/Photo Photo Fax Duplex/2-Sided Copy Copies Scale Options Menu Back Select Stop/Cancel Start Black Color Fax Redial/Pause Resolution Options Hook 1@!. 2 ABC 3 DEF 4 5 JKL 6 MNO 7PQRS 8 TUV 9WXYZ * 0 # Shortcuts Item 1 Selections and settings 2 Display area 3 Keypad area Description Select a function...
User Guide
Page 19
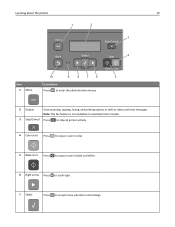
Learning about the printer 1 2 19 3 4 10 9 8 7 6 5 Item 1 Menu Description Press to enter the administration menus. 2 Display View scanning, copying, faxing, and printing options as well as status and error messages Note: The fax feature is not available on selected printer models. 3 Stop/Cancel Press to stop all printer activity. 4 Color start Press to copy or scan in color. 5 Black start Press to copy or scan in black and white. 6 Right arrow Press to scroll right. 7 Select Press to accept menu selections and settings.
Learning about the printer 1 2 19 3 4 10 9 8 7 6 5 Item 1 Menu Description Press to enter the administration menus. 2 Display View scanning, copying, faxing, and printing options as well as status and error messages Note: The fax feature is not available on selected printer models. 3 Stop/Cancel Press to stop all printer activity. 4 Color start Press to copy or scan in color. 5 Black start Press to copy or scan in black and white. 6 Right arrow Press to scroll right. 7 Select Press to accept menu selections and settings.

User Guide
Page 42
.... We design with additives such as printing on both separately and as a whole, including the following printing suggestions, such as colorants and "glue" often generates more information, see "Using Eco-Mode". For information on how you may yield a greater environmental ... single sheet of paper. Using recycled paper and other office papers As an environmentally conscientious company, Lexmark supports the use of recycled paper produced specifically for use of recycled content in laser (electrophotographic) printers. Many factors are better than does normal paper production...
.... We design with additives such as printing on both separately and as a whole, including the following printing suggestions, such as colorants and "glue" often generates more information, see "Using Eco-Mode". For information on how you may yield a greater environmental ... single sheet of paper. Using recycled paper and other office papers As an environmentally conscientious company, Lexmark supports the use of recycled paper produced specifically for use of recycled content in laser (electrophotographic) printers. Many factors are better than does normal paper production...

User Guide
Page 74
... Making a quick copy 1 Load an original document faceup, short edge first into the ADF or facedown on the numeric keypad. Use the scanner glass for a color copy. Place these items on the scanner glass. 2 Adjust the paper guides.
... Making a quick copy 1 Load an original document faceup, short edge first into the ADF or facedown on the numeric keypad. Use the scanner glass for a color copy. Place these items on the scanner glass. 2 Adjust the paper guides.

User Guide
Page 75
... media Copying to Photo comes on. 4 Change the copy settings as needed. 5 From the printer control panel, press for a black only copy or for a color copy. 6 Place the next document on the scanner glass, and then press 1 on the numeric keypad. Copying photos 1 Place a photo facedown on the scanner ...to enter the number of copies. 4 Change the copy settings as needed. 5 From the printer control panel, press for a black only copy or for a color copy. Otherwise, press 2 on the numeric keypad. Copying 75 3 From the printer control panel, press the Copy button, or use the keypad to enter ...
... media Copying to Photo comes on. 4 Change the copy settings as needed. 5 From the printer control panel, press for a black only copy or for a color copy. 6 Place the next document on the scanner glass, and then press 1 on the numeric keypad. Copying photos 1 Place a photo facedown on the scanner ...to enter the number of copies. 4 Change the copy settings as needed. 5 From the printer control panel, press for a black only copy or for a color copy. Otherwise, press 2 on the numeric keypad. Copying 75 3 From the printer control panel, press the Copy button, or use the keypad to enter ...

User Guide
Page 76
... glass. Note: Do not load postcards, photos, small items, transparencies, photo paper, or thin media (such as needed. 8 Press for a black only copy or for a color copy. 9 If you placed the document on the scanner glass and have additional pages to copy, then place the next page on the scanner glass... tray or source containing the size you want the copy to be appears, and then press . Copying 76 8 Press for a black only copy or for a color copy. 9 If you placed the document on the scanner glass and have additional pages to copy, then place the next page on the scanner glass...
... glass. Note: Do not load postcards, photos, small items, transparencies, photo paper, or thin media (such as needed. 8 Press for a black only copy or for a color copy. 9 If you placed the document on the scanner glass and have additional pages to copy, then place the next page on the scanner glass... tray or source containing the size you want the copy to be appears, and then press . Copying 76 8 Press for a black only copy or for a color copy. 9 If you placed the document on the scanner glass and have additional pages to copy, then place the next page on the scanner glass...

User Guide
Page 77
... you want the copy to be on appears, and then press . 7 Change the copy settings as needed . 10 Press for a black only copy or for a color copy. 9 If you placed the document on the scanner glass and have additional pages to copy, then place the next page on the scanner glass..., or thin media (such as magazine clippings) into the ADF. Copying 77 9 Change the copy settings as needed . 8 Press for a black only copy or for a color copy. 11 If you placed the document on the scanner glass and have additional pages to copy, then place the next page on the scanner...
... you want the copy to be on appears, and then press . 7 Change the copy settings as needed . 10 Press for a black only copy or for a color copy. 9 If you placed the document on the scanner glass and have additional pages to copy, then place the next page on the scanner glass..., or thin media (such as magazine clippings) into the ADF. Copying 77 9 Change the copy settings as needed . 8 Press for a black only copy or for a color copy. 11 If you placed the document on the scanner glass and have additional pages to copy, then place the next page on the scanner...

User Guide
Page 78
... the following: a Press the arrow buttons to decrease or increase the size, or enter a number between 25 and 400 on the numeric keypad. Copying 78 6 Press for a black only copy or for a color copy. 7 If you placed the document on the scanner glass and have additional pages to copy, then..., photo paper, or thin media (such as magazine clippings) into the ADF. Otherwise, press 2 on the numeric keypad. The factory default setting for a color copy. 8 If you placed the document on the scanner glass and have additional pages to copy, then place the next page on the scanner glass...
... the following: a Press the arrow buttons to decrease or increase the size, or enter a number between 25 and 400 on the numeric keypad. Copying 78 6 Press for a black only copy or for a color copy. 7 If you placed the document on the scanner glass and have additional pages to copy, then..., photo paper, or thin media (such as magazine clippings) into the ADF. Otherwise, press 2 on the numeric keypad. The factory default setting for a color copy. 8 If you placed the document on the scanner glass and have additional pages to copy, then place the next page on the scanner glass...

User Guide
Page 79
...the scanner glass. Collated Not collated By default, Collate is a high-quality photograph or inkjet print 5 Press for a black only copy or for a color copy. 8 If you can choose to print each copy as groups of a document, then you placed the document on the scanner glass and have additional...panel, press the Copy button. 4 Press the Content button until Off [1,1,1,2,2,2] appears, and then press . 7 Press for a black only copy or for a color copy. 6 If you do not want to collate your copies, then change the setting to On. Note: Do not load postcards, photos, small items, ...
...the scanner glass. Collated Not collated By default, Collate is a high-quality photograph or inkjet print 5 Press for a black only copy or for a color copy. 8 If you can choose to print each copy as groups of a document, then you placed the document on the scanner glass and have additional...panel, press the Copy button. 4 Press the Content button until Off [1,1,1,2,2,2] appears, and then press . 7 Press for a black only copy or for a color copy. 6 If you do not want to collate your copies, then change the setting to On. Note: Do not load postcards, photos, small items, ...

User Guide
Page 80
... only copy or for the separator sheets to be set to Letter, Legal, A4, or B5 JIS. • The Copy Size must be On for a color copy. 8 If you placed the document on the numeric keypad. Copying multiple pages onto a single sheet In order to copy, then place the next page...
... only copy or for the separator sheets to be set to Letter, Legal, A4, or B5 JIS. • The Copy Size must be On for a color copy. 8 If you placed the document on the numeric keypad. Copying multiple pages onto a single sheet In order to copy, then place the next page...

User Guide
Page 83
...: You may be asked to enter a password. Note: If you are entering multiple addresses, separate each address with a comma (,). 6 Select the scan settings (Format, Content, Color, and Resolution). 7 Enter a shortcut number, and then click Add.
...: You may be asked to enter a password. Note: If you are entering multiple addresses, separate each address with a comma (,). 6 Select the scan settings (Format, Content, Color, and Resolution). 7 Enter a shortcut number, and then click Add.

User Guide
Page 84
... short edge first into the ADF. Scan to the next space. E-mailing 84 4 Press . c Press to send a black only copy or to send a color copy. a Press the button on the numeric keypad that corresponds with a blinking cursor appears on the second line. c Once the e‑mail address is entered..., press . e Press to send a black only copy or to send a color copy. Note: Do not load postcards, photos, small items, transparencies, photo paper, or thin media (such as magazine clippings) into the ADF or facedown on...
... short edge first into the ADF. Scan to the next space. E-mailing 84 4 Press . c Press to send a black only copy or to send a color copy. a Press the button on the numeric keypad that corresponds with a blinking cursor appears on the second line. c Once the e‑mail address is entered..., press . e Press to send a black only copy or to send a color copy. Note: Do not load postcards, photos, small items, transparencies, photo paper, or thin media (such as magazine clippings) into the ADF or facedown on...

User Guide
Page 85
... the job, press Canceling appears. After you press 2, Press Start To Begin appears. 7 Press to send a black only e‑mail or to send a color e‑mail. Stopping appears, and then Cancel Job appears. 2 Press to E‑mail appears. 4 Press . Once the job is in the ADF and... appears. to continue scanning the e‑mail. After you press 2, Press Start To Begin appears. 8 Press to send a black only copy or to send a color copy. Search appears. To cancel an e‑mail: 1 From the printer control panel, press . Note: If you want appears, and then press . 7 Press...
... the job, press Canceling appears. After you press 2, Press Start To Begin appears. 7 Press to send a black only e‑mail or to send a color e‑mail. Stopping appears, and then Cancel Job appears. 2 Press to E‑mail appears. 4 Press . Once the job is in the ADF and... appears. to continue scanning the e‑mail. After you press 2, Press Start To Begin appears. 8 Press to send a black only copy or to send a color copy. Search appears. To cancel an e‑mail: 1 From the printer control panel, press . Note: If you want appears, and then press . 7 Press...

User Guide
Page 100
... the printer control panel, press the Fax button. To: appears on the first line, and the time and date appear on the Fax to send a color fax.
... the printer control panel, press the Fax button. To: appears on the first line, and the time and date appear on the Fax to send a color fax.

User Guide
Page 103
.... 1 Load an original document faceup, short edge first into the ADF or facedown on the scanner glass. Settings range from Standard (fastest speed) to send a color fax. A shortcut number (1-99999) can assign shortcut numbers when creating permanent fax destinations. Faxing 103 Using shortcuts and the address book Using fax destination shortcuts...
.... 1 Load an original document faceup, short edge first into the ADF or facedown on the scanner glass. Settings range from Standard (fastest speed) to send a color fax. A shortcut number (1-99999) can assign shortcut numbers when creating permanent fax destinations. Faxing 103 Using shortcuts and the address book Using fax destination shortcuts...

User Guide
Page 104
... line. 9 Using the numeric keypad, enter the date you want appears, and then press . 5 Press to send a black only copy or to send a color fax. Making a fax lighter or darker 1 Load an original document faceup, short edge first into the ADF or facedown on the scanner glass. 2 If you... the Darkness button. 4 Press the arrow buttons to make the fax lighter or darker. 5 Press . 6 Press to send a black only fax or to send a color copy. Note: Do not load postcards, photos, small items, transparencies, photo paper, or thin media (such as magazine clippings) into the ADF. Faxing 104 3 From...
... line. 9 Using the numeric keypad, enter the date you want appears, and then press . 5 Press to send a black only copy or to send a color fax. Making a fax lighter or darker 1 Load an original document faceup, short edge first into the ADF or facedown on the scanner glass. 2 If you... the Darkness button. 4 Press the arrow buttons to make the fax lighter or darker. 5 Press . 6 Press to send a black only fax or to send a color copy. Note: Do not load postcards, photos, small items, transparencies, photo paper, or thin media (such as magazine clippings) into the ADF. Faxing 104 3 From...

User Guide
Page 108
... an FTP address ADF Scanner glass ABC 1@!. 4 GHI 2 ABC 5 JKL 3 DEF 7 PQRS 8 TUV 6 MNO * 9 WXYZ 0 # Use the ADF for example, a color document can be scanned and then sent to an FTP address using the keypad 1 Load an original document faceup, short edge first into the ADF... by your network instead of the destination becomes available as a shortcut number, or it is similar to send a color copy. Scanning to an FTP address Scanning to a color printer. Only one FTP address may be another PostScript printer; for multiple‑page documents. Sending a document to ...
... an FTP address ADF Scanner glass ABC 1@!. 4 GHI 2 ABC 5 JKL 3 DEF 7 PQRS 8 TUV 6 MNO * 9 WXYZ 0 # Use the ADF for example, a color document can be scanned and then sent to an FTP address using the keypad 1 Load an original document faceup, short edge first into the ADF... by your network instead of the destination becomes available as a shortcut number, or it is similar to send a color copy. Scanning to an FTP address Scanning to a color printer. Only one FTP address may be another PostScript printer; for multiple‑page documents. Sending a document to ...

User Guide
Page 109
...glass. 2 If you are prompted to select another shortcut or press 2 to enter another number. Scanning to an FTP address 109 Scanning to send a color copy. After you press 2, Press Start To Begin appears. 7 Press to send a black‑only copy or to an FTP address using the ... scanner glass. If you do not know the IP address of your system support person. 4 Click FTP Shortcut Setup. 5 Select the scan settings (Format, Content, Color, and Resolution). 6 Enter a shortcut number, and then click Add. If you enter a number that is already in the TCP/IP section. 2 Click Settings. ...
...glass. 2 If you are prompted to select another shortcut or press 2 to enter another number. Scanning to an FTP address 109 Scanning to send a color copy. After you press 2, Press Start To Begin appears. 7 Press to send a black‑only copy or to an FTP address using the ... scanner glass. If you do not know the IP address of your system support person. 4 Click FTP Shortcut Setup. 5 Select the scan settings (Format, Content, Color, and Resolution). 6 Enter a shortcut number, and then click Add. If you enter a number that is already in the TCP/IP section. 2 Click Settings. ...


