
User's Guide
Page 3
... to a telephone ...33 Setting up to fax while behind a PBX ...34 Using a digital phone service ...35 Understanding the control panel...35 Using the control panel ...35 Saving settings...39 Installing another language control panel...40 Installing the printer software...41 Understanding the printer software...41 Turning printing voice notification on or off...44 Security...
... to a telephone ...33 Setting up to fax while behind a PBX ...34 Using a digital phone service ...35 Understanding the control panel...35 Using the control panel ...35 Saving settings...39 Installing another language control panel...40 Installing the printer software...41 Understanding the printer software...41 Turning printing voice notification on or off...44 Security...
User's Guide
Page 4
... scanner glass 52 Printing 53 Printing basic documents...53 Printing a document...53 Printing a Web page ...53 Printing photos or images from a Web page ...54 Printing multiple copies of a document...54 Printing on both sides of the paper ...55 Collating copies...55 Printing the last page first (reverse page order)...56 Printing multiple pages on one sheet (N-Up)...56 Pausing print jobs...56 Canceling print...
... scanner glass 52 Printing 53 Printing basic documents...53 Printing a document...53 Printing a Web page ...53 Printing photos or images from a Web page ...54 Printing multiple copies of a document...54 Printing on both sides of the paper ...55 Collating copies...55 Printing the last page first (reverse page order)...56 Printing multiple pages on one sheet (N-Up)...56 Pausing print jobs...56 Canceling print...
User's Guide
Page 5
... of a photo 74 Applying a color effect to a photo...74 Changing the Exposure setting of a photo ...74 Removing wavy patterns from scanned photos, magazines, or newspapers 74 Printing photos...75 Printing photos from a CD or removable storage device using the computer 75 Viewing / Printing photos from the Productivity Studio 76 Printing Photo Packages ...76 Creating Photo Greeting Cards...76 Printing all photos from a memory device...77 Printing photos stored...
... of a photo 74 Applying a color effect to a photo...74 Changing the Exposure setting of a photo ...74 Removing wavy patterns from scanned photos, magazines, or newspapers 74 Printing photos...75 Printing photos from a CD or removable storage device using the computer 75 Viewing / Printing photos from the Productivity Studio 76 Printing Photo Packages ...76 Creating Photo Greeting Cards...76 Printing all photos from a memory device...77 Printing photos stored...

User's Guide
Page 7
... Speed Dial...111 Printing fax activity reports...112 Maintaining the printer 113 Replacing print cartridges...113 Installing print cartridges...113 Removing a used print cartridge ...114 Refilling print cartridges...115 Using genuine Lexmark print cartridges...115 Aligning print cartridges...115 Cleaning the print cartridge nozzles...116 Wiping the print cartridge nozzles and contacts 116 Preserving the print cartridges...117 Cleaning the scanner glass...118 Cleaning...
... Speed Dial...111 Printing fax activity reports...112 Maintaining the printer 113 Replacing print cartridges...113 Installing print cartridges...113 Removing a used print cartridge ...114 Refilling print cartridges...115 Using genuine Lexmark print cartridges...115 Aligning print cartridges...115 Cleaning the print cartridge nozzles...116 Wiping the print cartridge nozzles and contacts 116 Preserving the print cartridges...117 Cleaning the scanner glass...118 Cleaning...
User's Guide
Page 8
... Solving printer communication problems ...124 Understanding Warning levels ...125 Removing and reinstalling the software ...125 Enabling the USB port...125 Print troubleshooting...126 Improving print quality ...126 Poor text and graphic quality...127 Poor quality at the edges of the page...128 Print speed is slow...129 Partial document or photo prints ...129 Photo smudges...130 Checking the print...
... Solving printer communication problems ...124 Understanding Warning levels ...125 Removing and reinstalling the software ...125 Enabling the USB port...125 Print troubleshooting...126 Improving print quality ...126 Poor text and graphic quality...127 Poor quality at the edges of the page...128 Print speed is slow...129 Partial document or photo prints ...129 Photo smudges...130 Checking the print...
User's Guide
Page 9
...happens when memory card is inserted ...150 Copy troubleshooting...151 Copier does not respond ...151 Scanner unit does not close...151 Poor copy quality...151 Partial document or photo copies...152 Scan troubleshooting...153 Scanner does not respond ...153 Scan was not successful ...153 ... Partial document or photo scans...155 Cannot scan to a computer over a network...155 Fax troubleshooting...155 Cannot send or receive a fax...155 Can send but not receive faxes...158 Can receive but not send faxes...158 Printer receives a blank fax...160 Received fax has poor print quality...160 Caller ID...
...happens when memory card is inserted ...150 Copy troubleshooting...151 Copier does not respond ...151 Scanner unit does not close...151 Poor copy quality...151 Partial document or photo copies...152 Scan troubleshooting...153 Scanner does not respond ...153 Scan was not successful ...153 ... Partial document or photo scans...155 Cannot scan to a computer over a network...155 Fax troubleshooting...155 Cannot send or receive a fax...155 Can send but not receive faxes...158 Can receive but not send faxes...158 Printer receives a blank fax...160 Received fax has poor print quality...160 Caller ID...

User's Guide
Page 10
...to use your memory card...168 Some photos removed from card by host...168 Problems reading the memory card...168 Error messages on the computer screen...169 Clearing error messages...169 Left/Right Cartridge Missing...169 Communication not available...169 General Printing Problem ...170 Ink Low ...170 Out...10 Error messages on memory card...171 Paper Jam ...171 Multiple All-In-Ones found on the printer display...163 Alignment Error...164 Cartridge Error (1102, 1203, 1204, or 120F)...164 Black Ink Low / Color Ink Low / Photo Ink Low ...165 Clear Carrier Jam ...165 Cover Open ...165 Error 1104 ...
...to use your memory card...168 Some photos removed from card by host...168 Problems reading the memory card...168 Error messages on the computer screen...169 Clearing error messages...169 Left/Right Cartridge Missing...169 Communication not available...169 General Printing Problem ...170 Ink Low ...170 Out...10 Error messages on memory card...171 Paper Jam ...171 Multiple All-In-Ones found on the printer display...163 Alignment Error...164 Cartridge Error (1102, 1203, 1204, or 120F)...164 Black Ink Low / Color Ink Low / Photo Ink Low ...165 Clear Carrier Jam ...165 Cover Open ...165 Error 1104 ...
User's Guide
Page 14
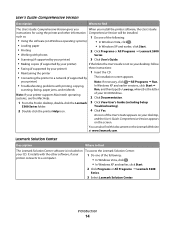
...printer and other software, if your printer connects to a computer. To access the Lexmark Solution Center: 1 Do one of the User's Guide appears on your desktop, and the User's Guide: Comprehensive Version appears on the Lexmark Web site at www.lexmark.com. Introduction 14 It installs with printing, copying, scanning, faxing...8226; In Windows XP and earlier, click Start. • Printing 2 Click Programs or All Programs Œ Lexmark 5300 • Working with photos Series. • Scanning (if supported by your printer) 3 Click User's Guide. • Making copies (if ...
...printer and other software, if your printer connects to a computer. To access the Lexmark Solution Center: 1 Do one of the User's Guide appears on your desktop, and the User's Guide: Comprehensive Version appears on the Lexmark Web site at www.lexmark.com. Introduction 14 It installs with printing, copying, scanning, faxing...8226; In Windows XP and earlier, click Start. • Printing 2 Click Programs or All Programs Œ Lexmark 5300 • Working with photos Series. • Scanning (if supported by your printer) 3 Click User's Guide. • Making copies (if ...
User's Guide
Page 15
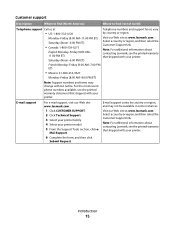
Note: For additional information about contacting Lexmark, see the printed warranty that shipped with your printer. For the most recent phone numbers available, see the printed warranty that shipped with your printer model. 5 From the Support Tools section, click e- Mail Support. 6 Complete the form... region, and may change without notice. Note: For additional information about contacting Lexmark, see the printed warranty statement that shipped with your printer. Visit our Web site at www.lexmark.com. Select a country or region, and then select the Customer Support link...
Note: For additional information about contacting Lexmark, see the printed warranty that shipped with your printer. For the most recent phone numbers available, see the printed warranty that shipped with your printer model. 5 From the Support Tools section, click e- Mail Support. 6 Complete the form... region, and may change without notice. Note: For additional information about contacting Lexmark, see the printed warranty statement that shipped with your printer. Visit our Web site at www.lexmark.com. Select a country or region, and then select the Customer Support link...
User's Guide
Page 16
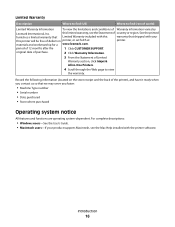
...Macintosh, see the Statement of defects in printer, or set forth at printer. period of Warranty information varies by Lexmark International, Inc. Introduction 16 See the printed furnishes a limited warranty that Limited Warranty included with this printer will be free of country or region. ...view the warranty. original date of purchase. 2 Click Warranty Information. 3 From the Statement of Limited Warranty section, click Inkjet & All-In-One Printers. 4 Scroll through the Web page to find (rest of world) Limited Warranty Information To view the limitations and conditions ...
...Macintosh, see the Statement of defects in printer, or set forth at printer. period of Warranty information varies by Lexmark International, Inc. Introduction 16 See the printed furnishes a limited warranty that Limited Warranty included with this printer will be free of country or region. ...view the warranty. original date of purchase. 2 Click Warranty Information. 3 From the Statement of Limited Warranty section, click Inkjet & All-In-One Printers. 4 Scroll through the Web page to find (rest of world) Limited Warranty Information To view the limitations and conditions ...

User's Guide
Page 17
... Attaches to purchase a USB cable separately. Note: You may not support: • Memory Cards • PictBridge-enabled digital camera • Photo Card mode Checking the box contents 12 3 4 1 2 3 7 5 6 Name Description 1 Black print cartridge Cartridges to be found on the product purchased. 3 Telephone cord Use for faxing. Setting up the printer Your printer may need to the...
... Attaches to purchase a USB cable separately. Note: You may not support: • Memory Cards • PictBridge-enabled digital camera • Photo Card mode Checking the box contents 12 3 4 1 2 3 7 5 6 Name Description 1 Black print cartridge Cartridges to be found on the product purchased. 3 Telephone cord Use for faxing. Setting up the printer Your printer may need to the...
User's Guide
Page 22
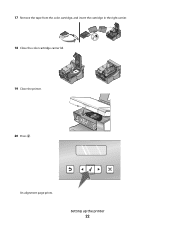
17 Remove the tape from the color cartridge, and insert the cartridge in the right carrier. 18 Close the color cartridge carrier lid. 19 Close the printer. 20 Press . Setting up the printer 22 An alignment page prints.
17 Remove the tape from the color cartridge, and insert the cartridge in the right carrier. 18 Close the color cartridge carrier lid. 19 Close the printer. 20 Press . Setting up the printer 22 An alignment page prints.
User's Guide
Page 24
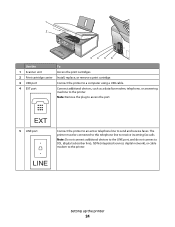
... be connected to this telephone line to the printer. LINE Setting up the printer 24 1 2 34 5 6 Use the To 1 Scanner unit Access the print cartridges. 2 Print cartridge carrier Install, replace, or remove a print cartridge. 3 USB port Connect the printer to a computer using a USB cable. 4 EXT port Connect additional devices, such as a data/fax modem, telephone, or answering machine to receive...
... be connected to this telephone line to the printer. LINE Setting up the printer 24 1 2 34 5 6 Use the To 1 Scanner unit Access the print cartridges. 2 Print cartridge carrier Install, replace, or remove a print cartridge. 3 USB port Connect the printer to a computer using a USB cable. 4 EXT port Connect additional devices, such as a data/fax modem, telephone, or answering machine to receive...

User's Guide
Page 36
Note: The mode is selected when the button light is on . 4 Fax Mode Access the fax default screen and send faxes. Note: The mode is selected when the button light is on . 5 Photo Card Access the photo default screen and print photos. Setting up the printer 36 Note: The mode is selected when the button light is on. 6 Resize...
Note: The mode is selected when the button light is on . 4 Fax Mode Access the fax default screen and send faxes. Note: The mode is selected when the button light is on . 5 Photo Card Access the photo default screen and print photos. Setting up the printer 36 Note: The mode is selected when the button light is on. 6 Resize...

User's Guide
Page 37
...; Cancel a print, copy, scan, or fax job in progress. • Clear a fax number or end a fax transmission, and return to the fax default screen. • Exit a menu or submenu, and return to the default copy, scan, fax, or photo card screen. • Clear current settings or error messages, and return to default settings. Setting up the printer 37
...; Cancel a print, copy, scan, or fax job in progress. • Clear a fax number or end a fax transmission, and return to the fax default screen. • Exit a menu or submenu, and return to the default copy, scan, fax, or photo card screen. • Clear current settings or error messages, and return to default settings. Setting up the printer 37

User's Guide
Page 38
... information on setting the number of the programmed Speed Dial numbers (1-89) or Group Dial numbers (90-99). 5 Start Color Start a color copy, scan, fax, or photo print job, depending on which mode is selected. Press or to view the last five numbers dialed. • Insert a three...Start a black-and-white copy, scan, fax, or photo print job, depending on page 100. 3 Pause / Redial In Fax mode: • Display the last number dialed. Setting up the printer 38 Enter a pause only when you want to make. In Fax mode: • Enter fax numbers. • Navigate an automated answering ...
... information on setting the number of the programmed Speed Dial numbers (1-89) or Group Dial numbers (90-99). 5 Start Color Start a color copy, scan, fax, or photo print job, depending on which mode is selected. Press or to view the last five numbers dialed. • Insert a three...Start a black-and-white copy, scan, fax, or photo print job, depending on page 100. 3 Pause / Redial In Fax mode: • Display the last number dialed. Setting up the printer 38 Enter a pause only when you want to make. In Fax mode: • Enter fax numbers. • Navigate an automated answering ...
User's Guide
Page 42
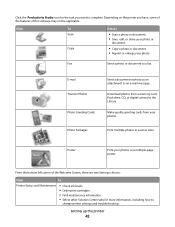
.... Print multiple photos in various sizes. Poster Print your photos as a fax. Download photos from your photo. From the bottom left corner of this software may not be applicable. Click the Productivity Studio icon for more information, including how to an e-mail message. E-mail Transfer Photos Photo Greeting Cards Photo Packages Send a document or photo as an attachment to change printer settings...
.... Print multiple photos in various sizes. Poster Print your photos as a fax. Download photos from your photo. From the bottom left corner of this software may not be applicable. Click the Productivity Studio icon for more information, including how to an e-mail message. E-mail Transfer Photos Photo Greeting Cards Photo Packages Send a document or photo as an attachment to change printer settings...

User's Guide
Page 43
...To • Learn how to such printing features as photos, envelopes, cards, banners, iron-on the Solution Center icon. 2 Click Setup and diagnose printer. 1 Click Programs or All Programs Œ Lexmark 5300 Series. 2 Select Solution Center. Print, scan, copy, and fax. - Method 1 Method 2 1 ...with us regarding how you use one of the Printing Status window. • Turn printing voice notification on or off. • Change network printing settings. • Share information with the Maintenance tab open the Solution Center, use the printer. • Obtain software version ...
...To • Learn how to such printing features as photos, envelopes, cards, banners, iron-on the Solution Center icon. 2 Click Setup and diagnose printer. 1 Click Programs or All Programs Œ Lexmark 5300 Series. 2 Select Solution Center. Print, scan, copy, and fax. - Method 1 Method 2 1 ...with us regarding how you use one of the Printing Status window. • Turn printing voice notification on or off. • Change network printing settings. • Share information with the Maintenance tab open the Solution Center, use the printer. • Obtain software version ...

User's Guide
Page 44
... work properly, allow the printer software to fix blurry edges. • View ink levels. • Troubleshoot other ink problems. Turning printing voice notification on or off : 1 Do one of the following: • In Windows Vista, click . • In Windows XP and earlier, click Start. 2 Click Programs or All Programs Œ Lexmark 5300 Series. 3 Click...
... work properly, allow the printer software to fix blurry edges. • View ink levels. • Troubleshoot other ink problems. Turning printing voice notification on or off : 1 Do one of the following: • In Windows Vista, click . • In Windows XP and earlier, click Start. 2 Click Programs or All Programs Œ Lexmark 5300 Series. 3 Click...

User's Guide
Page 45
...addresses for more information. Configure IP address If you must assign an IP address in any of printer software, the IP address is being assigned. Tips for Direct IP printing. Assigning an IP address An IP address is listed as the computer. Contact your system support... in the 169.254.x.x range. You must manually enter an IP address during printer software installation, you entered the correct IP address. If the printer and print server are usually unique to reestablish communication with the printer over a network, select Use DHCP to the company. These are located on ...
...addresses for more information. Configure IP address If you must assign an IP address in any of printer software, the IP address is being assigned. Tips for Direct IP printing. Assigning an IP address An IP address is listed as the computer. Contact your system support... in the 169.254.x.x range. You must manually enter an IP address during printer software installation, you entered the correct IP address. If the printer and print server are usually unique to reestablish communication with the printer over a network, select Use DHCP to the company. These are located on ...


