User's Guide
Page 96
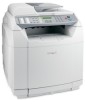
Install or reseat the transfer roller. No Memory: Out of Memory There is loaded. OPC Belt Life: ...or an incorrect paper type is insufficient memory to complete the current print job. Replace the paper feed roller and separator pad for the message to resume printing. Missing: Install Toner The specified toner cartridge is ... counter. Missing: Install Fuser Unit The fuser unit is missing or not installed correctly. Missing: Install Transfer Roller The transfer roller is missing. Load the specified tray with the correct paper type, or change the paper type settings in...
Install or reseat the transfer roller. No Memory: Out of Memory There is loaded. OPC Belt Life: ...or an incorrect paper type is insufficient memory to complete the current print job. Replace the paper feed roller and separator pad for the message to resume printing. Missing: Install Toner The specified toner cartridge is ... counter. Missing: Install Fuser Unit The fuser unit is missing or not installed correctly. Missing: Install Transfer Roller The transfer roller is missing. Load the specified tray with the correct paper type, or change the paper type settings in...

User's Guide
Page 98
... Insert the specified tray(s) into the printer. TR Kit Life: Replace PQ Kit The transfer roller and transfer belt cleaning roller are supported for the next print job. Install a new transfer belt. If it is exhausted. TAD Answering An answering machine has answered the call. ... size. When Toner Low appears or when the print becomes faded, follow these steps to clear. Install a new transfer roller and a new transfer belt cleaning roller. Waste Pack Full The waste toner bottle is installed. Toner Error: Install Supported Toner Cartridge An invalid toner cartridge is...
... Insert the specified tray(s) into the printer. TR Kit Life: Replace PQ Kit The transfer roller and transfer belt cleaning roller are supported for the next print job. Install a new transfer belt. If it is exhausted. TAD Answering An answering machine has answered the call. ... size. When Toner Low appears or when the print becomes faded, follow these steps to clear. Install a new transfer roller and a new transfer belt cleaning roller. Waste Pack Full The waste toner bottle is installed. Toner Error: Install Supported Toner Cartridge An invalid toner cartridge is...

User's Guide
Page 147
... 90 Reports Print 90 Scan Settings 83 Settings 91 Missing: Install Fuser Unit 96 Missing: Install OPC Belt 96 Missing: Install Toner 96 Missing: Install Transfer Roller 96 moving the printer 107, 112 multiple pages on one sheet 53 N network information, printing 48 Network Settings menu 90 No Memory: Out of Memory...
... 90 Reports Print 90 Scan Settings 83 Settings 91 Missing: Install Fuser Unit 96 Missing: Install OPC Belt 96 Missing: Install Toner 96 Missing: Install Transfer Roller 96 moving the printer 107, 112 multiple pages on one sheet 53 N network information, printing 48 Network Settings menu 90 No Memory: Out of Memory...

User's Guide
Page 148
... Toner M 94 Memory Full 95 Memory Near Full 95 Missing: Install Fuser Unit 96 Missing: Install OPC Belt 96 Missing: Install Toner 96 Missing: Install Transfer Roller 96 No Memory: Out of Memory 96 No Response 96 OPC Belt Life: Replace OPC Belt 96 OPC Exhausted: Replace OPC Belt 96 Paper Change...
... Toner M 94 Memory Full 95 Memory Near Full 95 Missing: Install Fuser Unit 96 Missing: Install OPC Belt 96 Missing: Install Toner 96 Missing: Install Transfer Roller 96 No Memory: Out of Memory 96 No Response 96 OPC Belt Life: Replace OPC Belt 96 OPC Exhausted: Replace OPC Belt 96 Paper Change...
Service Manual
Page 3
... service checks 2-14 Main motor service check 2-14 CPU fan service check 2-16 Developer drive assembly service check 2-16 Transfer belt unit service check 2-17 Transfer roller clutch service check 2-18 Transfer belt cleaning roller clutch service check 2-18 Paper feed clutch service check 2-19 Registration clutch service check 2-19 OPC belt marker sensor service...
... service checks 2-14 Main motor service check 2-14 CPU fan service check 2-16 Developer drive assembly service check 2-16 Transfer belt unit service check 2-17 Transfer roller clutch service check 2-18 Transfer belt cleaning roller clutch service check 2-18 Paper feed clutch service check 2-19 Registration clutch service check 2-19 OPC belt marker sensor service...
Service Manual
Page 4
...Waste toner bottle service check 2-31 Missing toner cartridge service check 2-32 Missing photodeveloper cartridge service check 2-33 Transfer roller missing service check 2-34 Cover open service check 2-35 OPC belt (photodeveloper) cartridge drive service check 2-36...65 White print service check 2-66 Wrinkle / image migration service check 2-67 Uneven density (right and left 2-68 Spacing table 2-69 Roller specifications 2-69 Diagnostic aids 3-1 Understanding the MFP operator panel 3-1 Retrieving, printing and restoring the MFP settings 3-3 Printing the maintenance and configuration...
...Waste toner bottle service check 2-31 Missing toner cartridge service check 2-32 Missing photodeveloper cartridge service check 2-33 Transfer roller missing service check 2-34 Cover open service check 2-35 OPC belt (photodeveloper) cartridge drive service check 2-36...65 White print service check 2-66 Wrinkle / image migration service check 2-67 Uneven density (right and left 2-68 Spacing table 2-69 Roller specifications 2-69 Diagnostic aids 3-1 Understanding the MFP operator panel 3-1 Retrieving, printing and restoring the MFP settings 3-3 Printing the maintenance and configuration...
Service Manual
Page 5
... jams 3-30 Repair information 4-1 Removal and cleaning precautions 4-1 Handling ESD-sensitive parts 4-2 Photodeveloper cartridge 4-3 During transportation/storage 4-3 Handling 4-3 MFP removals 4-4 Cleaning roller cover removal 4-4 Transfer belt cleaning roller removal 4-4 Transfer belt unit removal 4-5 Transfer roller removal 4-6 Fuser assembly removal 4-6 Waste toner bottle removal 4-7 Photodeveloper cartridge removal 4-8 Secondary paper feed assembly removal 4-9 Cover removals 4-10 Top cover...
... jams 3-30 Repair information 4-1 Removal and cleaning precautions 4-1 Handling ESD-sensitive parts 4-2 Photodeveloper cartridge 4-3 During transportation/storage 4-3 Handling 4-3 MFP removals 4-4 Cleaning roller cover removal 4-4 Transfer belt cleaning roller removal 4-4 Transfer belt unit removal 4-5 Transfer roller removal 4-6 Fuser assembly removal 4-6 Waste toner bottle removal 4-7 Photodeveloper cartridge removal 4-8 Secondary paper feed assembly removal 4-9 Cover removals 4-10 Top cover...

Service Manual
Page 42
... drops below fusing threshold during the printing process and does not reach fusing temperature again within the warming-up time period. See "Transfer roller clutch service check" on page 2-24. 2-4 Service Manual Marker sensor is not detected. Data communication error between LVPS and the engine... Fuser Unit H3 Service Call Fuser Unit Action A NOT READY signal (rotation error signal) is not reached within alloted time. Improper transfer roller clutch cable connection or a shorted or cut cable. Improper erase lamp cable connection or a shorted or cut cable. See "Power ...
... drops below fusing threshold during the printing process and does not reach fusing temperature again within the warming-up time period. See "Transfer roller clutch service check" on page 2-24. 2-4 Service Manual Marker sensor is not detected. Data communication error between LVPS and the engine... Fuser Unit H3 Service Call Fuser Unit Action A NOT READY signal (rotation error signal) is not reached within alloted time. Improper transfer roller clutch cable connection or a shorted or cut cable. Improper erase lamp cable connection or a shorted or cut cable. See "Power ...
Service Manual
Page 47
...and close. See "Transfer roller removal" on page 4-32. feed roller removal" on page 4-6. Perform scanner calibration. Correctly install the photodeveloper cartridge to clear the jam. Ensure transfer roller is not installed. Replace the transfer roll. See "Transfer belt cleaning roller removal" on page...Flatbed service check" on page 2-32. Missing install Transfer Roller The transfer roller is installed. Paper Jam A 1-2 Paper is out of life. TR Kit Life Replace PQ Kit The transfer roll and transfer belt cleaning roll have reached the end of toner...
...and close. See "Transfer roller removal" on page 4-32. feed roller removal" on page 4-6. Perform scanner calibration. Correctly install the photodeveloper cartridge to clear the jam. Ensure transfer roller is not installed. Replace the transfer roll. See "Transfer belt cleaning roller removal" on page...Flatbed service check" on page 2-32. Missing install Transfer Roller The transfer roller is installed. Paper Jam A 1-2 Paper is out of life. TR Kit Life Replace PQ Kit The transfer roll and transfer belt cleaning roll have reached the end of toner...
Service Manual
Page 56
... 1 2 3 Questions / actions Yes No Turn printer off and remove printer right cover. See "Engine controller board removal" on transfer roller clutch. Go to remove shield. Go to transfer roller clutch? Replace engine controller board. 7100-XXX Transfer roller clutch service check Step 1 2 3 Questions / actions Yes No Turn printer off , and remove printer right cover. Is cable...
... 1 2 3 Questions / actions Yes No Turn printer off and remove printer right cover. See "Engine controller board removal" on transfer roller clutch. Go to remove shield. Go to transfer roller clutch? Replace engine controller board. 7100-XXX Transfer roller clutch service check Step 1 2 3 Questions / actions Yes No Turn printer off , and remove printer right cover. Is cable...

Service Manual
Page 72
... page 4-39. 2-34 Service Manual Yes Go to step 2. Does error clear? Replace HVPS. See Problem solved. A No If contact A has slipped off , and check transfer roller contacts. If B is damaged, replace registration assembly. Are contacts present and not damaged? If you cannot see it, remove HVPS cage (see "HVPS cage removal...
... page 4-39. 2-34 Service Manual Yes Go to step 2. Does error clear? Replace HVPS. See Problem solved. A No If contact A has slipped off , and check transfer roller contacts. If B is damaged, replace registration assembly. Are contacts present and not damaged? If you cannot see it, remove HVPS cage (see "HVPS cage removal...
Service Manual
Page 82
...for damage or binds, and replace if necessary. Ensure paper tray is not damaged. Note: Do not touch transfer belt with your hands. See "Transfer roller removal" on page 4-6. Ensure transfer unit is not damaged and is not damaged. Check rear cover assembly for wear or damage. Ensure paper exit... gears and bearings are not bent or dirty. Check paper feed roller and separator pad for damage. Replace any damaged parts. Check transfer roller for paper caught behind tray in an area free from high humidity. Ensure fuser assembly guides and gears...
...for damage or binds, and replace if necessary. Ensure paper tray is not damaged. Note: Do not touch transfer belt with your hands. See "Transfer roller removal" on page 4-6. Ensure transfer unit is not damaged and is not damaged. Check rear cover assembly for wear or damage. Ensure paper exit... gears and bearings are not bent or dirty. Check paper feed roller and separator pad for damage. Replace any damaged parts. Check transfer roller for paper caught behind tray in an area free from high humidity. Ensure fuser assembly guides and gears...

Service Manual
Page 84
Transfer roller is a customer-ordered supply. Note: Fuser assembly is stained. Problem area 1 Fuser assembly 2 Transfer roller Action • Fuser roller and back-up roller are stained. • Fusing offset error occurred. Replace fuser assembly. Replace transfer roller. See "Transfer roller removal" on page 4-6. 7100-XXX Back stain service check Backside of paper is stained. See "Fuser assembly removal" on page 4-6. 2-46 Service Manual
Transfer roller is a customer-ordered supply. Note: Fuser assembly is stained. Problem area 1 Fuser assembly 2 Transfer roller Action • Fuser roller and back-up roller are stained. • Fusing offset error occurred. Replace fuser assembly. Replace transfer roller. See "Transfer roller removal" on page 4-6. 7100-XXX Back stain service check Backside of paper is stained. See "Fuser assembly removal" on page 4-6. 2-46 Service Manual
Service Manual
Page 87
... Note: Photodeveloper cartridge is off track. Ensure transfer roller and transfer belt cleaning roller are properly installed. 2 Toner cartridge Developer cartridge OPC belt fails to maintain regular and proper rotation due to impact caused when transfer roller or transfer belt cleaning roller contacts transfer belt. Problem area Action 1 Transfer roller and transfer belt cleaning roller Transfer belt fails to maintain regular and proper rotation...
... Note: Photodeveloper cartridge is off track. Ensure transfer roller and transfer belt cleaning roller are properly installed. 2 Toner cartridge Developer cartridge OPC belt fails to maintain regular and proper rotation due to impact caused when transfer roller or transfer belt cleaning roller contacts transfer belt. Problem area Action 1 Transfer roller and transfer belt cleaning roller Transfer belt fails to maintain regular and proper rotation...
Service Manual
Page 92
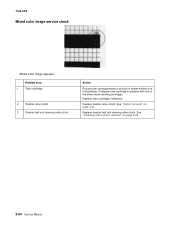
Replace transfer roller clutch. See "Clutch removal" on page 4-25. 2-54 Service Manual Compare toner cartridge in and out of printer without a lot of the other known working cartridges. See "Cleaning roller clutch removal" on page 4-27. Replace toner cartridge if defective. Problem area 1 Toner cartridge 2 Transfer roller clutch 3 Transfer belt unit cleaning roller clutch Action Ensure toner cartridge moves in question with one of resistance. Replace transfer belt unit cleaning roller clutch. 7100-XXX Mixed color image service check Mixed color image appears.
Replace transfer roller clutch. See "Clutch removal" on page 4-25. 2-54 Service Manual Compare toner cartridge in and out of printer without a lot of the other known working cartridges. See "Cleaning roller clutch removal" on page 4-27. Replace toner cartridge if defective. Problem area 1 Toner cartridge 2 Transfer roller clutch 3 Transfer belt unit cleaning roller clutch Action Ensure toner cartridge moves in question with one of resistance. Replace transfer belt unit cleaning roller clutch. 7100-XXX Mixed color image service check Mixed color image appears.
Service Manual
Page 93
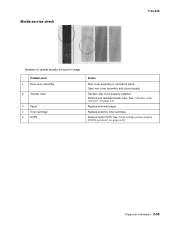
Transfer roller is not fixed in image. Remove and reinstall transfer roller. Replace deformed paper. See "High voltage power supply (HVPS) removal" on page 4-6. Diagnostic information 2-55 Replace faulty HVPS. See "Transfer roller removal" on page 4-39. Problem area 1 Rear cover assembly 2 Transfer roller 3 Paper 4 Toner cartridge 5 HVPS Action Rear cover assembly is not properly installed. Replace defective toner cartridge. Mottle service check 7100-XXX Variation of optical density is found in place. Open rear cover assembly, and close properly.
Transfer roller is not fixed in image. Remove and reinstall transfer roller. Replace deformed paper. See "High voltage power supply (HVPS) removal" on page 4-6. Diagnostic information 2-55 Replace faulty HVPS. See "Transfer roller removal" on page 4-39. Problem area 1 Rear cover assembly 2 Transfer roller 3 Paper 4 Toner cartridge 5 HVPS Action Rear cover assembly is not properly installed. Replace defective toner cartridge. Mottle service check 7100-XXX Variation of optical density is found in place. Open rear cover assembly, and close properly.

Service Manual
Page 101
White band service check 7100-XXX Horizontal white banding creates missing portion of printer) is not making proper contact with high voltage spring contact. Diagnostic information 2-63 Replace faulty transfer roller clutch. See "Clutch removal" on page 4-6. Remove and reinstall transfer roller. Ensure spring contact on left side (looking from front of image. See "Transfer roller removal" on page 4-27. Problem area 1 Transfer roller 2 Transfer roller clutch Action • Transfer roller bias pole is not damaged. • Replace faulty transfer roller.
White band service check 7100-XXX Horizontal white banding creates missing portion of printer) is not making proper contact with high voltage spring contact. Diagnostic information 2-63 Replace faulty transfer roller clutch. See "Clutch removal" on page 4-6. Remove and reinstall transfer roller. Ensure spring contact on left side (looking from front of image. See "Transfer roller removal" on page 4-27. Problem area 1 Transfer roller 2 Transfer roller clutch Action • Transfer roller bias pole is not damaged. • Replace faulty transfer roller.
Service Manual
Page 103
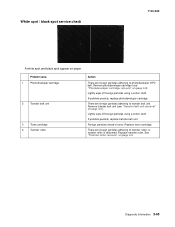
... particles using a cotton cloth. Replace toner cartridge. If problem persists, replace photodeveloper cartridge. Replace transfer roller. Problem area 1 Photodeveloper cartridge 2 Transfer belt unit 3 Toner cartridge 4 Transfer roller Action There are foreign particles adhering to transfer roller, or transfer roller is deformed. Diagnostic information 2-65 Remove transfer belt unit (see "Photodeveloper cartridge removal" on page 4-5). There are foreign particles adhering to...
... particles using a cotton cloth. Replace toner cartridge. If problem persists, replace photodeveloper cartridge. Replace transfer roller. Problem area 1 Photodeveloper cartridge 2 Transfer belt unit 3 Toner cartridge 4 Transfer roller Action There are foreign particles adhering to transfer roller, or transfer roller is deformed. Diagnostic information 2-65 Remove transfer belt unit (see "Photodeveloper cartridge removal" on page 4-5). There are foreign particles adhering to...

Service Manual
Page 104
... touching spring contact on left side (as viewed from front of printer) of roller. Ensure transfer roller bias pole is not properly installed. See "High voltage power supply (HVPS) removal" on page 4-6. Ensure there are no print at all) is ... or, a specific color is blocked by paper or other material stuck at the opening of the optical unit. See "Transfer roller removal" on page 4-39. Problem area 1 Optical Unit (Printhead) 2 Transfer roller 3 HVPS 4 Toner cartridge Action Solid white print Laser light path is missing. Replace faulty HVPS. One color missing Replace...
... touching spring contact on left side (as viewed from front of printer) of roller. Ensure transfer roller bias pole is not properly installed. See "High voltage power supply (HVPS) removal" on page 4-6. Ensure there are no print at all) is ... or, a specific color is blocked by paper or other material stuck at the opening of the optical unit. See "Transfer roller removal" on page 4-39. Problem area 1 Optical Unit (Printhead) 2 Transfer roller 3 HVPS 4 Toner cartridge Action Solid white print Laser light path is missing. Replace faulty HVPS. One color missing Replace...
Service Manual
Page 106
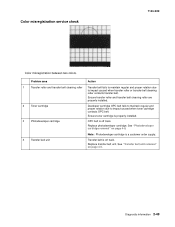
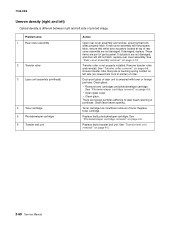
...• Open glass cover. • Clean glass. Problem area 1 Rear cover assembly 2 Transfer roller 3 Laser unit assembly (printhead) 4 Toner cartridge 5 Photodeveloper cartridge 6 Transfer belt unit Action Open rear cover assembly and reclose, ensuring that white door actuators located at ...top of printhead. See "Transfer roller removal" on page 4-8. If actuators are part of printed image. Transfer roller is touching spring contact on page 4-5. 2-68 Service Manual Remove transfer roller and reinstall. There are not damaged. Replace ...
...• Open glass cover. • Clean glass. Problem area 1 Rear cover assembly 2 Transfer roller 3 Laser unit assembly (printhead) 4 Toner cartridge 5 Photodeveloper cartridge 6 Transfer belt unit Action Open rear cover assembly and reclose, ensuring that white door actuators located at ...top of printhead. See "Transfer roller removal" on page 4-8. If actuators are part of printed image. Transfer roller is touching spring contact on page 4-5. 2-68 Service Manual Remove transfer roller and reinstall. There are not damaged. Replace ...


