
User's Guide
Page 3
... 23 Understanding the control panel...26 Using the control panel...26 Navigating the control panel menus ...27 Saving settings...28 Installing the printer software...29 What do the Wi-Fi indicator lights mean 29 Turning printing voice notification on or off 29 Security Information... I need and where do I find it 33 Finding the MAC address ...33 Printing a network setup page ...34 Sharing a printer in a Windows environment 34 Finding a printer/print server located on remote subnets 35 Wireless networking...35 Finding IP addresses...35 Assigning an IP address...36 Configure IP address...36...
... 23 Understanding the control panel...26 Using the control panel...26 Navigating the control panel menus ...27 Saving settings...28 Installing the printer software...29 What do the Wi-Fi indicator lights mean 29 Turning printing voice notification on or off 29 Security Information... I need and where do I find it 33 Finding the MAC address ...33 Printing a network setup page ...34 Sharing a printer in a Windows environment 34 Finding a printer/print server located on remote subnets 35 Wireless networking...35 Finding IP addresses...35 Assigning an IP address...36 Configure IP address...36...
User's Guide
Page 4
Creating an ad hoc wireless network using Windows 39 Adding a printer to an existing ad hoc wireless network using Windows 40 Loading paper and original documents 41 Loading paper...41 Using the automatic paper type sensor ...
Creating an ad hoc wireless network using Windows 39 Adding a printer to an existing ad hoc wireless network using Windows 40 Loading paper and original documents 41 Loading paper...41 Using the automatic paper type sensor ...
User's Guide
Page 5
...) automatically 54 Printing on both sides of the paper (duplexing) manually 55 Changing printer settings...55 Saving and deleting print settings...55 Using the Change Printer Default Settings submenu 56 Resetting printer software to factory default settings 56 Resetting the printer to factory default settings 57 Working with photos 58 Using recommended paper...58...
...) automatically 54 Printing on both sides of the paper (duplexing) manually 55 Changing printer settings...55 Saving and deleting print settings...55 Using the Change Printer Default Settings submenu 56 Resetting printer software to factory default settings 56 Resetting the printer to factory default settings 57 Working with photos 58 Using recommended paper...58...
User's Guide
Page 7
... screen preferences 92 Faxing...93 Receiving a fax automatically...93 Sending a fax using the software...93 Maintaining the printer 94 Installing print cartridges...94 Removing a used print cartridge...96 Refilling print cartridges...96 Using genuine Lexmark print cartridges 96 Aligning print cartridges...97 Cleaning the print cartridge nozzles 97 Wiping the print cartridge...
... screen preferences 92 Faxing...93 Receiving a fax automatically...93 Sending a fax using the software...93 Maintaining the printer 94 Installing print cartridges...94 Removing a used print cartridge...96 Refilling print cartridges...96 Using genuine Lexmark print cartridges 96 Aligning print cartridges...97 Cleaning the print cartridge nozzles 97 Wiping the print cartridge...
User's Guide
Page 8
... Setup Utility (Windows users only 116 Changing wireless settings after installation 116 Resetting an internal wireless print server to factory default settings 117 Check printer ports (Windows users only 117 Print troubleshooting...117 Partial 4 x 6 in. (10 x 15 cm) photo prints when using a PictBridge... appear in graphics or solid black areas 126 Checking the printer status...127 Settings are not saved...127 Checking printer readiness...127 Checking the Spool Settings for banner printing 128 Resolving font problems ...128 Printer is busy printing another job ...129 Ready or Busy Printing...
... Setup Utility (Windows users only 116 Changing wireless settings after installation 116 Resetting an internal wireless print server to factory default settings 117 Check printer ports (Windows users only 117 Print troubleshooting...117 Partial 4 x 6 in. (10 x 15 cm) photo prints when using a PictBridge... appear in graphics or solid black areas 126 Checking the printer status...127 Settings are not saved...127 Checking printer readiness...127 Checking the Spool Settings for banner printing 128 Resolving font problems ...128 Printer is busy printing another job ...129 Ready or Busy Printing...
User's Guide
Page 9
... Jams and misfeeds troubleshooting 136 How to clear and avoid paper jams ...136 Paper jam in the printer ...137 Paper jam in the paper support ...137 Paper or specialty media misfeeds...137 Printer does not feed paper, envelopes, or specialty media 138 Banner paper jams ...138 Paper continues to ...the computer 145 Poor scanned image quality ...146 Partial document or photo scans ...146 Cannot scan to a computer over a network 146 Error messages on the printer display 147 Alignment Error...147 Cartridge Error (1102, 1203, 1204, or 120F 147 Black Ink Low / Color Ink Low / Photo Ink Low 148 ...
... Jams and misfeeds troubleshooting 136 How to clear and avoid paper jams ...136 Paper jam in the printer ...137 Paper jam in the paper support ...137 Paper or specialty media misfeeds...137 Printer does not feed paper, envelopes, or specialty media 138 Banner paper jams ...138 Paper continues to ...the computer 145 Poor scanned image quality ...146 Partial document or photo scans ...146 Cannot scan to a computer over a network 146 Error messages on the printer display 147 Alignment Error...147 Cartridge Error (1102, 1203, 1204, or 120F 147 Black Ink Low / Color Ink Low / Photo Ink Low 148 ...
User's Guide
Page 10
Photo must fit on page 151 PictBridge Communication Error ...152 Please remove the camera card...152 Printer Carrier Stall ...152 Proof Sheet Error...152 Some photos removed from card by host 152 Problems reading the memory card ...152 Two-sided paper type ...
Photo must fit on page 151 PictBridge Communication Error ...152 Please remove the camera card...152 Printer Carrier Stall ...152 Proof Sheet Error...152 Some photos removed from card by host 152 Problems reading the memory card ...152 Two-sided paper type ...
User's Guide
Page 11
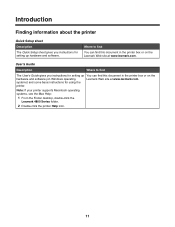
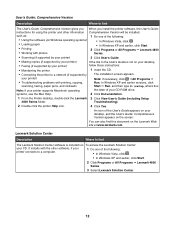
...this document in the printer box or on Windows operating Lexmark Web site at www.lexmark.com. Note: If your printer supports Macintosh operating systems, see the Mac Help: 1 From the Finder desktop, double-click the Lexmark 4800 Series folder. 2 Double-click the printer Help icon. 11 ... instructions for setting up You can find this document in the printer box or on the hardware and software (on the Lexmark Web site at www.lexmark.com. Introduction Finding information about the printer Quick Setup sheet Description The Quick Setup sheet gives you instructions ...
...this document in the printer box or on Windows operating Lexmark Web site at www.lexmark.com. Note: If your printer supports Macintosh operating systems, see the Mac Help: 1 From the Finder desktop, double-click the Lexmark 4800 Series folder. 2 Double-click the printer Help icon. 11 ... instructions for setting up You can find this document in the printer box or on the hardware and software (on the Lexmark Web site at www.lexmark.com. Introduction Finding information about the printer Quick Setup sheet Description The Quick Setup sheet gives you instructions ...
User's Guide
Page 12
...In Windows XP and earlier, click Start. 2 Click Programs or All Programs Œ Lexmark 4800 Series. 3 Select Lexmark Solution Center. 12 It installs with photos Series. • Scanning (if supported by your printer) 3 Click User's Guide. • Making copies (if supported by The installation screen ... faxing, paper jams, and misfeeds Start Œ Run, and then type D:\setup, where D is not on To access the Lexmark Solution Center: your printer) Note: If necessary, click ŒAll Programs Œ • Troubleshooting problems with printing, copying, Run. User's Guide: ...
...In Windows XP and earlier, click Start. 2 Click Programs or All Programs Œ Lexmark 4800 Series. 3 Select Lexmark Solution Center. 12 It installs with photos Series. • Scanning (if supported by your printer) 3 Click User's Guide. • Making copies (if supported by The installation screen ... faxing, paper jams, and misfeeds Start Œ Run, and then type D:\setup, where D is not on To access the Lexmark Solution Center: your printer) Note: If necessary, click ŒAll Programs Œ • Troubleshooting problems with printing, copying, Run. User's Guide: ...

User's Guide
Page 13
Visit our Web site at www.lexmark.com. Note: For additional information about contacting Lexmark, see the printed warranty statement that shipped with your printer will be available in printer, or set forth at • US: 1-800-332-4120 Monday-Friday (8:00 AM-11:00 PM ET) Saturday (Noon-6:00 PM ET) • Canada: 1-800...
Visit our Web site at www.lexmark.com. Note: For additional information about contacting Lexmark, see the printed warranty statement that shipped with your printer will be available in printer, or set forth at • US: 1-800-332-4120 Monday-Friday (8:00 AM-11:00 PM ET) Saturday (Noon-6:00 PM ET) • Canada: 1-800...
User's Guide
Page 14
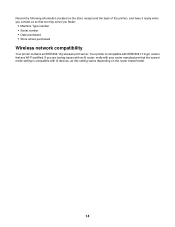
...Serial number • Date purchased • Store where purchased Wireless network compatibility Your printer contains an IEEE 802.11g wireless print server. Record the following information (located on the router brand/model. 14 Your printer is compatible with IEEE 802.11 b/g/n routers that the current mode setting is ...compatible with G devices, as this setting varies depending on the store receipt and the back of the printer), and have it ready when you contact us so that we may serve you are having issues with an N router, verify with your...
...Serial number • Date purchased • Store where purchased Wireless network compatibility Your printer contains an IEEE 802.11g wireless print server. Record the following information (located on the router brand/model. 14 Your printer is compatible with IEEE 802.11 b/g/n routers that the current mode setting is ...compatible with G devices, as this setting varies depending on the store receipt and the back of the printer), and have it ready when you contact us so that we may serve you are having issues with an N router, verify with your...

User's Guide
Page 15
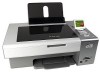
... cable WI F I PRINTING 1 2 3 Description Cartridges to be found on the product purchased. Initial setup directions Connects the printer to the computer temporarily during some methods of the printer. Setting up the printer Checking the box contents 7 1 2 3 6 5 4 Name 1 Black print cartridge 2 Color print cartridge 3 Power cord... 4 Installation software CD for the printer • Windows Help • User's Guide in electronic format • Mac Help Printed booklet that serves as a guide. Attaches ...
... cable WI F I PRINTING 1 2 3 Description Cartridges to be found on the product purchased. Initial setup directions Connects the printer to the computer temporarily during some methods of the printer. Setting up the printer Checking the box contents 7 1 2 3 6 5 4 Name 1 Black print cartridge 2 Color print cartridge 3 Power cord... 4 Installation software CD for the printer • Windows Help • User's Guide in electronic format • Mac Help Printed booklet that serves as a guide. Attaches ...
User's Guide
Page 16
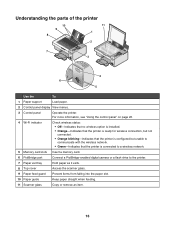
...I PRINTING 3 WI F I PRINTING 4 6 5 Use the To 1 Paper support Load paper. 2 Control panel display View menus. 3 Control panel Operate the printer. For more information, see "Using the control panel" on page 26. 4 Wi-Fi indicator Check wireless status: • Off-Indicates that no wireless option is... network. 5 Memory card slots Insert a memory card. 6 PictBridge port Connect a PictBridge-enabled digital camera or a flash drive to the printer. 7 Paper exit tray Hold paper as it exits. 8 Top cover Access the scanner glass. 9 Paper feed guard Prevent items from falling...
...I PRINTING 3 WI F I PRINTING 4 6 5 Use the To 1 Paper support Load paper. 2 Control panel display View menus. 3 Control panel Operate the printer. For more information, see "Using the control panel" on page 26. 4 Wi-Fi indicator Check wireless status: • Off-Indicates that no wireless option is... network. 5 Memory card slots Insert a memory card. 6 PictBridge port Connect a PictBridge-enabled digital camera or a flash drive to the printer. 7 Paper exit tray Hold paper as it exits. 8 Top cover Access the scanner glass. 9 Paper feed guard Prevent items from falling...

User's Guide
Page 17
server) 4 USB port Connect the printer to a power source. 2 1 17 Warning: Do not touch the USB port except when plugging in or removing a USB cable or installation cable. 5 Duplex cover • ... the paper • Remove paper jams. For more information, see "Paper jam in the duplex unit" on page 139. 6 Power supply with port Connect the printer to a computer using a USB cable. 1 2 WI F I PRINTING 3 4 5 6 Use the To 1 Scanner unit Access the print cartridges. 2 Print cartridge carrier Install, replace, or remove a print cartridge...
server) 4 USB port Connect the printer to a power source. 2 1 17 Warning: Do not touch the USB port except when plugging in or removing a USB cable or installation cable. 5 Duplex cover • ... the paper • Remove paper jams. For more information, see "Paper jam in the duplex unit" on page 139. 6 Power supply with port Connect the printer to a computer using a USB cable. 1 2 WI F I PRINTING 3 4 5 6 Use the To 1 Scanner unit Access the print cartridges. 2 Print cartridge carrier Install, replace, or remove a print cartridge...
User's Guide
Page 18
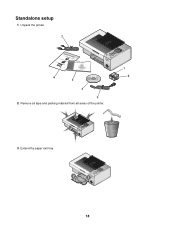
Standalone setup 1 Unpack the printer. 7 1 2 3 WI F I PRINTING 6 5 4 3 2 Remove all tape and packing material from all areas of the printer. 1 2 WI F I PRINTING 3 Extend the paper exit tray. 2 1 WI F I PRINTING 18
Standalone setup 1 Unpack the printer. 7 1 2 3 WI F I PRINTING 6 5 4 3 2 Remove all tape and packing material from all areas of the printer. 1 2 WI F I PRINTING 3 Extend the paper exit tray. 2 1 WI F I PRINTING 18
User's Guide
Page 20
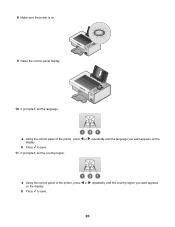
b Press to save . 11 If prompted, set the language. 121 a Using the control panel of the printer, press or repeatedly until the language you want appears on the display. b Press to save . 20 WI F I PRINTING 10 If prompted, set the country/region. 121 a Using the control panel of the printer, press or repeatedly until the country/region you want appears on . WI F I PRINTING 9 Raise the control panel display. 8 Make sure the power is on the display.
b Press to save . 11 If prompted, set the language. 121 a Using the control panel of the printer, press or repeatedly until the language you want appears on the display. b Press to save . 20 WI F I PRINTING 10 If prompted, set the country/region. 121 a Using the control panel of the printer, press or repeatedly until the country/region you want appears on . WI F I PRINTING 9 Raise the control panel display. 8 Make sure the power is on the display.
User's Guide
Page 21
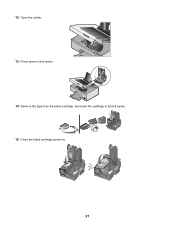
WI F I PRINTING 14 Remove the tape from the black cartridge, and insert the cartridge in the left carrier. 15 Close the black cartridge carrier lid. 21 12 Open the printer. 13 Press down on the levers.
WI F I PRINTING 14 Remove the tape from the black cartridge, and insert the cartridge in the left carrier. 15 Close the black cartridge carrier lid. 21 12 Open the printer. 13 Press down on the levers.
User's Guide
Page 22
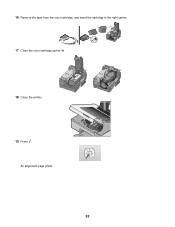
16 Remove the tape from the color cartridge, and insert the cartridge in the right carrier. 17 Close the color cartridge carrier lid. 18 Close the printer. 19 Press . An alignment page prints. 22
16 Remove the tape from the color cartridge, and insert the cartridge in the right carrier. 17 Close the color cartridge carrier lid. 18 Close the printer. 19 Press . An alignment page prints. 22

User's Guide
Page 23
... desktop, double-click the Productivity Studio icon. Fax Send a photo or document as an attachment to complete. Understanding the printer software Using the software that installed with your printer, and do not indicate a problem. Notes: • The alignment page may not be applicable. Method 2 1 Do... : • In Windows Vista, click . • In Windows XP and earlier, click Start. 2 Click Programs or All Programs Œ Lexmark 4800 Series. 3 Select Productivity Studio. 20 Discard the alignment page. Click the Productivity Studio icon for the task you want to an e-mail message...
... desktop, double-click the Productivity Studio icon. Fax Send a photo or document as an attachment to complete. Understanding the printer software Using the software that installed with your printer, and do not indicate a problem. Notes: • The alignment page may not be applicable. Method 2 1 Do... : • In Windows Vista, click . • In Windows XP and earlier, click Start. 2 Click Programs or All Programs Œ Lexmark 4800 Series. 3 Select Productivity Studio. 20 Discard the alignment page. Click the Productivity Studio icon for the task you want to an e-mail message...
User's Guide
Page 24
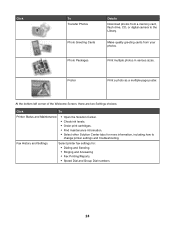
At the bottom left corner of the Welcome Screen, there are two Settings choices: Click To Printer Status and Maintenance • Open the Solution Center. • Check ink levels. • Order print cartridges. • Find maintenance information. • ...Make quality greeting cards from a memory card, flash drive, CD, or digital camera to change printer settings and troubleshooting. Poster Print a photo as a multiple-page poster. Fax History and Settings Select printer fax settings for more information, including how to the Library. Photo Packages Print multiple photos in ...
At the bottom left corner of the Welcome Screen, there are two Settings choices: Click To Printer Status and Maintenance • Open the Solution Center. • Check ink levels. • Order print cartridges. • Find maintenance information. • ...Make quality greeting cards from a memory card, flash drive, CD, or digital camera to change printer settings and troubleshooting. Poster Print a photo as a multiple-page poster. Fax History and Settings Select printer fax settings for more information, including how to the Library. Photo Packages Print multiple photos in ...


