
User's Guide
Page 31
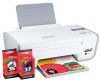
... or delete contacts in the built-in phone book. • Access the Lexmark Fax Setup Utility in four-in-one printers. Access your own photos. • Adjust settings for Office Lexmark Fax Solutions Abbyy Sprint OCR Lexmark Wireless Setup Utility To • Scan, copy, fax, e-mail, or ... these programs, depending on the features of the printer that you set Ringing and Answering, and print fax history and status reports. Use the LexmarkTM Productivity Studio Lexmark Fast Pics Lexmark Toolbar Lexmark Tools for the printer. Note: Your printer may have chosen to save ink. •...
... or delete contacts in the built-in phone book. • Access the Lexmark Fax Setup Utility in four-in-one printers. Access your own photos. • Adjust settings for Office Lexmark Fax Solutions Abbyy Sprint OCR Lexmark Wireless Setup Utility To • Scan, copy, fax, e-mail, or ... these programs, depending on the features of the printer that you set Ringing and Answering, and print fax history and status reports. Use the LexmarkTM Productivity Studio Lexmark Fast Pics Lexmark Toolbar Lexmark Tools for the printer. Note: Your printer may have chosen to save ink. •...

User's Guide
Page 75
... application to launch when a memory device is connected to the computer, then the application automatically launches. Using Lexmark Productivity Studio in Windows • If you installed Lexmark Productivity Studio, and if the printer is connected to the computer through a network: 1 Do one of the following: - In Windows XP and earlier, click Start. 2 Click All Programs or Programs, and...
... application to launch when a memory device is connected to the computer, then the application automatically launches. Using Lexmark Productivity Studio in Windows • If you installed Lexmark Productivity Studio, and if the printer is connected to the computer through a network: 1 Do one of the following: - In Windows XP and earlier, click Start. 2 Click All Programs or Programs, and...
User's Guide
Page 77
...Transfer the photos to the computer. 77 d Open the photo that came with the paper.) 2 To print the photos: Using Windows a Do one of the following: • In Windows Vista, click . • In Windows XP and earlier, click Start. e Follow the instructions on..."Format for the current print job. Using Macintosh a Customize the settings as needed in your printer program folder, depending on the computer screen to install it with the printer software during installation. c Select Lexmark Productivity Studio. You may not appear in the Page Setup dialog. 1 With a photo open , choose...
...Transfer the photos to the computer. 77 d Open the photo that came with the paper.) 2 To print the photos: Using Windows a Do one of the following: • In Windows Vista, click . • In Windows XP and earlier, click Start. e Follow the instructions on..."Format for the current print job. Using Macintosh a Customize the settings as needed in your printer program folder, depending on the computer screen to install it with the printer software during installation. c Select Lexmark Productivity Studio. You may not appear in the Page Setup dialog. 1 With a photo open , choose...
User's Guide
Page 78
... use the applications installed on transferring photos using Windows: 1 Do one of the following: • In Windows Vista, click . • In Windows XP and earlier, click Start. 2 Click All Programs or Programs, and then select the printer program folder from the list. 3 Click Lexmark Productivity Studio. 4 From the Photo Printing section of the main screen...
... use the applications installed on transferring photos using Windows: 1 Do one of the following: • In Windows Vista, click . • In Windows XP and earlier, click Start. 2 Click All Programs or Programs, and then select the printer program folder from the list. 3 Click Lexmark Productivity Studio. 4 From the Photo Printing section of the main screen...
User's Guide
Page 79
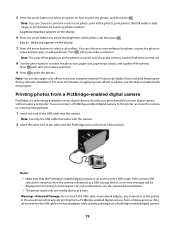
..., and then press . Press each time you installed the program during software installation). Printing photos from your digital camera without using the Lexmark Productivity Studio (if you make a selection. If the camera USB selection is incorrect, then the camera is set to auto-enhance the photo, ... other end of the cable into the camera. Note: The color effect applies to photos, see the camera documentation. • The printer reads only one end of data can choose to print the most digital cameras that came with the program. Notes: • Make sure that fall ...
..., and then press . Press each time you installed the program during software installation). Printing photos from your digital camera without using the Lexmark Productivity Studio (if you make a selection. If the camera USB selection is incorrect, then the camera is set to auto-enhance the photo, ... other end of the cable into the camera. Note: The color effect applies to photos, see the camera documentation. • The printer reads only one end of data can choose to print the most digital cameras that came with the program. Notes: • Make sure that fall ...
User's Guide
Page 87
...dark edges on the scanned image. 3 Do one of the following: • In Windows Vista, click . • In Windows XP and earlier, click Start. 4 Click All Programs or Programs, and then select the printer program folder from the list. 5 Click Lexmark Productivity Studio. 6 From the Photo Printing section of ...press . Note: Do not remove the memory device until Network appears, and then press . b If prompted, press the arrow buttons until the printer has finished downloading the scan applications list. To assign a computer name and a PIN to the network computer, see the Help for each time...
...dark edges on the scanned image. 3 Do one of the following: • In Windows Vista, click . • In Windows XP and earlier, click Start. 4 Click All Programs or Programs, and then select the printer program folder from the list. 5 Click Lexmark Productivity Studio. 6 From the Photo Printing section of ...press . Note: Do not remove the memory device until Network appears, and then press . b If prompted, press the arrow buttons until the printer has finished downloading the scan applications list. To assign a computer name and a PIN to the network computer, see the Help for each time...
User's Guide
Page 89
...started in -One Center, click Cancel on the computer screen. Using Windows To cancel a scan job started in the Lexmark All-in the Lexmark Productivity Studio, click Stop on the computer screen. 89 Notes: • You may be prompted to increase or decrease the value for the printer software associated with...To assign a computer name and a PIN to the network computer, see the Help for each time you select a digit. 6 Wait until the printer has finished downloading the scan applications list. 7 Press the arrow buttons until the application that you want appears, and then press . 8 Press ....
...started in -One Center, click Cancel on the computer screen. Using Windows To cancel a scan job started in the Lexmark All-in the Lexmark Productivity Studio, click Stop on the computer screen. 89 Notes: • You may be prompted to increase or decrease the value for the printer software associated with...To assign a computer name and a PIN to the network computer, see the Help for each time you select a digit. 6 Wait until the printer has finished downloading the scan applications list. 7 Press the arrow buttons until the application that you want appears, and then press . 8 Press ....
User's Guide
Page 90
... the scanner glass. 2 Do one of your fax. 13 Click Send. If you want to send with an active fax modem, the computer is configured to fax, a phone line is connected to the computer, and both the printer and computer are on. • The Lexmark Fax Solutions and Lexmark Productivity Studio software are any additional documents...
... the scanner glass. 2 Do one of your fax. 13 Click Send. If you want to send with an active fax modem, the computer is configured to fax, a phone line is connected to the computer, and both the printer and computer are on. • The Lexmark Fax Solutions and Lexmark Productivity Studio software are any additional documents...
User's Guide
Page 91
...Windows 1 Do one of the following : • In Mac OS X version 10.4 or later, select Fax PDF from the PDF drop-down menu. • In Mac OS X version 10.3, click Fax. 11 In the "To" field, enter the fax number of document to choose a recipient from the list. 3 Click Lexmark Productivity Studio. 4 From .... The Scan dialog appears with fax numbers. 12 If you want from the drop-down lists. 9 To set the number of telephone rings before the printer automatically receives faxes, select a setting from the "Pick-up on the" drop-down list. 8 To turn the Auto Answer feature on and off at...
...Windows 1 Do one of the following : • In Mac OS X version 10.4 or later, select Fax PDF from the PDF drop-down menu. • In Mac OS X version 10.3, click Fax. 11 In the "To" field, enter the fax number of document to choose a recipient from the list. 3 Click Lexmark Productivity Studio. 4 From .... The Scan dialog appears with fax numbers. 12 If you want from the drop-down lists. 9 To set the number of telephone rings before the printer automatically receives faxes, select a setting from the "Pick-up on the" drop-down list. 8 To turn the Auto Answer feature on and off at...

User's Guide
Page 141
... Web site finding 10 WEP key key index 53 Windows installing printer on wireless network 36 Windows software Abby Sprint OCR 31 Fast Pics 31 Fax Setup Utility 31 Fax Solutions software 31 Printing Preferences 31 Productivity Studio 31 Service Center 31 Toolbar 31 Tools for Office 31 Wireless... Setup Utility 31 wireless printer does not print 114 troubleshooting 114, 123 with USB 50 wireless installation will not continue ...
... Web site finding 10 WEP key key index 53 Windows installing printer on wireless network 36 Windows software Abby Sprint OCR 31 Fast Pics 31 Fax Setup Utility 31 Fax Solutions software 31 Printing Preferences 31 Productivity Studio 31 Service Center 31 Toolbar 31 Tools for Office 31 Wireless... Setup Utility 31 wireless printer does not print 114 troubleshooting 114, 123 with USB 50 wireless installation will not continue ...


