User's Guide
Page 5
... quality ...52 Aligning the print cartridges ...52 Cleaning the print cartridge nozzles...53 Wiping the print cartridge nozzles and contacts ...54 Preserving the print cartridges...55 Cleaning the scanner glass...55 Ordering print cartridges...55 Ordering paper and other supplies...56 Using genuine Lexmark print cartridges...56 Refilling a print cartridge...57 Recycling Lexmark products...57 Troubleshooting 58 Setup troubleshooting...
... quality ...52 Aligning the print cartridges ...52 Cleaning the print cartridge nozzles...53 Wiping the print cartridge nozzles and contacts ...54 Preserving the print cartridges...55 Cleaning the scanner glass...55 Ordering print cartridges...55 Ordering paper and other supplies...56 Using genuine Lexmark print cartridges...56 Refilling a print cartridge...57 Recycling Lexmark products...57 Troubleshooting 58 Setup troubleshooting...
User's Guide
Page 11
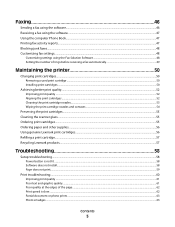
Note: The complete version of the printer. Setting up the printer Checking the box contents 1 2 ?? ? 6 5 4 3 Name Description 1 Black print cartridge Cartridges to be included. Note: A USB cable may or may look different from the one shown. 4 Installation software CD • Installation software for the printer • Help • User's Guide in electronic format 5 Setup sheet Instructions on...
Note: The complete version of the printer. Setting up the printer Checking the box contents 1 2 ?? ? 6 5 4 3 Name Description 1 Black print cartridge Cartridges to be included. Note: A USB cable may or may look different from the one shown. 4 Installation software CD • Installation software for the printer • Help • User's Guide in electronic format 5 Setup sheet Instructions on...
User's Guide
Page 13
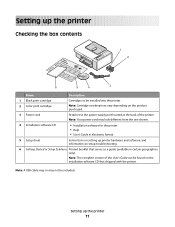
1 2 3 5 4 Use the To 1 Scanner unit Access the print cartridges. 2 Scanner support Hold up the scanner unit. 3 Print cartridge carrier Install, replace, or remove a print cartridge. 4 Power supply with port Connect the printer to a power source. 5 USB port Connect the printer to a computer using a USB cable. Learning about the printer 13
1 2 3 5 4 Use the To 1 Scanner unit Access the print cartridges. 2 Scanner support Hold up the scanner unit. 3 Print cartridge carrier Install, replace, or remove a print cartridge. 4 Power supply with port Connect the printer to a power source. 5 USB port Connect the printer to a computer using a USB cable. Learning about the printer 13
User's Guide
Page 14
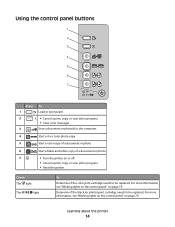
...the control panel buttons Press 1 2 3 To Load or eject paper. • Cancel a print, copy, or scan job in progress. • Reset the printer. For more information, see "Blinking lights on the control panel" on or off. • Cancel a print, copy, or scan job in progress. •... photo. 6 Start a black-and-white copy of a document or photo. 7 • Turn the printer on page 70. Learning about the printer 14 Check The light The light To Determine if the color print cartridge needs to be replaced. For more information, see "Blinking lights on the control panel" on page...
...the control panel buttons Press 1 2 3 To Load or eject paper. • Cancel a print, copy, or scan job in progress. • Reset the printer. For more information, see "Blinking lights on the control panel" on or off. • Cancel a print, copy, or scan job in progress. •... photo. 6 Start a black-and-white copy of a document or photo. 7 • Turn the printer on page 70. Learning about the printer 14 Check The light The light To Determine if the color print cartridge needs to be replaced. For more information, see "Blinking lights on the control panel" on page...
User's Guide
Page 15
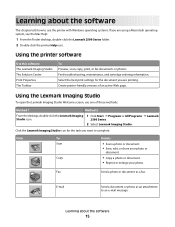
..., and cartridge ordering information. Select the best print settings for the task you are printing. Learning about the software 15 Using the Lexmark Imaging Studio To open the Lexmark Imaging Studio Welcome screen, use the printer with Windows operating systems. If you want to use one of an... active Web page. Click the Lexmark Imaging Studio icon for the document you are ...
..., and cartridge ordering information. Select the best print settings for the task you are printing. Learning about the software 15 Using the Lexmark Imaging Studio To open the Lexmark Imaging Studio Welcome screen, use the printer with Windows operating systems. If you want to use one of an... active Web page. Click the Lexmark Imaging Studio icon for the document you are ...
User's Guide
Page 16
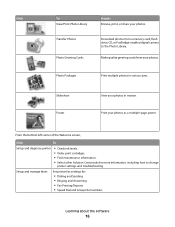
...Packages Print multiple photos in motion. From the bottom left corner of the Welcome screen, Click To Setup and diagnose printer • Check ink levels. • Order print cartridges. • Find maintenance information. • Select other Solution Center tabs for : • Dialing and Sending ... a memory card, flash drive, CD, or PictBridge-enabled digital camera to change printer settings and troubleshooting. Print your photos in various sizes. Setup and manage faxes Set printer fax settings for more information, including how to the Photo Library. Download photos from...
...Packages Print multiple photos in motion. From the bottom left corner of the Welcome screen, Click To Setup and diagnose printer • Check ink levels. • Order print cartridges. • Find maintenance information. • Select other Solution Center tabs for : • Dialing and Sending ... a memory card, flash drive, CD, or PictBridge-enabled digital camera to change printer settings and troubleshooting. Print your photos in various sizes. Setup and manage faxes Set printer fax settings for more information, including how to the Photo Library. Download photos from...
User's Guide
Page 17
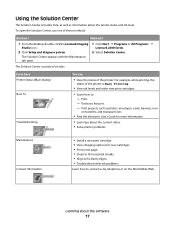
.... For example, while printing, the status of the printer. Use basic features. - Learning about the current status. • Solve printer problems. Maintenance Contact Information • Install a new print cartridge. • View shopping options for new cartridges. • Print a test page. • Clean... tab open the Solution Center, use one of these methods: Method 1 Method 2 1 From the desktop, double-click the Lexmark Imaging Studio icon. 2 Click Setup and diagnose printer. 1 Click Start Œ Programs or All Programs Œ Lexmark 2500 Series. 2 Select Solution Center....
.... For example, while printing, the status of the printer. Use basic features. - Learning about the current status. • Solve printer problems. Maintenance Contact Information • Install a new print cartridge. • View shopping options for new cartridges. • Print a test page. • Clean... tab open the Solution Center, use one of these methods: Method 1 Method 2 1 From the desktop, double-click the Lexmark Imaging Studio icon. 2 Click Setup and diagnose printer. 1 Click Start Œ Programs or All Programs Œ Lexmark 2500 Series. 2 Select Solution Center....

User's Guide
Page 50
... metal nozzles on the bottom of the cartridges. The print cartridge carrier moves and stops at the loading position, unless the printer is on the cartridge carrier lever to raise the cartridge carrier lid. 4 Remove the used print cartridge. Maintaining the printer Changing print cartridges Removing a used print cartridge 1 Make sure the printer is busy. 3 Press down on . 2 Lift the...
... metal nozzles on the bottom of the cartridges. The print cartridge carrier moves and stops at the loading position, unless the printer is on the cartridge carrier lever to raise the cartridge carrier lid. 4 Remove the used print cartridge. Maintaining the printer Changing print cartridges Removing a used print cartridge 1 Make sure the printer is busy. 3 Press down on . 2 Lift the...
User's Guide
Page 51
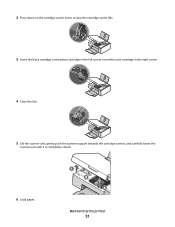
Insert the color cartridge in the left carrier. Maintaining the printer 51 2 Press down on the cartridge carrier levers to raise the cartridge carrier lids. 3 Insert the black cartridge or the photo cartridge in the right carrier. 4 Close the lids. 5 Lift the scanner unit, gently push the scanner support towards the cartridge carriers, and carefully lower the scanner unit until it is completely closed. 6 Load paper.
Insert the color cartridge in the left carrier. Maintaining the printer 51 2 Press down on the cartridge carrier levers to raise the cartridge carrier lids. 3 Insert the black cartridge or the photo cartridge in the right carrier. 4 Close the lids. 5 Lift the scanner unit, gently push the scanner support towards the cartridge carriers, and carefully lower the scanner unit until it is completely closed. 6 Load paper.
User's Guide
Page 52
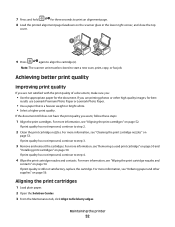
...cartridge nozzles. Maintaining the printer 52 If you are not satisfied with the print quality of a document, make sure you want, follow these steps: 1 Align the print cartridges...the print cartridge nozzles" on page 54. For more information, see "Wiping the print cartridge nozzles and contacts" on page 53. Aligning the print cartridges 1 Load ... Align to step 3. 3 Remove and reinsert the cartridges. Note: The scanner unit must be closed to ...results use Lexmark Premium Photo Paper or Lexmark Photo Paper. • Use a paper that is still not satisfactory, replace the cartridge. 7 ...
...cartridge nozzles. Maintaining the printer 52 If you are not satisfied with the print quality of a document, make sure you want, follow these steps: 1 Align the print cartridges...the print cartridge nozzles" on page 54. For more information, see "Wiping the print cartridge nozzles and contacts" on page 53. Aligning the print cartridges 1 Load ... Align to step 3. 3 Remove and reinsert the cartridges. Note: The scanner unit must be closed to ...results use Lexmark Premium Photo Paper or Lexmark Photo Paper. • Use a paper that is still not satisfactory, replace the cartridge. 7 ...
User's Guide
Page 53
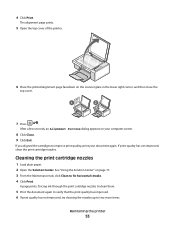
.... 8 Click Close. 9 Click Exit. The alignment page prints. 5 Open the top cover of the printer. 6 Place the printed alignment page facedown on your document again. If you aligned the cartridges to fix horizontal streaks. 4 Click Print. 4 Click Print. If print quality has not improved, clean the... prints, forcing ink through the print cartridge nozzles to clean them. 5 Print the document again to verify that the print quality has improved. 6 If print quality has not improved, try cleaning the nozzles up to two more times. Maintaining the printer 53 After a few seconds, an ...
.... 8 Click Close. 9 Click Exit. The alignment page prints. 5 Open the top cover of the printer. 6 Place the printed alignment page facedown on your document again. If you aligned the cartridges to fix horizontal streaks. 4 Click Print. 4 Click Print. If print quality has not improved, clean the... prints, forcing ink through the print cartridge nozzles to clean them. 5 Print the document again to verify that the print quality has improved. 6 If print quality has not improved, try cleaning the nozzles up to two more times. Maintaining the printer 53 After a few seconds, an ...

User's Guide
Page 54
...printer 54 Wiping the print cartridge nozzles and contacts 1 Remove the print cartridges. 2 Dampen a clean, lint-free cloth with water. 3 Gently hold the cloth against the nozzles for about three seconds, and then wipe in the direction shown. 4 Using another clean section of the cloth, gently hold the cloth against the contacts for about three... seconds, and then wipe in the direction shown. 5 With another clean section of the cloth, repeat step 3 and step 4. 6 Let the nozzles and contacts dry completely. 7 Reinsert the print cartridges. 8 Print the document...
...printer 54 Wiping the print cartridge nozzles and contacts 1 Remove the print cartridges. 2 Dampen a clean, lint-free cloth with water. 3 Gently hold the cloth against the nozzles for about three seconds, and then wipe in the direction shown. 4 Using another clean section of the cloth, gently hold the cloth against the contacts for about three... seconds, and then wipe in the direction shown. 5 With another clean section of the cloth, repeat step 3 and step 4. 6 Let the nozzles and contacts dry completely. 7 Reinsert the print cartridges. 8 Print the document...
User's Guide
Page 55
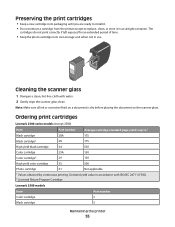
..., clean, or store it in an airtight container. Preserving the print cartridges • Keep a new cartridge in its own storage unit when not in use. Cleaning the scanner glass 1 Dampen a clean, lint-free cloth with ISO/IEC 24711 (FDIS). 2 Licensed Return Program Cartridge Lexmark 2580 models Item Color cartridge Part number 2 Black cartridge 3 Maintaining the printer 55
..., clean, or store it in an airtight container. Preserving the print cartridges • Keep a new cartridge in its own storage unit when not in use. Cleaning the scanner glass 1 Dampen a clean, lint-free cloth with ISO/IEC 24711 (FDIS). 2 Licensed Return Program Cartridge Lexmark 2580 models Item Color cartridge Part number 2 Black cartridge 3 Maintaining the printer 55
User's Guide
Page 56
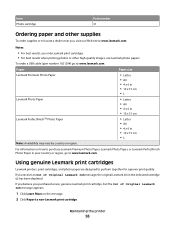
... To order supplies or to perform together for superior print quality. Using genuine Lexmark print cartridges Lexmark printers, print cartridges, and photo paper are designed to locate a dealer near you purchased a new, genuine Lexmark print cartridge, but the Out of Original Lexmark Ink message, the original Lexmark ink in . • 10 x 15 cm •L Note: Availability may vary by...
... To order supplies or to perform together for superior print quality. Using genuine Lexmark print cartridges Lexmark printers, print cartridges, and photo paper are designed to locate a dealer near you purchased a new, genuine Lexmark print cartridge, but the Out of Original Lexmark Ink message, the original Lexmark ink in . • 10 x 15 cm •L Note: Availability may vary by...
User's Guide
Page 57
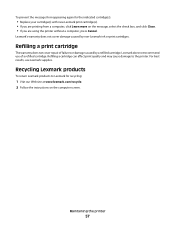
... by non-Lexmark ink or print cartridges. Recycling Lexmark products To return Lexmark products to the printer. Lexmark does not recommend use Lexmark supplies. Maintaining the printer 57 Refilling a print cartridge The warranty does not cover repair of a refilled cartridge. Refilling a cartridge can affect print quality and may cause damage to Lexmark for the indicated cartridge(s): • Replace your cartridge(s) with new Lexmark print cartridge(s). •...
... by non-Lexmark ink or print cartridges. Recycling Lexmark products To return Lexmark products to the printer. Lexmark does not recommend use Lexmark supplies. Maintaining the printer 57 Refilling a print cartridge The warranty does not cover repair of a refilled cartridge. Refilling a cartridge can affect print quality and may cause damage to Lexmark for the indicated cartridge(s): • Replace your cartridge(s) with new Lexmark print cartridge(s). •...
User's Guide
Page 60
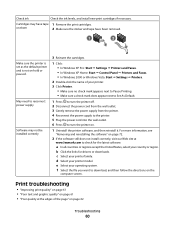
... quality" on page 61 • "Poor quality at www.lexmark.com to turn the printer on page 72. 2 If the software still does not install correctly, visit our Web site at the edges of your printer. 3 Click Printer. • Make sure no check mark appears next to Pause...regions except the United States, select your printer model. Cartridges may not be installed correctly 3 Reinsert the cartridges. 1 Click: • In Windows XP Pro: Start Œ Settings Œ Printers and Faxes. • In Windows XP Home: Start Œ Control Panel Œ Printers and Faxes. • In Windows 2000 ...
... quality" on page 61 • "Poor quality at www.lexmark.com to turn the printer on page 72. 2 If the software still does not install correctly, visit our Web site at the edges of your printer. 3 Click Printer. • Make sure no check mark appears next to Pause...regions except the United States, select your printer model. Cartridges may not be installed correctly 3 Reinsert the cartridges. 1 Click: • In Windows XP Pro: Start Œ Settings Œ Printers and Faxes. • In Windows XP Home: Start Œ Control Panel Œ Printers and Faxes. • In Windows 2000 ...

User's Guide
Page 61
...print quality Check paper • Use the appropriate paper for best results use Lexmark Premium Photo Paper or Lexmark Photo Paper. • Use a paper that is still not satisfactory, replace the print cartridges. If print quality has not improved, continue to improve print quality Check the... ink levels, and install new print cartridges if necessary. For more information, see "...
...print quality Check paper • Use the appropriate paper for best results use Lexmark Premium Photo Paper or Lexmark Photo Paper. • Use a paper that is still not satisfactory, replace the print cartridges. If print quality has not improved, continue to improve print quality Check the... ink levels, and install new print cartridges if necessary. For more information, see "...

User's Guide
Page 64
...photo is blinking, see "Removing image patterns from photos, magazines, or newspapers" on the scanner glass in print Check the control If one of the document or image. Make sure the paper size being used matches the size you are copying or scanning from photo or ... in the lower right corner. a magazine, or a newspaper? panel for any blinking lights Check ink Check the ink levels, and install a new print cartridge if necessary. Poor copy quality • Blank pages • Checkerboard pattern • Distorted graphics or pictures • Missing characters • Faded print &#...
...photo is blinking, see "Removing image patterns from photos, magazines, or newspapers" on the scanner glass in print Check the control If one of the document or image. Make sure the paper size being used matches the size you are copying or scanning from photo or ... in the lower right corner. a magazine, or a newspaper? panel for any blinking lights Check ink Check the ink levels, and install a new print cartridge if necessary. Poor copy quality • Blank pages • Checkerboard pattern • Distorted graphics or pictures • Missing characters • Faded print &#...
User's Guide
Page 67
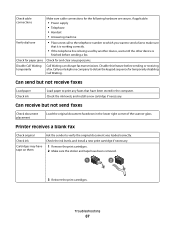
Printer receives a blank fax Check original Ask the sender to obtain the keypad sequence for temporarily disabling Call Waiting. Check for paper jams Check for and ... receive but not receive faxes Load paper Check ink Load paper to make sure that have been removed. 1 2 3 Reinsert the print cartridges. Cartridges may have tape on them 1 Remove the print cartridges. 2 Make sure the sticker and tape have been stored in the lower right corner of the scanner glass. Disable this feature...
Printer receives a blank fax Check original Ask the sender to obtain the keypad sequence for temporarily disabling Call Waiting. Check for paper jams Check for and ... receive but not receive faxes Load paper Check ink Load paper to make sure that have been removed. 1 2 3 Reinsert the print cartridges. Cartridges may have tape on them 1 Remove the print cartridges. 2 Make sure the sticker and tape have been stored in the lower right corner of the scanner glass. Disable this feature...
User's Guide
Page 68
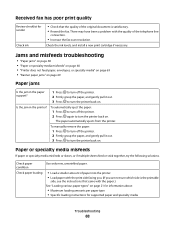
... again to turn the printer back on . Paper or specialty media misfeeds If paper or specialty media misfeeds or skews, or if multiple sheets feed or stick together, try the following solutions. Check the ink levels, and install a new print cartridge if necessary. To automatically eject the paper: 1 ...Press to turn off the printer. 2 Firmly grasp the paper, and gently pull it out. 3 Press to turn the...
... again to turn the printer back on . Paper or specialty media misfeeds If paper or specialty media misfeeds or skews, or if multiple sheets feed or stick together, try the following solutions. Check the ink levels, and install a new print cartridge if necessary. To automatically eject the paper: 1 ...Press to turn off the printer. 2 Firmly grasp the paper, and gently pull it out. 3 Press to turn the...


