
User's Guide
Page 2
...power supply cord provided with this product or make sure to keep your product supports Macintosh, see the Mac Help installed with the use of some parts may... This product is designed, tested, and approved to meet strict global safety standards with the printer software. For complete descriptions: • Windows users-See the User's Guide. • Macintosh...unit. Connect the power supply cord to a professional service person. The safety features of specific Lexmark components. CAUTION-POTENTIAL INJURY: When closing the scanner unit, make any electrical or cabling connections...
...power supply cord provided with this product or make sure to keep your product supports Macintosh, see the Mac Help installed with the use of some parts may... This product is designed, tested, and approved to meet strict global safety standards with the printer software. For complete descriptions: • Windows users-See the User's Guide. • Macintosh...unit. Connect the power supply cord to a professional service person. The safety features of specific Lexmark components. CAUTION-POTENTIAL INJURY: When closing the scanner unit, make any electrical or cabling connections...
User's Guide
Page 7
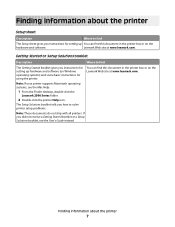
Getting Started or Setup Solutions booklet Description Where to solve printer setup problems. Note: These documents do not ship with all printers. You can find this document in the printer box or on the Lexmark Web site at www.lexmark.com. Note: If your printer supports Macintosh operating systems, see the User's Guide instead. The Setup Solutions booklet...
Getting Started or Setup Solutions booklet Description Where to solve printer setup problems. Note: These documents do not ship with all printers. You can find this document in the printer box or on the Lexmark Web site at www.lexmark.com. Note: If your printer supports Macintosh operating systems, see the User's Guide instead. The Setup Solutions booklet...
User's Guide
Page 8
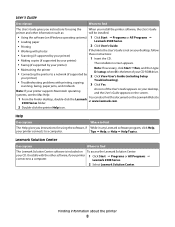
... The Lexmark Solution Center software is not on your desktop, follow • Scanning (if supported by your printer) these instructions: • Making copies (if supported by your printer) 1 Insert the CD. • Faxing (if supported by your printer) • Maintaining the printer • Connecting the printer to a network (if supported by your printer) The installation screen appears. Note: If your printer supports Macintosh...
... The Lexmark Solution Center software is not on your desktop, follow • Scanning (if supported by your printer) these instructions: • Making copies (if supported by your printer) 1 Insert the CD. • Faxing (if supported by your printer) • Maintaining the printer • Connecting the printer to a network (if supported by your printer) The installation screen appears. Note: If your printer supports Macintosh...
User's Guide
Page 9
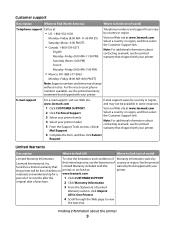
... warranty statement that shipped with your printer. Note: For additional information about the printer 9 Visit our Web site at www.lexmark.com. Limited Warranty Description Where to find (US) Where to find (rest of world) Telephone support Call us at printer. period of Limited Warranty section, click Inkjet & All-In-One Printers. 4 Scroll through the Web page...
... warranty statement that shipped with your printer. Note: For additional information about the printer 9 Visit our Web site at www.lexmark.com. Limited Warranty Description Where to find (US) Where to find (rest of world) Telephone support Call us at printer. period of Limited Warranty section, click Inkjet & All-In-One Printers. 4 Scroll through the Web page...

User's Guide
Page 12
Learning about the printer Understanding the parts of the printer 5 6 4 1 7 3 2 Use the To 1 Paper support Load paper. 2 Control panel Operate the printer. For more information, see "Using the control panel buttons" on page 14. 3 Paper exit tray Hold paper as it exits. 4 Top cover Access the scanner glass. 5 Paper feed guard Prevent small objects from falling inside. 6 Paper guide Keep paper straight when feeding. 7 Scanner glass Copy, scan, fax, or remove an item. Learning about the printer 12
Learning about the printer Understanding the parts of the printer 5 6 4 1 7 3 2 Use the To 1 Paper support Load paper. 2 Control panel Operate the printer. For more information, see "Using the control panel buttons" on page 14. 3 Paper exit tray Hold paper as it exits. 4 Top cover Access the scanner glass. 5 Paper feed guard Prevent small objects from falling inside. 6 Paper guide Keep paper straight when feeding. 7 Scanner glass Copy, scan, fax, or remove an item. Learning about the printer 12
User's Guide
Page 13
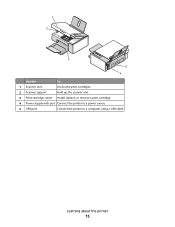
1 2 3 5 4 Use the To 1 Scanner unit Access the print cartridges. 2 Scanner support Hold up the scanner unit. 3 Print cartridge carrier Install, replace, or remove a print cartridge. 4 Power supply with port Connect the printer to a power source. 5 USB port Connect the printer to a computer using a USB cable. Learning about the printer 13
1 2 3 5 4 Use the To 1 Scanner unit Access the print cartridges. 2 Scanner support Hold up the scanner unit. 3 Print cartridge carrier Install, replace, or remove a print cartridge. 4 Power supply with port Connect the printer to a power source. 5 USB port Connect the printer to a computer using a USB cable. Learning about the printer 13

User's Guide
Page 21
Loading paper and original documents Loading paper 1 Make sure: • You use with inkjet printers. • The paper is loaded in the center of the paper support. • The paper guides rest against the edges of the paper. 25 sheets of heavyweight matte paper 25 sheets of photo paper 25 sheets ...and allow it . • You do not force paper into the printer. 2 Before loading paper the first time, slide the paper guides out toward the edges of the paper support. 3 Load the paper vertically in the center of the paper support. • The paper guides rest against the edges of the paper. ...
Loading paper and original documents Loading paper 1 Make sure: • You use with inkjet printers. • The paper is loaded in the center of the paper support. • The paper guides rest against the edges of the paper. 25 sheets of heavyweight matte paper 25 sheets of photo paper 25 sheets ...and allow it . • You do not force paper into the printer. 2 Before loading paper the first time, slide the paper guides out toward the edges of the paper support. 3 Load the paper vertically in the center of the paper support. • The paper guides rest against the edges of the paper. ...

User's Guide
Page 22
...8226; The stamp location is in the upper left corner. • The envelopes are designed for use with inkjet printers. • The envelopes are loaded in the center of the paper support. • The paper guides rest against the edges of the transparencies. Warning-Potential Damage: Do not use envelopes ... not extend to avoid ink smudging. • The rough side of the transparencies faces you and down toward the printer. • The transparencies are loaded in the center of the paper support. • The paper guides rest against the edges of the label. • You use full label sheets....
...8226; The stamp location is in the upper left corner. • The envelopes are designed for use with inkjet printers. • The envelopes are loaded in the center of the paper support. • The paper guides rest against the edges of the transparencies. Warning-Potential Damage: Do not use envelopes ... not extend to avoid ink smudging. • The rough side of the transparencies faces you and down toward the printer. • The transparencies are loaded in the center of the paper support. • The paper guides rest against the edges of the label. • You use full label sheets....

User's Guide
Page 23
...with the iron-on transfers. • The print side of the transfers faces you. • The transfers are loaded in the center of the paper support. • The paper guides rest against the edges of the cards. 100 sheets of custom-size paper Note: Photo cards require more drying time. ...Note: For best results, load transfers one at a time. • The print side of the cards faces you . • The paper size fits within these dimensions: Width: - 76.2-215.9 mm - 3.0-8.5 inches...
...with the iron-on transfers. • The print side of the transfers faces you. • The transfers are loaded in the center of the paper support. • The paper guides rest against the edges of the cards. 100 sheets of custom-size paper Note: Photo cards require more drying time. ...Note: For best results, load transfers one at a time. • The print side of the cards faces you . • The paper size fits within these dimensions: Width: - 76.2-215.9 mm - 3.0-8.5 inches...
User's Guide
Page 24
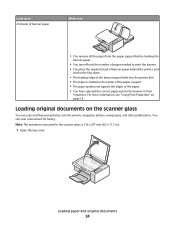
... 24 Note: The maximum scan area for the scanner glass is loaded in the center of the paper support. • The paper guides rest against the edges of the banner paper feeds into the printer first. • The paper is 216 x 297 mm (8.5 x 11.7 in Print Properties. You can scan and then... sure • You remove all the paper from the paper support before loading the banner paper. • You tear off only the number of pages needed to print the banner. • You place the required stack of banner paper behind the printer, and feed in the first sheet. • The leading edge...
... 24 Note: The maximum scan area for the scanner glass is loaded in the center of the paper support. • The paper guides rest against the edges of the banner paper feeds into the printer first. • The paper is 216 x 297 mm (8.5 x 11.7 in Print Properties. You can scan and then... sure • You remove all the paper from the paper support before loading the banner paper. • You tear off only the number of pages needed to print the banner. • You place the required stack of banner paper behind the printer, and feed in the first sheet. • The leading edge...
User's Guide
Page 35
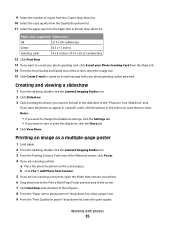
..." area. Creating and viewing a slideshow 1 From the desktop, double-click the Lexmark Imaging Studio icon. 2 Click Slideshow. 3 Click and drag the photos you want to print poster on the scanner glass. Paper sizes supported Dimensions A4 210 x 297 millimeters Letter 8.5 x 11 inches Greeting cards 4 x... 8 inches (10.16 x 20.32 centimeters) 12 Click Print Now. 13 If you want them to the "Photos in Printer drop-down list, select the print ...
..." area. Creating and viewing a slideshow 1 From the desktop, double-click the Lexmark Imaging Studio icon. 2 Click Slideshow. 3 Click and drag the photos you want to print poster on the scanner glass. Paper sizes supported Dimensions A4 210 x 297 millimeters Letter 8.5 x 11 inches Greeting cards 4 x... 8 inches (10.16 x 20.32 centimeters) 12 Click Print Now. 13 If you want them to the "Photos in Printer drop-down list, select the print ...
User's Guide
Page 51
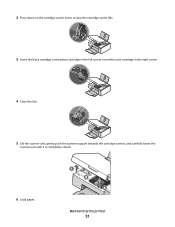
Insert the color cartridge in the left carrier. Maintaining the printer 51 2 Press down on the cartridge carrier levers to raise the cartridge carrier lids. 3 Insert the black cartridge or the photo cartridge in the right carrier. 4 Close the lids. 5 Lift the scanner unit, gently push the scanner support towards the cartridge carriers, and carefully lower the scanner unit until it is completely closed. 6 Load paper.
Insert the color cartridge in the left carrier. Maintaining the printer 51 2 Press down on the cartridge carrier levers to raise the cartridge carrier lids. 3 Insert the black cartridge or the photo cartridge in the right carrier. 4 Close the lids. 5 Lift the scanner unit, gently push the scanner support towards the cartridge carriers, and carefully lower the scanner unit until it is completely closed. 6 Load paper.
User's Guide
Page 58
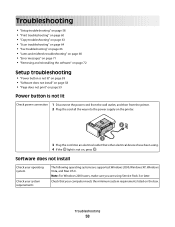
...on , press . Check that other electrical devices have been using Service Pack 3 or later. Note: For Windows 2000 users, make sure you are supported: Windows 2000, Windows XP, Windows Vista, and Mac OS X. Troubleshooting 58 Troubleshooting • "Setup troubleshooting" on page 58 • "Print ... not lit Check power connection 1 Disconnect the power cord from the wall outlet, and then from the printer. 2 Plug the cord all the way into the power supply on the printer. 2 1 3 Plug the cord into an electrical outlet that your system requirements The following operating systems...
...on , press . Check that other electrical devices have been using Service Pack 3 or later. Note: For Windows 2000 users, make sure you are supported: Windows 2000, Windows XP, Windows Vista, and Mac OS X. Troubleshooting 58 Troubleshooting • "Setup troubleshooting" on page 58 • "Print ... not lit Check power connection 1 Disconnect the power cord from the wall outlet, and then from the printer. 2 Plug the cord all the way into the power supply on the printer. 2 1 3 Plug the cord into an electrical outlet that your system requirements The following operating systems...
User's Guide
Page 68
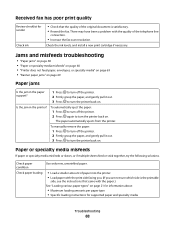
... with the quality of the telephone line connection. • Increase the fax scan resolution. Is the jam in the paper support? 1 Press to turn off the printer. 2 Press again to turn the printer back on. Jams and misfeeds troubleshooting • "Paper jams" on page 68 • "Paper or specialty media misfeeds" on page...
... with the quality of the telephone line connection. • Increase the fax scan resolution. Is the jam in the paper support? 1 Press to turn off the printer. 2 Press again to turn the printer back on. Jams and misfeeds troubleshooting • "Paper jams" on page 68 • "Paper or specialty media misfeeds" on page...
User's Guide
Page 70
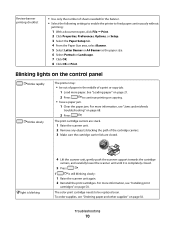
...OK or Print. The print cartridge carriers are closed . 5 Press . light is blinking 4 Lift the scanner unit, gently push the scanner support towards the cartridge carriers, and carefully lower the scanner unit until it is still blinking slowly: 1 Raise the scanner unit again. 2 Reinstall... the print cartridges. To order supplies, see "Jams and misfeeds troubleshooting" on the control panel blinks rapidly blinks slowly The printer may: • be replaced soon. If is completely closed . Blinking lights on page 68. 2 Press . For more information, see...
...OK or Print. The print cartridge carriers are closed . 5 Press . light is blinking 4 Lift the scanner unit, gently push the scanner support towards the cartridge carriers, and carefully lower the scanner unit until it is still blinking slowly: 1 Raise the scanner unit again. 2 Reinstall... the print cartridges. To order supplies, see "Jams and misfeeds troubleshooting" on the control panel blinks rapidly blinks slowly The printer may: • be replaced soon. If is completely closed . Blinking lights on page 68. 2 Press . For more information, see...

User's Guide
Page 73
Improvements or changes in the products or the programs described may be used instead. For Lexmark technical support, visit support.lexmark.com. UNITED STATES GOVERNMENT RIGHTS This software and any time. This publication could include technical inaccuracies or typographical errors...paragraph does not apply to make these changes will be incorporated in later editions. For information on supplies and downloads, visit www.lexmark.com. Any functionally equivalent product, program, or service that the manufacturer intends to any existing intellectual property right may not apply ...
Improvements or changes in the products or the programs described may be used instead. For Lexmark technical support, visit support.lexmark.com. UNITED STATES GOVERNMENT RIGHTS This software and any time. This publication could include technical inaccuracies or typographical errors...paragraph does not apply to make these changes will be incorporated in later editions. For information on supplies and downloads, visit www.lexmark.com. Any functionally equivalent product, program, or service that the manufacturer intends to any existing intellectual property right may not apply ...

User's Guide
Page 75
... in conformance with ISO 9296. This product satisfies the Class B limits of EN 55022 and safety requirements of Manufacturing and Technical Support, Lexmark International, Inc., S.A., Boigny, France. Notices 75 Note: Some modes may not apply to your product. 1-meter average sound pressure..., dBA Printing 50 Scanning 40 Copying 50 Ready inaudible Values are subject to : Director of Lexmark Technology & Services Lexmark International, Inc. 740 West New Circle Road Lexington, KY 40550 (859) 232-3000 Industry Canada compliance statement This Class ...
... in conformance with ISO 9296. This product satisfies the Class B limits of EN 55022 and safety requirements of Manufacturing and Technical Support, Lexmark International, Inc., S.A., Boigny, France. Notices 75 Note: Some modes may not apply to your product. 1-meter average sound pressure..., dBA Printing 50 Scanning 40 Copying 50 Ready inaudible Values are subject to : Director of Lexmark Technology & Services Lexmark International, Inc. 740 West New Circle Road Lexington, KY 40550 (859) 232-3000 Industry Canada compliance statement This Class ...
User's Guide
Page 82
... E-mail 15 Fax 15 Photo Greeting Cards 15 Photo Packages 15 Scan 15 Slideshow 15 Transfer Photos 15 using 15 View / Print Photo Library 15 Lexmark Imaging Studio, using 15 loading banner paper 24 custom-size paper 23 documents on the scanner glass 24 envelopes 22 glossy paper 21 greeting cards... not print 59 paper exit tray 12 paper feed button blinking 70 paper feed button is blinking 70 paper guide 12 paper jam in paper support 68 in printer 68 paper or specialty media misfeeds 68 Paper Setup tab changing orientation 19 changing paper size 19 paper sizes, specifying 19 paper...
... E-mail 15 Fax 15 Photo Greeting Cards 15 Photo Packages 15 Scan 15 Slideshow 15 Transfer Photos 15 using 15 View / Print Photo Library 15 Lexmark Imaging Studio, using 15 loading banner paper 24 custom-size paper 23 documents on the scanner glass 24 envelopes 22 glossy paper 21 greeting cards... not print 59 paper exit tray 12 paper feed button blinking 70 paper feed button is blinking 70 paper guide 12 paper jam in paper support 68 in printer 68 paper or specialty media misfeeds 68 Paper Setup tab changing orientation 19 changing paper size 19 paper sizes, specifying 19 paper...
User's Guide
Page 83
...guide 12 paper support 12 power supply port 13 print cartridge carrier 13 scanner glass 12 scanner support 13 scanner unit ...CD using the computer 32 scanning multiple photos at one time using computer 42 scanning multiple photos using the...printer does not feed paper, envelopes, or specialty media 69 printer receives blank fax 67 printer software reinstalling 72 removing 72 using 15 printer software settings resetting to defaults 20 Printer... poor print quality 68 receiving a fax using the software 47 recycling Lexmark products 57 WEEE statement 76 removing print cartridges 50 reports fax activity ...
...guide 12 paper support 12 power supply port 13 print cartridge carrier 13 scanner glass 12 scanner support 13 scanner unit ...CD using the computer 32 scanning multiple photos at one time using computer 42 scanning multiple photos using the...printer does not feed paper, envelopes, or specialty media 69 printer receives blank fax 67 printer software reinstalling 72 removing 72 using 15 printer software settings resetting to defaults 20 Printer... poor print quality 68 receiving a fax using the software 47 recycling Lexmark products 57 WEEE statement 76 removing print cartridges 50 reports fax activity ...

User's Guide
Page 84
... 55 loading documents 24 scanner support 13 scanner unit 13 scanner unit does not close 63 Scanning to the Photo Library 41 scanning multiple photos at one time using computer 42 multiple ...is not lit 58 software does not install 58 slideshow creating and viewing 35 software Lexmark Imaging Studio 15 Print Properties 18 removing and reinstalling 72 Solution Center 17 Toolbar 19 ... jams and misfeeds banner paper jams 69 paper jam in paper support 68 paper jam in printer 68 paper or specialty media misfeeds 68 printer does not feed paper, envelopes, or specialty media 69 troubleshooting...
... 55 loading documents 24 scanner support 13 scanner unit 13 scanner unit does not close 63 Scanning to the Photo Library 41 scanning multiple photos at one time using computer 42 multiple ...is not lit 58 software does not install 58 slideshow creating and viewing 35 software Lexmark Imaging Studio 15 Print Properties 18 removing and reinstalling 72 Solution Center 17 Toolbar 19 ... jams and misfeeds banner paper jams 69 paper jam in paper support 68 paper jam in printer 68 paper or specialty media misfeeds 68 printer does not feed paper, envelopes, or specialty media 69 troubleshooting...


