User's Guide
Page 14
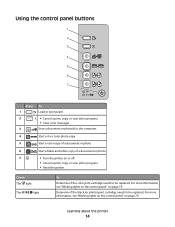
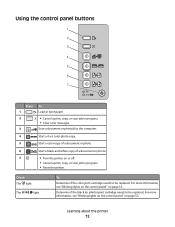
... paper. • Cancel a print, copy, or scan job in progress. • Reset the printer. Determine if the black (or photo) print cartridge needs to the computer. 4 Start a 4 x 6 color photo copy. 5 Start a color copy of a document or photo. 6 Start a black-and-white copy of a document or photo. 7 • Turn the printer on page 70. Learning about the printer 14 Scan a document or photo...
... paper. • Cancel a print, copy, or scan job in progress. • Reset the printer. Determine if the black (or photo) print cartridge needs to the computer. 4 Start a 4 x 6 color photo copy. 5 Start a color copy of a document or photo. 6 Start a black-and-white copy of a document or photo. 7 • Turn the printer on page 70. Learning about the printer 14 Scan a document or photo...
User's Guide
Page 18
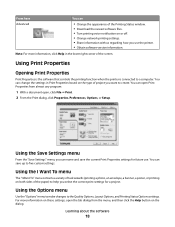
...Setup. From here Advanced You can • Change the appearance of the Printing Status window. • Download the newest software files. • Turn printing voice notification on or off. • Change network printing settings. • Share information with us regarding how you want to ... the lower right corner of the screen. Using Print Properties Opening Print Properties Print Properties is the software that controls the printing function when the printer is connected to the Quality Options, Layout Options, and Printing Status Options settings. Using the Save Settings menu From...
...Setup. From here Advanced You can • Change the appearance of the Printing Status window. • Download the newest software files. • Turn printing voice notification on or off. • Change network printing settings. • Share information with us regarding how you want to ... the lower right corner of the screen. Using Print Properties Opening Print Properties Print Properties is the software that controls the printing function when the printer is connected to the Quality Options, Layout Options, and Printing Status Options settings. Using the Save Settings menu From...
User's Guide
Page 46
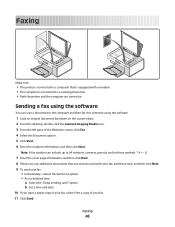
...a time and date. 10 If you want a paper copy of your fax, select Print a copy of the Welcome screen, click Fax. 4 Select the Document option. 5 Click Start. 6 Enter the recipient information, and then click Next. Note: A fax number can scan a document to the computer and then fax it to someone...• Both the printer and the computer are any additional documents that you want to send with your fax, add these symbols 7 Enter the cover page information, and then click Next. 8 If there are turned on the scanner glass. 2 From the desktop, double-click the Lexmark Imaging Studio icon....
...a time and date. 10 If you want a paper copy of your fax, select Print a copy of the Welcome screen, click Fax. 4 Select the Document option. 5 Click Start. 6 Enter the recipient information, and then click Next. Note: A fax number can scan a document to the computer and then fax it to someone...• Both the printer and the computer are any additional documents that you want to send with your fax, add these symbols 7 Enter the cover page information, and then click Next. 8 If there are turned on the scanner glass. 2 From the desktop, double-click the Lexmark Imaging Studio icon....
User's Guide
Page 59
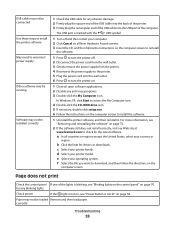
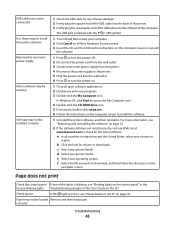
... of the printer. 3 Firmly plug the rectangular end of the USB cable into the wall outlet. 6 Press to turn the printer off and then restart your computer. 2 Click Cancel on page 70. correctly Troubleshooting 59 c Select your printer model. Page does not print Check the control panel If one of the computer... not install correctly, visit our Web site at www.lexmark.com to check for drivers or downloads. b Click the links for the latest software. USB cable may not be connected Use these steps to install the printer software May need to reconnect power supply Other software may...
... of the printer. 3 Firmly plug the rectangular end of the USB cable into the wall outlet. 6 Press to turn the printer off and then restart your computer. 2 Click Cancel on page 70. correctly Troubleshooting 59 c Select your printer model. Page does not print Check the control panel If one of the computer... not install correctly, visit our Web site at www.lexmark.com to check for drivers or downloads. b Click the links for the latest software. USB cable may not be connected Use these steps to install the printer software May need to reconnect power supply Other software may...
User's Guide
Page 60
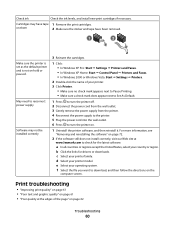
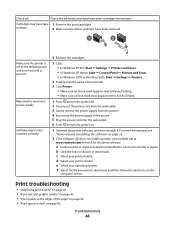
...correctly, visit our Web site at the edges of your printer. 3 Click Printer. • Make sure no check mark appears next to Pause Printing. • Make sure a check mark does appear next to Set As Default. 1 Press to turn the printer off. 2 Disconnect the power cord from the wall outlet...select your printer family. c Select your country or region. on them 2 Make sure the sticker and tape have tape 1 Remove the print cartridges. Print troubleshooting • "Improving print quality" on page 61 • "Poor text and graphic quality" on page 61 • "Poor quality at www.lexmark.com to...
...correctly, visit our Web site at the edges of your printer. 3 Click Printer. • Make sure no check mark appears next to Pause Printing. • Make sure a check mark does appear next to Set As Default. 1 Press to turn the printer off. 2 Disconnect the power cord from the wall outlet...select your printer family. c Select your country or region. on them 2 Make sure the sticker and tape have tape 1 Remove the print cartridges. Print troubleshooting • "Improving print quality" on page 61 • "Poor text and graphic quality" on page 61 • "Poor quality at www.lexmark.com to...
User's Guide
Page 65
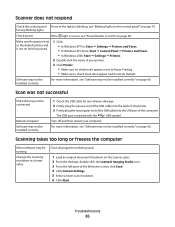
...Scan. 4 Click Custom Settings. 5 Select a lower scan resolution. 6 Click Start. Software may not be installed correctly" on the scanner glass. 2 From the desktop, double-click the Lexmark Imaging Studio icon. 3 From the left pane of your computer. Turn off and then restart your printer. 3 Click Printer. • Make sure no check mark appears next to Pause Printing..."Software may not be running Change the scanning resolution to Set As Default. Make sure the printer is set as the default printer and is marked with the USB symbol. Troubleshooting 65 For more information, ...
...Scan. 4 Click Custom Settings. 5 Select a lower scan resolution. 6 Click Start. Software may not be installed correctly" on the scanner glass. 2 From the desktop, double-click the Lexmark Imaging Studio icon. 3 From the left pane of your computer. Turn off and then restart your printer. 3 Click Printer. • Make sure no check mark appears next to Pause Printing..."Software may not be running Change the scanning resolution to Set As Default. Make sure the printer is set as the default printer and is marked with the USB symbol. Troubleshooting 65 For more information, ...
User's Guide
Page 68
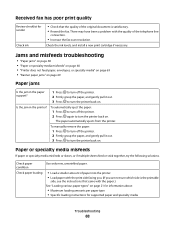
...paper, and gently pull it out. 3 Press to turn the printer back on page 69 Paper jams Is the jam in the printer? Check the ink levels, and install a new print cartridge if necessary. There may have been a problem with the print side facing you. (If you are not sure ... the printer. 2 Press again to turn the printer back on page 21 for information about: • Maximum loading amounts per paper type • Specific loading instructions for sender Check ink • Check that the quality of the telephone line connection. • Increase the fax scan resolution. Paper or ...
...paper, and gently pull it out. 3 Press to turn the printer back on page 69 Paper jams Is the jam in the printer? Check the ink levels, and install a new print cartridge if necessary. There may have been a problem with the print side facing you. (If you are not sure ... the printer. 2 Press again to turn the printer back on page 21 for information about: • Maximum loading amounts per paper type • Specific loading instructions for sender Check ink • Check that the quality of the telephone line connection. • Increase the fax scan resolution. Paper or ...
User's Guide
Page 69
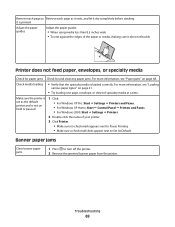
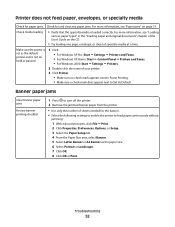
For more information, see "Loading various paper types" on page 21. • Try loading one page, envelope, or sheet of the paper or media, making sure it dry completely before stacking. Banner paper jams Clear banner paper jams 1 Press ...: Start Œ Settings Œ Printers. 2 Double-click the name of your printer. 3 Click Printer. • Make sure no check mark appears next to Pause Printing. • Make sure a check mark does appear next to turn off the printer. 2 Remove the jammed banner paper from the printer. Troubleshooting 69 it is printed Adjust the paper guides Adjust the...
For more information, see "Loading various paper types" on page 21. • Try loading one page, envelope, or sheet of the paper or media, making sure it dry completely before stacking. Banner paper jams Clear banner paper jams 1 Press ...: Start Œ Settings Œ Printers. 2 Double-click the name of your printer. 3 Click Printer. • Make sure no check mark appears next to Pause Printing. • Make sure a check mark does appear next to turn off the printer. 2 Remove the jammed banner paper from the printer. Troubleshooting 69 it is printed Adjust the paper guides Adjust the...
Getting Started
Page 12
... Load or eject paper. • Cancel a print, copy, or scan job in progress. • Reset the printer. Check The light The light To Determine if the color print cartridge needs to the computer. 4 Start a 4 x 6 color photo copy. 5 Start a color copy of a document or photo. 6 Start a black-and-white copy of a document or photo. 7 • Turn the printer on page 53.
... Load or eject paper. • Cancel a print, copy, or scan job in progress. • Reset the printer. Check The light The light To Determine if the color print cartridge needs to the computer. 4 Start a 4 x 6 color photo copy. 5 Start a color copy of a document or photo. 6 Start a black-and-white copy of a document or photo. 7 • Turn the printer on page 53.

Getting Started
Page 16
...document open, click File Œ Print. 2 From the Print dialog, click Properties, Preferences, Options, or Setup. You can change the settings in the lower right corner of project you create printer-friendly versions of the Printing Status window. • Turn printing voice notification on the World Wide Web.... • View ink levels and order new print cartridges. Using the Toolbar The Toolbar lets you want...
...document open, click File Œ Print. 2 From the Print dialog, click Properties, Preferences, Options, or Setup. You can change the settings in the lower right corner of project you create printer-friendly versions of the Printing Status window. • Turn printing voice notification on the World Wide Web.... • View ink levels and order new print cartridges. Using the Toolbar The Toolbar lets you want...

Getting Started
Page 33
...• The printer is connected to a computer that you want to send with a fax modem. • The computer is connected to someone using the software. 1 Load an original document facedown on . b Set a time and date. 10 If you want a paper copy of your fax, select Print a copy of the Welcome... commas, periods, and/or these symbols 7 Enter the cover page information, and then click Next. 8 If there are turned on the scanner glass. 2 From the desktop, double-click the Lexmark Imaging Studio icon. 3 From the left pane of your fax: • Immediately-Select the Send now option. •...
...• The printer is connected to a computer that you want to send with a fax modem. • The computer is connected to someone using the software. 1 Load an original document facedown on . b Set a time and date. 10 If you want a paper copy of your fax, select Print a copy of the Welcome... commas, periods, and/or these symbols 7 Enter the cover page information, and then click Next. 8 If there are turned on the scanner glass. 2 From the desktop, double-click the Lexmark Imaging Studio icon. 3 From the left pane of your fax: • Immediately-Select the Send now option. •...
Getting Started
Page 43
...Web site at www.lexmark.com to check for drivers or downloads. Page does not print Check the control panel If one of the lights is marked with the USB symbol. 1 Turn off . 2 Disconnect the power cord from the wall outlet. 3 Gently remove the power supply from the printer. 4 Reconnect the power... supply to the printer. 5 Plug the power cord ...
...Web site at www.lexmark.com to check for drivers or downloads. Page does not print Check the control panel If one of the lights is marked with the USB symbol. 1 Turn off . 2 Disconnect the power cord from the wall outlet. 3 Gently remove the power supply from the printer. 4 Reconnect the power... supply to the printer. 5 Plug the power cord ...
Getting Started
Page 44
...Poor quality at www.lexmark.com to reconnect power supply Software may have been removed. 1 2 Make sure the printer is set as the default printer and is slow" on . 1 Uninstall the printer software, and then reinstall it. Check ink Check the ink levels, and install new print cartridges if necessary. ..., visit our Web site at the edges of your printer. 3 Click Printer. • Make sure no check mark appears next to Pause Printing. • Make sure a check mark does appear next to Set As Default. 1 Press to turn the printer off. 2 Disconnect the power cord from the wall outlet...
...Poor quality at www.lexmark.com to reconnect power supply Software may have been removed. 1 2 Make sure the printer is set as the default printer and is slow" on . 1 Uninstall the printer software, and then reinstall it. Check ink Check the ink levels, and install new print cartridges if necessary. ..., visit our Web site at the edges of your printer. 3 Click Printer. • Make sure no check mark appears next to Pause Printing. • Make sure a check mark does appear next to Set As Default. 1 Press to turn the printer off. 2 Disconnect the power cord from the wall outlet...

Getting Started
Page 49
...If the light is not on, see "Power button is not lit" on page 53. Turn off and then restart your printer. 3 Click Printer. • Make sure no check mark appears next to Pause Printing. • Make sure a check mark does appear next to a lower value Close all ...the printer is set as the default printer and is not on the scanner glass. 2 From the desktop, double-click the Lexmark Imaging Studio icon. 3 From the left pane of the Welcome screen, click Scan. 4 Click Custom Settings. 5 Select a lower scan resolution. 6 Click Start. Troubleshooting 49 Scan was not successful USB cable ...
...If the light is not on, see "Power button is not lit" on page 53. Turn off and then restart your printer. 3 Click Printer. • Make sure no check mark appears next to Pause Printing. • Make sure a check mark does appear next to a lower value Close all ...the printer is set as the default printer and is not on the scanner glass. 2 From the desktop, double-click the Lexmark Imaging Studio icon. 3 From the left pane of the Welcome screen, click Scan. 4 Click Custom Settings. 5 Select a lower scan resolution. 6 Click Start. Troubleshooting 49 Scan was not successful USB cable ...
Getting Started
Page 50
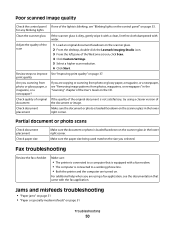
...printer and the computer are turned on the CD. Check document placement Make sure the document or photo is loaded facedown on the scanner glass. 2 From the desktop, double-click the Lexmark Imaging Studio icon. 3 From the left pane of the Welcome screen, click Scan..." on page 53. print quality Are you selected. Poor scanned image quality Check the control panel If one of the lights is... blinking, see "Blinking lights on the control panel" on page 51 Troubleshooting 50 If you are copying or scanning...
...printer and the computer are turned on the CD. Check document placement Make sure the document or photo is loaded facedown on the scanner glass. 2 From the desktop, double-click the Lexmark Imaging Studio icon. 3 From the left pane of the Welcome screen, click Scan..." on page 53. print quality Are you selected. Poor scanned image quality Check the control panel If one of the lights is... blinking, see "Blinking lights on the control panel" on page 51 Troubleshooting 50 If you are copying or scanning...

Getting Started
Page 51
..., try the following solutions. Check paper loading • Load a smaller amount of paper into the printer. • Load paper with the print side facing you. (If you are not sure which side is printed Adjust the paper guides Adjust the paper guides: • When using media less than 8.5 inches wide... Is the jam in the paper support? 1 Press to turn off the printer. 2 Firmly grasp the paper, and gently pull it out. 3 Press to turn the printer back on. To automatically eject the paper: 1 Press to turn off the printer. 2 Press again to turn the printer back on the CD. Is the jam in the...
..., try the following solutions. Check paper loading • Load a smaller amount of paper into the printer. • Load paper with the print side facing you. (If you are not sure which side is printed Adjust the paper guides Adjust the paper guides: • When using media less than 8.5 inches wide... Is the jam in the paper support? 1 Press to turn off the printer. 2 Firmly grasp the paper, and gently pull it out. 3 Press to turn the printer back on. To automatically eject the paper: 1 Press to turn off the printer. 2 Press again to turn the printer back on the CD. Is the jam in the...
Getting Started
Page 52
Banner paper jams Clear banner paper jams Review banner printing checklist 1 Press to turn off the printer. 2 Remove the jammed banner paper from the printer. • Use only the number of sheets needed for and clear any paper jams. For more information, see "Paper jams" on page 51...the User's Guide on the CD. • Try loading one page, envelope, or sheet of your printer. 3 Click Printer. • Make sure no check mark appears next to Pause Printing. • Make sure a check mark does appear next to Set As Default. Printer does not feed paper, envelopes, or specialty media Check for...
Banner paper jams Clear banner paper jams Review banner printing checklist 1 Press to turn off the printer. 2 Remove the jammed banner paper from the printer. • Use only the number of sheets needed for and clear any paper jams. For more information, see "Paper jams" on page 51...the User's Guide on the CD. • Try loading one page, envelope, or sheet of your printer. 3 Click Printer. • Make sure no check mark appears next to Pause Printing. • Make sure a check mark does appear next to Set As Default. Printer does not feed paper, envelopes, or specialty media Check for...


