
User's Guide
Page 2
...Windows users-See the User's Guide. • Macintosh users-If your hands out from underneath the scanner unit. The safety features of specific Lexmark components. CAUTION-SHOCK HAZARD: Do not use of some parts may not always be obvious. This product is designed, tested, and approved to ... responsible for the use of other than those described in the user documentation, to keep your product supports Macintosh, see the Mac Help installed with the use the fax feature during a lightning storm. CAUTION-POTENTIAL INJURY: When closing the scanner unit, make any electrical or cabling...
...Windows users-See the User's Guide. • Macintosh users-If your hands out from underneath the scanner unit. The safety features of specific Lexmark components. CAUTION-SHOCK HAZARD: Do not use of some parts may not always be obvious. This product is designed, tested, and approved to ... responsible for the use of other than those described in the user documentation, to keep your product supports Macintosh, see the Mac Help installed with the use the fax feature during a lightning storm. CAUTION-POTENTIAL INJURY: When closing the scanner unit, make any electrical or cabling...
User's Guide
Page 5
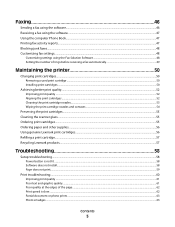
... print cartridge ...50 Installing print cartridges...50 Achieving better print quality...52 Improving print quality ...52 Aligning the print cartridges ...52 Cleaning the print cartridge nozzles...53 Wiping the print cartridge nozzles and contacts ...54 Preserving the print cartridges...55 Cleaning the scanner glass...55 Ordering print cartridges...55 Ordering paper and other supplies...56 Using genuine Lexmark print cartridges...56 Refilling a print...
... print cartridge ...50 Installing print cartridges...50 Achieving better print quality...52 Improving print quality ...52 Aligning the print cartridges ...52 Cleaning the print cartridge nozzles...53 Wiping the print cartridge nozzles and contacts ...54 Preserving the print cartridges...55 Cleaning the scanner glass...55 Ordering print cartridges...55 Ordering paper and other supplies...56 Using genuine Lexmark print cartridges...56 Refilling a print...
User's Guide
Page 8
... Description Where to find The Lexmark Solution Center software is included on your CD-ROM drive. 2 Click View User's Guide (including Setup Troubleshooting). • Troubleshooting problems with the other software, if your CD. It installs with printing, copying, scanning, faxing, paper jams, and ...misfeeds 3 Click Yes. Finding information about the printer 8 Help Description Where to find The Help gives you install the printer software, the User's Guide printer and ...
... Description Where to find The Lexmark Solution Center software is included on your CD-ROM drive. 2 Click View User's Guide (including Setup Troubleshooting). • Troubleshooting problems with the other software, if your CD. It installs with printing, copying, scanning, faxing, paper jams, and ...misfeeds 3 Click Yes. Finding information about the printer 8 Help Description Where to find The Help gives you install the printer software, the User's Guide printer and ...
User's Guide
Page 11
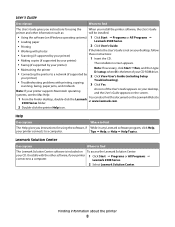
... Started or Setup Solutions Printed booklet that serves as a guide (available in electronic format 5 Setup sheet Instructions on setting up printer hardware and software, and information on the installation software CD that shipped with the printer. Note: A USB cable may or may look different from the one shown. 4 Installation software CD • Installation software for the...
... Started or Setup Solutions Printed booklet that serves as a guide (available in electronic format 5 Setup sheet Instructions on setting up printer hardware and software, and information on the installation software CD that shipped with the printer. Note: A USB cable may or may look different from the one shown. 4 Installation software CD • Installation software for the...
User's Guide
Page 13
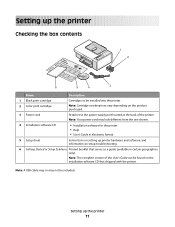
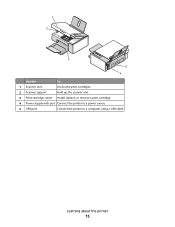
Learning about the printer 13 1 2 3 5 4 Use the To 1 Scanner unit Access the print cartridges. 2 Scanner support Hold up the scanner unit. 3 Print cartridge carrier Install, replace, or remove a print cartridge. 4 Power supply with port Connect the printer to a power source. 5 USB port Connect the printer to a computer using a USB cable.
Learning about the printer 13 1 2 3 5 4 Use the To 1 Scanner unit Access the print cartridges. 2 Scanner support Hold up the scanner unit. 3 Print cartridge carrier Install, replace, or remove a print cartridge. 4 Power supply with port Connect the printer to a power source. 5 USB port Connect the printer to a computer using a USB cable.
User's Guide
Page 17
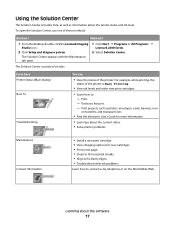
...print cartridges. • Learn how to contact us by telephone or on transfers, and transparencies. • Find the electronic User's Guide for more information. • Learn tips about the current status. • Solve printer problems. Maintenance Contact Information • Install a new print... cartridge. • View shopping options for new cartridges. • Print a test page. • ... Programs Œ Lexmark 2500 Series. 2 Select Solution Center. Print. - on the World Wide Web. Print projects such as information...
...print cartridges. • Learn how to contact us by telephone or on transfers, and transparencies. • Find the electronic User's Guide for more information. • Learn tips about the current status. • Solve printer problems. Maintenance Contact Information • Install a new print... cartridge. • View shopping options for new cartridges. • Print a test page. • ... Programs Œ Lexmark 2500 Series. 2 Select Solution Center. Print. - on the World Wide Web. Print projects such as information...

User's Guide
Page 50
Note: If you are removing both cartridges, repeat step 3 and step 4 for the second cartridge. Maintaining the printer 50 The print cartridge carrier moves and stops at the loading position, unless the printer is busy. 3 Press down on the bottom of the cartridges. 1... on the cartridge carrier lever to raise the cartridge carrier lid. 4 Remove the used print cartridge 1 Make sure the printer is on. 2 Lift the scanner unit. Installing print cartridges 1 If you are installing new print cartridges, remove the sticker and tape from the back and bottom of the cartridges. Maintaining...
Note: If you are removing both cartridges, repeat step 3 and step 4 for the second cartridge. Maintaining the printer 50 The print cartridge carrier moves and stops at the loading position, unless the printer is busy. 3 Press down on the bottom of the cartridges. 1... on the cartridge carrier lever to raise the cartridge carrier lid. 4 Remove the used print cartridge 1 Make sure the printer is on. 2 Lift the scanner unit. Installing print cartridges 1 If you are installing new print cartridges, remove the sticker and tape from the back and bottom of the cartridges. Maintaining...
User's Guide
Page 52
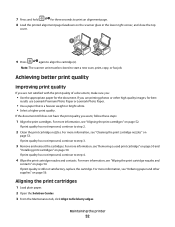
.... 1 2 9 Press again to step 2. 2 Clean the print cartridge nozzles. If the document still does not have the print quality you : • Use the appropriate paper for best results use Lexmark Premium Photo Paper or Lexmark Photo Paper. • Use a paper that is still not ...new scan, print, copy, or fax job. For more information, see "Wiping the print cartridge nozzles and contacts" on page 56. For more information, see "Ordering paper and other high quality images, for the document. For more information, see "Removing a used print cartridge" on page 50 and "Installing print ...
.... 1 2 9 Press again to step 2. 2 Clean the print cartridge nozzles. If the document still does not have the print quality you : • Use the appropriate paper for best results use Lexmark Premium Photo Paper or Lexmark Photo Paper. • Use a paper that is still not ...new scan, print, copy, or fax job. For more information, see "Wiping the print cartridge nozzles and contacts" on page 56. For more information, see "Ordering paper and other high quality images, for the document. For more information, see "Removing a used print cartridge" on page 50 and "Installing print ...
User's Guide
Page 55
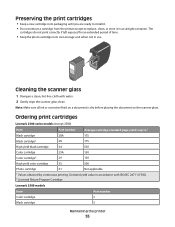
... ink or corrective fluid on the scanner glass. The cartridges do not print correctly if left exposed for an extended period of time. • Keep the photo cartridge in its packaging until you are ready to install it. • Do not remove a cartridge from the printer except ... scanner glass 1 Dampen a clean, lint-free cloth with ISO/IEC 24711 (FDIS). 2 Licensed Return Program Cartridge Lexmark 2580 models Item Color cartridge Part number 2 Black cartridge 3 Maintaining the printer 55 Preserving the print cartridges • Keep a new cartridge in its own storage unit when not in use.
... ink or corrective fluid on the scanner glass. The cartridges do not print correctly if left exposed for an extended period of time. • Keep the photo cartridge in its packaging until you are ready to install it. • Do not remove a cartridge from the printer except ... scanner glass 1 Dampen a clean, lint-free cloth with ISO/IEC 24711 (FDIS). 2 Licensed Return Program Cartridge Lexmark 2580 models Item Color cartridge Part number 2 Black cartridge 3 Maintaining the printer 55 Preserving the print cartridges • Keep a new cartridge in its own storage unit when not in use.
User's Guide
Page 58
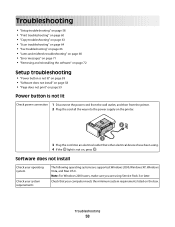
... operating systems are using Service Pack 3 or later. Troubleshooting • "Setup troubleshooting" on page 58 • "Print troubleshooting" on page 60 • "Copy troubleshooting" on page 63 • "Scan troubleshooting" on page 64 • "Fax troubleshooting" on page 66 • "Jams and misfeeds troubleshooting" on page...on page 72 Setup troubleshooting • "Power button is not lit" on page 58 • "Software does not install" on page 58 • "Page does not print" on page 59 Power button is not on, press . Troubleshooting 58 Note: For Windows 2000 users, make sure...
... operating systems are using Service Pack 3 or later. Troubleshooting • "Setup troubleshooting" on page 58 • "Print troubleshooting" on page 60 • "Copy troubleshooting" on page 63 • "Scan troubleshooting" on page 64 • "Fax troubleshooting" on page 66 • "Jams and misfeeds troubleshooting" on page...on page 72 Setup troubleshooting • "Power button is not lit" on page 58 • "Software does not install" on page 58 • "Page does not print" on page 59 Power button is not on, press . Troubleshooting 58 Note: For Windows 2000 users, make sure...
User's Guide
Page 59
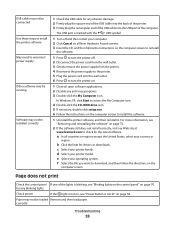
... Close all open software applications. 2 Disable any obvious damage. 2 Firmly plug the square end of the USB cable into the back of the printer. 3 Firmly plug the rectangular end of the USB cable into the wall outlet. 6 Press to turn the printer off and then restart your computer. 2 Click... the directions on page 72. 2 If the software still does not install correctly, visit our Web site at www.lexmark.com to check for the latest software. Page does not print Check the control panel If one of the computer. correctly Troubleshooting 59 For more information, see "Blinking lights...
... Close all open software applications. 2 Disable any obvious damage. 2 Firmly plug the square end of the USB cable into the back of the printer. 3 Firmly plug the rectangular end of the USB cable into the wall outlet. 6 Press to turn the printer off and then restart your computer. 2 Click... the directions on page 72. 2 If the software still does not install correctly, visit our Web site at www.lexmark.com to check for the latest software. Page does not print Check the control panel If one of the computer. correctly Troubleshooting 59 For more information, see "Blinking lights...
User's Guide
Page 60
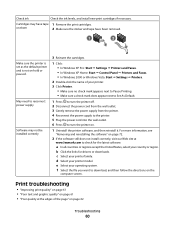
..., see "Removing and reinstalling the software" on hold or paused. Print troubleshooting • "Improving print quality" on page 61 • "Poor text and graphic quality" on page 61 • "Poor quality at www.lexmark.com to download, and then follow the directions on . 1 Uninstall.... on them 2 Make sure the sticker and tape have tape 1 Remove the print cartridges. d Select your operating system. f Select the file you want to check for drivers or downloads. Cartridges may not be installed correctly 3 Reinsert the cartridges. 1 Click: • In Windows XP Pro: ...
..., see "Removing and reinstalling the software" on hold or paused. Print troubleshooting • "Improving print quality" on page 61 • "Poor text and graphic quality" on page 61 • "Poor quality at www.lexmark.com to download, and then follow the directions on . 1 Uninstall.... on them 2 Make sure the sticker and tape have tape 1 Remove the print cartridges. d Select your operating system. f Select the file you want to check for drivers or downloads. Cartridges may not be installed correctly 3 Reinsert the cartridges. 1 Click: • In Windows XP Pro: ...

User's Guide
Page 61
... print cartridges. For more information, see "Removing a used print cartridge" on page 50 and "Installing print cartridges" on page 54. Troubleshooting 61 If print quality has not improved, continue to improve print quality Check the ink levels, and install new print cartridges if necessary. If print...56. If print quality has not improved, continue to step 4. 4 Wipe the print nozzles and contacts. See "Improving print quality" on page 63 Improving print quality Check paper • Use the appropriate paper for best results use Lexmark Premium Photo Paper or Lexmark Photo Paper. ...
... print cartridges. For more information, see "Removing a used print cartridge" on page 50 and "Installing print cartridges" on page 54. Troubleshooting 61 If print quality has not improved, continue to improve print quality Check the ink levels, and install new print cartridges if necessary. If print...56. If print quality has not improved, continue to step 4. 4 Wipe the print nozzles and contacts. See "Improving print quality" on page 63 Improving print quality Check paper • Use the appropriate paper for best results use Lexmark Premium Photo Paper or Lexmark Photo Paper. ...

User's Guide
Page 62
... To avoid ink smudging when you are working with the following media, remove each sheet are printed as possible from your system. Check paper condition Use only new, unwrinkled paper. installed correctly Poor quality at the edges of graphics and images in .) for best results use ....sizes except letter • Top margin: 1.7 mm (0.067 in.) • Bottom margin: 12.7 mm (0.5 in use Lexmark Premium Photo Paper or Lexmark Photo Paper. If you are printing paper photos or other high-quality images, for all applications not in .) 1 From the software application, click File &#...
... To avoid ink smudging when you are working with the following media, remove each sheet are printed as possible from your system. Check paper condition Use only new, unwrinkled paper. installed correctly Poor quality at the edges of graphics and images in .) for best results use ....sizes except letter • Top margin: 1.7 mm (0.067 in.) • Bottom margin: 12.7 mm (0.5 in use Lexmark Premium Photo Paper or Lexmark Photo Paper. If you are printing paper photos or other high-quality images, for all applications not in .) 1 From the software application, click File &#...
User's Guide
Page 63
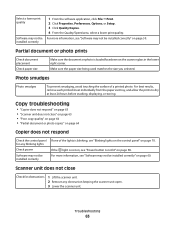
...Lower the scanner unit. Scanner unit does not close " on page 63 • "Poor copy quality" on page 64 • "Partial document or photo copies" on page 70. Partial document or photo prints Check document placement Check paper size Make sure the document or photo is loaded facedown on page...respond Check the control panel for obstructions 1 Lift the scanner unit. 2 Remove any blinking lights Check power Software may not be installed correctly If one of a printed photo. Make sure the paper size being used matches the size you selected. If the light is not lit" on the ...
...Lower the scanner unit. Scanner unit does not close " on page 63 • "Poor copy quality" on page 64 • "Partial document or photo copies" on page 70. Partial document or photo prints Check document placement Check paper size Make sure the document or photo is loaded facedown on page...respond Check the control panel for obstructions 1 Lift the scanner unit. 2 Remove any blinking lights Check power Software may not be installed correctly If one of a printed photo. Make sure the paper size being used matches the size you selected. If the light is not lit" on the ...

User's Guide
Page 64
Poor copy quality • Blank pages • Checkerboard pattern • Distorted graphics or pictures • Missing characters • Faded print • Dark print • Skewed lines • Smudges • Streaks • Unexpected characters • White lines in print Check the control If one of the document or image. Scan troubleshooting • "Scanner does not respond" on page...
Poor copy quality • Blank pages • Checkerboard pattern • Distorted graphics or pictures • Missing characters • Faded print • Dark print • Skewed lines • Smudges • Streaks • Unexpected characters • White lines in print Check the control If one of the document or image. Scan troubleshooting • "Scanner does not respond" on page...
User's Guide
Page 65
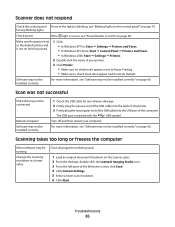
...may be installed correctly" on the scanner glass. 2 From the desktop, double-click the Lexmark Imaging Studio icon. 3 From the left pane of the Welcome screen, click Scan. 4 Click Custom Settings. 5 Select a lower scan resolution. 6 Click Start. The USB port is marked with the USB symbol. Scanning takes ...USB port of the computer. Scanner does not respond Check the control panel If one of the lights is blinking, see "Blinking lights on the control panel" on page 60. Turn off and then restart your printer. 3 Click Printer. • Make sure no check mark appears next to Pause Printing...
...may be installed correctly" on the scanner glass. 2 From the desktop, double-click the Lexmark Imaging Studio icon. 3 From the left pane of the Welcome screen, click Scan. 4 Click Custom Settings. 5 Select a lower scan resolution. 6 Click Start. The USB port is marked with the USB symbol. Scanning takes ...USB port of the computer. Scanner does not respond Check the control panel If one of the lights is blinking, see "Blinking lights on the control panel" on page 60. Turn off and then restart your printer. 3 Click Printer. • Make sure no check mark appears next to Pause Printing...
User's Guide
Page 67
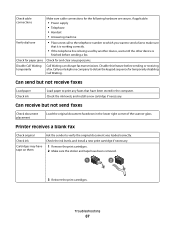
...to send a fax to make sure that have been removed. 1 2 3 Reinsert the print cartridges. Disable this feature before sending a fax. Check ink Check the ink levels, and install a new print cartridge if necessary. Troubleshooting 67 Can receive but not receive faxes Load paper Check ink .... Disable Call Waiting temporarily Call Waiting can disrupt fax transmissions. Check the ink levels, and install a new cartridge if necessary. Cartridges may have tape on them 1 Remove the print cartridges. 2 Make sure the sticker and tape have been stored in the lower right corner ...
...to send a fax to make sure that have been removed. 1 2 3 Reinsert the print cartridges. Disable this feature before sending a fax. Check ink Check the ink levels, and install a new print cartridge if necessary. Troubleshooting 67 Can receive but not receive faxes Load paper Check ink .... Disable Call Waiting temporarily Call Waiting can disrupt fax transmissions. Check the ink levels, and install a new cartridge if necessary. Cartridges may have tape on them 1 Remove the print cartridges. 2 Make sure the sticker and tape have been stored in the lower right corner ...
User's Guide
Page 68
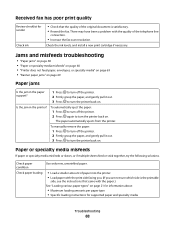
...Resend the fax. There may have been a problem with the quality of the telephone line connection. • Increase the fax scan resolution. To automatically eject the paper: 1 Press to turn off the printer. 2 Firmly grasp the paper, and gently ... Press to turn off the printer. 2 Press again to turn the printer back on. Received fax has poor print quality Review checklist for sender Check ink • Check that the quality of the original document is the printable ...The paper automatically ejects from the printer. Check the ink levels, and install a new print cartridge if necessary.
...Resend the fax. There may have been a problem with the quality of the telephone line connection. • Increase the fax scan resolution. To automatically eject the paper: 1 Press to turn off the printer. 2 Firmly grasp the paper, and gently ... Press to turn off the printer. 2 Press again to turn the printer back on. Received fax has poor print quality Review checklist for sender Check ink • Check that the quality of the original document is the printable ...The paper automatically ejects from the printer. Check the ink levels, and install a new print cartridge if necessary.
User's Guide
Page 70
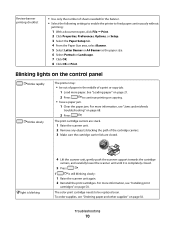
...Remove any objects blocking the path of sheets needed for the banner. • Select the following settings to enable the printer to continue printing or copying. • have a paper jam. 1 Clear the paper jam. See "Loading paper" on page 56. light is blinking 4 ... it is still blinking slowly: 1 Raise the scanner unit again. 2 Reinstall the print cartridges. If is completely closed . For more information, see "Jams and misfeeds troubleshooting" on page 50. Troubleshooting 70 For more information, see "Installing print cartridges" on page 68. 2 Press .
...Remove any objects blocking the path of sheets needed for the banner. • Select the following settings to enable the printer to continue printing or copying. • have a paper jam. 1 Clear the paper jam. See "Loading paper" on page 56. light is blinking 4 ... it is still blinking slowly: 1 Raise the scanner unit again. 2 Reinstall the print cartridges. If is completely closed . For more information, see "Jams and misfeeds troubleshooting" on page 50. Troubleshooting 70 For more information, see "Installing print cartridges" on page 68. 2 Press .


