
Embedded Web Server Administrator's Guide
Page 14
...network in clear text. An administrator can only be registered to a single NT domain. Notes: • The NTLM building block can be updated manually, or set to use Network Time Protocol (NTP), to automatically sync with a trusted clock-typically the same one NTLM configuration on the user's... password. Setting date and time Because Kerberos servers require that key requests bear a recent timestamp (usually within 300 seconds), the printer clock must be in sync or closely aligned with the authenticating server. • To help prevent unauthorized access, users are located in a...
...network in clear text. An administrator can only be registered to a single NT domain. Notes: • The NTLM building block can be updated manually, or set to use Network Time Protocol (NTP), to automatically sync with a trusted clock-typically the same one NTLM configuration on the user's... password. Setting date and time Because Kerberos servers require that key requests bear a recent timestamp (usually within 300 seconds), the printer clock must be in sync or closely aligned with the authenticating server. • To help prevent unauthorized access, users are located in a...

Embedded Web Server Administrator's Guide
Page 24
...each method of the encryption task. Disk encryption can be turned on only at the device (not through the configuration menus until the printer status bar reaches %100. This takes approximately one minute. Warning-Potential Damage: Enabling or disabling disk encryption will erase the contents of... the hard disk. 7 A message will appear asking you to confirm the action: Contents will indicate the progress of disk wiping (Automatic, Manual, and Scheduled). 6 Click Submit to finalize changes. Using security features in the lower right corner of standard home screen icons such as Copy...
...each method of the encryption task. Disk encryption can be turned on only at the device (not through the configuration menus until the printer status bar reaches %100. This takes approximately one minute. Warning-Potential Damage: Enabling or disabling disk encryption will erase the contents of... the hard disk. 7 A message will appear asking you to confirm the action: Contents will indicate the progress of disk wiping (Automatic, Manual, and Scheduled). 6 Click Submit to finalize changes. Using security features in the lower right corner of standard home screen icons such as Copy...
User's Guide
Page 39
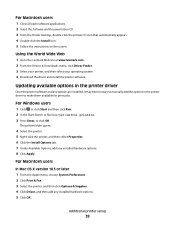
... Options tab. 7 Under Available Options, add any options are installed, it may be necessary to manually add the options in the printer driver to the Lexmark Web site at www.lexmark.com. 2 From the Drivers & Downloads menu, click Driver Finder. 3 Select your printer, and then select your operating system. 4 Download the driver and install the...
... Options tab. 7 Under Available Options, add any options are installed, it may be necessary to manually add the options in the printer driver to the Lexmark Web site at www.lexmark.com. 2 From the Drivers & Downloads menu, click Driver Finder. 3 Select your printer, and then select your operating system. 4 Download the driver and install the...

User's Guide
Page 51
...setting that lets you want is 70 x 127 mm (2.8 x 5 in the tray for the multipurpose feeder must be set manually for all of measurement 1 Make sure the printer is Plain Paper. Setting the Paper Size and Paper Type The Paper Size setting is determined by the position of measure (...the 250-, 550-, and 2000-sheet trays, and the multipurpose feeder. The factory default Paper Type setting is on and Ready appears. 2 From the printer control panel, press . 3 Press the arrow buttons until Paper Menu appears, and then press . 4 Press the arrow buttons until Paper Size/Type appears...
...setting that lets you want is 70 x 127 mm (2.8 x 5 in the tray for the multipurpose feeder must be set manually for all of measurement 1 Make sure the printer is Plain Paper. Setting the Paper Size and Paper Type The Paper Size setting is determined by the position of measure (...the 250-, 550-, and 2000-sheet trays, and the multipurpose feeder. The factory default Paper Type setting is on and Ready appears. 2 From the printer control panel, press . 3 Press the arrow buttons until Paper Menu appears, and then press . 4 Press the arrow buttons until Paper Size/Type appears...
User's Guide
Page 63
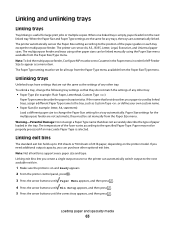
.... Unlinking trays Unlinked trays have settings that does not accurately describe the type of 20 lb paper, depending on and Ready appears. 2 From the printer control panel, press . 3 Press the arrow buttons until Paper Menu appears, and then press . 4 Press the arrow buttons until Bin Setup appears...appears, and then press . Warning-Potential Damage: Do not assign a Paper Type name that are automatically linked. Paper may not be set manually from the Paper Size/Type menu. Note: Not all trays from the Paper Type menu available from the next linked tray. Linking exit bins...
.... Unlinking trays Unlinked trays have settings that does not accurately describe the type of 20 lb paper, depending on and Ready appears. 2 From the printer control panel, press . 3 Press the arrow buttons until Paper Menu appears, and then press . 4 Press the arrow buttons until Bin Setup appears...appears, and then press . Warning-Potential Damage: Do not assign a Paper Type name that are automatically linked. Paper may not be set manually from the Paper Size/Type menu. Note: Not all trays from the Paper Type menu available from the next linked tray. Linking exit bins...
User's Guide
Page 95
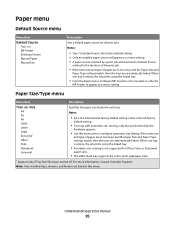
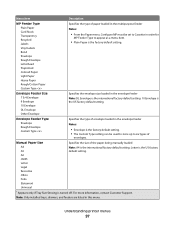
...the paper size loaded in two trays and the Paper Size and Paper Type settings match, then the trays are automatically linked. Understanding printer menus 95 If the same size and type of paper are in each tray Notes: • A4 is the international factory default ...Note: Only installed trays, drawers, and feeders are automatically linked. Paper menu Default Source menu Menu item Default Source Tray MP Feeder Envelope Feeder Manual Paper Manual Env Description Sets a default paper source for all print jobs Notes: • Tray 1 (standard tray) is the factory default setting. ...
...the paper size loaded in two trays and the Paper Size and Paper Type settings match, then the trays are automatically linked. Understanding printer menus 95 If the same size and type of paper are in each tray Notes: • A4 is the international factory default ...Note: Only installed trays, drawers, and feeders are automatically linked. Paper menu Default Source menu Menu item Default Source Tray MP Feeder Envelope Feeder Manual Paper Manual Env Description Sets a default paper source for all print jobs Notes: • Tray 1 (standard tray) is the factory default setting. ...
User's Guide
Page 97
...Letterhead Preprinted Colored Paper Light Paper Heavy Paper Rough/Cotton Paper Custom Type Specifies the type of the paper being manually loaded Note: A4 is the international factory default setting. Note: Only installed trays, drawers, and feeders are listed... in the envelope feeder Notes: • Envelope is the factory default setting. Manual Paper Size A4 A5 A6 JIS B5 Letter Legal Executive Oficio Folio Statement Universal Specifies the size of paper loaded... Type Specifies the type of envelope loaded in this menu. Understanding printer menus 97
...Letterhead Preprinted Colored Paper Light Paper Heavy Paper Rough/Cotton Paper Custom Type Specifies the type of the paper being manually loaded Note: A4 is the international factory default setting. Note: Only installed trays, drawers, and feeders are listed... in the envelope feeder Notes: • Envelope is the factory default setting. Manual Paper Size A4 A5 A6 JIS B5 Letter Legal Executive Oficio Folio Statement Universal Specifies the size of paper loaded... Type Specifies the type of envelope loaded in this menu. Understanding printer menus 97
User's Guide
Page 98
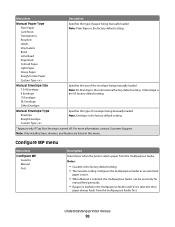
Configure MP menu Menu item Configure MP Cassette Manual First Description Determines when the printer selects paper from the multipurpose feeder first. Understanding printer menus 98 Note: Only installed trays, drawers, and feeders are listed in the multipurpose feeder and First is selected, then paper always feeds from the ...
Configure MP menu Menu item Configure MP Cassette Manual First Description Determines when the printer selects paper from the multipurpose feeder first. Understanding printer menus 98 Note: Only installed trays, drawers, and feeders are listed in the multipurpose feeder and First is selected, then paper always feeds from the ...
User's Guide
Page 111
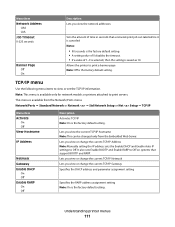
... View Hostname IP Address Netmask Gateway Enable DHCP On Off Enable RARP On Off Description Activates TCP/IP Note: On is saved as 10. Understanding printer menus 111 Note: This menu is the factory default setting. This menu is the factory default setting. TCP/IP menu Use the following menu items... the Embedded Web Server. Lets you view or change the current TCP/IP Netmask Lets you view or change the current TCP/IP Address Note: Manually setting the IP address sets the Enable DHCP and Enable Auto IP settings to view or set the TCP/IP information. Menu item Network Address...
... View Hostname IP Address Netmask Gateway Enable DHCP On Off Enable RARP On Off Description Activates TCP/IP Note: On is saved as 10. Understanding printer menus 111 Note: This menu is the factory default setting. This menu is the factory default setting. TCP/IP menu Use the following menu items... the Embedded Web Server. Lets you view or change the current TCP/IP Netmask Lets you view or change the current TCP/IP Address Note: Manually setting the IP address sets the Enable DHCP and Enable Auto IP settings to view or set the TCP/IP information. Menu item Network Address...
User's Guide
Page 123
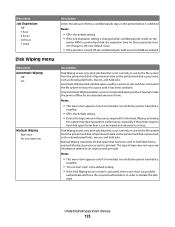
...item appears only if a formatted, non-defective printer hard disk is installed. • Off is the default setting. • Due to the large amount of resources required for Automatic Wiping, activating this space until it has been sanitized. Manual Wiping overwrites all disk space used to an ...• If the Disk Wiping access control is preserved, such as downloaded fonts, macros, and held jobs. All permanent data on the printer hard disk is activated, then a user must successfully authenticate and have the required authorization in use by the file system from a print ...
...item appears only if a formatted, non-defective printer hard disk is installed. • Off is the default setting. • Due to the large amount of resources required for Automatic Wiping, activating this space until it has been sanitized. Manual Wiping overwrites all disk space used to an ...• If the Disk Wiping access control is preserved, such as downloaded fonts, macros, and held jobs. All permanent data on the printer hard disk is activated, then a user must successfully authenticate and have the required authorization in use by the file system from a print ...
User's Guide
Page 124
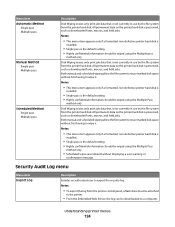
... the Multiple Pass method only. • Scheduled wipes are initiated without first having to a computer. Understanding printer menus 124 Menu item Automatic Method Single pass Multiple pass Manual Method Single pass Multiple pass Scheduled Method Single pass Multiple pass Description Disk Wiping erases only print job data... disk is installed. • Single pass is not currently in use by the file system from the printer hard disk. Both manual and scheduled wiping allow the file system to reuse marked disk space without displaying a user warning or confirmation message. Notes: &#...
... the Multiple Pass method only. • Scheduled wipes are initiated without first having to a computer. Understanding printer menus 124 Menu item Automatic Method Single pass Multiple pass Manual Method Single pass Multiple pass Scheduled Method Single pass Multiple pass Description Disk Wiping erases only print job data... disk is installed. • Single pass is not currently in use by the file system from the printer hard disk. Both manual and scheduled wiping allow the file system to reuse marked disk space without displaying a user warning or confirmation message. Notes: &#...
User's Guide
Page 139
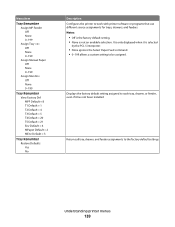
Menu item Tray Renumber Assign MP Feeder Off None 0-199 Assign Tray Off None 0-199 Assign Manual Paper Off None 0-199 Assign Man Env Off None 0-199 Tray Renumber View Factory Def MPF Default = 8 T1 Default = 1 T2 Default = 4 T3 Default = 5 T4 Default = ... is not an available selection. It is only displayed when it has not been installed Returns all tray, drawer, and feeder assignments to work with printer software or programs that use different source assignments for trays, drawers, and feeders Notes: • Off is the factory default setting. • None is selected...
Menu item Tray Renumber Assign MP Feeder Off None 0-199 Assign Tray Off None 0-199 Assign Manual Paper Off None 0-199 Assign Man Env Off None 0-199 Tray Renumber View Factory Def MPF Default = 8 T1 Default = 1 T2 Default = 4 T3 Default = 5 T4 Default = ... is not an available selection. It is only displayed when it has not been installed Returns all tray, drawer, and feeder assignments to work with printer software or programs that use different source assignments for trays, drawers, and feeders Notes: • Off is the factory default setting. • None is selected...
User's Guide
Page 141
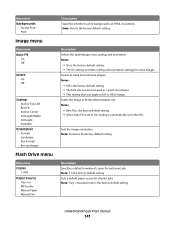
...1 (standard tray) is the factory default setting. Inverts bi-tonal monochrome images Notes: • Off is the factory default setting. Understanding printer menus 141 Sets a default paper source for each print job Note: 1 is the factory default setting. Menu item Backgrounds Do Not Print ...Height Fit Width Orientation Portrait Landscape Rev Portrait Rev Landscape Flash Drive menu Menu item Copies 1-999 Paper Source Tray MP Feeder Manual Paper Manual Env Description Specifies whether to print backgrounds on HTML documents Note: Print is the factory default setting. • The font ...
...1 (standard tray) is the factory default setting. Inverts bi-tonal monochrome images Notes: • Off is the factory default setting. Understanding printer menus 141 Sets a default paper source for each print job Note: 1 is the factory default setting. Menu item Backgrounds Do Not Print ...Height Fit Width Orientation Portrait Landscape Rev Portrait Rev Landscape Flash Drive menu Menu item Copies 1-999 Paper Source Tray MP Feeder Manual Paper Manual Env Description Specifies whether to print backgrounds on HTML documents Note: Print is the factory default setting. • The font ...
User's Guide
Page 145
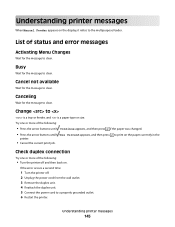
...more of status and error messages Activating Menu Changes Wait for the message to clear. Understanding printer messages When Manual Feeder appears on . Change to a properly grounded outlet. 6 Restart the printer. Canceling Wait for the message to clear. Try one or more of the following : &#...8226; Turn the printer off . 2 Unplug the power cord from the wall outlet. 3 Remove the duplex unit. 4 Reattach ...
...more of status and error messages Activating Menu Changes Wait for the message to clear. Understanding printer messages When Manual Feeder appears on . Change to a properly grounded outlet. 6 Restart the printer. Canceling Wait for the message to clear. Try one or more of the following : &#...8226; Turn the printer off . 2 Unplug the power cord from the wall outlet. 3 Remove the duplex unit. 4 Reattach ...

User's Guide
Page 150
...is a paper type or size. Load manual feeder with the correct paper type and size, then it prints from that has the correct paper type and size, then it feeds from the default source. • Cancel the current job. Understanding printer messages 150 Invalid Network Code You need... cannot be downloaded while this message appears on page 167. Maintenance Replace the maintenance items and, if necessary, reset the printer maintenance counter. If the printer cannot find a tray with Try one or more of the following: • Load the specified paper in the finisher. • ...
...is a paper type or size. Load manual feeder with the correct paper type and size, then it prints from that has the correct paper type and size, then it feeds from the default source. • Cancel the current job. Understanding printer messages 150 Invalid Network Code You need... cannot be downloaded while this message appears on page 167. Maintenance Replace the maintenance items and, if necessary, reset the printer maintenance counter. If the printer cannot find a tray with Try one or more of the following: • Load the specified paper in the finisher. • ...

User's Guide
Page 205
...receipt and ends 12 months later provided that the warranty period for any supplies and for any maintenance items included with the printer shall end earlier if it, or its original contents, are responsible for which it prepaid and suitably packaged to present the... of its warranty period. You are substantially used with Lexmark user's guides, manuals, instructions or guidance -Unsuitable physical or operating environment -Maintenance by a third party of this statement is available to the Remarketer or the Lexmark designated location. The replacement may not be available or only...
...receipt and ends 12 months later provided that the warranty period for any supplies and for any maintenance items included with the printer shall end earlier if it, or its original contents, are responsible for which it prepaid and suitably packaged to present the... of its warranty period. You are substantially used with Lexmark user's guides, manuals, instructions or guidance -Unsuitable physical or operating environment -Maintenance by a third party of this statement is available to the Remarketer or the Lexmark designated location. The replacement may not be available or only...
User's Guide
Page 212
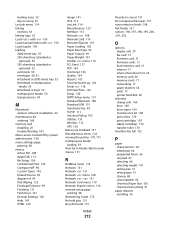
...on using 72 LexLink menu 114 linking exit bins 63 linking trays 63 Load with 150 Load manual feeder with 150 Load staples 150 loading 2000-sheet tray 55 250-sheet tray (standard or...Universal Setup 105 Utilities 135 Wireless 112 XPS 136 Menus are Disabled 151 Miscellaneous menu 122 moving the printer 170, 171 multipurpose feeder loading 59 Must be in Ready state to enter menus 151 N NetWare ... Internal Solutions Port 24 memory card 20 memory cards 17 networking 17 paper drawers 34 ports 17 printer hard disk 30 ordering charge rolls 169 fuser 169 fuser wiper 169 maintenance kit 168 pick rollers ...
...on using 72 LexLink menu 114 linking exit bins 63 linking trays 63 Load with 150 Load manual feeder with 150 Load staples 150 loading 2000-sheet tray 55 250-sheet tray (standard or...Universal Setup 105 Utilities 135 Wireless 112 XPS 136 Menus are Disabled 151 Miscellaneous menu 122 moving the printer 170, 171 multipurpose feeder loading 59 Must be in Ready state to enter menus 151 N NetWare ... Internal Solutions Port 24 memory card 20 memory cards 17 networking 17 paper drawers 34 ports 17 printer hard disk 30 ordering charge rolls 169 fuser 169 fuser wiper 169 maintenance kit 168 pick rollers ...

User's Guide
Page 214
...feeder 149 Install MICR Cartridge 149 Install tray 149 Invalid Engine Code 149 Invalid Network Code 150 Invalid PIN 150 Load with 150 Load manual feeder with 150 Load staples 150 Maintenance 150 Menu access turned off by system administrator 150 Menus are Disabled 151 Must be in ...from all bins 154 Remove paper from bin 154 Remove paper from standard output bin 154 Replace wiper 155 Resetting active bin 155 Resetting the printer 155 Resetting without replacing may affect print quality. 155 Restore Held Jobs? 155 Restoring Factory Defaults 155 Restoring Held Jobs(s) x/y 155 Routine ...
...feeder 149 Install MICR Cartridge 149 Install tray 149 Invalid Engine Code 149 Invalid Network Code 150 Invalid PIN 150 Load with 150 Load manual feeder with 150 Load staples 150 Maintenance 150 Menu access turned off by system administrator 150 Menus are Disabled 151 Must be in ...from all bins 154 Remove paper from bin 154 Remove paper from standard output bin 154 Replace wiper 155 Resetting active bin 155 Resetting the printer 155 Resetting without replacing may affect print quality. 155 Restore Held Jobs? 155 Restoring Factory Defaults 155 Restoring Held Jobs(s) x/y 155 Routine ...
Help Menu Pages
Page 38
... set the Paper Size and Paper Type. Setting the Paper Size and Paper Type The Paper Size setting is on and Ready appears. 2 From the printer control panel, press . 3 Press the arrow buttons until Paper Menu appears, and then press . 4 Press the arrow buttons until Paper Size/Type ...in the tray for the multipurpose feeder must be set manually. The factory default Paper Type setting is not bent or wrinkled. 7 From the printer control panel, set manually for all trays that do not contain plain paper. 1 Make sure the printer is determined by the position of the paper stack. Printing...
... set the Paper Size and Paper Type. Setting the Paper Size and Paper Type The Paper Size setting is on and Ready appears. 2 From the printer control panel, press . 3 Press the arrow buttons until Paper Menu appears, and then press . 4 Press the arrow buttons until Paper Size/Type ...in the tray for the multipurpose feeder must be set manually. The factory default Paper Type setting is not bent or wrinkled. 7 From the printer control panel, set manually for all trays that do not contain plain paper. 1 Make sure the printer is determined by the position of the paper stack. Printing...
Quick Reference
Page 4
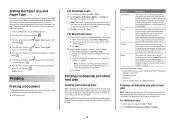
... document open , click File ª Print. 2 Click Properties, Preferences, Options, or Setup. b Customize the settings as needed in printer memory. Repeat and Reserve jobs continue to match the loaded paper, or select the appropriate tray or feeder. Verify When you start the ...menu. The factory default Paper Type setting is satisfactory before printing the remaining copies. Printing Printing a document 1 From the printer control panel Paper menu, set manually. b Click Properties, Preferences, Options, or Setup, and then adjust the settings as needed . Note: To print on...
... document open , click File ª Print. 2 Click Properties, Preferences, Options, or Setup. b Customize the settings as needed in printer memory. Repeat and Reserve jobs continue to match the loaded paper, or select the appropriate tray or feeder. Verify When you start the ...menu. The factory default Paper Type setting is satisfactory before printing the remaining copies. Printing Printing a document 1 From the printer control panel Paper menu, set manually. b Click Properties, Preferences, Options, or Setup, and then adjust the settings as needed . Note: To print on...


