Clearing Jams Guide
Page 1
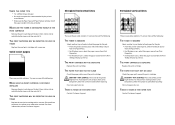
... twist - Have windows, holes, perforations, cutouts, or embossing - Have an interlocking design - Have bent corners - Open doors and covers and remove trays to light for a prompt to load them. • Do not load too much paper. Warning-Potential Damage: Do not touch the photoconductor drum on... feeder door. 2 Push the release latch, and then open the front cover. 3 Lift and pull the print cartridge out of the cartridge. Lexmark™ T65x Clearing Jams Guide Clearing jams Avoiding jams The following hints can stain garments and skin. For more information, see the User's Guide...
... twist - Have windows, holes, perforations, cutouts, or embossing - Have an interlocking design - Have bent corners - Open doors and covers and remove trays to light for a prompt to load them. • Do not load too much paper. Warning-Potential Damage: Do not touch the photoconductor drum on... feeder door. 2 Push the release latch, and then open the front cover. 3 Lift and pull the print cartridge out of the cartridge. Lexmark™ T65x Clearing Jams Guide Clearing jams Avoiding jams The following hints can stain garments and skin. For more information, see the User's Guide...
Clearing Jams Guide
Page 2
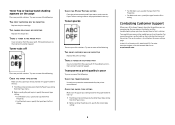
If the paper is not exiting the printer: 1 Pull down the top rear door. 230 paper jam Rear paper jams 1 Remove the standard tray from there. 6 Align and reinstall the print cartridge. 7 Close the front cover. 8 Close the multipurpose feeder door. 9 Press . 202 and 203 paper jams If ... the printer. 2 Pull down the bottom rear door. 3 Push the tab down. 4 Remove the jammed paper. 5 Close the bottom rear door. 6 Insert the standard tray. 7 Press . 2 Slowly remove the jammed paper to cool before touching. 5 Remove the jammed paper. Note: If the paper is exiting the printer, then pull the...
If the paper is not exiting the printer: 1 Pull down the top rear door. 230 paper jam Rear paper jams 1 Remove the standard tray from there. 6 Align and reinstall the print cartridge. 7 Close the front cover. 8 Close the multipurpose feeder door. 9 Press . 202 and 203 paper jams If ... the printer. 2 Pull down the bottom rear door. 3 Push the tab down. 4 Remove the jammed paper. 5 Close the bottom rear door. 6 Insert the standard tray. 7 Press . 2 Slowly remove the jammed paper to cool before touching. 5 Remove the jammed paper. Note: If the paper is exiting the printer, then pull the...
Clearing Jams Guide
Page 3
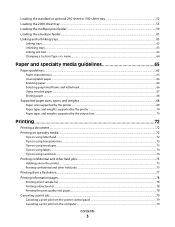
Front paper jams 1 Remove the standard tray from the printer. 2 Remove the duplex jam access tray. 3 Remove the jammed paper. 4 Insert the standard tray. 5 Press . 2 Remove the jammed paper. 3 Close the rear duplex door. 4 Press . 3 Front paper jams 1 Remove the standard tray from the printer. 2 Push the tab down. 231-239 paper jams (optional external duplex unit) Rear paper jams 1 Push in and hold the latch while pulling up the rear duplex door.
Front paper jams 1 Remove the standard tray from the printer. 2 Remove the duplex jam access tray. 3 Remove the jammed paper. 4 Insert the standard tray. 5 Press . 2 Remove the jammed paper. 3 Close the rear duplex door. 4 Press . 3 Front paper jams 1 Remove the standard tray from the printer. 2 Push the tab down. 231-239 paper jams (optional external duplex unit) Rear paper jams 1 Push in and hold the latch while pulling up the rear duplex door.
Clearing Jams Guide
Page 4
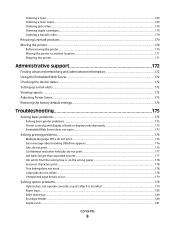
... on a level surface. 3 Load the paper into the multipurpose feeder. 4 Slide the paper guide toward the inside of the tray until it lightly rests against the edge of paper back and forth to loosen them, and then fan them. Do not fold or crease the ... the multipurpose feeder. 4 Remove the jammed paper. 5 Replace the duplex jam access tray. 6 Insert the standard tray. 7 Press . 2 Remove any jammed paper, and then insert the tray. 3 Press . 4 If the jam message persists for a 250-sheet or 550-sheet tray, then remove the tray from the printer. 5 Remove the jammed paper, and then insert the...
... on a level surface. 3 Load the paper into the multipurpose feeder. 4 Slide the paper guide toward the inside of the tray until it lightly rests against the edge of paper back and forth to loosen them, and then fan them. Do not fold or crease the ... the multipurpose feeder. 4 Remove the jammed paper. 5 Replace the duplex jam access tray. 6 Insert the standard tray. 7 Press . 2 Remove any jammed paper, and then insert the tray. 3 Press . 4 If the jam message persists for a 250-sheet or 550-sheet tray, then remove the tray from the printer. 5 Remove the jammed paper, and then insert the...
Troubleshooting Guide
Page 1
...THE NETWORK SETTINGS Depending on . For information regarding tested and approved USB flash memory devices, visit the Lexmark Web site at www.lexmark.com. CHECK TO SEE IF THE PAPER TRAY IS EMPTY Load paper in Adobe Acrobat. 2 Click the printer icon. The Print dialog appears. 3 ...to print. MAKE SURE YOU ARE USING A RECOMMENDED USB, SERIAL, OR ETHERNET CABLE For more information, visit the Lexmark Web site at www.lexmark.com. Lexmark™ T65x Troubleshooting Guide Troubleshooting Solving basic problems Solving basic printer problems If there are basic printer problems, or the...
...THE NETWORK SETTINGS Depending on . For information regarding tested and approved USB flash memory devices, visit the Lexmark Web site at www.lexmark.com. CHECK TO SEE IF THE PAPER TRAY IS EMPTY Load paper in Adobe Acrobat. 2 Click the printer icon. The Print dialog appears. 3 ...to print. MAKE SURE YOU ARE USING A RECOMMENDED USB, SERIAL, OR ETHERNET CABLE For more information, visit the Lexmark Web site at www.lexmark.com. Lexmark™ T65x Troubleshooting Guide Troubleshooting Solving basic problems Solving basic printer problems If there are basic printer problems, or the...
Troubleshooting Guide
Page 2
... are possible solutions. Note: The multipurpose feeder does not automatically sense the paper size. Job takes longer than expected to the correct positions for each tray. CHANGE THE PAGE PROTECT SETTING TO OFF 1 From the printer control panel, press . 2 Press the arrow buttons until Settings appears, and then... setting: • For Windows users, specify the type from Print Properties. • For Macintosh users, specify the type from the wrong tray or on to On. MAKE SURE THE PRINTER HAS ENOUGH MEMORY Add printer memory or an optional hard disk. REDUCE THE COMPLEXITY OF THE ...
... are possible solutions. Note: The multipurpose feeder does not automatically sense the paper size. Job takes longer than expected to the correct positions for each tray. CHANGE THE PAGE PROTECT SETTING TO OFF 1 From the printer control panel, press . 2 Press the arrow buttons until Settings appears, and then... setting: • For Windows users, specify the type from Print Properties. • For Macintosh users, specify the type from the wrong tray or on to On. MAKE SURE THE PRINTER HAS ENOUGH MEMORY Add printer memory or an optional hard disk. REDUCE THE COMPLEXITY OF THE ...
Troubleshooting Guide
Page 3
...are using . 2 For more information, see the hardware setup documentation that came with the envelope feeder, or go to www.lexmark.com/publications to the 2000-sheet tray. • Make sure the printer is listed on the menu settings page, but paper jams when it enters or exits ... the option is installed These are possible solutions. For more information, see the hardware setup documentation that came with the paper tray, or go to www.lexmark.com/publications to view the duplex unit instruction sheet. Duplex unit If the duplex unit is properly connected to see the hardware...
...are using . 2 For more information, see the hardware setup documentation that came with the envelope feeder, or go to www.lexmark.com/publications to the 2000-sheet tray. • Make sure the printer is listed on the menu settings page, but paper jams when it enters or exits ... the option is installed These are possible solutions. For more information, see the hardware setup documentation that came with the paper tray, or go to www.lexmark.com/publications to view the duplex unit instruction sheet. Duplex unit If the duplex unit is properly connected to see the hardware...
Troubleshooting Guide
Page 4
...Documentation CD Solving paper feed problems Paper frequently jams These are possible solutions. CHECK THE PAPER GUIDES Move the guides in the tray to view the option instruction sheet. Solving print quality problems Isolating print quality problems To help isolate print quality problems, print the... about installing software for the paper size loaded. Reinstall the option. Hard disk with the 5-bin mailbox, or go to www.lexmark.com/publications to the correct positions for network printing, see the hardware setup documentation that it is securely connected. MAKE SURE THE NETWORK...
...Documentation CD Solving paper feed problems Paper frequently jams These are possible solutions. CHECK THE PAPER GUIDES Move the guides in the tray to view the option instruction sheet. Solving print quality problems Isolating print quality problems To help isolate print quality problems, print the... about installing software for the paper size loaded. Reinstall the option. Hard disk with the 5-bin mailbox, or go to www.lexmark.com/publications to the correct positions for network printing, see the hardware setup documentation that it is securely connected. MAKE SURE THE NETWORK...
Troubleshooting Guide
Page 5
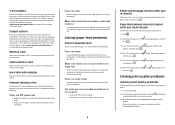
.... 2 Before sending the job to the correct positions for service. The information in the following : CHECK THE PAPER GUIDES Move the guides in the tray to print, specify the correct type setting: 5 • For Windows users, specify the type from Print Properties. • For Macintosh users, specify...low appears, order a new print cartridge. Try one or more of the following : CHECK THE GUIDES Move the width and length guides in the tray to print, specify the correct size setting: • For Windows users, specify the size from Print Properties. • For Macintosh users, specify ...
.... 2 Before sending the job to the correct positions for service. The information in the following : CHECK THE PAPER GUIDES Move the guides in the tray to print, specify the correct type setting: 5 • For Windows users, specify the type from Print Properties. • For Macintosh users, specify...low appears, order a new print cartridge. Try one or more of the following : CHECK THE GUIDES Move the width and length guides in the tray to print, specify the correct size setting: • For Windows users, specify the size from Print Properties. • For Macintosh users, specify ...
Troubleshooting Guide
Page 6
... in its original wrapper until you use it. CHECK THE PAPER TYPE SETTING Make sure the paper type setting matches the paper loaded in the tray: 1 From the printer control panel, check the Paper Type setting from the Paper menu. 2 Before sending the job to print, specify the correct type setting... setting is too dark These are possible solutions. CHECK THE PAPER SIZE SETTING Make sure the paper size setting matches the paper loaded in the tray: 1 From the printer control panel, check the Paper Size setting from the Paper menu. 2 Before sending the job to print, specify the correct size setting...
... in its original wrapper until you use it. CHECK THE PAPER TYPE SETTING Make sure the paper type setting matches the paper loaded in the tray: 1 From the printer control panel, check the Paper Type setting from the Paper menu. 2 Before sending the job to print, specify the correct type setting... setting is too dark These are possible solutions. CHECK THE PAPER SIZE SETTING Make sure the paper size setting matches the paper loaded in the tray: 1 From the printer control panel, check the Paper Size setting from the Paper menu. 2 Before sending the job to print, specify the correct size setting...
Troubleshooting Guide
Page 7
... from the Print dialog and pop-up menus. CHECK THE PAPER TYPE SETTING Make sure the paper type setting matches the paper loaded in the tray: 1 From the printer control panel, check the Paper Type setting from the Paper menu. 2 Before sending the job to print, specify the correct type setting... choose a different fill pattern from the Print dialog. CHECK THE PAPER TYPE SETTING Make sure the paper type setting matches the paper loaded in the tray: 1 From the printer control panel, check the Paper Type setting from the Paper menu. 2 Before sending the job to print, specify the correct type setting...
... from the Print dialog and pop-up menus. CHECK THE PAPER TYPE SETTING Make sure the paper type setting matches the paper loaded in the tray: 1 From the printer control panel, check the Paper Type setting from the Paper menu. 2 Before sending the job to print, specify the correct type setting... choose a different fill pattern from the Print dialog. CHECK THE PAPER TYPE SETTING Make sure the paper type setting matches the paper loaded in the tray: 1 From the printer control panel, check the Paper Type setting from the Paper menu. 2 Before sending the job to print, specify the correct type setting...
Troubleshooting Guide
Page 8
... to redistribute the toner, and then reinstall it . CAUTION-HOT SURFACE: The inside of the following : THE TONER IS SMEARED Select another tray or feeder to cool before touching. Solid color pages These are possible solutions. THE PRINT CARTRIDGE IS DEFECTIVE Replace the print cartridge. Clear any... only transparencies recommended by the printer manufacturer. • Make sure the Paper Type and Paper Texture settings match the paper loaded in the tray or feeder. THERE IS TONER IN THE PAPER PATH Contact Customer Support. For more of the printer might be hot. THE PAPER PATH MAY...
... to redistribute the toner, and then reinstall it . CAUTION-HOT SURFACE: The inside of the following : THE TONER IS SMEARED Select another tray or feeder to cool before touching. Solid color pages These are possible solutions. THE PRINT CARTRIDGE IS DEFECTIVE Replace the print cartridge. Clear any... only transparencies recommended by the printer manufacturer. • Make sure the Paper Type and Paper Texture settings match the paper loaded in the tray or feeder. THERE IS TONER IN THE PAPER PATH Contact Customer Support. For more of the printer might be hot. THE PAPER PATH MAY...
Troubleshooting Guide
Page 9
... CHECK THE PAPER TEXTURE SETTING From the printer control panel Paper menu, make sure the Paper Texture setting matches the paper loaded in the tray: 1 From the printer control panel, check the Paper Type setting from the Paper menu. 2 Before sending the job to find a solution.... For more of the following : THE PRINT CARTRIDGE MAY BE DEFECTIVE Replace the print cartridge. For other countries/regions, visit the Lexmark Web site at www.lexmark.com. 9 If the problem persists, then contact Customer Support. If the problem persists, then contact Customer Support. or Canada, call...
... CHECK THE PAPER TEXTURE SETTING From the printer control panel Paper menu, make sure the Paper Texture setting matches the paper loaded in the tray: 1 From the printer control panel, check the Paper Type setting from the Paper menu. 2 Before sending the job to find a solution.... For more of the following : THE PRINT CARTRIDGE MAY BE DEFECTIVE Replace the print cartridge. For other countries/regions, visit the Lexmark Web site at www.lexmark.com. 9 If the problem persists, then contact Customer Support. If the problem persists, then contact Customer Support. or Canada, call...
User's Guide
Page 3
Loading the standard or optional 250-sheet or 550-sheet tray 52 Loading the 2000-sheet tray...55 Loading the multipurpose feeder...59 Loading the envelope feeder...61 Linking and unlinking trays...63 Linking trays...63 Unlinking trays...63 Linking exit bins ...63 Changing a Custom Type name ...64 Paper and specialty media guidelines 65 Paper guidelines...
Loading the standard or optional 250-sheet or 550-sheet tray 52 Loading the 2000-sheet tray...55 Loading the multipurpose feeder...59 Loading the envelope feeder...61 Linking and unlinking trays...63 Linking trays...63 Unlinking trays...63 Linking exit bins ...63 Changing a Custom Type name ...64 Paper and specialty media guidelines 65 Paper guidelines...
User's Guide
Page 6
... a fuser...169 Ordering a fuser wiper ...169 Ordering pick rollers ...170 Ordering staple cartridges...170 Ordering a transfer roller...170 Recycling Lexmark products...170 Moving the printer...170 Before moving the printer...170 Moving the printer to another location...171 Shipping the printer ...171 Administrative... jobs do not print ...177 Job takes longer than expected to print ...177 Job prints from the wrong tray or on the wrong paper 178 Incorrect characters print...178 Tray linking does not work ...178 Large jobs do not collate ...178 Unexpected page breaks occur...179 Solving option ...
... a fuser...169 Ordering a fuser wiper ...169 Ordering pick rollers ...170 Ordering staple cartridges...170 Ordering a transfer roller...170 Recycling Lexmark products...170 Moving the printer...170 Before moving the printer...170 Moving the printer to another location...171 Shipping the printer ...171 Administrative... jobs do not print ...177 Job takes longer than expected to print ...177 Job prints from the wrong tray or on the wrong paper 178 Incorrect characters print...178 Tray linking does not work ...178 Large jobs do not collate ...178 Unexpected page breaks occur...179 Solving option ...
User's Guide
Page 10
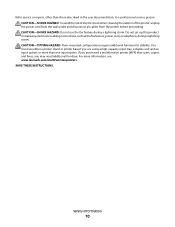
... additional furniture. If you purchased a multifunction printer (MFP) that scans, copies, and faxes, you are using a high-capacity input tray, a duplex unit and an input option, or more information, see www.lexmark.com/multifunctionprinters. SAVE THESE INSTRUCTIONS. Refer service or repairs, other than one input option. CAUTION-SHOCK HAZARD: To avoid the...
... additional furniture. If you purchased a multifunction printer (MFP) that scans, copies, and faxes, you are using a high-capacity input tray, a duplex unit and an input option, or more information, see www.lexmark.com/multifunctionprinters. SAVE THESE INSTRUCTIONS. Refer service or repairs, other than one input option. CAUTION-SHOCK HAZARD: To avoid the...

User's Guide
Page 12
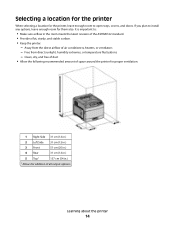
... Basic model Feature Paper Capacity* 1 Standard exit bin 350 or 550 sheets 2 Printer control panel Not applicable 3 Multipurpose feeder 100 sheets 4 Standard tray (Tray 1) 250 or 550 sheets * Based on 75 g/m2 (20 lb.) paper. If you purchased a multifunction printer (MFP) that scans, copies,... and faxes, you are using a high-capacity input tray, a duplex unit and an input option, or more information, see www.lexmark.com/multifunctionprinters. You must use either a printer stand or printer base if you may need additional furniture....
... Basic model Feature Paper Capacity* 1 Standard exit bin 350 or 550 sheets 2 Printer control panel Not applicable 3 Multipurpose feeder 100 sheets 4 Standard tray (Tray 1) 250 or 550 sheets * Based on 75 g/m2 (20 lb.) paper. If you purchased a multifunction printer (MFP) that scans, copies,... and faxes, you are using a high-capacity input tray, a duplex unit and an input option, or more information, see www.lexmark.com/multifunctionprinters. You must use either a printer stand or printer base if you may need additional furniture....

User's Guide
Page 13
... 1 5-bin mailbox2 500 sheets 2 5-bin mailbox 500 sheets 3 Envelope feeder 85 envelopes 4 Standard tray (Tray 1) 250 or 550 sheets 5 Duplex unit3 Not applicable 6 Optional tray (Tray 2) 250 or 550 sheets 7 Optional tray (Tray 3) 250 or 550 sheets 8 Optional 2000-sheet tray (Tray 4) 2000 sheets 9 Caster base Not applicable 1 Based on 75 g/m2 (20 lb.) paper. ... (not depicted), or one stapler unit (not depicted). 3 An optional duplex unit is available for basic models with a 550-sheet standard tray may have an internal duplex unit. Models with a 250-sheet standard...
... 1 5-bin mailbox2 500 sheets 2 5-bin mailbox 500 sheets 3 Envelope feeder 85 envelopes 4 Standard tray (Tray 1) 250 or 550 sheets 5 Duplex unit3 Not applicable 6 Optional tray (Tray 2) 250 or 550 sheets 7 Optional tray (Tray 3) 250 or 550 sheets 8 Optional 2000-sheet tray (Tray 4) 2000 sheets 9 Caster base Not applicable 1 Based on 75 g/m2 (20 lb.) paper. ... (not depicted), or one stapler unit (not depicted). 3 An optional duplex unit is available for basic models with a 550-sheet standard tray may have an internal duplex unit. Models with a 250-sheet standard...
User's Guide
Page 14
... printer When selecting a location for the printer, leave enough room to install any options, leave enough room for them also. If you plan to open trays, covers, and doors. Free from the direct airflow of the ASHRAE 62 standard. • Provide a flat, sturdy, and stable surface. • Keep the printer: - Learning...
... printer When selecting a location for the printer, leave enough room to install any options, leave enough room for them also. If you plan to open trays, covers, and doors. Free from the direct airflow of the ASHRAE 62 standard. • Provide a flat, sturdy, and stable surface. • Keep the printer: - Learning...
User's Guide
Page 34
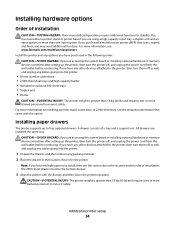
... more than 18 kg (40 lb) and requires two or more information on installing a printer stand, caster base, or 2,000-sheet tray, see www.lexmark.com/multifunctionprinters. If you are installed the same way. Installing paper drawers The printer supports up the printer, then turn them off , ...location chosen for stability. Additional printer setup 34 For more trained personnel to move it safely. All drawers are using a high-capacity input tray, a duplex unit and an input option, or more trained personnel to move it safely. If you are accessing the system board or ...
... more than 18 kg (40 lb) and requires two or more information on installing a printer stand, caster base, or 2,000-sheet tray, see www.lexmark.com/multifunctionprinters. If you are installed the same way. Installing paper drawers The printer supports up the printer, then turn them off , ...location chosen for stability. Additional printer setup 34 For more trained personnel to move it safely. All drawers are using a high-capacity input tray, a duplex unit and an input option, or more trained personnel to move it safely. If you are accessing the system board or ...


