Troubleshooting Guide
Page 1
... tested and approved USB flash memory devices, visit the Lexmark Web site at www.lexmark.com. Contact your system administrator. MAKE SURE PRINTER CABLES ARE SECURELY CONNECTED Check the cable connections to the printer and print server to make sure the network is functioning correctly. This often fixes the problem. CHECK TO SEE IF THE STANDARD EXIT BIN IS FULL Remove the stack of these possibilities, turn the printer off, wait for about reading USB drive appears Make sure the USB drive is connected...
... tested and approved USB flash memory devices, visit the Lexmark Web site at www.lexmark.com. Contact your system administrator. MAKE SURE PRINTER CABLES ARE SECURELY CONNECTED Check the cable connections to the printer and print server to make sure the network is functioning correctly. This often fixes the problem. CHECK TO SEE IF THE STANDARD EXIT BIN IS FULL Remove the stack of these possibilities, turn the printer off, wait for about reading USB drive appears Make sure the USB drive is connected...
Troubleshooting Guide
Page 3
... the option and the printer. 4 Connect the power cord to view the envelope feeder instruction sheet. Solving option problems Settings chosen from the software program or application can change or override settings chosen from the Print dialog. For more of envelope you are using : 1 From the printer control panel, check the settings for paper jams or misfeeds. 3 Make sure paper guides are possible solutions. MAKE SURE THE PAPER TRAY IS INSTALLED CORRECTLY If the paper tray is listed on . 3 MAKE SURE THE ENVELOPES ARE LOADED CORRECTLY 1 Adjust the envelope support...
... the option and the printer. 4 Connect the power cord to view the envelope feeder instruction sheet. Solving option problems Settings chosen from the software program or application can change or override settings chosen from the Print dialog. For more of envelope you are using : 1 From the printer control panel, check the settings for paper jams or misfeeds. 3 Make sure paper guides are possible solutions. MAKE SURE THE PAPER TRAY IS INSTALLED CORRECTLY If the paper tray is listed on . 3 MAKE SURE THE ENVELOPES ARE LOADED CORRECTLY 1 Adjust the envelope support...
Troubleshooting Guide
Page 5
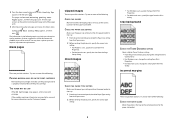
... loaded. THE TONER MAY BE LOW When 88 Cartridge low appears, order a new print cartridge. If the problem continues, the printer may have a printer part that requires adjustment or replacement. The message remains on the printer control panel display until all the pages print. 5 After the print quality test pages print, press the down arrow button until Exit Config Menu appears, and then press . Try one or more information, contact Customer Support. Blank pages These are formatted, Printing Quality Test Pages appears, and then the pages print. Ghost images CHECK THE PAPER TYPE...
... loaded. THE TONER MAY BE LOW When 88 Cartridge low appears, order a new print cartridge. If the problem continues, the printer may have a printer part that requires adjustment or replacement. The message remains on the printer control panel display until all the pages print. 5 After the print quality test pages print, press the down arrow button until Exit Config Menu appears, and then press . Try one or more information, contact Customer Support. Blank pages These are formatted, Printing Quality Test Pages appears, and then the pages print. Ghost images CHECK THE PAPER TYPE...
User's Guide
Page 37
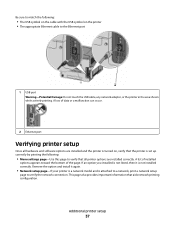
... of data or a malfunction can occur. 2 Ethernet port Verifying printer setup Once all printer options are installed and the printer is turned on the printer • The appropriate Ethernet cable to the Ethernet port 1 USB port Warning-Potential Damage: Do not touch the USB cable, any network adapter, or the printer in the area shown while actively printing. Additional printer setup 37 Remove the option and install it is attached to a network, print a network setup page to verify the network connection. This page...
... of data or a malfunction can occur. 2 Ethernet port Verifying printer setup Once all printer options are installed and the printer is turned on the printer • The appropriate Ethernet cable to the Ethernet port 1 USB port Warning-Potential Damage: Do not touch the USB cable, any network adapter, or the printer in the area shown while actively printing. Additional printer setup 37 Remove the option and install it is attached to a network, print a network setup page to verify the network connection. This page...

User's Guide
Page 51
... correct Paper Type setting appears, and then press . Loading paper and specialty media 51 The Paper Type setting must be set manually. It also includes information about paper orientation, setting the Paper Size and Paper Type, and linking and unlinking trays. The factory default Paper Type setting is 216 x 356 mm (8.5 x 14 in the printer menus. Then, specify all trays that are not preset in .). The Paper Size setting for your paper: • Units of the following Universal size settings for the multipurpose feeder...
... correct Paper Type setting appears, and then press . Loading paper and specialty media 51 The Paper Type setting must be set manually. It also includes information about paper orientation, setting the Paper Size and Paper Type, and linking and unlinking trays. The factory default Paper Type setting is 216 x 356 mm (8.5 x 14 in the printer menus. Then, specify all trays that are not preset in .). The Paper Size setting for your paper: • Units of the following Universal size settings for the multipurpose feeder...
User's Guide
Page 107
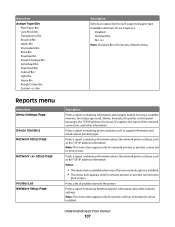
... when more than one network option is the factory default setting. Menu Item Assign Type/Bin Plain Paper Bin Card Stock Bin Transparency Bin Recycled Bin Labels Bin Vinyl Labels Bin Bond Bin Envelope Bin Rough Envelope Bin Letterhead Bin Preprinted Bin Colored Bin Light Bin Heavy Bin Rough/Cotton Bin Custom Bin Reports menu Menu item Menu Settings Page Device Statistics Network Setup Page Network Setup Page Profiles List NetWare Setup Page Description Selects an output bin for each supported paper type Available selections for network printers or printers connected to print servers.
... when more than one network option is the factory default setting. Menu Item Assign Type/Bin Plain Paper Bin Card Stock Bin Transparency Bin Recycled Bin Labels Bin Vinyl Labels Bin Bond Bin Envelope Bin Rough Envelope Bin Letterhead Bin Preprinted Bin Colored Bin Light Bin Heavy Bin Rough/Cotton Bin Custom Bin Reports menu Menu item Menu Settings Page Device Statistics Network Setup Page Network Setup Page Profiles List NetWare Setup Page Description Selects an output bin for each supported paper type Available selections for network printers or printers connected to print servers.
User's Guide
Page 108
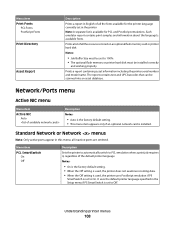
...; Auto is the factory default setting. • This menu item appears only if an optional network card is available for PCL and PostScript emulations. Understanding printer menus 108 Prints a report containing asset information including the printer serial number and model name. Menu item PCL SmartSwitch On Off Description Sets the printer to automatically switch to PCL emulation when a print job requires it, regardless of all inactive ports are omitted. It uses the default printer language specified in this menu; Standard Network...
...; Auto is the factory default setting. • This menu item appears only if an optional network card is available for PCL and PostScript emulations. Understanding printer menus 108 Prints a report containing asset information including the printer serial number and model name. Menu item PCL SmartSwitch On Off Description Sets the printer to automatically switch to PCL emulation when a print job requires it, regardless of all inactive ports are omitted. It uses the default printer language specified in this menu; Standard Network...
User's Guide
Page 129
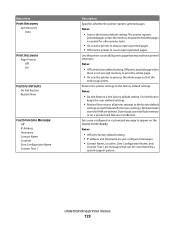
...; IP address and Hostname are pre-configured messages. • Contact Name, Location, Zero Configuration Name, and Custom Text 1 are not affected. Do Not Restore keeps the user-defined settings. • Restore Now returns all printer settings to never reprint jammed pages. All downloads stored in flash memory or on the display beside Ready Notes: • Off is the factory default setting. Returns the printer settings to appear on a printer hard disk are messages that the entire page prints...
...; IP address and Hostname are pre-configured messages. • Contact Name, Location, Zero Configuration Name, and Custom Text 1 are not affected. Do Not Restore keeps the user-defined settings. • Restore Now returns all printer settings to never reprint jammed pages. All downloads stored in flash memory or on the display beside Ready Notes: • Off is the factory default setting. Returns the printer settings to appear on a printer hard disk are messages that the entire page prints...
User's Guide
Page 175
Check the printer power switch. • The printer cable is securely attached to the same network. Printer control panel display is turned on. Embedded Web Server does not open These are correct. Troubleshooting Solving basic problems Solving basic printer problems If there are basic printer problems, or the printer is unresponsive, make sure: • The power cord is plugged into the printer and a properly grounded electrical outlet. • The electrical outlet is not turned off , wait about...
Check the printer power switch. • The printer cable is securely attached to the same network. Printer control panel display is turned on. Embedded Web Server does not open These are correct. Troubleshooting Solving basic problems Solving basic printer problems If there are basic printer problems, or the printer is unresponsive, make sure: • The power cord is plugged into the printer and a properly grounded electrical outlet. • The electrical outlet is not turned off , wait about...
User's Guide
Page 211
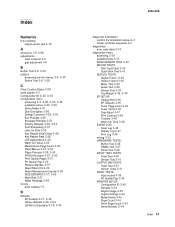
directory list printing 78 Disabling DLEs 147 Disabling Menus 147 Disk Corrupted 147 Disk recovery x/y XX% 147 Disk Wiping menu 123 display troubleshooting display is blank 175 display shows only diamonds 175 display, printer control panel 15 documents, printing from Macintosh 72 from Windows 72 drawers, paper installing 34 duplex unit installing 35 E Embedded Web Server 172 administrator settings 172 checking device status 172 does not open 175 networking settings 172 setting up e-mail alerts 172 Embedded Web Server Administrator's Guide 172 emission notices 197, 198, 200, 201...
directory list printing 78 Disabling DLEs 147 Disabling Menus 147 Disk Corrupted 147 Disk recovery x/y XX% 147 Disk Wiping menu 123 display troubleshooting display is blank 175 display shows only diamonds 175 display, printer control panel 15 documents, printing from Macintosh 72 from Windows 72 drawers, paper installing 34 duplex unit installing 35 E Embedded Web Server 172 administrator settings 172 checking device status 172 does not open 175 networking settings 172 setting up e-mail alerts 172 Embedded Web Server Administrator's Guide 172 emission notices 197, 198, 200, 201...
User's Guide
Page 212
... letterhead in trays 52 multipurpose feeder 59 transparencies 59 M Macintosh wireless network installation 42 maintenance kit ordering 168 memory card installing 20 troubleshooting 181 Menu access turned off by system administrator 150 menu settings page printing 38 menus Active NIC 108 AppleTalk 113 Bin Setup 106 Confidential Print 122 Configure MP 98 Custom Types 105 Default Source 95 diagram of 94 Disk Wiping 123 Envelope Enhance 99 Finishing 131 Flash Drive 141 General Settings 126 Help 143 HTML 140 Image 141 IPv6...
... letterhead in trays 52 multipurpose feeder 59 transparencies 59 M Macintosh wireless network installation 42 maintenance kit ordering 168 memory card installing 20 troubleshooting 181 Menu access turned off by system administrator 150 menu settings page printing 38 menus Active NIC 108 AppleTalk 113 Bin Setup 106 Confidential Print 122 Configure MP 98 Custom Types 105 Default Source 95 diagram of 94 Disk Wiping 123 Envelope Enhance 99 Finishing 131 Flash Drive 141 General Settings 126 Help 143 HTML 140 Image 141 IPv6...

User's Guide
Page 214
... Serial 156 Some held jobs were lost 156 Standard Bin Full 156 Staples empty or misfed 156 Staples low or missing 156 Submitting selection 156 Toner low 157 Too many failed panel logins 156 Tray Empty 157 Tray Low 157 Tray Missing 157 Unsupported disk 157 Unsupported USB device, please remove 157 Unsupported USB hub, please remove 157 USB drive removed 157 USB/USB 157 View supplies 157 Waiting 157 printer options troubleshooting 2000-sheet tray 180 5-bin mailbox 181 duplex unit 181 envelope feeder 180 flash memory card 181 hard disk...
... Serial 156 Some held jobs were lost 156 Standard Bin Full 156 Staples empty or misfed 156 Staples low or missing 156 Submitting selection 156 Toner low 157 Too many failed panel logins 156 Tray Empty 157 Tray Low 157 Tray Missing 157 Unsupported disk 157 Unsupported USB device, please remove 157 Unsupported USB hub, please remove 157 USB drive removed 157 USB/USB 157 View supplies 157 Waiting 157 printer options troubleshooting 2000-sheet tray 180 5-bin mailbox 181 duplex unit 181 envelope feeder 180 flash memory card 181 hard disk...
User's Guide
Page 215
... Toner low 157 Too many failed panel logins 156 transfer roller ordering 170 transparencies loading 59 tips on using 73 Tray Empty 157 Tray Low 157 Tray Missing 157 tray linking 64 tray unlinking 64 trays linking 63 unlinking 63 troubleshooting checking an unresponsive printer 175 contacting Customer Support 194 solving basic printer problems 175 troubleshooting, display display is blank 175 display shows only diamonds 175 troubleshooting, paper feed message remains after jam is cleared 183 page that jammed does not reprint 183 troubleshooting, print error reading USB drive 176 held jobs...
... Toner low 157 Too many failed panel logins 156 transfer roller ordering 170 transparencies loading 59 tips on using 73 Tray Empty 157 Tray Low 157 Tray Missing 157 tray linking 64 tray unlinking 64 trays linking 63 unlinking 63 troubleshooting checking an unresponsive printer 175 contacting Customer Support 194 solving basic printer problems 175 troubleshooting, display display is blank 175 display shows only diamonds 175 troubleshooting, paper feed message remains after jam is cleared 183 page that jammed does not reprint 183 troubleshooting, print error reading USB drive 176 held jobs...
Quick Reference
Page 4
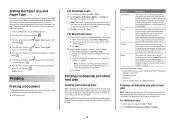
... . The factory default Paper Type setting is held jobs. Other types of the paper guides in memory until you send a Reserve print job, the printer does not print the job immediately. b Customize the settings as needed . The job is Plain Paper. Printing Printing a document 1 From the printer control panel Paper menu, set manually for the multipurpose feeder must create a PIN from the Held Jobs menu. The Paper Type setting must be set the Paper Type and Paper Size to match the loaded paper, or select the appropriate tray or feeder. 3 Click Print. The PIN...
... . The factory default Paper Type setting is held jobs. Other types of the paper guides in memory until you send a Reserve print job, the printer does not print the job immediately. b Customize the settings as needed . The job is Plain Paper. Printing Printing a document 1 From the printer control panel Paper menu, set manually for the multipurpose feeder must create a PIN from the Held Jobs menu. The Paper Type setting must be set the Paper Type and Paper Size to match the loaded paper, or select the appropriate tray or feeder. 3 Click Print. The PIN...
Service Manual
Page 56
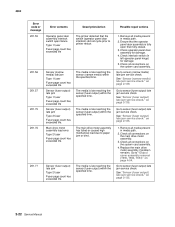
... time. Possible repair actions 1. See "Sensor (fuser output) late jam service check." on page 2-135. Remove all media present in left operator panel hinge) for damage. 4. Check interlock switch (in media path. 2. on page 2-135. 2-22 Service Manual 4062 Error code or message 201.55 201.56 201.57 201.75 201.76 201.77 Error contents Operator panel door assembly interlock switch open then fully closed. 3. Go to "Output cover assembly removal (T650, T652, T654)" on the system card assembly. 4. Replace...
... time. Possible repair actions 1. See "Sensor (fuser output) late jam service check." on page 2-135. Remove all media present in left operator panel hinge) for damage. 4. Check interlock switch (in media path. 2. on page 2-135. 2-22 Service Manual 4062 Error code or message 201.55 201.56 201.57 201.75 201.76 201.77 Error contents Operator panel door assembly interlock switch open then fully closed. 3. Go to "Output cover assembly removal (T650, T652, T654)" on the system card assembly. 4. Replace...

Service Manual
Page 69
...) late jam Source = External duplex Sensor (duplex input) lingering jam Source = External duplex Sensor (duplex double-feed) late jam Source = External duplex Description/Action The internal duplex drive motor is not reporting pulses back to sensor (duplex input) lingering jam service check. Go to sensor (duplex input) late jam service check. Possible repair actions 1. See "Sensor (duplex input) late jam service check." Check all connections on page 4-19. See "Sensor (pass through) late jam service check" on page 2-141. Go to "Duplex drive motor assembly removal (T652...
...) late jam Source = External duplex Sensor (duplex input) lingering jam Source = External duplex Sensor (duplex double-feed) late jam Source = External duplex Description/Action The internal duplex drive motor is not reporting pulses back to sensor (duplex input) lingering jam service check. Go to sensor (duplex input) late jam service check. Possible repair actions 1. See "Sensor (duplex input) late jam service check." Check all connections on page 4-19. See "Sensor (pass through) late jam service check" on page 2-141. Go to "Duplex drive motor assembly removal (T652...
Service Manual
Page 214
... Mode 1. Press and hold and . 3. Configuration Menu Flash system code mode 3. Press and hold and . Press and hold , , and . The Configuration Menu group contains a set of the printer to identify problems with the printer. Turn on page 3-25 for more information. 3. Release the buttons after 10 seconds. 1. Turn off the printer. 2. Turn off the printer. 2. Generally, the options made available in Diagnostic Mode. 3-2 Service Manual Turn on the printer. 4. Turn off the printer. 2. Turn on the printer. 4. See "Diagnostics mode (models T650...
... Mode 1. Press and hold and . 3. Configuration Menu Flash system code mode 3. Press and hold and . Press and hold , , and . The Configuration Menu group contains a set of the printer to identify problems with the printer. Turn on page 3-25 for more information. 3. Release the buttons after 10 seconds. 1. Turn off the printer. 2. Turn off the printer. 2. Generally, the options made available in Diagnostic Mode. 3-2 Service Manual Turn on the printer. 4. Turn off the printer. 2. Turn on the printer. 4. See "Diagnostics mode (models T650...
Service Manual
Page 232
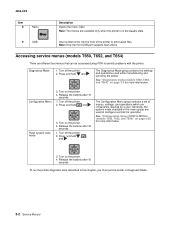
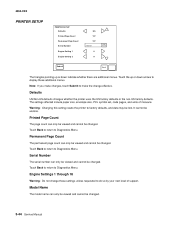
..., Check Config ID displays. To view the permanent page count: 1. Select Serial number from PRINTER SETUP. 2. Select Page Count from PRINTER SETUP. 2. Note: When the printer detects a Configuration ID that cannot be determined using hardware sensors. Serial Number The serial number can only be viewed and cannot be changed . Submitting Selection displays, followed by your next level of support. Select Configuration ID from the Printer Setup menu. 4062-XXX The page count can only be viewed and cannot be changed . Engine Setting...
..., Check Config ID displays. To view the permanent page count: 1. Select Serial number from PRINTER SETUP. 2. Select Page Count from PRINTER SETUP. 2. Note: When the printer detects a Configuration ID that cannot be determined using hardware sensors. Serial Number The serial number can only be viewed and cannot be changed . Submitting Selection displays, followed by your next level of support. Select Configuration ID from the Printer Setup menu. 4062-XXX The page count can only be viewed and cannot be changed . Engine Setting...
Service Manual
Page 256
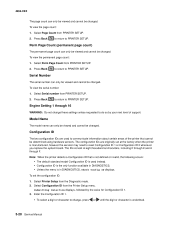
... to return to Diagnostics Menu. Engine Settings 1 through 16 Warning: Do not change effective. Touch Back to return to Diagnostics Menu. Note: If you make changes, touch Submit to make the change these additional menus. The settings affected include paper size, envelope size, PCL symbol set, code pages, and units of support. Permanent Page Count The permanent page count can only be viewed and cannot be changed . It cannot be changed . Serial Number The serial number can only be viewed...
... to return to Diagnostics Menu. Engine Settings 1 through 16 Warning: Do not change effective. Touch Back to return to Diagnostics Menu. Note: If you make changes, touch Submit to make the change these additional menus. The settings affected include paper size, envelope size, PCL symbol set, code pages, and units of support. Permanent Page Count The permanent page count can only be viewed and cannot be changed . It cannot be changed . Serial Number The serial number can only be viewed...
Service Manual
Page 573
... confirm the installation status 2-2 Power-on Reset sequence 2-2 diagnostics error code table 2-14 diagnostics menu accessing 3-30 available tests 3-31 BASE SENSOR TEST 3-42 DEVICE TESTS Disk Test/Clean 3-43 Quick Disk Test 3-43 DUPLEX TESTS Duplex Feed 1 3-40 Duplex Feed 2 3-40 Motor Test 3-39 Quick Test 3-38 Sensor Test 3-39 Top Margin 3-38, 3-39 EP SETUP Charge Roll 3-46 EP Defaults 3-46 Fuser Page Count 3-46 Fuser Temp 3-46 Gap Adjust 3-47 Print Contrast 3-46 Transfer 3-46 Warm Up Time 3-46 EVENT LOG Clear Log 3-48 Display Log 3-47 Print Log...
... confirm the installation status 2-2 Power-on Reset sequence 2-2 diagnostics error code table 2-14 diagnostics menu accessing 3-30 available tests 3-31 BASE SENSOR TEST 3-42 DEVICE TESTS Disk Test/Clean 3-43 Quick Disk Test 3-43 DUPLEX TESTS Duplex Feed 1 3-40 Duplex Feed 2 3-40 Motor Test 3-39 Quick Test 3-38 Sensor Test 3-39 Top Margin 3-38, 3-39 EP SETUP Charge Roll 3-46 EP Defaults 3-46 Fuser Page Count 3-46 Fuser Temp 3-46 Gap Adjust 3-47 Print Contrast 3-46 Transfer 3-46 Warm Up Time 3-46 EVENT LOG Clear Log 3-48 Display Log 3-47 Print Log...


