Quick Reference
Page 8
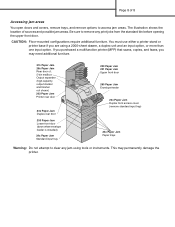
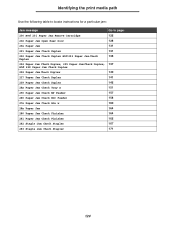
... stacker and finisher not shown) 202 Paper Jam Printer rear door 23x Paper Jam Duplex rear door 250 Paper Jam Lower front door (down when envelope feeder is installed) 24x Paper Jam Standard input tray 200 Paper Jam 201 Paper Jam Upper front door 260 Paper Jam Envelope feeder 23x Paper Jam Duplex front access cover (remove standard input tray) 24x Paper Jam Paper trays Warning: Do not attempt...
... stacker and finisher not shown) 202 Paper Jam Printer rear door 23x Paper Jam Duplex rear door 250 Paper Jam Lower front door (down when envelope feeder is installed) 24x Paper Jam Standard input tray 200 Paper Jam 201 Paper Jam Upper front door 260 Paper Jam Envelope feeder 23x Paper Jam Duplex front access cover (remove standard input tray) 24x Paper Jam Paper trays Warning: Do not attempt...
User's Reference
Page 5
... to the standard output bin 130 23x Paper Jam ...131 231 Paper Jam Check Duplex 131 232 Paper Jam Check Duplex and 233 Paper Jam Check Duplex 135 234 Paper Jam Check Duplex, 235 Paper Jam Check Duplex, and 238 Paper Jam Check Duplex 137 236 Paper Jam Check Duplex 140 237 Paper Jam Check Duplex 141 239 Paper Jam Check Duplex 145 24x Paper Jam Check Tray x 151 On the incline...
... to the standard output bin 130 23x Paper Jam ...131 231 Paper Jam Check Duplex 131 232 Paper Jam Check Duplex and 233 Paper Jam Check Duplex 135 234 Paper Jam Check Duplex, 235 Paper Jam Check Duplex, and 238 Paper Jam Check Duplex 137 236 Paper Jam Check Duplex 140 237 Paper Jam Check Duplex 141 239 Paper Jam Check Duplex 145 24x Paper Jam Check Tray x 151 On the incline...
User's Reference
Page 122
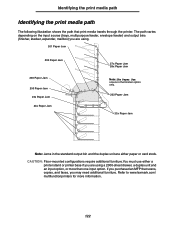
Refer to www.lexmark.com/ multifunctionprinters for more than one input option. CAUTION: Floor-mounted configurations require additional furniture.You must use either a printer stand or printer base if you are either paper or card stock. The path varies depending on the ...path that scans, copies, and faxes, you are using. 201 Paper Jam 200 Paper Jam 260 Paper Jam 250 Paper Jam 23x Paper Jam 24x Paper Jam 27x Paper Jam 28x Paper Jam Note: 28x Paper Jam occurs in the finisher option only. 202 Paper Jam 23x Paper Jam Note: Jams in the standard output bin and the duplex unit are using a ...
Refer to www.lexmark.com/ multifunctionprinters for more than one input option. CAUTION: Floor-mounted configurations require additional furniture.You must use either a printer stand or printer base if you are either paper or card stock. The path varies depending on the ...path that scans, copies, and faxes, you are using. 201 Paper Jam 200 Paper Jam 260 Paper Jam 250 Paper Jam 23x Paper Jam 24x Paper Jam 27x Paper Jam 28x Paper Jam Note: 28x Paper Jam occurs in the finisher option only. 202 Paper Jam 23x Paper Jam Note: Jams in the standard output bin and the duplex unit are using a ...
User's Reference
Page 124
... Paper Jam Remove Cartridge 125 202 Paper Jam Open Rear Door 128 23x Paper Jam 131 231 Paper Jam Check Duplex 131 232 Paper Jam Check Duplex and 233 Paper Jam Check 135 Duplex 234 Paper Jam Check Duplex, 235 Paper Jam Check Duplex, 137 and 238 Paper Jam Check Duplex 236 Paper Jam Check Duplex 140 237 Paper Jam Check Duplex 141 239 Paper Jam Check Duplex 145 24x Paper Jam Check Tray x 151 250 Paper Jam...
... Paper Jam Remove Cartridge 125 202 Paper Jam Open Rear Door 128 23x Paper Jam 131 231 Paper Jam Check Duplex 131 232 Paper Jam Check Duplex and 233 Paper Jam Check 135 Duplex 234 Paper Jam Check Duplex, 235 Paper Jam Check Duplex, 137 and 238 Paper Jam Check Duplex 236 Paper Jam Check Duplex 140 237 Paper Jam Check Duplex 141 239 Paper Jam Check Duplex 145 24x Paper Jam Check Tray x 151 250 Paper Jam...
User's Reference
Page 125
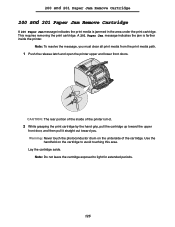
... cartridge. Note: To resolve the message, you . Use the handhold on the underside of the inside the printer. 200 and 201 Paper Jam Remove Cartridge 200 and 201 Paper Jam Remove Cartridge A 200 Paper Jam message indicates the print media is hot. 2 While grasping the print cartridge by the hand grip, pull the cartridge up toward...
... cartridge. Note: To resolve the message, you . Use the handhold on the underside of the inside the printer. 200 and 201 Paper Jam Remove Cartridge 200 and 201 Paper Jam Remove Cartridge A 200 Paper Jam message indicates the print media is hot. 2 While grasping the print cartridge by the hand grip, pull the cartridge up toward...

User's Reference
Page 126
You need to access the print media from the printer rear door. If the print media does not move immediately when you . Otherwise, continue with unfused toner, which can stain garments and skin. Note: The print media may be covered with step 8. 126 200 and 201 Paper Jam Remove Cartridge 3 Gently push the feed roller release lever toward the back of the printer. 4 Pull the print media up and toward you pull, stop pulling.
You need to access the print media from the printer rear door. If the print media does not move immediately when you . Otherwise, continue with unfused toner, which can stain garments and skin. Note: The print media may be covered with step 8. 126 200 and 201 Paper Jam Remove Cartridge 3 Gently push the feed roller release lever toward the back of the printer. 4 Pull the print media up and toward you pull, stop pulling.
User's Reference
Page 127
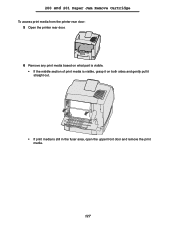
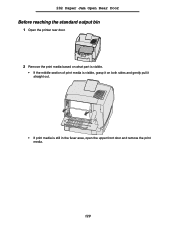
200 and 201 Paper Jam Remove Cartridge To access print media from the printer rear door: 5 Open the printer rear door. 6 Remove any print media based on what part is visible. • If the middle section of print media is visible, grasp it on both sides and gently pull it straight out. • If print media is still in the fuser area, open the upper front door and remove the print media. 127
200 and 201 Paper Jam Remove Cartridge To access print media from the printer rear door: 5 Open the printer rear door. 6 Remove any print media based on what part is visible. • If the middle section of print media is visible, grasp it on both sides and gently pull it straight out. • If print media is still in the fuser area, open the upper front door and remove the print media. 127
User's Reference
Page 128
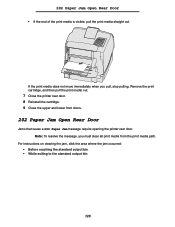
Note: To resolve the message, you pull, stop pulling. For instructions on clearing the jam, click the area where the jam occurred: • Before reaching the standard output bin • While exiting to the standard output bin 128 202 Paper Jam Open Rear Door • If the end of the print media is visible, pull... print cartridge, and then pull the print media out. 7 Close the printer rear door. 8 Reinstall the cartridge. 9 Close the upper and lower front doors. 202 Paper Jam Open Rear Door Jams that cause a 202 Paper Jam message require opening the printer rear door.
Note: To resolve the message, you pull, stop pulling. For instructions on clearing the jam, click the area where the jam occurred: • Before reaching the standard output bin • While exiting to the standard output bin 128 202 Paper Jam Open Rear Door • If the end of the print media is visible, pull... print cartridge, and then pull the print media out. 7 Close the printer rear door. 8 Reinstall the cartridge. 9 Close the upper and lower front doors. 202 Paper Jam Open Rear Door Jams that cause a 202 Paper Jam message require opening the printer rear door.
User's Reference
Page 129
202 Paper Jam Open Rear Door Before reaching the standard output bin 1 Open the printer rear door. 2 Remove the print media based on what part is visible. • If the middle section of print media is visible, grasp it on both sides and gently pull it straight out. • If print media is still in the fuser area, open the upper front door and remove the print media. 129
202 Paper Jam Open Rear Door Before reaching the standard output bin 1 Open the printer rear door. 2 Remove the print media based on what part is visible. • If the middle section of print media is visible, grasp it on both sides and gently pull it straight out. • If print media is still in the fuser area, open the upper front door and remove the print media. 129

User's Reference
Page 130
202 Paper Jam Open Rear Door • If the end of the print media is visible, pull the print media straight out. Remove the print cartridge, and then pull the print media out. 3 Close the printer rear door. While exiting to the standard output bin Pull the print media straight out. 130 If the print media does not move immediately when you pull, stop pulling.
202 Paper Jam Open Rear Door • If the end of the print media is visible, pull the print media straight out. Remove the print cartridge, and then pull the print media out. 3 Close the printer rear door. While exiting to the standard output bin Pull the print media straight out. 130 If the print media does not move immediately when you pull, stop pulling.

User's Reference
Page 131
23x Paper Jam If the print media does not move immediately when you must clear all print media from the print media path. 1 Open the printer rear door. 2 Remove any print media based on what part is visible. 131 The second line of the operator panel indicates the jam area. 231 Paper Jam Check Duplex Note: To resolve the message, you pull, stop pulling. Open the upper front door and pull the print media out. 23x Paper Jam Jams in the optional duplex unit result in a 23x message, where x represents specific jam areas.
23x Paper Jam If the print media does not move immediately when you must clear all print media from the print media path. 1 Open the printer rear door. 2 Remove any print media based on what part is visible. 131 The second line of the operator panel indicates the jam area. 231 Paper Jam Check Duplex Note: To resolve the message, you pull, stop pulling. Open the upper front door and pull the print media out. 23x Paper Jam Jams in the optional duplex unit result in a 23x message, where x represents specific jam areas.

User's Reference
Page 132
If the print media does not move immediately when you pull, stop pulling. Remove the print cartridge, and then pull the print media out. 3 Close the printer rear door. 132 23x Paper Jam • If the middle section of print media is visible, grasp it on both sides and gently pull it straight out. • If print media is still in the fuser area, open the upper front door and remove the print media. • If the end of the print media is visible, pull the print media straight out.
If the print media does not move immediately when you pull, stop pulling. Remove the print cartridge, and then pull the print media out. 3 Close the printer rear door. 132 23x Paper Jam • If the middle section of print media is visible, grasp it on both sides and gently pull it straight out. • If print media is still in the fuser area, open the upper front door and remove the print media. • If the end of the print media is visible, pull the print media straight out.
User's Reference
Page 133
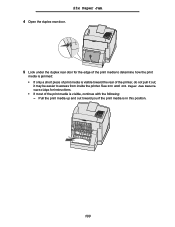
Pull the print media up and out toward the rear of the printer, do not pull it out; See 200 and 201 Paper Jam Remove Cartridge for the edge of the print media to access from inside the printer. 23x Paper Jam 4 Open the duplex rear door. 5 Look under the duplex rear door for instructions. • If most of the print media is in this position. 133 it may be easier to determine how the print media is jammed: • If only a short piece of print media is visible toward you if the print media is visible, continue with the following: -
Pull the print media up and out toward the rear of the printer, do not pull it out; See 200 and 201 Paper Jam Remove Cartridge for the edge of the print media to access from inside the printer. 23x Paper Jam 4 Open the duplex rear door. 5 Look under the duplex rear door for instructions. • If most of the print media is in this position. 133 it may be easier to determine how the print media is jammed: • If only a short piece of print media is visible toward you if the print media is visible, continue with the following: -

User's Reference
Page 134
Make sure it snaps into place. 134 Pull down and out if the print media is in this position. 6 Close the duplex rear door. 23x Paper Jam -
Make sure it snaps into place. 134 Pull down and out if the print media is in this position. 6 Close the duplex rear door. 23x Paper Jam -
User's Reference
Page 135
... the printer, do not pull it may be easier to determine how the print media is jammed: • If only a short piece of the print media is in this position. 135 See 200 and 201 Paper Jam Remove Cartridge for the edge of the print media to access from the print media path... door for instructions. • If most of print media is visible toward you must clear all print media from inside the printer. it out; 23x Paper Jam 232 Paper Jam Check Duplex and 233 Paper Jam Check Duplex Note: To resolve the message, you if the print media is visible, continue with the following: -
... the printer, do not pull it may be easier to determine how the print media is jammed: • If only a short piece of the print media is in this position. 135 See 200 and 201 Paper Jam Remove Cartridge for the edge of the print media to access from the print media path... door for instructions. • If most of print media is visible toward you must clear all print media from inside the printer. it out; 23x Paper Jam 232 Paper Jam Check Duplex and 233 Paper Jam Check Duplex Note: To resolve the message, you if the print media is visible, continue with the following: -

User's Reference
Page 136
Make sure it snaps into place. 136 23x Paper Jam - Pull down and out if the print media is in this position. 3 Close the duplex rear door.
Make sure it snaps into place. 136 23x Paper Jam - Pull down and out if the print media is in this position. 3 Close the duplex rear door.
User's Reference
Page 137
...inner wall, grasp it and pull it out. See 200 and 201 Paper Jam Remove Cartridge for the edge of print media is visible inside the printer. 23x Paper Jam 234 Paper Jam Check Duplex, 235 Paper Jam Check Duplex, and 238 Paper Jam Check Duplex Note: To resolve the message, you must clear all ...print media from inside the duplex unit next to determine how the print media is jammed: • If a short piece ...
...inner wall, grasp it and pull it out. See 200 and 201 Paper Jam Remove Cartridge for the edge of print media is visible inside the printer. 23x Paper Jam 234 Paper Jam Check Duplex, 235 Paper Jam Check Duplex, and 238 Paper Jam Check Duplex Note: To resolve the message, you must clear all ...print media from inside the duplex unit next to determine how the print media is jammed: • If a short piece ...

User's Reference
Page 138
23x Paper Jam 3 Close the duplex rear door. Make sure it snaps into place. 4 Remove the standard tray. 5 Locate the recessed areas on each side of the duplex front access cover. 6 Slowly pull the duplex front access cover straight out. 138
23x Paper Jam 3 Close the duplex rear door. Make sure it snaps into place. 4 Remove the standard tray. 5 Locate the recessed areas on each side of the duplex front access cover. 6 Slowly pull the duplex front access cover straight out. 138

User's Reference
Page 139
Make sure it back into the printer. 139 If the print media is visible, pull the print media straight up and out. Interior view of print media lying in the duplex front access cover. 23x Paper Jam 7 If the edge of the print media is not visible, continue with step 8. Otherwise, close the duplex front access cover. 8 Remove any sheets of duplex unit 9 Hold the duplex front access cover level while you slide it snaps into place. 10 Slide the standard tray back into the duplex unit.
Make sure it back into the printer. 139 If the print media is visible, pull the print media straight up and out. Interior view of print media lying in the duplex front access cover. 23x Paper Jam 7 If the edge of the print media is not visible, continue with step 8. Otherwise, close the duplex front access cover. 8 Remove any sheets of duplex unit 9 Hold the duplex front access cover level while you slide it snaps into place. 10 Slide the standard tray back into the duplex unit.

User's Reference
Page 140
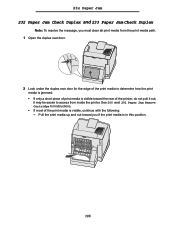
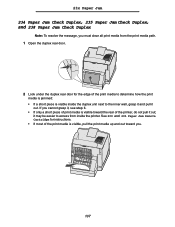
23x Paper Jam 236 Paper Jam Check Duplex Note: To resolve the message, you must clear all print media from the print media path. 1 Locate the recessed areas on each side of the duplex front access cover. 2 Slowly pull the duplex front access cover straight out. 3 If the edge of the print media is not visible, continue with step 4. Otherwise, close the duplex front access cover. 4 Slide out the standard tray. 140 If the print media is visible, pull the print media straight up and out.
23x Paper Jam 236 Paper Jam Check Duplex Note: To resolve the message, you must clear all print media from the print media path. 1 Locate the recessed areas on each side of the duplex front access cover. 2 Slowly pull the duplex front access cover straight out. 3 If the edge of the print media is not visible, continue with step 4. Otherwise, close the duplex front access cover. 4 Slide out the standard tray. 140 If the print media is visible, pull the print media straight up and out.


