Setup Guide (1.4 MB)
Page 2
... herein may result in hazardous radiation exposure. • Your product uses a printing process that is near the product and easily accessible. • Refer service or repairs, other countries. All rights reserved. Please see the online User's Guide for the reader's comments is not responsible for selecting print media to you. Lexmark is provided at any country where such provisions are provided...
... herein may result in hazardous radiation exposure. • Your product uses a printing process that is near the product and easily accessible. • Refer service or repairs, other countries. All rights reserved. Please see the online User's Guide for the reader's comments is not responsible for selecting print media to you. Lexmark is provided at any country where such provisions are provided...
Setup Guide (1.4 MB)
Page 3
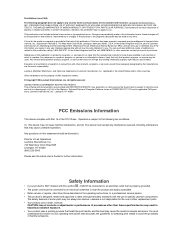
... T614n models only 500-Sheet Drawer - The location of the label is off and the power cord and any cables are ready to install it. If any options. Troubleshooting If you bought the printer. Options Compatibility Options compatible with Optra™ T printers are missing, contact the place where you encounter a problem while setting up your printer is already set the printer. 304.8 mm (12 in.) 508 mm (20 in.) Printer Handhold Power switch cover Power...
... T614n models only 500-Sheet Drawer - The location of the label is off and the power cord and any cables are ready to install it. If any options. Troubleshooting If you bought the printer. Options Compatibility Options compatible with Optra™ T printers are missing, contact the place where you encounter a problem while setting up your printer is already set the printer. 304.8 mm (12 in.) 508 mm (20 in.) Printer Handhold Power switch cover Power...
Setup Guide (1.4 MB)
Page 4
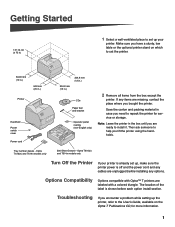
... reversed. Configure Network Printer 6 See Page 23 TCP/IP - Page 29 Page 29 OS/2 Warp Server - Page 20 Power Cord - Page 24 Novell NetWare - Page 28 AppleTalk - Setup Install Paper Options and Printer 1 Install Memory and Option Cards 2 Printer/Flash Memory Page 16 5-Bin Mailbox Page 12 * Output Expander Page 10 High-Capacity Output Stacker Page 14 Print Cartridge Page 9 Envelope Feeder Page 14 Printer Page 7 Duplex Unit Page 6 250-Sheet Drawer Page 5 * 500-Sheet Drawer Page 5 Access printer system board Page 15 Load Paper 3 See Page 19 Option Cards Page 17...
... reversed. Configure Network Printer 6 See Page 23 TCP/IP - Page 29 Page 29 OS/2 Warp Server - Page 20 Power Cord - Page 24 Novell NetWare - Page 28 AppleTalk - Setup Install Paper Options and Printer 1 Install Memory and Option Cards 2 Printer/Flash Memory Page 16 5-Bin Mailbox Page 12 * Output Expander Page 10 High-Capacity Output Stacker Page 14 Print Cartridge Page 9 Envelope Feeder Page 14 Printer Page 7 Duplex Unit Page 6 250-Sheet Drawer Page 5 * 500-Sheet Drawer Page 5 Access printer system board Page 15 Load Paper 3 See Page 19 Option Cards Page 17...
Setup Guide (1.4 MB)
Page 6
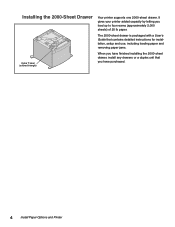
Installing the 2000-Sheet Drawer Optra T label (colored triangle) Your printer supports one 2000-sheet drawer. The 2000-sheet drawer is packaged with a User's Guide that contains detailed instructions for installation, setup and use, including loading paper and removing paper jams. When you have purchased. 4 Install Paper Options and Printer It gives your printer added capacity by letting you have finished installing the 2000-sheet drawer, install any drawers or a duplex unit that you load up to four reams (approximately 2,000 sheets) of 20 lb paper.
Installing the 2000-Sheet Drawer Optra T label (colored triangle) Your printer supports one 2000-sheet drawer. The 2000-sheet drawer is packaged with a User's Guide that contains detailed instructions for installation, setup and use, including loading paper and removing paper jams. When you have purchased. 4 Install Paper Options and Printer It gives your printer added capacity by letting you have finished installing the 2000-sheet drawer, install any drawers or a duplex unit that you load up to four reams (approximately 2,000 sheets) of 20 lb paper.
Setup Guide (1.4 MB)
Page 11
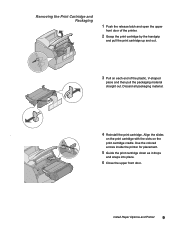
... print cartridge by the handgrip and pull the print cartridge up and out. 3 Pull on the print cartridge cradle. Discard all packaging material. . 4 Reinstall the print cartridge. Removing the Print Cartridge and Packaging 1 Push the release latch and open the upper front door of the plastic, V-shaped piece and then pull the packaging material straight out. Use the colored arrows inside the printer for placement. 5 Guide the print cartridge...
... print cartridge by the handgrip and pull the print cartridge up and out. 3 Pull on the print cartridge cradle. Discard all packaging material. . 4 Reinstall the print cartridge. Removing the Print Cartridge and Packaging 1 Push the release latch and open the upper front door of the plastic, V-shaped piece and then pull the packaging material straight out. Use the colored arrows inside the printer for placement. 5 Guide the print cartridge...
Setup Guide (1.4 MB)
Page 12
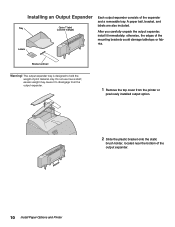
... disengage from the output expander. 1 Remove the top cover from the printer or previously installed output option. 2 Slide the plastic bracket onto the static brush holder, located near the bottom of print material only. Do not use it to hold the weight of the output expander. 10 Install Paper Options and Printer excess weight may cause it as a shelf; Installing an Output Expander Tray Optra T label (colored triangle) Labels Each output expander consists of...
... disengage from the output expander. 1 Remove the top cover from the printer or previously installed output option. 2 Slide the plastic bracket onto the static brush holder, located near the bottom of print material only. Do not use it to hold the weight of the output expander. 10 Install Paper Options and Printer excess weight may cause it as a shelf; Installing an Output Expander Tray Optra T label (colored triangle) Labels Each output expander consists of...
Setup Guide (1.4 MB)
Page 13
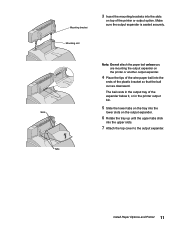
Install Paper Options and Printer 11 Slots Tabs Note: Do not attach the paper bail unless you are mounting the output expander on the printer or another output expander. 4 Place the tips of the wire paper bail into the upper slots. 7 Attach the top cover to the output expander. Make sure the output expander is seated securely. The bail rests in the output tray of the...
Install Paper Options and Printer 11 Slots Tabs Note: Do not attach the paper bail unless you are mounting the output expander on the printer or another output expander. 4 Place the tips of the wire paper bail into the upper slots. 7 Attach the top cover to the output expander. Make sure the output expander is seated securely. The bail rests in the output tray of the...
Setup Guide (1.4 MB)
Page 14
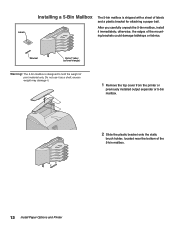
... to hold the weight of print material only. After you carefully unpack the 5-bin mailbox, install it . 1 Remove the top cover from the printer or previously installed output expander or 5-bin mailbox. 2 Slide the plastic bracket onto the static brush holder, located near the bottom of the mounting brackets could damage tabletops or fabrics. Do not use it as a shelf; Bracket Optra T label (colored triangle) Warning!
... to hold the weight of print material only. After you carefully unpack the 5-bin mailbox, install it . 1 Remove the top cover from the printer or previously installed output expander or 5-bin mailbox. 2 Slide the plastic bracket onto the static brush holder, located near the bottom of the mounting brackets could damage tabletops or fabrics. Do not use it as a shelf; Bracket Optra T label (colored triangle) Warning!

Setup Guide (1.4 MB)
Page 16
... installation instructions. Optra T label (colored triangle) Installing the Envelope Feeder Optra T label (colored triangle) The envelope feeder attaches to the User's Guide, available on the Optra T Publications CD, for information on both sides of your printer behind the lower front door. It can be removed when you are not using the envelope feeder. The envelope feeder tilts downward at a slight angle when it is packaged with the slots on using it snaps into the opening until it , making...
... installation instructions. Optra T label (colored triangle) Installing the Envelope Feeder Optra T label (colored triangle) The envelope feeder attaches to the User's Guide, available on the Optra T Publications CD, for information on both sides of your printer behind the lower front door. It can be removed when you are not using the envelope feeder. The envelope feeder tilts downward at a slight angle when it is packaged with the slots on using it snaps into the opening until it , making...
Setup Guide (1.4 MB)
Page 19
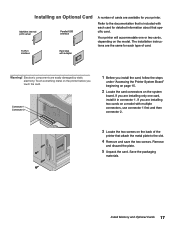
... the same for each card for your printer. Installing an Optional Card MarkNet internal print server Parallel/USB interface Tri-Port interface Hard disk with each type of cards are installing only one or two cards, depending on the model. The installation instructions are easily damaged by static electricity. Touch something metal on the printer before you install the card, follow the steps under "Accessing the Printer System Board" beginning on page 15. 2 Locate the card connectors on the...
... the same for each card for your printer. Installing an Optional Card MarkNet internal print server Parallel/USB interface Tri-Port interface Hard disk with each type of cards are installing only one or two cards, depending on the model. The installation instructions are easily damaged by static electricity. Touch something metal on the printer before you install the card, follow the steps under "Accessing the Printer System Board" beginning on page 15. 2 Locate the card connectors on the...
Setup Guide (1.4 MB)
Page 24
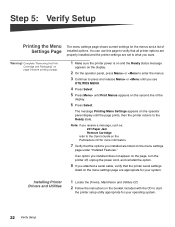
Complete "Removing the Print Cartridge and Packaging" on page 9 before printing a page. 1 Make sure the printer power is on and the Ready status message appears on the display. 2 On the operator panel, press Menu> or or until the page prints, then the printer returns to the User's Guide on the Publications CD for more information. 7 Verify that the printer serial settings listed on the second line of installed options. Note: If you receive a message, such as: 201 Paper Jam Remove Cartridge refer...
Complete "Removing the Print Cartridge and Packaging" on page 9 before printing a page. 1 Make sure the printer power is on and the Ready status message appears on the display. 2 On the operator panel, press Menu> or or until the page prints, then the printer returns to the User's Guide on the Publications CD for more information. 7 Verify that the printer serial settings listed on the second line of installed options. Note: If you receive a message, such as: 201 Paper Jam Remove Cartridge refer...
Setup Guide (1.4 MB)
Page 25
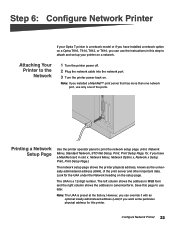
... of the print server and other important data. Note: The UAA is a 12-digit number. Printing a Network Setup Page Use the printer operator panel to the Network 1 Turn the printer power off. 2 Plug the network cable into the network port. 3 Turn the printer power back on. Attaching Your Printer to print the network setup page. (Hint: Network Menu, Standard Network, STD Net Setup, Print, Print Setup Page. Step 6: Configure Network Printer If your printer on a network. The UAA is preset at the factory. Note: If you have a MarkNet card in canonical form. Configure Network Printer 23...
... of the print server and other important data. Note: The UAA is a 12-digit number. Printing a Network Setup Page Use the printer operator panel to the Network 1 Turn the printer power off. 2 Plug the network cable into the network port. 3 Turn the printer power back on. Attaching Your Printer to print the network setup page. (Hint: Network Menu, Standard Network, STD Net Setup, Print, Print Setup Page. Step 6: Configure Network Printer If your printer on a network. The UAA is preset at the factory. Note: If you have a MarkNet card in canonical form. Configure Network Printer 23...
Setup Guide (1.4 MB)
Page 26
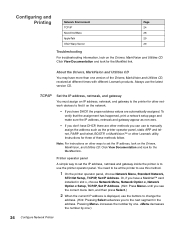
... has happened, print a network setup page and make sure the IP address, netmask and gateway appear as the printer operator panel, static ARP and telnet, RARP and telnet, BOOTP, or MarkVision™ or other network devices to use this method. 1 On the printer operator panel, choose Network Menu, Standard Network, STD Net Setup, TCP/IP, Set IP Address. Or, if you have DHCP, the proper address values are automatically assigned. Instructions for three of...
... has happened, print a network setup page and make sure the IP address, netmask and gateway appear as the printer operator panel, static ARP and telnet, RARP and telnet, BOOTP, or MarkVision™ or other network devices to use this method. 1 On the printer operator panel, choose Network Menu, Standard Network, STD Net Setup, TCP/IP, Set IP Address. Or, if you have DHCP, the proper address values are automatically assigned. Instructions for three of...
Setup Guide (1.4 MB)
Page 27
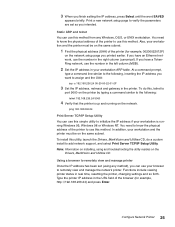
... a custom install to add network support, and select Print Server TCP/IP Setup Utility. Configure Network Printer 25 ping 192.168.236.24 Print Server TCP/IP Setup Utility You can use your browser to remotely view and manage the network printer. You need to know the physical address of the printer (for example, http: //192.168.236.24) and press Enter. Functions include viewing printer status in the printer. Type the printer IP address...
... a custom install to add network support, and select Print Server TCP/IP Setup Utility. Configure Network Printer 25 ping 192.168.236.24 Print Server TCP/IP Setup Utility You can use your browser to remotely view and manage the network printer. You need to know the physical address of the printer (for example, http: //192.168.236.24) and press Enter. Functions include viewing printer status in the printer. Type the printer IP address...
Setup Guide (1.4 MB)
Page 28
c Select Lexmark Network Port, then click New Port. This software is necessary to Windows NT Server versions 4.0 and later. 1 Install the TCP/IP software component on a Windows NT server. The following instructions apply to establish the link between the printer and the queue. Set up your printer setup process. b Click Add Port. tions on the server. Instructions for queue-based printing where network users print to a queue defined on the server that contains the print queue. Print to automate...
c Select Lexmark Network Port, then click New Port. This software is necessary to Windows NT Server versions 4.0 and later. 1 Install the TCP/IP software component on a Windows NT server. The following instructions apply to establish the link between the printer and the queue. Set up your printer setup process. b Click Add Port. tions on the server. Instructions for queue-based printing where network users print to a queue defined on the server that contains the print queue. Print to automate...
Setup Guide (1.4 MB)
Page 29
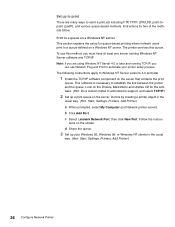
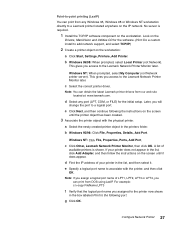
... can print from any port (LPT, COM, or FILE) for the software. (Hint: Do a custom install to add network support, and select TCP/IP.) 2 Create a printer object on the IP network. d Select any Windows 95, Windows 98 or Windows NT workstation directly to a Lexmark printer located anywhere on the workstation: a Click Start, Settings, Printers, Add Printer. b Windows 95/98: Click File, Properties, Details, Add Port. If your printer in the list, click Add Adapter, and then follow the instructions...
... can print from any port (LPT, COM, or FILE) for the software. (Hint: Do a custom install to add network support, and select TCP/IP.) 2 Create a printer object on the IP network. d Select any Windows 95, Windows 98 or Windows NT workstation directly to a Lexmark printer located anywhere on the workstation: a Click Start, Settings, Printers, Add Printer. b Windows 95/98: Click File, Properties, Details, Add Port. If your printer in the list, click Add Adapter, and then follow the instructions...
Setup Guide (1.4 MB)
Page 30
... the file servers. Novell NetWare NDPS (Novell Distributed Print Services) If you have Lexmark printers in to the NetWare server. To find the new network printer. MarkVision automatically creates all support files and installation procedures from the Lexmark Web site (www.lexmark.com) or from a Windows 95 or Windows 98 workstation running Novell NetWare Client32 software, or from some versions of the Drivers, MarkVision and Utilities CD. Note: The default login name...
... the file servers. Novell NetWare NDPS (Novell Distributed Print Services) If you have Lexmark printers in to the NetWare server. To find the new network printer. MarkVision automatically creates all support files and installation procedures from the Lexmark Web site (www.lexmark.com) or from a Windows 95 or Windows 98 workstation running Novell NetWare Client32 software, or from some versions of the Drivers, MarkVision and Utilities CD. Note: The default login name...
Setup Guide (1.4 MB)
Page 31
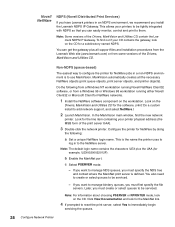
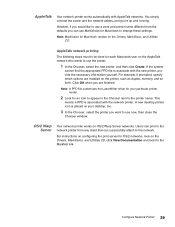
... Chooser window. Users can print to the network printer from the defaults you are installed on OS/2 Warp Server networks. AppleTalk Your network printer works automatically with AppleTalk networks. Configure Network Printer 29 Click OK when you can successfully attach to the printer name. A new desktop printer icon is associated with the new printer, provide the necessary information yourself. However, if you 're up and running. You simply connect the power and the network cables...
... Chooser window. Users can print to the network printer from the defaults you are installed on OS/2 Warp Server networks. AppleTalk Your network printer works automatically with AppleTalk networks. Configure Network Printer 29 Click OK when you can successfully attach to the printer name. A new desktop printer icon is associated with the new printer, provide the necessary information yourself. However, if you 're up and running. You simply connect the power and the network cables...
Setup Guide (1.4 MB)
Page 33
... is a feature or option, this statement applies only when that this product: • Is manufactured from new parts, or new and serviceable used with the product. For products no longer covered by a Lexmark warranty, technical support may be required to the Remarketer or Lexmark, or ship it was originally purchased for your use, and not for repair without charge. Optra T Laser Printers This Statement of...
... is a feature or option, this statement applies only when that this product: • Is manufactured from new parts, or new and serviceable used with the product. For products no longer covered by a Lexmark warranty, technical support may be required to the Remarketer or Lexmark, or ship it was originally purchased for your use, and not for repair without charge. Optra T Laser Printers This Statement of...
Setup Guide (1.4 MB)
Page 34
... other than Lexmark or a Lexmark authorized servicer • operation of a product beyond the limit of Limited Warranty, you may not apply to you advise Lexmark or a Remarketer of the possibility of materials supplied to Lexmark. You may also have installed a maintenance kit as specified (if applicable) • use of printing media outside of Lexmark specifications • use of other than Lexmark supplies (such as toner cartridges, inkjet cartridges, and ribbons...
... other than Lexmark or a Lexmark authorized servicer • operation of a product beyond the limit of Limited Warranty, you may not apply to you advise Lexmark or a Remarketer of the possibility of materials supplied to Lexmark. You may also have installed a maintenance kit as specified (if applicable) • use of printing media outside of Lexmark specifications • use of other than Lexmark supplies (such as toner cartridges, inkjet cartridges, and ribbons...

