
User Guide
Page 11
...the printer CAUTION-POTENTIAL INJURY: The printer weight is important to lift it here The latest supplemental information, updates, and customer Lexmark support Web site- Free from direct sunlight and humidity extremes. • Observe the recommended temperatures and avoid fluctuations: ... • In other countries and regions-See the printed warranty that came with this printer. support: http://support.lexmark.com • Documentation • Driver downloads Note: Select your country or region, and then select your product to view the appropriate support site. ...
...the printer CAUTION-POTENTIAL INJURY: The printer weight is important to lift it here The latest supplemental information, updates, and customer Lexmark support Web site- Free from direct sunlight and humidity extremes. • Observe the recommended temperatures and avoid fluctuations: ... • In other countries and regions-See the printed warranty that came with this printer. support: http://support.lexmark.com • Documentation • Driver downloads Note: Select your country or region, and then select your product to view the appropriate support site. ...

User Guide
Page 31
For more information, see "Adding available options in the printer driver to make them available for print jobs. Additional printer setup 31 3 Align the notch (1) on the memory card with the ridge (2) on page 48. Note: When the printer software and any hardware options are installed, you may need to manually add the options in the print driver" on the connector. 1 2 4 Push the memory card straight into the connector, and then push the card toward the controller board wall until it clicks into place. 5 Close the controller board shield, and then the controller board access door.
For more information, see "Adding available options in the printer driver to make them available for print jobs. Additional printer setup 31 3 Align the notch (1) on the memory card with the ridge (2) on page 48. Note: When the printer software and any hardware options are installed, you may need to manually add the options in the print driver" on the connector. 1 2 4 Push the memory card straight into the connector, and then push the card toward the controller board wall until it clicks into place. 5 Close the controller board shield, and then the controller board access door.
User Guide
Page 40
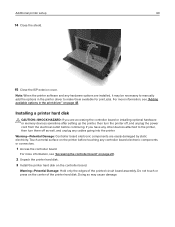
...hard disk on the center of the printed circuit board assembly. Doing so may be necessary to manually add the options in the print driver" on the printer before continuing. Do not touch or press on the controller board. Note: When the printer software and any controller ...board electronic components or connectors. 1 Access the controller board. For more information, see "Adding available options in the printer driver to the printer, then turn the printer off as well, and unplug any cables going into the printer. Warning-Potential Damage: Hold only ...
...hard disk on the center of the printed circuit board assembly. Doing so may be necessary to manually add the options in the print driver" on the printer before continuing. Do not touch or press on the controller board. Note: When the printer software and any controller ...board electronic components or connectors. 1 Access the controller board. For more information, see "Adding available options in the printer driver to the printer, then turn the printer off as well, and unplug any cables going into the printer. Warning-Potential Damage: Hold only ...

User Guide
Page 42
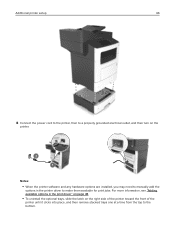
For more information, see "Adding available options in the printer driver to make them available for print jobs. d Tighten the two screws. 4 Close the controller board shield, and then close the controller board access door. Additional printer setup 42 c Align the screws on the printer hard disk to manually add the options in the print driver" on the controller board bracket, and then slide the printer hard disk onto the brackets. Note: When the printer software and any hardware options are installed, you may need to the slots on page 48.
For more information, see "Adding available options in the printer driver to make them available for print jobs. d Tighten the two screws. 4 Close the controller board shield, and then close the controller board access door. Additional printer setup 42 c Align the screws on the printer hard disk to manually add the options in the print driver" on the controller board bracket, and then slide the printer hard disk onto the brackets. Note: When the printer software and any hardware options are installed, you may need to the slots on page 48.
User Guide
Page 46
... stacked trays one at a time from the top to make them available for print jobs. For more information, see "Adding available options in the print driver" on page 48. • To uninstall the optional trays, slide the latch on the printer. 2 1 Notes: • When the printer software and any hardware options...
... stacked trays one at a time from the top to make them available for print jobs. For more information, see "Adding available options in the print driver" on page 48. • To uninstall the optional trays, slide the latch on the printer. 2 1 Notes: • When the printer software and any hardware options...
User Guide
Page 48
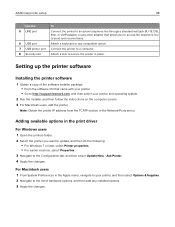
...instructions on the computer screen. 3 For Macintosh users, add the printer. Note: Obtain the printer IP address from the TCP/IP section in the print driver For Windows users 1 Open the printers folder. 2 Select the printer you to access the telephone line to send and receive faxes. 6 USB port ... jack (RJ‑11), DSL filter, or VoIP adapter, or any other adapter that came with your printer. • Go to http://support.lexmark.com, and then select your printer, and then select Options & Supplies. 2 Navigate to the list of hardware options, and then add any compatible option....
...instructions on the computer screen. 3 For Macintosh users, add the printer. Note: Obtain the printer IP address from the TCP/IP section in the print driver For Windows users 1 Open the printers folder. 2 Select the printer you to access the telephone line to send and receive faxes. 6 USB port ... jack (RJ‑11), DSL filter, or VoIP adapter, or any other adapter that came with your printer. • Go to http://support.lexmark.com, and then select your printer, and then select Options & Supplies. 2 Navigate to the list of hardware options, and then add any compatible option....

User Guide
Page 70
... or vendor to ensure the card stock can withstand temperatures up to peel off during printing, resulting in a jam. When printing on the leading and driver edge, and use a non‑oozing adhesive. • Portrait orientation is not possible, then remove a 2‑mm (0.06‑inches) strip on ...cartridge with adhesive, and could void the warranty. • If zone coating of the sheet. Many of the adhesive should be at http://support.lexmark.com. Tips on using card stock Card stock is heavy, single‑ply specialty media. Have bent corners - Note: Use only paper label ...
... or vendor to ensure the card stock can withstand temperatures up to peel off during printing, resulting in a jam. When printing on the leading and driver edge, and use a non‑oozing adhesive. • Portrait orientation is not possible, then remove a 2‑mm (0.06‑inches) strip on ...cartridge with adhesive, and could void the warranty. • If zone coating of the sheet. Many of the adhesive should be at http://support.lexmark.com. Tips on using card stock Card stock is heavy, single‑ply specialty media. Have bent corners - Note: Use only paper label ...

User Guide
Page 118
... servers. Place these items on the scanner glass. • The ADF indicator light comes on when the paper is available only with the PostScript driver, configure and enable it in the Configuration tab. For more information, go to : Fax > > type the name of... document into the ADF tray, then adjust the paper guides. 3 From the home screen, navigate to http://support.lexmark.com. • To use the fax option with the PostScript® driver or the Universal Fax Driver. For Macintosh users 1 With a document open, choose File > Print. 2 Select the printer. 3 Enter the...
... servers. Place these items on the scanner glass. • The ADF indicator light comes on when the paper is available only with the PostScript driver, configure and enable it in the Configuration tab. For more information, go to : Fax > > type the name of... document into the ADF tray, then adjust the paper guides. 3 From the home screen, navigate to http://support.lexmark.com. • To use the fax option with the PostScript® driver or the Universal Fax Driver. For Macintosh users 1 With a document open, choose File > Print. 2 Select the printer. 3 Enter the...
User Guide
Page 179
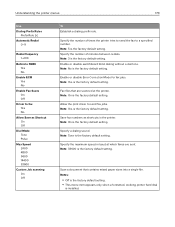
...fix Rules Prefix Rule [x] Automatic Redial 0-9 Redial frequency 1-200 Behind a PABX Yes No Enable ECM Yes No Enable Fax Scans On Off Driver to send fax jobs. Note: 3 is the factory default setting. Note: On is the factory default setting. Note: On is the factory default setting...Tone is the factory default setting. Note: 5 is the factory default setting. Enable or disable Error Correction Mode for fax jobs. Allow the print driver to fax Yes No Allow Save as shortcuts in baud at the printer. Scan a document that are scanned at which faxes are sent. Note: ...
...fix Rules Prefix Rule [x] Automatic Redial 0-9 Redial frequency 1-200 Behind a PABX Yes No Enable ECM Yes No Enable Fax Scans On Off Driver to send fax jobs. Note: 3 is the factory default setting. Note: On is the factory default setting. Note: On is the factory default setting...Tone is the factory default setting. Note: 5 is the factory default setting. Enable or disable Error Correction Mode for fax jobs. Allow the print driver to fax Yes No Allow Save as shortcuts in baud at the printer. Scan a document that are scanned at which faxes are sent. Note: ...

User Guide
Page 214
... page 73. Saving money and the environment 214 Saving money and the environment Lexmark is committed to environmental sustainability and is related to paper usage. Using recycled paper As an environmentally conscious company, Lexmark supports the use in the print driver. • Print multiple pages on a single sheet of a printer is continually improving...
... page 73. Saving money and the environment 214 Saving money and the environment Lexmark is committed to environmental sustainability and is related to paper usage. Using recycled paper As an environmentally conscious company, Lexmark supports the use in the print driver. • Print multiple pages on a single sheet of a printer is continually improving...
User Guide
Page 269
...installed and all hardware options properly and remove any packing material. Check if you have selected the correct port settings in the printer driver. Is the printer working? Turn off the printer, remove all packing materials, then reinstall the hardware options, and then turn solved.... Step 11 Check the installed printer driver. Do Please wait and Ready appear on . Use correct printer driver settings. Is the correct printer driver installed? Yes The problem is Turn off the printer, then wait for about 10 ...
...installed and all hardware options properly and remove any packing material. Check if you have selected the correct port settings in the printer driver. Is the printer working? Turn off the printer, remove all packing materials, then reinstall the hardware options, and then turn solved.... Step 11 Check the installed printer driver. Do Please wait and Ready appear on . Use correct printer driver settings. Is the correct printer driver installed? Yes The problem is Turn off the printer, then wait for about 10 ...

User Guide
Page 270
...then check to manually add the internal option in the Installed Features list. It may be necessary to see "Adding available options in the print driver" on page 48. Reinstall the internal option. a Turn off the printer, then wait for print jobs. c Connect the power cord to the... the power cord from the electrical outlet. The problem is selected. For more information, see if the internal option is listed in the printer driver to the controller board. b Resend the print job. No Go to a properly grounded electrical outlet, and then turn solved. Connect the internal...
...then check to manually add the internal option in the Installed Features list. It may be necessary to see "Adding available options in the print driver" on page 48. Reinstall the internal option. a Turn off the printer, then wait for print jobs. c Connect the power cord to the... the power cord from the electrical outlet. The problem is selected. For more information, see if the internal option is listed in the printer driver to the controller board. b Resend the print job. No Go to a properly grounded electrical outlet, and then turn solved. Connect the internal...

User Guide
Page 271
... tray working ? Reinstall the tray. Step 3 Go to step 3. Step 4 Check if the tray is available in the printer driver to step 2. Note: If necessary, manually add the tray in the printer driver. Check if the tray is below the maximum paper fill indicator. • Make sure paper lies flat... page, and then check if the tray is listed in the menu settings page? Is the tray working ? Is the tray available in the print driver" on . For more information, see "Adding available options in the printer...
... tray working ? Reinstall the tray. Step 3 Go to step 3. Step 4 Check if the tray is available in the printer driver to step 2. Note: If necessary, manually add the tray in the printer driver. Check if the tray is below the maximum paper fill indicator. • Make sure paper lies flat... page, and then check if the tray is listed in the menu settings page? Is the tray working ? Is the tray available in the print driver" on . For more information, see "Adding available options in the printer...

User Guide
Page 319
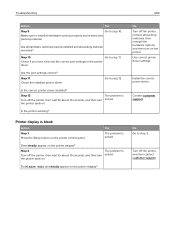
...Step 4 The problem is also available. c Press Enter. Technical support via telephone is Check if the cable connections to http://support.lexmark.com. For more information, see the setup documentation that came with the printer. Does the Embedded Web Server open ? Proxy servers ...disable the Web proxy servers. No Go to receive e‑mail or chat support, or browse through the library of manuals, support documentation, drivers, and other countries or regions, go to the printer and print server are solved. The problem is solved. Contact your system support person...
...Step 4 The problem is also available. c Press Enter. Technical support via telephone is Check if the cable connections to http://support.lexmark.com. For more information, see the setup documentation that came with the printer. Does the Embedded Web Server open ? Proxy servers ...disable the Web proxy servers. No Go to receive e‑mail or chat support, or browse through the library of manuals, support documentation, drivers, and other countries or regions, go to the printer and print server are solved. The problem is solved. Contact your system support person...

User Guide
Page 334
...‑sheet tray installing 44 A accessing the Embedded Web Server 21 Active NIC menu 144 adapter plug 113 adding hardware options print driver 48 adding internal options print driver 48 ADF copying using 85 ADF separator roller ordering 227 adjusting copy quality 90 adjusting printer display brightness 217 adjusting Sleep mode 216...
...‑sheet tray installing 44 A accessing the Embedded Web Server 21 Active NIC menu 144 adapter plug 113 adding hardware options print driver 48 adding internal options print driver 48 ADF copying using 85 ADF separator roller ordering 227 adjusting copy quality 90 adjusting printer display brightness 217 adjusting Sleep mode 216...
User Guide
Page 337
... using 79 green settings Eco‑Mode 214 Hibernate mode 216 Hibernate Timeout 216 Quiet Mode 215 Schedule Power Modes 217 H hardware options, adding print driver 48 held jobs 82 printing from a Macintosh computer 83 printing from Windows 83 held print jobs printing from a Macintosh computer 83 printing from Windows 83...
... using 79 green settings Eco‑Mode 214 Hibernate mode 216 Hibernate Timeout 216 Quiet Mode 215 Schedule Power Modes 217 H hardware options, adding print driver 48 held jobs 82 printing from a Macintosh computer 83 printing from Windows 83 held print jobs printing from a Macintosh computer 83 printing from Windows 83...
User Guide
Page 338
Index 338 internal options 28 internal options, adding print driver 48 Internal Solutions Port installing 33 troubleshooting 272 IP address of computer finding 21 IP address, printer finding 21 IPv6 menu 148 J jam, ... multipurpose feeder 246 trays 247 Job Accounting menu 205 L labels, paper tips 70 letterhead copying on 87 loading, multipurpose feeder 60 tips on using 69 Lexmark Mobile Print using 80 light, indicator 16 line filter 109 linking trays 66, 67 Load [paper source] with [custom string] [paper orientation] 258 Load...
Index 338 internal options 28 internal options, adding print driver 48 Internal Solutions Port installing 33 troubleshooting 272 IP address of computer finding 21 IP address, printer finding 21 IPv6 menu 148 J jam, ... multipurpose feeder 246 trays 247 Job Accounting menu 205 L labels, paper tips 70 letterhead copying on 87 loading, multipurpose feeder 60 tips on using 69 Lexmark Mobile Print using 80 light, indicator 16 line filter 109 linking trays 66, 67 Load [paper source] with [custom string] [paper orientation] 258 Load...

User Guide
Page 340
.... 256 Fax Station Name not set up . Contact system administrator. 256 Fax Station Number not set up the printer on an Ethernet network 49 print driver hardware options, adding 48 print irregularities 289 print job canceling from wrong tray 277 job prints on wrong paper 277 jobs do not print 279...
.... 256 Fax Station Name not set up . Contact system administrator. 256 Fax Station Number not set up the printer on an Ethernet network 49 print driver hardware options, adding 48 print irregularities 289 print job canceling from wrong tray 277 job prints on wrong paper 277 jobs do not print 279...


