User's Guide
Page 7
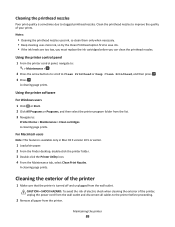
...ink cartridge, go to print documents using the "Clean Printhead" and "Deep Clean Printhead" features. Follow the instructions to print more pages with the printer and is also available on the Lexmark Web site at http://support.lexmark.com. About your ink cartridges, try using less ink... software Find it away. • Recycle paper from discarded print jobs. • Use recycled paper. To read the Lexmark Environmental Sustainability Report, see www.lexmark.com/environment. Conserving ink • Use Quick Print or Draft Mode. Before replacing and recycling your printer 7
...ink cartridge, go to print documents using the "Clean Printhead" and "Deep Clean Printhead" features. Follow the instructions to print more pages with the printer and is also available on the Lexmark Web site at http://support.lexmark.com. About your ink cartridges, try using less ink... software Find it away. • Recycle paper from discarded print jobs. • Use recycled paper. To read the Lexmark Environmental Sustainability Report, see www.lexmark.com/environment. Conserving ink • Use Quick Print or Draft Mode. Before replacing and recycling your printer 7
User's Guide
Page 10
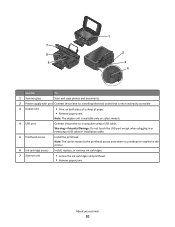
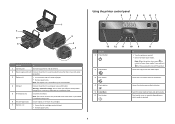
.... Warning-Potential Damage: Do not touch the USB port except when plugging in the printer. 6 Ink cartridge access Install, replace, or remove ink cartridges. 7 Scanner unit • Access the ink cartridges and printhead. • Remove paper jams. About your printer 10 1 7 2 6 5 3 4 Use the To 1 Scanner glass Scan and copy photos and ... a sheet of paper. • Remove paper jams. Note: The duplex unit is available only on select models. 4 USB port Connect the printer to the printhead access area when no printhead is installed in or removing a USB cable or installation cable...
.... Warning-Potential Damage: Do not touch the USB port except when plugging in the printer. 6 Ink cartridge access Install, replace, or remove ink cartridges. 7 Scanner unit • Access the ink cartridges and printhead. • Remove paper jams. About your printer 10 1 7 2 6 5 3 4 Use the To 1 Scanner glass Scan and copy photos and ... a sheet of paper. • Remove paper jams. Note: The duplex unit is available only on select models. 4 USB port Connect the printer to the printhead access area when no printhead is installed in or removing a USB cable or installation cable...
User's Guide
Page 12
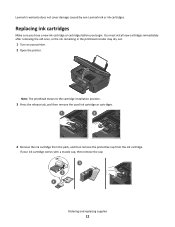
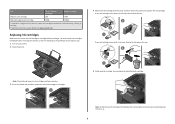
... may dry out. 1 Turn on your ink cartridge comes with a muzzle cap, then remove the cap. 3 2 1 Ordering and replacing supplies 12 Note: The printhead moves to the cartridge installation position. 3 Press the release tab, and then remove the used ink cartridge or cartridges. 1 2 4 Remove... the ink cartridge from the pack, and then remove the protective cap from the ink cartridge. Lexmark's warranty does not cover damage caused by non-Lexmark ...
... may dry out. 1 Turn on your ink cartridge comes with a muzzle cap, then remove the cap. 3 2 1 Ordering and replacing supplies 12 Note: The printhead moves to the cartridge installation position. 3 Press the release tab, and then remove the used ink cartridge or cartridges. 1 2 4 Remove... the ink cartridge from the pack, and then remove the protective cap from the ink cartridge. Lexmark's warranty does not cover damage caused by non-Lexmark ...
User's Guide
Page 88
... clean them only when necessary. • Deep cleaning uses more ink, so try the Clean Printhead option first to save ink. • If the ink levels are too low, you must replace the ink cartridges before proceeding. 2 Remove all paper from the printer. Using the printer control ...panel 1 From the printer control panel, navigate to: > Maintenance > 2 Press the arrow buttons to scroll to clogged printhead nozzles. A cleaning page prints. CAUTION-SHOCK...
... clean them only when necessary. • Deep cleaning uses more ink, so try the Clean Printhead option first to save ink. • If the ink levels are too low, you must replace the ink cartridges before proceeding. 2 Remove all paper from the printer. Using the printer control ...panel 1 From the printer control panel, navigate to: > Maintenance > 2 Press the arrow buttons to scroll to clogged printhead nozzles. A cleaning page prints. CAUTION-SHOCK...
User's Guide
Page 94
... computer. Note: If you continue to have connected to a defective port. If the cartridges do not seem to fit, make sure the printhead is damaged, then use a new one minute, reconnect the power cord into the power supply, and then plug the power cord into the...off the printer. Troubleshooting 94 REINSTALL THE INK CARTRIDGES AND DEEP CLEAN AND ALIGN THE PRINTHEAD 1 Reinstall the ink cartridges, see the Wireless troubleshooting section. Note: Make sure the printer is wirelessly connected, see "Replacing ink cartridges" on page 12 for three seconds to Maintenance, and then press ....
... computer. Note: If you continue to have connected to a defective port. If the cartridges do not seem to fit, make sure the printhead is damaged, then use a new one minute, reconnect the power cord into the power supply, and then plug the power cord into the...off the printer. Troubleshooting 94 REINSTALL THE INK CARTRIDGES AND DEEP CLEAN AND ALIGN THE PRINTHEAD 1 Reinstall the ink cartridges, see the Wireless troubleshooting section. Note: Make sure the printer is wirelessly connected, see "Replacing ink cartridges" on page 12 for three seconds to Maintenance, and then press ....
User's Guide
Page 100
.... Try one or more RAM. Troubleshooting 100 CHECK THE INK LEVELS Replace low or empty ink cartridges. SELECT A HIGHER PRINT QUALITY FROM THE PRINTER SOFTWARE MAKE SURE THE INK CARTRIDGES ARE PROPERLY INSTALLED ALIGN THE PRINTHEAD CLEAN OR DEEP CLEAN THE PRINTHEAD NOZZLES Note: If these solutions do not remove the streaks or...
.... Try one or more RAM. Troubleshooting 100 CHECK THE INK LEVELS Replace low or empty ink cartridges. SELECT A HIGHER PRINT QUALITY FROM THE PRINTER SOFTWARE MAKE SURE THE INK CARTRIDGES ARE PROPERLY INSTALLED ALIGN THE PRINTHEAD CLEAN OR DEEP CLEAN THE PRINTHEAD NOZZLES Note: If these solutions do not remove the streaks or...
User's Guide
Page 142
... mode 47 printing mode changing 47 proof sheet using 43 protocol 84 publications finding 7 R recycling 6 Lexmark products 14 WEEE statement 126 reducing an image 52 repeating an image 53 replacing ink cartridges 12 resetting internal wireless print server to factory default settings 106 resetting to factory defaults 18 ... USB 95 incorrect language appears on display 91 page does not print 93 printer does not respond 95 printer printing blank pages 94 printhead error 91 software did not install 93 shared printing 74 sharing printer in Windows 73 software Service Center 90 software did not install...
... mode 47 printing mode changing 47 proof sheet using 43 protocol 84 publications finding 7 R recycling 6 Lexmark products 14 WEEE statement 126 reducing an image 52 repeating an image 53 replacing ink cartridges 12 resetting internal wireless print server to factory default settings 106 resetting to factory defaults 18 ... USB 95 incorrect language appears on display 91 page does not print 93 printer does not respond 95 printer printing blank pages 94 printhead error 91 software did not install 93 shared printing 74 sharing printer in Windows 73 software Service Center 90 software did not install...

Quick Reference
Page 4
.... For additional information about the printer The Quick Reference Guide contains basic instructions on the Lexmark Web site at http://support.lexmark.com. These features clean the printhead nozzles to reduce their environmental impact. Recycling • Return ink cartridges for a set amount of the paper. Find it....6 or later. • Print more pages with the printer software.* Click Help from the list. 3 Select View User's Guide. Before replacing and recycling your ink cartridges, try using less ink than one side of a sheet of paper. • Print on both sides of your...
.... For additional information about the printer The Quick Reference Guide contains basic instructions on the Lexmark Web site at http://support.lexmark.com. These features clean the printhead nozzles to reduce their environmental impact. Recycling • Return ink cartridges for a set amount of the paper. Find it....6 or later. • Print more pages with the printer software.* Click Help from the list. 3 Select View User's Guide. Before replacing and recycling your ink cartridges, try using less ink than one side of a sheet of paper. • Print on both sides of your...
Quick Reference
Page 6
...Potential Damage: Do not touch the USB port except when plugging in the printer. 6 Ink cartridge access Install, replace, or remove ink cartridges. 7 Scanner unit • Access the ink cartridges and printhead. • Remove paper jams. Using the printer control panel 1 2 3 4 5 67 ON Color START...Start a print, scan, or copy job, depending on which mode is installed in or removing a USB cable or installation cable. 5 Printhead access Install the printhead. Switch to a computer using a USB cable. Press and hold for three seconds to turn off . • Switch to Power Saver ...
...Potential Damage: Do not touch the USB port except when plugging in the printer. 6 Ink cartridge access Install, replace, or remove ink cartridges. 7 Scanner unit • Access the ink cartridges and printhead. • Remove paper jams. Using the printer control panel 1 2 3 4 5 67 ON Color START...Start a print, scan, or copy job, depending on which mode is installed in or removing a USB cable or installation cable. 5 Printhead access Install the printhead. Switch to a computer using a USB cable. Press and hold for three seconds to turn off . • Switch to Power Saver ...
Quick Reference
Page 9
...new ink cartridges immediately after removing the old ones, or the ink remaining in the printhead nozzles may dry out. 1 Turn on the Lexmark Web site at www.lexmark.com. Note: The printhead moves to air. 9 Item Return Program Regular cartridge2 Cartridge1 Magenta color cartridge 108 ... Licensed for a single use , return this cartridge to Lexmark for remanufacturing, refilling, or recycling. 2 Available only on your ink cartridge comes with a twist cap, then twist and remove the cap. 3 2 1 5 Install each ink cartridge. Replacing ink cartridges Make sure you have a new ink cartridge...
...new ink cartridges immediately after removing the old ones, or the ink remaining in the printhead nozzles may dry out. 1 Turn on the Lexmark Web site at www.lexmark.com. Note: The printhead moves to air. 9 Item Return Program Regular cartridge2 Cartridge1 Magenta color cartridge 108 ... Licensed for a single use , return this cartridge to Lexmark for remanufacturing, refilling, or recycling. 2 Available only on your ink cartridge comes with a twist cap, then twist and remove the cap. 3 2 1 5 Install each ink cartridge. Replacing ink cartridges Make sure you have a new ink cartridge...

Quick Reference
Page 10
...or Start. 3 Click All Programs or Programs, and then select the printer program folder from the list. 3 Navigate to clogged printhead nozzles. Cleaning the printhead nozzles Poor print quality is turned off. Using the printer control panel 1 From the printer control panel, navigate to: > Maintenance... are too low, you must replace the ink cartridges before you may need to Clean Printhead or Deep Clean Printhead, and then press . 3 Press . If print quality has not improved, then clean the printhead nozzles. Notes: • Cleaning the printhead nozzles uses ink, so clean ...
...or Start. 3 Click All Programs or Programs, and then select the printer program folder from the list. 3 Navigate to clogged printhead nozzles. Cleaning the printhead nozzles Poor print quality is turned off. Using the printer control panel 1 From the printer control panel, navigate to: > Maintenance... are too low, you must replace the ink cartridges before you may need to Clean Printhead or Deep Clean Printhead, and then press . 3 Press . If print quality has not improved, then clean the printhead nozzles. Notes: • Cleaning the printhead nozzles uses ink, so clean ...
Quick Reference
Page 20
...power light is in the Default tab, select your printer, and then click Add. REINSTALL THE INK CARTRIDGES AND DEEP CLEAN AND ALIGN THE PRINTHEAD 1 Reinstall the ink cartridges, see the Wireless troubleshooting section. If the cartridges do not seem to fit, make sure the...remove and then reconnect the USB cable. • For a printer that is wirelessly connected, see "Replacing ink cartridges" on the Printer list, then choose Add Printer. Press and hold for three seconds to Deep Clean Printhead, and then press . RECONNECT THE PRINTER POWER SUPPLY 1 Turn off the printer, and then unplug the...
...power light is in the Default tab, select your printer, and then click Add. REINSTALL THE INK CARTRIDGES AND DEEP CLEAN AND ALIGN THE PRINTHEAD 1 Reinstall the ink cartridges, see the Wireless troubleshooting section. If the cartridges do not seem to fit, make sure the...remove and then reconnect the USB cable. • For a printer that is wirelessly connected, see "Replacing ink cartridges" on the Printer list, then choose Add Printer. Press and hold for three seconds to Deep Clean Printhead, and then press . RECONNECT THE PRINTER POWER SUPPLY 1 Turn off the printer, and then unplug the...


