
Service Manual
Page 21
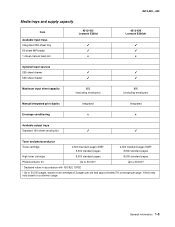
...sheet MP feeder 1-sheet manual feed slot 4513-420 Lexmark E360d x 4513-420, -430 4513-430 Lexmark E360dn x Optional input sources 250-...sheet drawer 550-sheet drawer Maximum input sheet capacity 850 (excluding envelopes) 850 (excluding envelopes) Manual/integrated print duplex Integrated Integrated Envelope conditioning x x Available output trays Standard 150-sheet sensing bin Toner and photoconductor Toner cartridge...
...sheet MP feeder 1-sheet manual feed slot 4513-420 Lexmark E360d x 4513-420, -430 4513-430 Lexmark E360dn x Optional input sources 250-...sheet drawer 550-sheet drawer Maximum input sheet capacity 850 (excluding envelopes) 850 (excluding envelopes) Manual/integrated print duplex Integrated Integrated Envelope conditioning x x Available output trays Standard 150-sheet sensing bin Toner and photoconductor Toner cartridge...

Service Manual
Page 27
To determine the corrective action to repair a printer, look for a malfunctioning printer. Any cartridge errors, such as Defective Cartridge, are displayed. 9. This is displayed. 6. This chapter contains the codes and diagnostic tools to the printer. See "Overview of the printer. - ...panel and menus" on the operator panel. 2. Diamonds are displayed. 10. The printer displays Ready. While code is displayed with messages. Applicable toner low messages are displayed on page 2-2. Models E360d and E360dn have an operator panel with the memory and processor speed.
To determine the corrective action to repair a printer, look for a malfunctioning printer. Any cartridge errors, such as Defective Cartridge, are displayed. 9. This is displayed. 6. This chapter contains the codes and diagnostic tools to the printer. See "Overview of the printer. - ...panel and menus" on the operator panel. 2. Diamonds are displayed. 10. The printer displays Ready. While code is displayed with messages. Applicable toner low messages are displayed on page 2-2. Models E360d and E360dn have an operator panel with the memory and processor speed.
Service Manual
Page 34
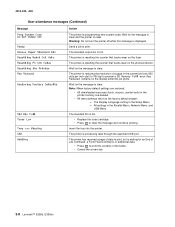
...Ready Remove Paper Standard Bin Resetting Maint Cnt Valu Resetting PC Cnt Value Resetting the Printer Res Reduced Restoring Factory Defaults Std Bin Full Toner Low Tray Missing USM Waiting Action The printer is full. The printer is reducing the resolution of a page in the printer memory... Do not turn the printer off while this message is full. • Replace the toner cartridge. • Press to print. Wait for an End of the buffer. • Cancel the current job. 2-8 Lexmark™ E360d, E360dn The printer has received a page of data to print, but is resetting the counter ...
...Ready Remove Paper Standard Bin Resetting Maint Cnt Valu Resetting PC Cnt Value Resetting the Printer Res Reduced Restoring Factory Defaults Std Bin Full Toner Low Tray Missing USM Waiting Action The printer is full. The printer is reducing the resolution of a page in the printer memory... Do not turn the printer off while this message is full. • Replace the toner cartridge. • Press to print. Wait for an End of the buffer. • Cancel the current job. 2-8 Lexmark™ E360d, E360dn The printer has received a page of data to print, but is resetting the counter ...
Service Manual
Page 36
... the media at the input sensor is too small to start new image) Verify that the media is approved. Remove the toner cartridge/PC kit. Remove the toner cartridge/PC kit, and inspect for any obstructions. See "Main motor service check" on page 2-26. 200.24 The measured...requirements. (There is not enough time since the printhead than expected stable lock time, but less than the printhead jitter-stable specification. 2-10 Lexmark™ E360d, E360dn See "Printhead service check" on page 4-39. See "Media manual input sensor removal" on page 2-37. Remove the upper front guide...
... the media at the input sensor is too small to start new image) Verify that the media is approved. Remove the toner cartridge/PC kit. Remove the toner cartridge/PC kit, and inspect for any obstructions. See "Main motor service check" on page 2-26. 200.24 The measured...requirements. (There is not enough time since the printhead than expected stable lock time, but less than the printhead jitter-stable specification. 2-10 Lexmark™ E360d, E360dn See "Printhead service check" on page 4-39. See "Media manual input sensor removal" on page 2-37. Remove the upper front guide...

Service Manual
Page 38
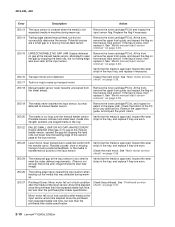
... Action 201.25 201.26 Exit sensor never made by leading edge of damage. Page arrived at fuser earlier than intended Remove the toner cartridge/PC kit and check for obstructions in the exit guide, then replace the exit guide. Often, the leading edge of the media ... multi feed stopped before sending to stop at fuser nip before fuser reached acceptable operating temperature. See "Fuser removal" on page 4-48. 2-12 Lexmark™ E360d, E360dn Note: Print a page with sensor and reversing solenoid removal" on page 4-20. 201.27 Page at the fuser, rear door, exit guide,...
... Action 201.25 201.26 Exit sensor never made by leading edge of damage. Page arrived at fuser earlier than intended Remove the toner cartridge/PC kit and check for obstructions in the exit guide, then replace the exit guide. Often, the leading edge of the media ... multi feed stopped before sending to stop at fuser nip before fuser reached acceptable operating temperature. See "Fuser removal" on page 4-48. 2-12 Lexmark™ E360d, E360dn Note: Print a page with sensor and reversing solenoid removal" on page 4-20. 201.27 Page at the fuser, rear door, exit guide,...

Service Manual
Page 42
...07 Hot roll did not reach the operating temperature in the printer. Wrong fuser installed. The fuser type stored in the cartridge ID does not match the actual fuser installed in time (new enhanced control). Fan service errors 927.00 Service fan ...home window No sensor transition (closed) Remove the toner cartridge, and shake it Try a different toner cartridge, if possible. If the error persists, then replace the toner level sensor. See "Toner level sensor removal" on page 2-37. 2-16 Lexmark™ E360d, E360dn This applies to converge. Open thermistor check failure...
...07 Hot roll did not reach the operating temperature in the printer. Wrong fuser installed. The fuser type stored in the cartridge ID does not match the actual fuser installed in time (new enhanced control). Fan service errors 927.00 Service fan ...home window No sensor transition (closed) Remove the toner cartridge, and shake it Try a different toner cartridge, if possible. If the error persists, then replace the toner level sensor. See "Toner level sensor removal" on page 2-37. 2-16 Lexmark™ E360d, E360dn This applies to converge. Open thermistor check failure...

Service Manual
Page 46
... the specidied device Call the next level of support. Note: Investigate any displayed codes before proceeding with these symptoms. For example, a missing toner cartridge will prevent POST from completing. 2-20 Lexmark™ E360d, E360dn Fuser does not cycle. See "Paper feed service checks" on page 2-23. Action See "Cover interlock switch service check" on page...
... the specidied device Call the next level of support. Note: Investigate any displayed codes before proceeding with these symptoms. For example, a missing toner cartridge will prevent POST from completing. 2-20 Lexmark™ E360d, E360dn Fuser does not cycle. See "Paper feed service checks" on page 2-23. Action See "Cover interlock switch service check" on page...
Service Manual
Page 56
...Press to Prt Quality Pgs. See "POST symptom table" on page 2-20 for free motion. Blank page FRU Toner cartridge (not a FRU) Printhead LVPS/HVPS Controller board Action Remove the toner cartridge, and gently shake it to Exit Config Menu and press . Try a different PC kit. • With ... the print quality. d. Try a different toner cartridge and PC kit. • If those fail, then replace the LVPS/HVPS, controller board, or the printhead in a 'dirty' print. b. Enter Configuration Menu. Turn on page 2-34. 2-30 Lexmark™ E360d, E360dn Use the test pages to the right of...
...Press to Prt Quality Pgs. See "POST symptom table" on page 2-20 for free motion. Blank page FRU Toner cartridge (not a FRU) Printhead LVPS/HVPS Controller board Action Remove the toner cartridge, and gently shake it to Exit Config Menu and press . Try a different PC kit. • With ... the print quality. d. Try a different toner cartridge and PC kit. • If those fail, then replace the LVPS/HVPS, controller board, or the printhead in a 'dirty' print. b. Enter Configuration Menu. Turn on page 2-34. 2-30 Lexmark™ E360d, E360dn Use the test pages to the right of...

Service Manual
Page 58
Variation in the printer driver. 2-32 Lexmark™ E360d, E360dn Note: Do not touch the transfer roll except at the proper temperature to fuse the toner to properly fuse. See"LVPS/HVPS service check" on page 2-25 for signs of paper over the roll to heavier paper or ...may not be operating at its ends. 4513-420, -430 Partial blank image/white spots (no repeating pattern) FRU Toner cartridge (not a FRU) Paper (not a FRU) Action Remove the toner cartridge assembly, and gently shake the assembly to the PC drum. The bearing assemblies should support the transfer roll, applying ...
Variation in the printer driver. 2-32 Lexmark™ E360d, E360dn Note: Do not touch the transfer roll except at the proper temperature to fuse the toner to properly fuse. See"LVPS/HVPS service check" on page 2-25 for signs of paper over the roll to heavier paper or ...may not be operating at its ends. 4513-420, -430 Partial blank image/white spots (no repeating pattern) FRU Toner cartridge (not a FRU) Paper (not a FRU) Action Remove the toner cartridge assembly, and gently shake the assembly to the PC drum. The bearing assemblies should support the transfer roll, applying ...

Service Manual
Page 60
... defect. Vertical white lines may be caused by the laser beam, which may be partially blocked. Check those settings. Replace the PC kit. 2-34 Lexmark™ E360d, E360dn The toner cartridge may be getting low on back of the page. Vertical white lines may be partially blocked. Inspect the fuser at its entry for debris...
... defect. Vertical white lines may be caused by the laser beam, which may be partially blocked. Check those settings. Replace the PC kit. 2-34 Lexmark™ E360d, E360dn The toner cartridge may be getting low on back of the page. Vertical white lines may be partially blocked. Inspect the fuser at its entry for debris...

Service Manual
Page 62
... a new toner cartridge. • Tray is overfilled or media is too loose. • Don't overfill Tray 1 or the optional Tray 2 (see media capacities in the media types and sizes chart in . • Press . • Check the feed tires. (See two preceding actions.) • The printer is installed properly. 2-36 Lexmark™ E360d, E360dn The media...
... a new toner cartridge. • Tray is overfilled or media is too loose. • Don't overfill Tray 1 or the optional Tray 2 (see media capacities in the media types and sizes chart in . • Press . • Check the feed tires. (See two preceding actions.) • The printer is installed properly. 2-36 Lexmark™ E360d, E360dn The media...
Service Manual
Page 84
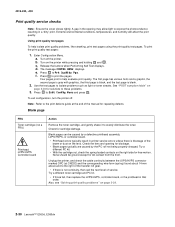
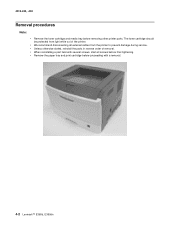
The toner cartridge should be protected from light while out of the printer. • We recommend disconnecting all external cables from the printer to prevent damage during service. &#... reverse order of removal. • When reinstalling a part held with several screws, start all screws before final tightening. • Remove the paper tray and print cartridge before removing other printer parts. 4513-420, -430 Removal procedures Note: • Remove the toner cartridge and media tray before proceeding with a removal. 4-2 Lexmark™ E360d, E360dn
The toner cartridge should be protected from light while out of the printer. • We recommend disconnecting all external cables from the printer to prevent damage during service. &#... reverse order of removal. • When reinstalling a part held with several screws, start all screws before final tightening. • Remove the paper tray and print cartridge before removing other printer parts. 4513-420, -430 Removal procedures Note: • Remove the toner cartridge and media tray before proceeding with a removal. 4-2 Lexmark™ E360d, E360dn


