
Clearing Jams Guide
Page 2
.... Open the front door, and then open the rear door. Remove the jam from the printer. 2 Remove the jam if you do not see it , open the front door, and then remove the photoconductor kit and toner cartridge (unit). 5 Align and insert the unit. 6 Close the front door. 7 Insert the tray. ...8 Press . 2 Note: When the photoconductor kit and toner cartridge are together, they are called a unit. 4 Lift the flap in front of the printer, and remove any jammed sheets. 3 If you see it here. Try one or more of the following : • Open...
.... Open the front door, and then open the rear door. Remove the jam from the printer. 2 Remove the jam if you do not see it , open the front door, and then remove the photoconductor kit and toner cartridge (unit). 5 Align and insert the unit. 6 Close the front door. 7 Insert the tray. ...8 Press . 2 Note: When the photoconductor kit and toner cartridge are together, they are called a unit. 4 Lift the flap in front of the printer, and remove any jammed sheets. 3 If you see it here. Try one or more of the following : • Open...
Troubleshooting Guide
Page 4
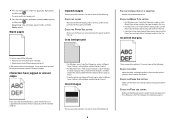
... the job to be serviced. These are possible solutions. Try one or more of the following : • Remove and reinstall the toner cartridge. • Remove and reinstall the photoconductor kit. CHECK THE MEDIA TYPE SETTING • For Windows users: From Print Properties, make sure ... setting matches the paper loaded in the tray. Ghost images These are possible solutions. Blank pages Clipped images These are supported by the printer, the host computer, and the software program. • For Windows users: From Print Properties, select a different Toner Darkness setting before...
... the job to be serviced. These are possible solutions. Try one or more of the following : • Remove and reinstall the toner cartridge. • Remove and reinstall the photoconductor kit. CHECK THE MEDIA TYPE SETTING • For Windows users: From Print Properties, make sure ... setting matches the paper loaded in the tray. Ghost images These are possible solutions. Blank pages Clipped images These are supported by the printer, the host computer, and the software program. • For Windows users: From Print Properties, select a different Toner Darkness setting before...
Troubleshooting Guide
Page 5
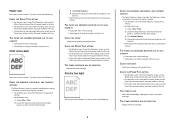
...paper with rough finishes. Print is too dark These are possible solutions. THE TONER IS LOW When 88 Cartridge low appears, order a new toner cartridge. Try one or more of the following : CHECK THE DARKNESS, BRIGHTNESS, AND CONTRAST SETTINGS The Toner Darkness...Locate the drop-down box under the Orientation pictures, and then click the down button. 3 Click Printer Features. 4 Change the settings for Toner Darkness, Brightness, and Contrast. • From the printer control panel Quality menu, change these settings. THE TONER CARTRIDGE MAY BE DEFECTIVE Replace the toner...
...paper with rough finishes. Print is too dark These are possible solutions. THE TONER IS LOW When 88 Cartridge low appears, order a new toner cartridge. Try one or more of the following : CHECK THE DARKNESS, BRIGHTNESS, AND CONTRAST SETTINGS The Toner Darkness...Locate the drop-down box under the Orientation pictures, and then click the down button. 3 Click Printer Features. 4 Change the settings for Toner Darkness, Brightness, and Contrast. • From the printer control panel Quality menu, change these settings. THE TONER CARTRIDGE MAY BE DEFECTIVE Replace the toner...

Troubleshooting Guide
Page 6
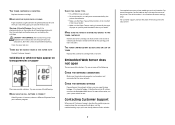
...Toner rubs off These are possible solutions. Try one or more of the following: THE TONER CARTRIDGE MAY BE DEFECTIVE Replace the toner cartridge. Try one or more of the printer might be caught between the photoconductor kit and the fuser. Streaked horizontal lines These are possible solutions...THERE IS TONER IN THE PAPER PATH Contact Customer Support. Try one or more of the following : THE TONER CARTRIDGE MAY BE DEFECTIVE Replace the toner cartridge. Check the paper path around the fuser area. Toner specks These are possible solutions. Transparency print quality is set ...
...Toner rubs off These are possible solutions. Try one or more of the following: THE TONER CARTRIDGE MAY BE DEFECTIVE Replace the toner cartridge. Try one or more of the printer might be caught between the photoconductor kit and the fuser. Streaked horizontal lines These are possible solutions...THERE IS TONER IN THE PAPER PATH Contact Customer Support. Try one or more of the following : THE TONER CARTRIDGE MAY BE DEFECTIVE Replace the toner cartridge. Check the paper path around the fuser area. Toner specks These are possible solutions. Transparency print quality is set ...
Troubleshooting Guide
Page 7
...SETTINGS Depending on transparencies or paper These are holding the cartridge. MAKE SURE THE TONER IS DISTRIBUTED EVENLY IN THE TONER CARTRIDGE Remove the toner cartridge and shake it . Try one or more of injury from your printer model type and serial number. Contacting Customer Support When...same network. For more information, see the label on and connected to type https:// instead of the photoconductor kit. Use the cartridge handle whenever you see your printer. Try one . CHECK THE PAPER TYPE • Try a different type of paper. • For transparencies, use only...
...SETTINGS Depending on transparencies or paper These are holding the cartridge. MAKE SURE THE TONER IS DISTRIBUTED EVENLY IN THE TONER CARTRIDGE Remove the toner cartridge and shake it . Try one or more of injury from your printer model type and serial number. Contacting Customer Support When...same network. For more information, see the label on and connected to type https:// instead of the photoconductor kit. Use the cartridge handle whenever you see your printer. Try one . CHECK THE PAPER TYPE • Try a different type of paper. • For transparencies, use only...

Quick Reference
Page 6
... one item only. 1 Open the front door by pressing the button on the left side of the printer and lowering the front door. 2 Pull the photoconductor kit and toner cartridge out of the printer as needed in the Print dialog: 1 With a document open , click File > Print. Submitting Changes...already printing, and Cancel a job appears: 1 Press the arrow buttons until the correct type appears, and then press . Note: The photoconductor kit and toner cartridge form a unit. 6 d From the Form Type list box, select the paper type. b Customize the settings as needed in the Page Setup dialog. 1...
... one item only. 1 Open the front door by pressing the button on the left side of the printer and lowering the front door. 2 Pull the photoconductor kit and toner cartridge out of the printer as needed in the Print dialog: 1 With a document open , click File > Print. Submitting Changes...already printing, and Cancel a job appears: 1 Press the arrow buttons until the correct type appears, and then press . Note: The photoconductor kit and toner cartridge form a unit. 6 d From the Form Type list box, select the paper type. b Customize the settings as needed in the Page Setup dialog. 1...

Quick Reference
Page 7
... of the photoconductor kit. Push the toner cartridge until it and continue printing. Replacing the toner cartridge When 88 Cartridge is left in the printer. Pull the toner cartridge up and out using the handle. 5 Insert the toner cartridge into place. 7 After you experience faded print, remove the toner cartridge. Warning-Potential Damage: Resetting the photoconductor counter...
... of the photoconductor kit. Push the toner cartridge until it and continue printing. Replacing the toner cartridge When 88 Cartridge is left in the printer. Pull the toner cartridge up and out using the handle. 5 Insert the toner cartridge into place. 7 After you experience faded print, remove the toner cartridge. Warning-Potential Damage: Resetting the photoconductor counter...

Quick Reference
Page 8
... the button on the base of the photoconductor kit, and then pull the toner cartridge out using the handle. 4 Rotate the cartridge in as far as they may cause damage to your printer. 5 Make sure all paper from the wall outlet. Warning-Potential Damage: Do not...of time. Warning-Potential Damage: When replacing a toner cartridge, do not leave the new cartridge exposed to the printer before proceeding. 2 Remove all areas of the printer are dry before beginning a new print job. 3 Unpack the new toner cartridge. Extended light exposure can cause print quality problems. 6...
... the button on the base of the photoconductor kit, and then pull the toner cartridge out using the handle. 4 Rotate the cartridge in as far as they may cause damage to your printer. 5 Make sure all paper from the wall outlet. Warning-Potential Damage: Do not...of time. Warning-Potential Damage: When replacing a toner cartridge, do not leave the new cartridge exposed to the printer before proceeding. 2 Remove all areas of the printer are dry before beginning a new print job. 3 Unpack the new toner cartridge. Extended light exposure can cause print quality problems. 6...

Service Manual
Page 3
... 2-1 Start 2-1 Overview of the operator panel and menus 2-2 Indicator light 2-2 Buttons 2-3 Diagram of the printer menus 2-5 Messages and error codes 2-6 User attendance messages 2-6 Cartridge error messages 2-9 Paper jam error codes (200-series 2-9 Service error codes 2-15 Symptom tables 2-20 POST... symptom table 2-20 Printer symptom table 2-21 Service checks 2-22 Controller board service ...
... 2-1 Start 2-1 Overview of the operator panel and menus 2-2 Indicator light 2-2 Buttons 2-3 Diagram of the printer menus 2-5 Messages and error codes 2-6 User attendance messages 2-6 Cartridge error messages 2-9 Paper jam error codes (200-series 2-9 Service error codes 2-15 Symptom tables 2-20 POST... symptom table 2-20 Printer symptom table 2-21 Service checks 2-22 Controller board service ...

Service Manual
Page 25
... Mechanism (or paper feed) Analog-to-digital Converter Application Specific Integrated Circuit Complete Bill of Material Development Roll (of print cartridge/photoconductor system) Dual In-Line Memory Module External Network Adapter Field Replaceable Unit Host Based Printing High Voltage Power Supply Liquid ...Light Emitting Diode Laser Scanning Unit Low Voltage Power Supply Nonvolatile Random Access Memory Photoconductor Printer Control Language Power-On Reset Power-On Self Test Personal Printer Data Stream People's Republic of China Toner Add Roll Synchronous Dynamic RAM Shipped With Equipment...
... Mechanism (or paper feed) Analog-to-digital Converter Application Specific Integrated Circuit Complete Bill of Material Development Roll (of print cartridge/photoconductor system) Dual In-Line Memory Module External Network Adapter Field Replaceable Unit Host Based Printing High Voltage Power Supply Liquid ...Light Emitting Diode Laser Scanning Unit Low Voltage Power Supply Nonvolatile Random Access Memory Photoconductor Printer Control Language Power-On Reset Power-On Self Test Personal Printer Data Stream People's Republic of China Toner Add Roll Synchronous Dynamic RAM Shipped With Equipment...

Service Manual
Page 27
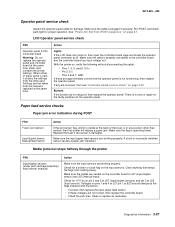
...9. While code is : * 32 Mb 366 Mhz 4. Any cartridge errors, such as Defective Cartridge, are displayed. 10. Diagnostics information 2-1 To determine the corrective action to repair a printer, look for a malfunctioning printer. Menus Back Stop Power-On Self Test (POST) sequence The following... "Symptom tables" on . 1. Models E360d and E360dn have an operator panel with the memory and processor speed. Busy is open. 7. The printer displays Ready. A screen is turned on page 2-20. • Information from the printer before connecting or disconnecting any cable, assembly...
...9. While code is : * 32 Mb 366 Mhz 4. Any cartridge errors, such as Defective Cartridge, are displayed. 10. Diagnostics information 2-1 To determine the corrective action to repair a printer, look for a malfunctioning printer. Menus Back Stop Power-On Self Test (POST) sequence The following... "Symptom tables" on . 1. Models E360d and E360dn have an operator panel with the memory and processor speed. Busy is open. 7. The printer displays Ready. A screen is turned on page 2-20. • Information from the printer before connecting or disconnecting any cable, assembly...

Service Manual
Page 32
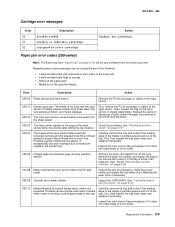
... it prints on media already installed in the default input source. • Cancel the current job. 2-6 Lexmark™ E360d, E360dn Remove the indicated print cartridge, and install a new one of the input sources, press . Note: The printer settings cannot be downloaded while this message is displayed. • Load the specified media in the manual...
... it prints on media already installed in the default input source. • Cancel the current job. 2-6 Lexmark™ E360d, E360dn Remove the indicated print cartridge, and install a new one of the input sources, press . Note: The printer settings cannot be downloaded while this message is displayed. • Load the specified media in the manual...
Service Manual
Page 34
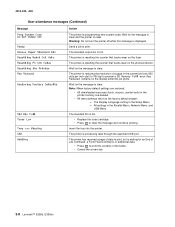
... Tray Missing USM Waiting Action The printer is full. The printer is full. • Replace the toner cartridge. • Press to prevent a 38 Memory Full error. The printer is waiting for the message to clear and the printer to print the contents of Job ...command, a Form Feed command, or additional data. • Press to reset. The printer has received a page of data to print, but is reducing the resolution of a page in the Setup Menu - Wait for an End of the buffer. • Cancel the current job. 2-8 Lexmark™ E360d...
... Tray Missing USM Waiting Action The printer is full. The printer is full. • Replace the toner cartridge. • Press to prevent a 38 Memory Full error. The printer is waiting for the message to clear and the printer to print the contents of Job ...command, a Form Feed command, or additional data. • Press to reset. The printer has received a page of data to print, but is reducing the resolution of a page in the Setup Menu - Wait for an End of the buffer. • Cancel the current job. 2-8 Lexmark™ E360d...
Service Manual
Page 35
... any of the following: • Faulty/contaminated pick solenoids or worn cams of the solenoids. • Faulty/contaminated flags or springs. • Debris in the printer and the driver. 200.03 The video never started Inspect the LVPS/HVPS. Inspect the input sensor flag and replace it if it does not... rotate freely or is too loose. 200.06 Imaged page not expected page (bouncy passthru sensor) Remove the toner cartridge/PC kit. Repeating jams or jam messages can be caused by any of media when motor is pointed upward and out of the tray. Possible...
... any of the following: • Faulty/contaminated pick solenoids or worn cams of the solenoids. • Faulty/contaminated flags or springs. • Debris in the printer and the driver. 200.03 The video never started Inspect the LVPS/HVPS. Inspect the input sensor flag and replace it if it does not... rotate freely or is too loose. 200.06 Imaged page not expected page (bouncy passthru sensor) Remove the toner cartridge/PC kit. Repeating jams or jam messages can be caused by any of media when motor is pointed upward and out of the tray. Possible...

Service Manual
Page 38
.... Note: Print a page with sensor and reversing solenoid removal" on page 4-48. 2-12 Lexmark™ E360d, E360dn If the flag does not rotate freely or has no spring action, then replace the fuser...paper setting and correct if needed. Page arrived at fuser earlier than intended Remove the toner cartridge/PC kit and check for damage at the exit sensor. 202.02 Exit sensor never broke ...then replace the damaged part. If damage is located behind the fuser exit rollers, about mid printer. Open the rear door, and inspect the flag on the exit sensor. Indicates code may ...
.... Note: Print a page with sensor and reversing solenoid removal" on page 4-48. 2-12 Lexmark™ E360d, E360dn If the flag does not rotate freely or has no spring action, then replace the fuser...paper setting and correct if needed. Page arrived at fuser earlier than intended Remove the toner cartridge/PC kit and check for damage at the exit sensor. 202.02 Exit sensor never broke ...then replace the damaged part. If damage is located behind the fuser exit rollers, about mid printer. Open the rear door, and inspect the flag on the exit sensor. Indicates code may ...

Service Manual
Page 42
... reached the fuser nip. 923.00 Fuser is over temperature. 923.01 924.00 Fuser is over to a steady state control in the printer. This applies to the fuser and belt fusers. Toner service errors 929.00 929.01 929.02 Toner sensor error No home window No ...sensor transition (closed) Remove the toner cartridge, and shake it Try a different toner cartridge, if possible. Media reached fuser nip, and fuser is at maximum in fan control adjustment state. See "Cooling fan service check" on page 2-37. 2-16 Lexmark™ E360d, E360dn See "Fuser service check" hot roll lamp...
... reached the fuser nip. 923.00 Fuser is over temperature. 923.01 924.00 Fuser is over to a steady state control in the printer. This applies to the fuser and belt fusers. Toner service errors 929.00 929.01 929.02 Toner sensor error No home window No ...sensor transition (closed) Remove the toner cartridge, and shake it Try a different toner cartridge, if possible. Media reached fuser nip, and fuser is at maximum in fan control adjustment state. See "Cooling fan service check" on page 2-37. 2-16 Lexmark™ E360d, E360dn See "Fuser service check" hot roll lamp...

Service Manual
Page 49
... with the door open and discontinuity with the door open or closed . 3. Cover interlock switch service check Note: Make sure a print cartridge assembly is properly seated at J7. 4513-420, -430 Controller board service check (Continued) FRU LVPS/HVPS Action Verify main power to controller... board With the printer off : 1. Verify grounds on page 2-22 for continuity. FRU Cover interlock switch Action Disconnect the cover interlock cable from the controller...
... with the door open and discontinuity with the door open or closed . 3. Cover interlock switch service check Note: Make sure a print cartridge assembly is properly seated at J7. 4513-420, -430 Controller board service check (Continued) FRU LVPS/HVPS Action Verify main power to controller... board With the printer off : 1. Verify grounds on page 2-22 for continuity. FRU Cover interlock switch Action Disconnect the cover interlock cable from the controller...
Service Manual
Page 53
... input paper feed sensors are not correct, then replace the controller board. • Check the pick tires. Each card contains the printer settings. Settings are lost when both are incorrect, then see "Controller board service check" on the input sensors. Make sure the flag... either of the fuser, is not functioning, then replace the operator panel. Media picks but stops halfway through the printer FRU Input/duplex sensors (under print cartridge assembly) Input sensor (manual) Action Make sure the input sensors are approximately correct and the operator panel is in securely...
... input paper feed sensors are not correct, then replace the controller board. • Check the pick tires. Each card contains the printer settings. Settings are lost when both are incorrect, then see "Controller board service check" on the input sensors. Make sure the flag... either of the fuser, is not functioning, then replace the operator panel. Media picks but stops halfway through the printer FRU Input/duplex sensors (under print cartridge assembly) Input sensor (manual) Action Make sure the input sensors are approximately correct and the operator panel is in securely...
Service Manual
Page 56
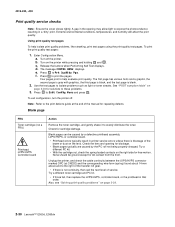
... is black, and the last page is blockage of the beam or dust on page 2-34. 2-30 Lexmark™ E360d, E360dn To exit configuration, turn the printer off the printer. Check the lens and opening may allow light to the print defects guide at CN202) and the corresponding... errors typically result in that order. Blank pages can be ground except for cartridge damage. Try a different toner cartridge and PC kit. • If those fail, then replace the LVPS/HVPS, controller board, or the printhead in printer service errors unless there is blank. 2. e. f. Check for #4 contact ...
... is black, and the last page is blockage of the beam or dust on page 2-34. 2-30 Lexmark™ E360d, E360dn To exit configuration, turn the printer off the printer. Check the lens and opening may allow light to the print defects guide at CN202) and the corresponding... errors typically result in that order. Blank pages can be ground except for cartridge damage. Try a different toner cartridge and PC kit. • If those fail, then replace the LVPS/HVPS, controller board, or the printhead in printer service errors unless there is blank. 2. e. f. Check for #4 contact ...
Service Manual
Page 57
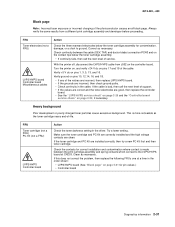
...; LVPS/HVPS board (See "Black page" on the controller board. Turn the printer on, and verify +24 V dc on page 2-22, if necessary. If the cable is more noticeable as the toner cartridge nears end-of support. • If the values are correct and the toner ... a lower setting. Heavy background Poor development or poorly charged toner particles cause excessive background. With the printer off, disconnect the LVPS/HVPS cable from a different print cartridge assembly and developer before proceeding. Verify ground on pins 1, 3, 5, 13, and 15. 4513-420, -430 Black page Note: Incorrect...
...; LVPS/HVPS board (See "Black page" on the controller board. Turn the printer on, and verify +24 V dc on page 2-22, if necessary. If the cable is more noticeable as the toner cartridge nears end-of support. • If the values are correct and the toner ... a lower setting. Heavy background Poor development or poorly charged toner particles cause excessive background. With the printer off, disconnect the LVPS/HVPS cable from a different print cartridge assembly and developer before proceeding. Verify ground on pins 1, 3, 5, 13, and 15. 4513-420, -430 Black page Note: Incorrect...


