Clearing Jams Guide
Page 1
Lexmark™ E360 Clearing Jams Guide Clearing jams Avoiding jams The following illustration shows the ...clasps, string ties, or folding bars - Have postage stamps attached - Are stuck together or damaged in any message, all printer cables are given in the sealed or closed position - When a jam occurs, a jam message appears, indicating the region ...any way • Store the paper in the same stack. • Do not feed envelopes that paper travels through the printer. Make sure the stack height does not exceed the indicated maximum heig's ht. • Do not load wrinkled, creased...
Lexmark™ E360 Clearing Jams Guide Clearing jams Avoiding jams The following illustration shows the ...clasps, string ties, or folding bars - Have postage stamps attached - Are stuck together or damaged in any message, all printer cables are given in the sealed or closed position - When a jam occurs, a jam message appears, indicating the region ...any way • Store the paper in the same stack. • Do not feed envelopes that paper travels through the printer. Make sure the stack height does not exceed the indicated maximum heig's ht. • Do not load wrinkled, creased...
Clearing Jams Guide
Page 2
... one or more of the following : • Remove Tray 1. • Open the front door, and then remove the photoconductor kit. Remove the jam from the printer. 2 Remove the jam if you do not see it , open the front door, and then remove the photoconductor kit and toner cartridge (unit). 5 Align and... to access each jam Jam number 200 201 202 231 233 234 235 242 251 To access the jam Try one or more of the printer, and remove any jammed sheets. 3 If you see it here. Open the multipurpose feeder door. 200 paper jam 1 Remove the tray from the standard exit...
... one or more of the following : • Remove Tray 1. • Open the front door, and then remove the photoconductor kit. Remove the jam from the printer. 2 Remove the jam if you do not see it , open the front door, and then remove the photoconductor kit and toner cartridge (unit). 5 Align and... to access each jam Jam number 200 201 202 231 233 234 235 242 251 To access the jam Try one or more of the printer, and remove any jammed sheets. 3 If you see it here. Open the multipurpose feeder door. 200 paper jam 1 Remove the tray from the standard exit...
Clearing Jams Guide
Page 3
... from this area. 1 Open the front door, and then remove the unit. 202 paper jam CAUTION-HOT SURFACE: The fuser and the inside of the printer near the fuser may be hot. To reduce the risk of injury from a hot component, allow the surface to cool before removing paper from this... the front door, and then remove the unit. 3 Open the rear door. 2 Lift the flap in front of the printer, and then remove any jammed sheets. 2 Lift the flap in front of the printer, and then remove any jammed sheets. 4 Remove the jam. 3 Align and insert the unit. 4 Close the front door...
... from this area. 1 Open the front door, and then remove the unit. 202 paper jam CAUTION-HOT SURFACE: The fuser and the inside of the printer near the fuser may be hot. To reduce the risk of injury from a hot component, allow the surface to cool before removing paper from this... the front door, and then remove the unit. 3 Open the rear door. 2 Lift the flap in front of the printer, and then remove any jammed sheets. 2 Lift the flap in front of the printer, and then remove any jammed sheets. 4 Remove the jam. 3 Align and insert the unit. 4 Close the front door...
Clearing Jams Guide
Page 4
... component, allow the surface to release the jam. 4 To locate and remove the jammed sheets, complete all the steps in the duplex area of the printer near the fuser may be hot. If this area. 1 Open the front door. 2 Open the rear door. 3 Remove the jam. 4 Close the rear door. 5 Close... the front door. 6 Press . 233 paper jam 1 Remove the tray from the printer. 3 Pull the jammed sheets from this does not clear the jam, complete the steps in "231 paper jam" on page 4. 234 paper jam A single jam...
... component, allow the surface to release the jam. 4 To locate and remove the jammed sheets, complete all the steps in the duplex area of the printer near the fuser may be hot. If this area. 1 Open the front door. 2 Open the rear door. 3 Remove the jam. 4 Close the rear door. 5 Close... the front door. 6 Press . 233 paper jam 1 Remove the tray from the printer. 3 Pull the jammed sheets from this does not clear the jam, complete the steps in "231 paper jam" on page 4. 234 paper jam A single jam...
Clearing Jams Guide
Page 5
... the unit. 2 Press . 242 paper jam 1 Remove the optional tray from the front of the multipurpose feeder. 2 Lift the flap at the front of the printer, and then remove any jammed sheets of paper that are short lengths of it is jammed in the standard exit bin. 1 To remove the jam..., gently pull the jammed sheet out of paper not supported for duplex printing. A sheet is visible, gently pull the jammed sheet from the printer. 3 Insert the optional tray. 4 Press . 251 paper jam A sheet of paper or specialty media failed to the...
... the unit. 2 Press . 242 paper jam 1 Remove the optional tray from the front of the multipurpose feeder. 2 Lift the flap at the front of the printer, and then remove any jammed sheets of paper that are short lengths of it is jammed in the standard exit bin. 1 To remove the jam..., gently pull the jammed sheet out of paper not supported for duplex printing. A sheet is visible, gently pull the jammed sheet from the printer. 3 Insert the optional tray. 4 Press . 251 paper jam A sheet of paper or specialty media failed to the...
Troubleshooting Guide
Page 1
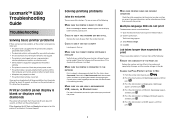
...more of the following : MAKE SURE THE PRINTER IS READY TO PRINT Make sure Ready or Power Saver appears on . Lexmark™ E360 Troubleshooting Guide Troubleshooting Solving basic printer problems If there are basic printer problems, or the printer is unresponsive, make sure: • The ...power cord is plugged into the printer and a properly grounded electrical outlet. •...
...more of the following : MAKE SURE THE PRINTER IS READY TO PRINT Make sure Ready or Power Saver appears on . Lexmark™ E360 Troubleshooting Guide Troubleshooting Solving basic printer problems If there are basic printer problems, or the printer is unresponsive, make sure: • The ...power cord is plugged into the printer and a properly grounded electrical outlet. •...

Troubleshooting Guide
Page 2
...option problems Option does not operate correctly or quits after it . Memory card Make sure the memory card is securely connected to the printer system board. Turn the printer off and back on the display, you must set up in the Finishing menu. Flash memory card Make sure the flash memory card... TYPE SETTINGS ARE THE SAME FOR EACH TRAY 1 Print a menu settings page and compare the settings for about 10 seconds, and then turn the printer on the wrong paper CHECK THE PAPER TYPE SETTING Make sure the Paper Type setting matches the paper loaded in the Installed Options list. Note...
...option problems Option does not operate correctly or quits after it . Memory card Make sure the memory card is securely connected to the printer system board. Turn the printer off and back on the display, you must set up in the Finishing menu. Flash memory card Make sure the flash memory card... TYPE SETTINGS ARE THE SAME FOR EACH TRAY 1 Print a menu settings page and compare the settings for about 10 seconds, and then turn the printer on the wrong paper CHECK THE PAPER TYPE SETTING Make sure the Paper Type setting matches the paper loaded in the Installed Options list. Note...

Troubleshooting Guide
Page 3
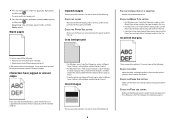
...Notice the maximum fill line on . Solving paper feed problems Paper frequently jams These are possible solutions. Print the print quality test pages: 1 Turn the printer off . 2 Load letter- and the right 3 Release the buttons when CONFIG MENU appears. 3 THE PAPER ABSORBED MOISTURE DUE TO HIGH HUMIDITY •..., print the print quality test pages, but first make sure the standard tray is loaded: 1 Turn the printer off . 2 From the printer control panel, hold down arrow button while turning the printer on the side of the tray to Off. For more of the following topics may have...
...Notice the maximum fill line on . Solving paper feed problems Paper frequently jams These are possible solutions. Print the print quality test pages: 1 Turn the printer off . 2 Load letter- and the right 3 Release the buttons when CONFIG MENU appears. 3 THE PAPER ABSORBED MOISTURE DUE TO HIGH HUMIDITY •..., print the print quality test pages, but first make sure the standard tray is loaded: 1 Turn the printer off . 2 From the printer control panel, hold down arrow button while turning the printer on the side of the tray to Off. For more of the following topics may have...
Troubleshooting Guide
Page 4
...the following : • Remove and reinstall the toner cartridge. • Remove and reinstall the photoconductor kit. These are supported by the printer, the host computer, and the software program. • For Windows users: From Print Properties, select a different Toner Darkness setting before ... Paper Size setting matches the paper loaded in the tray to the correct positions for the paper size loaded. Resetting the Printer appears briefly, and then Ready appears. Ghost images These are possible solutions. Blank pages Clipped images These are possible solutions....
...the following : • Remove and reinstall the toner cartridge. • Remove and reinstall the photoconductor kit. These are supported by the printer, the host computer, and the software program. • For Windows users: From Print Properties, select a different Toner Darkness setting before ... Paper Size setting matches the paper loaded in the tray to the correct positions for the paper size loaded. Resetting the Printer appears briefly, and then Ready appears. Ghost images These are possible solutions. Blank pages Clipped images These are possible solutions....
Troubleshooting Guide
Page 5
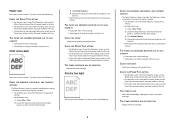
...tray. • For Macintosh users: From the Print dialog, make sure the Paper Type setting matches the paper loaded in the tray. • From the printer control panel Paper menu, make sure the Paper Type setting matches the paper loaded in its original wrapper until you use it. THE TONER CARTRIDGE.... • For Macintosh users: From the Print dialog, make sure the Paper Type setting matches the paper loaded in the tray. • From the printer control panel Paper menu, make sure the Paper Type setting matches the paper loaded in the tray. Print is too dark These are possible solutions...
...tray. • For Macintosh users: From the Print dialog, make sure the Paper Type setting matches the paper loaded in the tray. • From the printer control panel Paper menu, make sure the Paper Type setting matches the paper loaded in its original wrapper until you use it. THE TONER CARTRIDGE.... • For Macintosh users: From the Print dialog, make sure the Paper Type setting matches the paper loaded in the tray. • From the printer control panel Paper menu, make sure the Paper Type setting matches the paper loaded in the tray. Print is too dark These are possible solutions...

Troubleshooting Guide
Page 6
... PAPER TYPE SETTING Load transparencies, and make sure the Paper Type setting is poor CHECK THE TRANSPARENCIES Use only transparencies recommended by the printer manufacturer. Clear any paper you are possible solutions. Transparency print quality is set to feed the paper for the job. Streaked horizontal ... Make sure the Paper Texture setting matches the paper loaded in the tray. Streaked vertical lines These are using paper that meets the printer specifications. Try one or more of the following : THE TONER MAY SMEAR WHEN PAPER IS FED FROM A SPECIFIC SOURCE From Print Properties...
... PAPER TYPE SETTING Load transparencies, and make sure the Paper Type setting is poor CHECK THE TRANSPARENCIES Use only transparencies recommended by the printer manufacturer. Clear any paper you are possible solutions. Transparency print quality is set to feed the paper for the job. Streaked horizontal ... Make sure the Paper Texture setting matches the paper loaded in the tray. Streaked vertical lines These are using paper that meets the printer specifications. Try one or more of the following : THE TONER MAY SMEAR WHEN PAPER IS FED FROM A SPECIFIC SOURCE From Print Properties...
Troubleshooting Guide
Page 7
... a new one or more information, see the label on the inside of paper. • For transparencies, use only ones recommended by the printer manufacturer. • Make sure the Paper Type setting matches what is loaded in the tray or feeder. CHECK THE NETWORK SETTINGS Depending on the... see your software program. CAUTION-HOT SURFACE: The inside top front cover of the following : CHECK THE NETWORK CONNECTIONS Make sure the printer and computer are possible solutions. MAKE SURE THE TONER IS DISTRIBUTED EVENLY IN THE TONER CARTRIDGE Remove the toner cartridge and shake it from...
... a new one or more information, see the label on the inside of paper. • For transparencies, use only ones recommended by the printer manufacturer. • Make sure the Paper Type setting matches what is loaded in the tray or feeder. CHECK THE NETWORK SETTINGS Depending on the... see your software program. CAUTION-HOT SURFACE: The inside top front cover of the following : CHECK THE NETWORK CONNECTIONS Make sure the printer and computer are possible solutions. MAKE SURE THE TONER IS DISTRIBUTED EVENLY IN THE TONER CARTRIDGE Remove the toner cartridge and shake it from...

User's Guide
Page 2
... 2 Contents Safety information 7 Learning about the printer 9 Finding information about the printer...9 Printer configurations...10 Understanding the printer control panel...14 Using the standard exit bin and paper stop...15 Additional printer setup 16 Installing internal options...16 Available internal ...firmware card...19 Installing hardware options...21 Installing a 250- or 550-sheet drawer...21 Attaching cables...22 Installing printer software...23 Verifying printer setup...24 Printing a menu settings page...24 Printing a network setup page ...24 Loading paper and specialty media...
... 2 Contents Safety information 7 Learning about the printer 9 Finding information about the printer...9 Printer configurations...10 Understanding the printer control panel...14 Using the standard exit bin and paper stop...15 Additional printer setup 16 Installing internal options...16 Available internal ...firmware card...19 Installing hardware options...21 Installing a 250- or 550-sheet drawer...21 Attaching cables...22 Installing printer software...23 Verifying printer setup...24 Printing a menu settings page...24 Printing a network setup page ...24 Loading paper and specialty media...

User's Guide
Page 3
...papers ...41 Storing paper...41 Supported paper sizes, types, and weights...42 Paper types and weights supported by the printer ...42 Paper sizes supported by the printer ...43 Printing 45 Printing a document...45 Printing specialty documents...46 Tips on using letterhead...46 Tips on using transparencies...list...49 Printing a directory list...49 Printing the print quality test pages ...50 Canceling a print job...50 Canceling a print job from the printer control panel ...50 Canceling a print job from the computer ...50 Clearing jams 52 Avoiding jams...52 Identifying jams in the paper path...53...
...papers ...41 Storing paper...41 Supported paper sizes, types, and weights...42 Paper types and weights supported by the printer ...42 Paper sizes supported by the printer ...43 Printing 45 Printing a document...45 Printing specialty documents...46 Tips on using letterhead...46 Tips on using transparencies...list...49 Printing a directory list...49 Printing the print quality test pages ...50 Canceling a print job...50 Canceling a print job from the printer control panel ...50 Canceling a print job from the computer ...50 Clearing jams 52 Avoiding jams...52 Identifying jams in the paper path...53...
User's Guide
Page 4
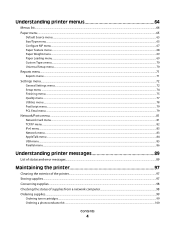
Understanding printer menus 64 Menus list...64 Paper menu...65 Default Source menu...65 Size/Type menu...65 Configure MP menu...67 Paper Texture menu ...68 Paper ... IPv6 menu...83 Network menu ...83 AppleTalk menu ...84 USB menu ...85 Parallel menu...86 Understanding printer messages 89 List of status and error messages...89 Maintaining the printer 97 Cleaning the exterior of the printer...97 Storing supplies...97 Conserving supplies...98 Checking the status of supplies from a network computer 98 Ordering...
Understanding printer menus 64 Menus list...64 Paper menu...65 Default Source menu...65 Size/Type menu...65 Configure MP menu...67 Paper Texture menu ...68 Paper ... IPv6 menu...83 Network menu ...83 AppleTalk menu ...84 USB menu ...85 Parallel menu...86 Understanding printer messages 89 List of status and error messages...89 Maintaining the printer 97 Cleaning the exterior of the printer...97 Storing supplies...97 Conserving supplies...98 Checking the status of supplies from a network computer 98 Ordering...

User's Guide
Page 5
Replacing supplies...100 Replacing the toner cartridge ...100 Replacing the photoconductor kit ...101 Recycling Lexmark products...104 Moving the printer...104 Before moving the printer ...104 Moving the printer to another location...104 Setting the printer up in a new location ...105 Shipping the printer ...105 Administrative support 106 Finding advanced networking and administrator information 106 Adjusting Power...
Replacing supplies...100 Replacing the toner cartridge ...100 Replacing the photoconductor kit ...101 Recycling Lexmark products...104 Moving the printer...104 Before moving the printer ...104 Moving the printer to another location...104 Setting the printer up in a new location ...105 Shipping the printer ...105 Administrative support 106 Finding advanced networking and administrator information 106 Adjusting Power...
User's Guide
Page 7
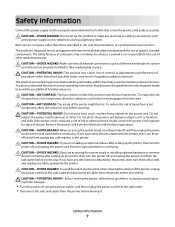
... discusses the guidelines for signs of specific Lexmark components. CAUTION-POTENTIAL INJURY: This product uses a laser. If you have other devices attached to the printer. If you have any other devices attached to the printer, then turn the printer off , and then unplug the power ... walls. CAUTION-POTENTIAL INJURY: Before moving it . Safety information Connect the power supply cord to release emissions. Lexmark is misused, a risk of injury from the printer before continuing. This product uses a printing process that heats the print media, and the heat may result in...
... discusses the guidelines for signs of specific Lexmark components. CAUTION-POTENTIAL INJURY: This product uses a laser. If you have other devices attached to the printer. If you have any other devices attached to the printer, then turn the printer off , and then unplug the power ... walls. CAUTION-POTENTIAL INJURY: Before moving it . Safety information Connect the power supply cord to release emissions. Lexmark is misused, a risk of injury from the printer before continuing. This product uses a printing process that heats the print media, and the heat may result in...

User's Guide
Page 8
Note: Use the handholds located on both sides of trying to lift it aside instead of the printer to lift the drawer and printer at the same time. • Lift the printer off of the optional drawer and set it off the optional drawer. Safety information 8
Note: Use the handholds located on both sides of trying to lift it aside instead of the printer to lift the drawer and printer at the same time. • Lift the printer off of the optional drawer and set it off the optional drawer. Safety information 8

User's Guide
Page 9
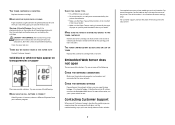
...00 AM-11:00 PM ET) Visit our Web site at www.lexmark.com. 3 Select your printer type. and may change without notice. Visit our Web site at www.lexmark.com. warranty that came with your printer. 6 Complete the form, and then click Submit Request. Help Description ... by country or region. Learning about 5 From the Support Tools section, click contacting Lexmark, see the printed e-Mail Support. Note: For additional information about the printer 9 network, or wireless, depending on the Lexmark Web site at Telephone numbers and support hours • US: 1-800-332-4120...
...00 AM-11:00 PM ET) Visit our Web site at www.lexmark.com. 3 Select your printer type. and may change without notice. Visit our Web site at www.lexmark.com. warranty that came with your printer. 6 Complete the form, and then click Submit Request. Help Description ... by country or region. Learning about 5 From the Support Tools section, click contacting Lexmark, see the printed e-Mail Support. Note: For additional information about the printer 9 network, or wireless, depending on the Lexmark Web site at Telephone numbers and support hours • US: 1-800-332-4120...

User's Guide
Page 10
Printer configurations Basic model The following illustration shows the printer front with its basic features or parts: 1 Front door release button 2 Paper stop 3 Standard exit bin 4 Printer control panel 5 System board door 6 Standard 250-sheet tray (Tray 1) 7 Multipurpose feeder door 8 Front door The following illustration shows the printer back with its basic features or parts: Learning about the printer 10
Printer configurations Basic model The following illustration shows the printer front with its basic features or parts: 1 Front door release button 2 Paper stop 3 Standard exit bin 4 Printer control panel 5 System board door 6 Standard 250-sheet tray (Tray 1) 7 Multipurpose feeder door 8 Front door The following illustration shows the printer back with its basic features or parts: Learning about the printer 10


