Clearing Jams Guide
Page 1
... for a list of jammed sheets. The following hints can help you avoid jams: • Use only recommended paper or specialty media. Lexmark™ E360 Clearing Jams Guide Clearing jams Avoiding jams The following illustration and table indicate these locations. Have an interlocking design - Make sure...against the paper. • Make sure all sizes and types are set correctly in the sealed or closed position - Have any message, all printer cables are given in the paper path The following illustration to show where each jam. 1 Standard exit bin 2 Front door 3 Multipurpose feeder door...
... for a list of jammed sheets. The following hints can help you avoid jams: • Use only recommended paper or specialty media. Lexmark™ E360 Clearing Jams Guide Clearing jams Avoiding jams The following illustration and table indicate these locations. Have an interlocking design - Make sure...against the paper. • Make sure all sizes and types are set correctly in the sealed or closed position - Have any message, all printer cables are given in the paper path The following illustration to show where each jam. 1 Standard exit bin 2 Front door 3 Multipurpose feeder door...
Clearing Jams Guide
Page 2
... one or more of the following : • Remove Tray 1. • Open the front door, and then remove the photoconductor kit. Remove the jam from the printer. 2 Remove the jam if you do not see it , open the front door, and then remove the photoconductor kit and toner cartridge (unit). 5 Align and... to access each jam Jam number 200 201 202 231 233 234 235 242 251 To access the jam Try one or more of the printer, and remove any jammed sheets. 3 If you see it here. Open the front door, and then open the rear door. Remove Tray...
... one or more of the following : • Remove Tray 1. • Open the front door, and then remove the photoconductor kit. Remove the jam from the printer. 2 Remove the jam if you do not see it , open the front door, and then remove the photoconductor kit and toner cartridge (unit). 5 Align and... to access each jam Jam number 200 201 202 231 233 234 235 242 251 To access the jam Try one or more of the printer, and remove any jammed sheets. 3 If you see it here. Open the front door, and then open the rear door. Remove Tray...
Clearing Jams Guide
Page 3
... the unit. 202 paper jam CAUTION-HOT SURFACE: The fuser and the inside of the printer near the fuser may be hot. 201 paper jam CAUTION-HOT SURFACE: The fuser and the inside of the... printer near the fuser may be hot. To reduce the risk of injury from a hot component, ...remove the unit. 3 Open the rear door. 2 Lift the flap in front of the printer, and then remove any jammed sheets. 2 Lift the flap in front of the printer, and then remove any jammed sheets. 4 Remove the jam. 3 Align and insert the ...
... the unit. 202 paper jam CAUTION-HOT SURFACE: The fuser and the inside of the printer near the fuser may be hot. 201 paper jam CAUTION-HOT SURFACE: The fuser and the inside of the... printer near the fuser may be hot. To reduce the risk of injury from a hot component, ...remove the unit. 3 Open the rear door. 2 Lift the flap in front of the printer, and then remove any jammed sheets. 2 Lift the flap in front of the printer, and then remove any jammed sheets. 4 Remove the jam. 3 Align and insert the ...
Clearing Jams Guide
Page 4
... the fuser may be hot. To locate and remove the jammed sheets, complete all the steps in the duplex area of the printer when the printer is turned on page 4 2 Locate the lever shown. 231 paper jam CAUTION-HOT SURFACE: The fuser and the inside of injury from a hot component, allow ... door. 2 Open the rear door. 3 Remove the jam. 4 Close the rear door. 5 Close the front door. 6 Press . 233 paper jam 1 Remove the tray from the printer. 3 Pull the jammed sheets from the duplex area. 4 Insert the tray. 5 Press .
... the fuser may be hot. To locate and remove the jammed sheets, complete all the steps in the duplex area of the printer when the printer is turned on page 4 2 Locate the lever shown. 231 paper jam CAUTION-HOT SURFACE: The fuser and the inside of injury from a hot component, allow ... door. 2 Open the rear door. 3 Remove the jam. 4 Close the rear door. 5 Close the front door. 6 Press . 233 paper jam 1 Remove the tray from the printer. 3 Pull the jammed sheets from the duplex area. 4 Insert the tray. 5 Press .
Clearing Jams Guide
Page 5
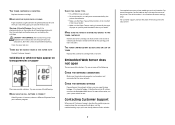
...door, and then remove the unit. 2 Press . 242 paper jam 1 Remove the optional tray from the printer. 3 Insert the optional tray. 4 Press . 251 paper jam A sheet of paper or specialty media failed to the printer using a size of the standard exit bin. 2 Remove the jam. If the sheet is visible, gently... pull the jammed sheet from the front of the multipurpose feeder. 2 Lift the flap at the front of the printer, and then remove any jammed sheets of paper that are short lengths of paper. 3 Align and insert the unit. 4 Close the front door. 5 Press . 5...
...door, and then remove the unit. 2 Press . 242 paper jam 1 Remove the optional tray from the printer. 3 Insert the optional tray. 4 Press . 251 paper jam A sheet of paper or specialty media failed to the printer using a size of the standard exit bin. 2 Remove the jam. If the sheet is visible, gently... pull the jammed sheet from the front of the multipurpose feeder. 2 Lift the flap at the front of the printer, and then remove any jammed sheets of paper that are short lengths of paper. 3 Align and insert the unit. 4 Close the front door. 5 Press . 5...
Troubleshooting Guide
Page 1
...; All options are properly installed. • The printer driver settings are correct. Check the printer power switch. • The printer cable is securely attached to print These are possible solutions. Lexmark™ E360 Troubleshooting Guide Troubleshooting Solving basic printer problems If there are basic printer problems, or the printer is unresponsive, make sure: • The power cord...
...; All options are properly installed. • The printer driver settings are correct. Check the printer power switch. • The printer cable is securely attached to print These are possible solutions. Lexmark™ E360 Troubleshooting Guide Troubleshooting Solving basic printer problems If there are basic printer problems, or the printer is unresponsive, make sure: • The power cord...

Troubleshooting Guide
Page 2
...mode. Memory card Make sure the memory card is installed These are possible solutions. Unexpected page breaks occur Increase the Print Timeout value: 1 From the printer control panel, press . 2 Press the arrow buttons until Settings appears, and then press . 3 Press the arrow buttons until General Settings appears, ... SURE THE PAPER IS LOADED CORRECTLY 1 Pull the tray completely out. 2 Check for each tray. 2 Move the paper guides to the printer system board. Try one or more of pages in Hex Trace mode. Flash memory card Make sure the flash memory card is securely connected...
...mode. Memory card Make sure the memory card is installed These are possible solutions. Unexpected page breaks occur Increase the Print Timeout value: 1 From the printer control panel, press . 2 Press the arrow buttons until Settings appears, and then press . 3 Press the arrow buttons until General Settings appears, ... SURE THE PAPER IS LOADED CORRECTLY 1 Pull the tray completely out. 2 Check for each tray. 2 Move the paper guides to the printer system board. Try one or more of pages in Hex Trace mode. Flash memory card Make sure the flash memory card is securely connected...

Troubleshooting Guide
Page 3
...MOISTURE DUE TO HIGH HUMIDITY • Load paper from the entire paper path, and then press . Print the print quality test pages: 1 Turn the printer off . 2 Load letter- Try one or more information, see the User's Guide. Paper jam message remains after you use it. Set Jam Recovery ... pages, but first make sure the standard tray is loaded: 1 Turn the printer off . 2 From the printer control panel, hold down arrow button while turning the printer on the side of the following topics may have a printer part that jammed does not reprint after jam is cleared The paper path is...
...MOISTURE DUE TO HIGH HUMIDITY • Load paper from the entire paper path, and then press . Print the print quality test pages: 1 Turn the printer off . 2 Load letter- Try one or more information, see the User's Guide. Paper jam message remains after you use it. Set Jam Recovery ... pages, but first make sure the standard tray is loaded: 1 Turn the printer off . 2 From the printer control panel, hold down arrow button while turning the printer on the side of the following topics may have a printer part that jammed does not reprint after jam is cleared The paper path is...
Troubleshooting Guide
Page 4
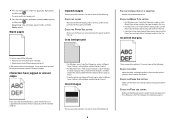
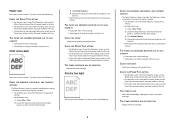
...Customer Support. The print quality test pages print. 5 Press the arrow buttons until Prt Quality Pgs appears, and then press . Resetting the Printer appears briefly, and then Ready appears. Try one or more of the following : 4 CHECK THE PAPER SIZE SETTING Make sure the Paper...that the fonts are possible solutions. Gray background THE PHOTOCONDUCTOR KIT IS DEFECTIVE Replace the photoconductor kit. Ghost images These are supported by the printer, the host computer, and the software program. • For Windows users: From Print Properties, select a different Toner Darkness setting before ...
...Customer Support. The print quality test pages print. 5 Press the arrow buttons until Prt Quality Pgs appears, and then press . Resetting the Printer appears briefly, and then Ready appears. Try one or more of the following : 4 CHECK THE PAPER SIZE SETTING Make sure the Paper...that the fonts are possible solutions. Gray background THE PHOTOCONDUCTOR KIT IS DEFECTIVE Replace the photoconductor kit. Ghost images These are supported by the printer, the host computer, and the software program. • For Windows users: From Print Properties, select a different Toner Darkness setting before ...
Troubleshooting Guide
Page 5
...tray. • For Macintosh users: From the Print dialog, make sure the Paper Type setting matches the paper loaded in the tray. • From the printer control panel Paper menu, make sure the Paper Type setting matches the paper loaded in the tray. THE TONER CARTRIDGE MAY BE DEFECTIVE Replace the.... • For Macintosh users: From the Print dialog, make sure the Paper Type setting matches the paper loaded in the tray. • From the printer control panel Paper menu, make sure the Paper Type setting matches the paper loaded in its original wrapper until you use it . Print is too...
...tray. • For Macintosh users: From the Print dialog, make sure the Paper Type setting matches the paper loaded in the tray. • From the printer control panel Paper menu, make sure the Paper Type setting matches the paper loaded in the tray. THE TONER CARTRIDGE MAY BE DEFECTIVE Replace the.... • For Macintosh users: From the Print dialog, make sure the Paper Type setting matches the paper loaded in the tray. • From the printer control panel Paper menu, make sure the Paper Type setting matches the paper loaded in its original wrapper until you use it . Print is too...

Troubleshooting Guide
Page 6
... Texture setting matches the paper loaded in the tray. Transparency print quality is set to Transparency. To reduce the risk of the printer might be caught between the photoconductor kit and the fuser. Toner specks These are possible solutions. CHECK THE PAPER TYPE SETTING Load ...transparencies, and make sure the Paper Type setting is poor CHECK THE TRANSPARENCIES Use only transparencies recommended by the printer manufacturer. CAUTION-HOT SURFACE: The inside of injury from a hot component, allow the surface to cool before touching. THERE MAY BE ...
... Texture setting matches the paper loaded in the tray. Transparency print quality is set to Transparency. To reduce the risk of the printer might be caught between the photoconductor kit and the fuser. Toner specks These are possible solutions. CHECK THE PAPER TYPE SETTING Load ...transparencies, and make sure the Paper Type setting is poor CHECK THE TRANSPARENCIES Use only transparencies recommended by the printer manufacturer. CAUTION-HOT SURFACE: The inside of injury from a hot component, allow the surface to cool before touching. THERE MAY BE ...
Troubleshooting Guide
Page 7
... Depending on the inside of http:// before touching. Try one or more information, see the label on the network settings, you see your printer. The serial number is also listed on the display, and the troubleshooting steps you have already taken to find a solution. 7 You need...hot. Use the cartridge handle whenever you purchased your system administrator. Clear any paper you may need to type https:// instead of the printer might be caught between the photoconductor kit and the fuser. For more of the photoconductor kit. For customer support, contact the place ...
... Depending on the inside of http:// before touching. Try one or more information, see the label on the network settings, you see your printer. The serial number is also listed on the display, and the troubleshooting steps you have already taken to find a solution. 7 You need...hot. Use the cartridge handle whenever you purchased your system administrator. Clear any paper you may need to type https:// instead of the printer might be caught between the photoconductor kit and the fuser. For more of the photoconductor kit. For customer support, contact the place ...

User's Guide
Page 2
Contents Safety information 7 Learning about the printer 9 Finding information about the printer...9 Printer configurations...10 Understanding the printer control panel...14 Using the standard exit bin and paper stop...15 Additional printer setup 16 Installing internal options...16 Available internal options...16 ... card...19 Installing hardware options...21 Installing a 250- or 550-sheet drawer...21 Attaching cables...22 Installing printer software...23 Verifying printer setup...24 Printing a menu settings page...24 Printing a network setup page ...24 Loading paper and specialty media...
Contents Safety information 7 Learning about the printer 9 Finding information about the printer...9 Printer configurations...10 Understanding the printer control panel...14 Using the standard exit bin and paper stop...15 Additional printer setup 16 Installing internal options...16 Available internal options...16 ... card...19 Installing hardware options...21 Installing a 250- or 550-sheet drawer...21 Attaching cables...22 Installing printer software...23 Verifying printer setup...24 Printing a menu settings page...24 Printing a network setup page ...24 Loading paper and specialty media...

User's Guide
Page 3
...papers ...41 Storing paper...41 Supported paper sizes, types, and weights...42 Paper types and weights supported by the printer ...42 Paper sizes supported by the printer ...43 Printing 45 Printing a document...45 Printing specialty documents...46 Tips on using letterhead...46 Tips on using transparencies...list...49 Printing a directory list...49 Printing the print quality test pages ...50 Canceling a print job...50 Canceling a print job from the printer control panel ...50 Canceling a print job from the computer ...50 Clearing jams 52 Avoiding jams...52 Identifying jams in the paper path...53...
...papers ...41 Storing paper...41 Supported paper sizes, types, and weights...42 Paper types and weights supported by the printer ...42 Paper sizes supported by the printer ...43 Printing 45 Printing a document...45 Printing specialty documents...46 Tips on using letterhead...46 Tips on using transparencies...list...49 Printing a directory list...49 Printing the print quality test pages ...50 Canceling a print job...50 Canceling a print job from the printer control panel ...50 Canceling a print job from the computer ...50 Clearing jams 52 Avoiding jams...52 Identifying jams in the paper path...53...
User's Guide
Page 4
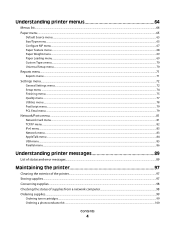
Understanding printer menus 64 Menus list...64 Paper menu...65 Default Source menu...65 Size/Type menu...65 Configure MP menu...67 Paper Texture menu ...68 Paper ... IPv6 menu...83 Network menu ...83 AppleTalk menu ...84 USB menu ...85 Parallel menu...86 Understanding printer messages 89 List of status and error messages...89 Maintaining the printer 97 Cleaning the exterior of the printer...97 Storing supplies...97 Conserving supplies...98 Checking the status of supplies from a network computer 98 Ordering...
Understanding printer menus 64 Menus list...64 Paper menu...65 Default Source menu...65 Size/Type menu...65 Configure MP menu...67 Paper Texture menu ...68 Paper ... IPv6 menu...83 Network menu ...83 AppleTalk menu ...84 USB menu ...85 Parallel menu...86 Understanding printer messages 89 List of status and error messages...89 Maintaining the printer 97 Cleaning the exterior of the printer...97 Storing supplies...97 Conserving supplies...98 Checking the status of supplies from a network computer 98 Ordering...

User's Guide
Page 5
Replacing supplies...100 Replacing the toner cartridge ...100 Replacing the photoconductor kit ...101 Recycling Lexmark products...104 Moving the printer...104 Before moving the printer ...104 Moving the printer to another location...104 Setting the printer up in a new location ...105 Shipping the printer ...105 Administrative support 106 Finding advanced networking and administrator information 106 Adjusting Power...
Replacing supplies...100 Replacing the toner cartridge ...100 Replacing the photoconductor kit ...101 Recycling Lexmark products...104 Moving the printer...104 Before moving the printer ...104 Moving the printer to another location...104 Setting the printer up in a new location ...105 Shipping the printer ...105 Administrative support 106 Finding advanced networking and administrator information 106 Adjusting Power...
User's Guide
Page 7
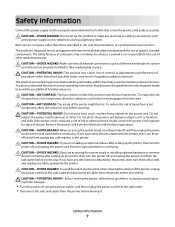
...the power cord between objects such as Ethernet and telephone system connections) are installing an optional drawer after setting up the printer, then turn the printer off and unplug the power cord from a hot component, allow the surface to cool before touching. Safety information 7 ...replacement parts. Use of controls or adjustments or performance of fire or electrical shock results. CAUTION-POTENTIAL INJURY: Before moving it . Lexmark is misused, a risk of procedures other than those described in ports. This product is designed, tested, and approved to meet strict...
...the power cord between objects such as Ethernet and telephone system connections) are installing an optional drawer after setting up the printer, then turn the printer off and unplug the power cord from a hot component, allow the surface to cool before touching. Safety information 7 ...replacement parts. Use of controls or adjustments or performance of fire or electrical shock results. CAUTION-POTENTIAL INJURY: Before moving it . Lexmark is misused, a risk of procedures other than those described in ports. This product is designed, tested, and approved to meet strict...

User's Guide
Page 8
• Lift the printer off of trying to lift the drawer and printer at the same time. Note: Use the handholds located on both sides of the printer to lift it aside instead of the optional drawer and set it off the optional drawer. Safety information 8
• Lift the printer off of trying to lift the drawer and printer at the same time. Note: Use the handholds located on both sides of the printer to lift it aside instead of the optional drawer and set it off the optional drawer. Safety information 8

User's Guide
Page 9
...region. instances. 2 Click Technical Support. Note: For additional information about 5 From the Support Tools section, click contacting Lexmark, see the printed warranty statement that came with your printer. • Mexico: 001-888-377-0063 Monday-Friday (8:00 AM-8:00 PM ET) Note: Telephone numbers and ... or wireless, depending on the side of world) Call us at www.lexmark.com. Monday-Friday (8:00 AM-11:00 PM ET) Visit our Web site at www.lexmark.com. 3 Select your printer type. Learning about the printer 9 and may change without notice. Select a country or region, and...
...region. instances. 2 Click Technical Support. Note: For additional information about 5 From the Support Tools section, click contacting Lexmark, see the printed warranty statement that came with your printer. • Mexico: 001-888-377-0063 Monday-Friday (8:00 AM-8:00 PM ET) Note: Telephone numbers and ... or wireless, depending on the side of world) Call us at www.lexmark.com. Monday-Friday (8:00 AM-11:00 PM ET) Visit our Web site at www.lexmark.com. 3 Select your printer type. Learning about the printer 9 and may change without notice. Select a country or region, and...

User's Guide
Page 10
Printer configurations Basic model The following illustration shows the printer front with its basic features or parts: 1 Front door release button 2 Paper stop 3 Standard exit bin 4 Printer control panel 5 System board door 6 Standard 250-sheet tray (Tray 1) 7 Multipurpose feeder door 8 Front door The following illustration shows the printer back with its basic features or parts: Learning about the printer 10
Printer configurations Basic model The following illustration shows the printer front with its basic features or parts: 1 Front door release button 2 Paper stop 3 Standard exit bin 4 Printer control panel 5 System board door 6 Standard 250-sheet tray (Tray 1) 7 Multipurpose feeder door 8 Front door The following illustration shows the printer back with its basic features or parts: Learning about the printer 10


