

Quick Reference
Page 5
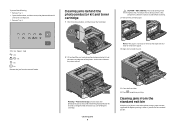
... light sequence for the light to access jam areas. On • Do not load the manual feeder while the printer is the unit housing the toner cartridge and photoconductor kit. 2 Standard exit bin 3 Front door 4 Manual feeder door 5 Standard 250-sheet tray (Tray 1) 6 Optional tray (Tray ...On - Clearing jams Avoiding jams The following : • Remove Tray 1. • Open the front door, and then remove the photoconductor kit and toner cartridge unit. 201.yy Paper jam - On - Inside this door is printing. On - On Open the front door, and then remove the ...
... light sequence for the light to access jam areas. On • Do not load the manual feeder while the printer is the unit housing the toner cartridge and photoconductor kit. 2 Standard exit bin 3 Front door 4 Manual feeder door 5 Standard 250-sheet tray (Tray 1) 6 Optional tray (Tray ...On - Clearing jams Avoiding jams The following : • Remove Tray 1. • Open the front door, and then remove the photoconductor kit and toner cartridge unit. 201.yy Paper jam - On - Inside this door is printing. On - On Open the front door, and then remove the ...
Quick Reference
Page 7
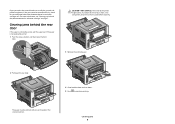
Clearing jams behind the photoconductor kit and toner cartridge 1 Push the release button, and then lower the front door. On - Clearing jams 7 5 Close the front door. 6 Press to the printer using a paper size ... and reinstall the unit. To reduce the risk of injury from the manual feeder. 2 Lift and pull the unit containing the photoconductor kit and the toner cartridge out of the following: • Remove Tray 1. • Open the front door, and then remove the photoconductor kit and...
Clearing jams behind the photoconductor kit and toner cartridge 1 Push the release button, and then lower the front door. On - Clearing jams 7 5 Close the front door. 6 Press to the printer using a paper size ... and reinstall the unit. To reduce the risk of injury from the manual feeder. 2 Lift and pull the unit containing the photoconductor kit and the toner cartridge out of the following: • Remove Tray 1. • Open the front door, and then remove the photoconductor kit and...
Quick Reference
Page 9
... and pulled straight out. To reduce the risk of the printer might be removed this way, check for jammed paper behind the photoconductor kit and toner cartridge unit. Paper jammed in the manual feeder can usually be jammed with one end caught in the standard exit bin. Clearing jams behind the...
... and pulled straight out. To reduce the risk of the printer might be removed this way, check for jammed paper behind the photoconductor kit and toner cartridge unit. Paper jammed in the manual feeder can usually be jammed with one end caught in the standard exit bin. Clearing jams behind the...
Maintenance Guide
Page 2
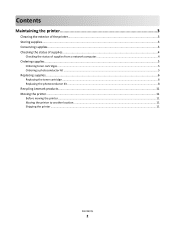
Contents Maintaining the printer 3 Cleaning the exterior of the printer...3 Storing supplies...3 Conserving supplies...3 Checking the status of supplies...4 Checking the status of supplies from a network computer 4 Ordering supplies...5 Ordering toner cartridges ...5 Ordering a photoconductor kit ...5 Replacing supplies...6 Replacing the toner cartridge ...6 Replacing the photoconductor kit ...8 Recycling Lexmark products...11 Moving the printer...11 Before moving the printer ...11 Moving the printer to another location...11 Shipping the printer ...11 Contents 2
Contents Maintaining the printer 3 Cleaning the exterior of the printer...3 Storing supplies...3 Conserving supplies...3 Checking the status of supplies...4 Checking the status of supplies from a network computer 4 Ordering supplies...5 Ordering toner cartridges ...5 Ordering a photoconductor kit ...5 Replacing supplies...6 Replacing the toner cartridge ...6 Replacing the photoconductor kit ...8 Recycling Lexmark products...11 Moving the printer...11 Before moving the printer ...11 Moving the printer to another location...11 Shipping the printer ...11 Contents 2
Maintenance Guide
Page 3
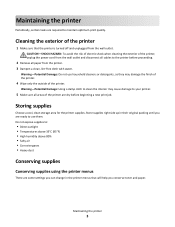
... • Heavy dust Conserving supplies Conserving supplies using the printer menus There are some settings you can change in their original packing until you conserve toner and paper. Warning-Potential Damage: Do not use them. Storing supplies Choose a cool, clean storage area for the printer supplies. Store supplies right side up...
... • Heavy dust Conserving supplies Conserving supplies using the printer menus There are some settings you can change in their original packing until you conserve toner and paper. Warning-Potential Damage: Do not use them. Storing supplies Choose a cool, clean storage area for the printer supplies. Store supplies right side up...

Maintenance Guide
Page 4
...Multipage Print) setting. The Device Status page appears, displaying a summary of these utilities installs with 8 being the factory default setting. Supply Toner Paper or specialty media Path to the computer by a USB or parallel cable, open the Local Printer Settings Utility for Windows or Printer Settings... from 1 (lightest setting) to the same network as the printer. 1 Type the printer IP address into the address field of toner the Toner Darkness setting. To access printer menus: • Open the Embedded Web Server by printing the first copy and checking it for accuracy...
...Multipage Print) setting. The Device Status page appears, displaying a summary of these utilities installs with 8 being the factory default setting. Supply Toner Paper or specialty media Path to the computer by a USB or parallel cable, open the Local Printer Settings Utility for Windows or Printer Settings... from 1 (lightest setting) to the same network as the printer. 1 Type the printer IP address into the address field of toner the Toner Darkness setting. To access printer menus: • Open the Embedded Web Server by printing the first copy and checking it for accuracy...

Maintenance Guide
Page 5
... sequence to let you may be able to redistribute toner. 3 Reinsert the cartridge and continue printing. Note: All life estimates for information about Lexmark authorized supplies dealers in the U.S., contact Lexmark at www.lexmark.comor contact the place where you purchased the printer.... Part name Regular cartridge Lexmark Return Program Cartridge For the US and Canada Toner cartridge E260A21A E260A11A For ...
... sequence to let you may be able to redistribute toner. 3 Reinsert the cartridge and continue printing. Note: All life estimates for information about Lexmark authorized supplies dealers in the U.S., contact Lexmark at www.lexmark.comor contact the place where you purchased the printer.... Part name Regular cartridge Lexmark Return Program Cartridge For the US and Canada Toner cartridge E260A21A E260A11A For ...

Maintenance Guide
Page 6
...;to‑back several times to see approximately how much toner is low" light sequence appears, or when you experience faded print, remove the toner cartridge. Part name Photoconductor kit Replacing supplies Replacing the toner cartridge Light sequence Toner is low Part number E260X22G • ‑ On ...left side of the printer and lowering the door. When shaking the cartridge no longer improves the print quality, replace the toner cartridge. To replace the toner cartridge: 1 Open the front door by pressing the button on the left in your cartridge by printing a menu settings...
...;to‑back several times to see approximately how much toner is low" light sequence appears, or when you experience faded print, remove the toner cartridge. Part name Photoconductor kit Replacing supplies Replacing the toner cartridge Light sequence Toner is low Part number E260X22G • ‑ On ...left side of the printer and lowering the door. When shaking the cartridge no longer improves the print quality, replace the toner cartridge. To replace the toner cartridge: 1 Open the front door by pressing the button on the left in your cartridge by printing a menu settings...
Maintenance Guide
Page 7
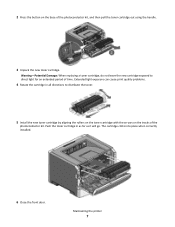
... tracks of the photoconductor kit. Warning-Potential Damage: When replacing a toner cartridge, do not leave the new cartridge exposed to distribute the toner. 5 Install the new toner cartridge by aligning the rollers on the toner cartridge with the arrows on the base of time. The cartridge clicks... installed. 6 Close the front door. Push the toner cartridge in all directions to direct light for an extended period of the photoconductor kit, and then pull the toner cartridge out using the handle. 3 Unpack the new toner cartridge. Extended light exposure can cause print quality problems...
... tracks of the photoconductor kit. Warning-Potential Damage: When replacing a toner cartridge, do not leave the new cartridge exposed to distribute the toner. 5 Install the new toner cartridge by aligning the rollers on the toner cartridge with the arrows on the base of time. The cartridge clicks... installed. 6 Close the front door. Push the toner cartridge in all directions to direct light for an extended period of the photoconductor kit, and then pull the toner cartridge out using the handle. 3 Unpack the new toner cartridge. Extended light exposure can cause print quality problems...

Maintenance Guide
Page 9
... so may affect the print quality of the printer by pressing the button on the base of the photoconductor kit. Note: The photoconductor kit and toner cartridge form a unit. Warning-Potential Damage: Be careful not to touch the photoconductor drum. Maintaining the printer 9 Place the unit on a flat, clean... surface. 3 Press the button on the left side of the printer and lowering the front door. 2 Pull the photoconductor kit and toner cartridge together as a unit out of future print jobs. Pull the toner cartridge up and out using the handle. 4 Unpack the new photoconductor kit.
... so may affect the print quality of the printer by pressing the button on the base of the photoconductor kit. Note: The photoconductor kit and toner cartridge form a unit. Warning-Potential Damage: Be careful not to touch the photoconductor drum. Maintaining the printer 9 Place the unit on a flat, clean... surface. 3 Press the button on the left side of the printer and lowering the front door. 2 Pull the photoconductor kit and toner cartridge together as a unit out of future print jobs. Pull the toner cartridge up and out using the handle. 4 Unpack the new photoconductor kit.

Maintenance Guide
Page 10
... in the printer. To reset the counter, see the instruction sheet that came with the new photoconductor kit. 5 Insert the toner cartridge into the printer by aligning the rollers on the guides of the unit with the arrows in until it will go. 7 After you replace ... printer 10 Push the unit as far as it clicks into place. 6 Install the unit into the photoconductor kit by aligning the arrows on the toner cartridge with the tracks.
... in the printer. To reset the counter, see the instruction sheet that came with the new photoconductor kit. 5 Insert the toner cartridge into the printer by aligning the rollers on the guides of the unit with the arrows in until it will go. 7 After you replace ... printer 10 Push the unit as far as it clicks into place. 6 Install the unit into the photoconductor kit by aligning the arrows on the toner cartridge with the tracks.
User Guide
Page 2
... driver...24 Minimizing your printer's environmental impact 26 Saving paper and toner...26 Using recycled paper and other office papers ...26 Conserving supplies...26 Saving energy...27 Adjusting Power Saver...27 Recycling...27 Recycling Lexmark products...28 Recycling Lexmark packaging...28 Returning Lexmark cartridges for the printer...10 Printer configurations...11 Understanding the printer...
... driver...24 Minimizing your printer's environmental impact 26 Saving paper and toner...26 Using recycled paper and other office papers ...26 Conserving supplies...26 Saving energy...27 Adjusting Power Saver...27 Recycling...27 Recycling Lexmark products...28 Recycling Lexmark packaging...28 Returning Lexmark cartridges for the printer...10 Printer configurations...11 Understanding the printer...
User Guide
Page 4
......83 Checking the status of supplies...83 Checking the status of supplies from a network computer 83 Ordering supplies...84 Ordering toner cartridges...84 Ordering a photoconductor kit ...85 Replacing supplies...85 Replacing the toner cartridge ...85 Replacing the photoconductor kit ...87 Moving the printer...90 Before moving the printer ...90 Moving the printer...
......83 Checking the status of supplies...83 Checking the status of supplies from a network computer 83 Ordering supplies...84 Ordering toner cartridges...84 Ordering a photoconductor kit ...85 Replacing supplies...85 Replacing the toner cartridge ...85 Replacing the photoconductor kit ...87 Moving the printer...90 Before moving the printer ...90 Moving the printer...
User Guide
Page 5
... jams 93 Avoiding jams...93 Accessing jam areas...93 Understanding jam lights and access locations...94 Clearing jams behind the photoconductor kit and toner cartridge 98 Clearing jams from the standard exit bin...100 Clearing jams from Tray 1...100 Clearing jams from Tray 2...102 Clearing jams ...unsupported cartridge ...107 58 Too many flash options installed ...107 58 Too many trays attached ...108 59 Incompatible tray ...108 88 Replace toner ...108 Solving basic printer problems...108 Solving printing problems...109 Jobs do not print...109 Multiple-language PDFs do not print...110 Job ...
... jams 93 Avoiding jams...93 Accessing jam areas...93 Understanding jam lights and access locations...94 Clearing jams behind the photoconductor kit and toner cartridge 98 Clearing jams from the standard exit bin...100 Clearing jams from Tray 1...100 Clearing jams from Tray 2...102 Clearing jams ...unsupported cartridge ...107 58 Too many flash options installed ...107 58 Too many trays attached ...108 59 Incompatible tray ...108 88 Replace toner ...108 Solving basic printer problems...108 Solving printing problems...109 Jobs do not print...109 Multiple-language PDFs do not print...110 Job ...
User Guide
Page 6
... Incorrect margins...117 Paper curl...117 Print is too dark...117 Print is too light ...118 Skewed print...119 Toner fog or background shading appears on the page 119 Toner rubs off...119 Toner specks...120 Transparency print quality is poor...120 Streaked horizontal lines...121 Streaked vertical lines ...121 Solid black or...
... Incorrect margins...117 Paper curl...117 Print is too dark...117 Print is too light ...118 Skewed print...119 Toner fog or background shading appears on the page 119 Toner rubs off...119 Toner specks...120 Transparency print quality is poor...120 Streaked horizontal lines...121 Streaked vertical lines ...121 Solid black or...
User Guide
Page 15
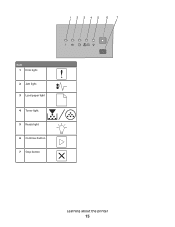
Item 1 Error light 2 Jam light 3 Load paper light 4 Toner light 5 Ready light 6 Continue button 7 Stop button Learning about the printer 15
Item 1 Error light 2 Jam light 3 Load paper light 4 Toner light 5 Ready light 6 Continue button 7 Stop button Learning about the printer 15

User Guide
Page 26
...is continually improving its printers with the environment in laser (electrophotographic) printers. Saving paper and toner Using recycled paper and other office papers As an environmentally conscious company, Lexmark supports the use in mind, engineer our packaging to reduce materials, and provide collection and...papers (such as premium 24 lb laser papers, 50-90 Sheffield units) and much rougher papers (such as non-recycled paper. Lexmark consistently tests its printers to reduce your paper supplier. • Suitable sheet-to the US government a study demonstrating that all recycled...
...is continually improving its printers with the environment in laser (electrophotographic) printers. Saving paper and toner Using recycled paper and other office papers As an environmentally conscious company, Lexmark supports the use in mind, engineer our packaging to reduce materials, and provide collection and...papers (such as premium 24 lb laser papers, 50-90 Sheffield units) and much rougher papers (such as non-recycled paper. Lexmark consistently tests its printers to reduce your paper supplier. • Suitable sheet-to the US government a study demonstrating that all recycled...

User Guide
Page 28
... from landfills annually by making it both easy and free for Lexmark customers to return used in your area. Recycling Lexmark products To return Lexmark products to Lexmark for recycling: 1 Visit our Web site at www.lexmark.com/recycle. 2 From the Toner Cartridges section, select your country from the list. 3 Follow the instructions on the computer...
... from landfills annually by making it both easy and free for Lexmark customers to return used in your area. Recycling Lexmark products To return Lexmark products to Lexmark for recycling: 1 Visit our Web site at www.lexmark.com/recycle. 2 From the Toner Cartridges section, select your country from the list. 3 Follow the instructions on the computer...
User Guide
Page 29
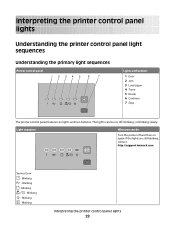
...control panel lights Understanding the printer control panel light sequences Understanding the primary light sequences Printer control panel Lights and buttons 1 Error 2 Jam 3 Load paper 4 Toner 5 Ready 6 Continue 7 Stop The printer control panel features six lights and two buttons. Blinking - Blinking - Blinking - Blinking - Light sequence What you ... the printer off and then on , off, blinking, or blinking slowly. Blinking - If the lights are still blinking, contact http://support.lexmark.com. Blinking Interpreting the printer control panel lights 29 Service Error -
...control panel lights Understanding the printer control panel light sequences Understanding the primary light sequences Printer control panel Lights and buttons 1 Error 2 Jam 3 Load paper 4 Toner 5 Ready 6 Continue 7 Stop The printer control panel features six lights and two buttons. Blinking - Blinking - Blinking - Blinking - Light sequence What you ... the printer off and then on , off, blinking, or blinking slowly. Blinking - If the lights are still blinking, contact http://support.lexmark.com. Blinking Interpreting the printer control panel lights 29 Service Error -
User Guide
Page 33
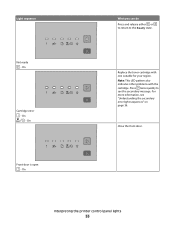
Replace the toner cartridge with the cartridge. On Front door is open - Press twice quickly to the Ready state. Note: This LED pattern also indicates other problems with one suitable for your region. On What you can do Press and release either or to return to see "Understanding the secondary error light sequences" on page 36. For more information, see the secondary message. Close the front door. Light sequence Not ready - On - On Cartridge error - Interpreting the printer control panel lights 33
Replace the toner cartridge with the cartridge. On Front door is open - Press twice quickly to the Ready state. Note: This LED pattern also indicates other problems with one suitable for your region. On What you can do Press and release either or to return to see "Understanding the secondary error light sequences" on page 36. For more information, see the secondary message. Close the front door. Light sequence Not ready - On - On Cartridge error - Interpreting the printer control panel lights 33


