User's Guide
Page 35
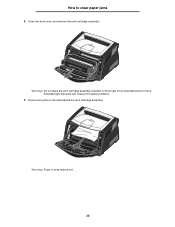
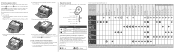
Extended light exposure can cause print quality problems. 3 Remove any jams in the area behind the print cartridge assembly. Warning: Do not leave the print cartridge assembly exposed to clear paper jams 2 Open the front cover, and remove the print cartridge assembly. Warning: Fuser or area may be hot. 35 How to direct light for an extended period of time.
Extended light exposure can cause print quality problems. 3 Remove any jams in the area behind the print cartridge assembly. Warning: Do not leave the print cartridge assembly exposed to clear paper jams 2 Open the front cover, and remove the print cartridge assembly. Warning: Fuser or area may be hot. 35 How to direct light for an extended period of time.
User's Guide
Page 54
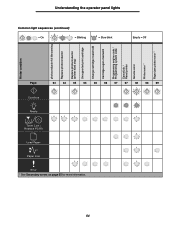
... Kit Load Paper Paper Jam Error * See Secondary errors on page 55 for more information. 64 Understanding the operator panel lights 64 65 = Blinking 65 54 Printer condition photoconductor kit life warning Replace photoconductor Replace photoconductor (printer hard stop) Unsupported print cartridge Change cartridge invalid refill Cartridge region mismatch Programming engine code...
... Kit Load Paper Paper Jam Error * See Secondary errors on page 55 for more information. 64 Understanding the operator panel lights 64 65 = Blinking 65 54 Printer condition photoconductor kit life warning Replace photoconductor Replace photoconductor (printer hard stop) Unsupported print cartridge Change cartridge invalid refill Cartridge region mismatch Programming engine code...
User's Guide
Page 64
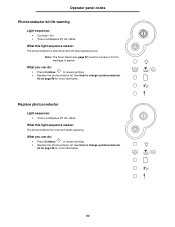
...Toner Low/Replace PC Kit-Blink What this light sequence means: The photoconductor kit is almost full and will need replacing soon. What you can do : • Press Continue to appear. Operator panel codes Photoconductor kit life warning Light sequence: • Continue-On • ...Toner Low/Replace PC Kit-Blink What this light sequence means: The photoconductor is full and needs replacing. Note: The Toner Alarm (see ...
...Toner Low/Replace PC Kit-Blink What this light sequence means: The photoconductor kit is almost full and will need replacing soon. What you can do : • Press Continue to appear. Operator panel codes Photoconductor kit life warning Light sequence: • Continue-On • ...Toner Low/Replace PC Kit-Blink What this light sequence means: The photoconductor is full and needs replacing. Note: The Toner Alarm (see ...
User's Guide
Page 91
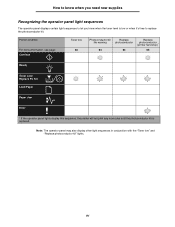
...know when you know when the toner level is replaced. Printer condition For more information, see page: Continue Toner low 63 Photoconductor kit life warning 64 Replace photoconductor 64 Replace photoconductor (printer hard stop)* 65 Ready Toner Low/ Replace PC Kit Load Paper Paper Jam Error * If the ...operator panel lights display this sequence, the printer will not print any more jobs until the photoconductor kit is low or when it's time to let you...
...know when you know when the toner level is replaced. Printer condition For more information, see page: Continue Toner low 63 Photoconductor kit life warning 64 Replace photoconductor 64 Replace photoconductor (printer hard stop)* 65 Ready Toner Low/ Replace PC Kit Load Paper Paper Jam Error * If the ...operator panel lights display this sequence, the printer will not print any more jobs until the photoconductor kit is low or when it's time to let you...
User's Guide
Page 96
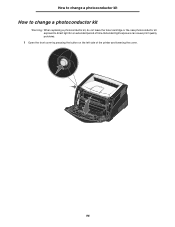
How to change a photoconductor kit How to change a photoconductor kit Warning: When replacing a photoconductor kit, do not leave the toner cartridge or the new photoconductor kit exposed to direct light for an extended period of the printer and lowering the cover. 96 Extended light exposure can cause print quality problems. 1 Open the front cover by pressing the button on the left side of time.
How to change a photoconductor kit How to change a photoconductor kit Warning: When replacing a photoconductor kit, do not leave the toner cartridge or the new photoconductor kit exposed to direct light for an extended period of the printer and lowering the cover. 96 Extended light exposure can cause print quality problems. 1 Open the front cover by pressing the button on the left side of time.
User's Guide
Page 106
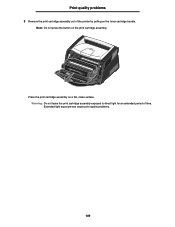
Warning: Do not leave the print cartridge assembly exposed to direct light for an extended period of the printer by pulling on the toner cartridge handle. Note: Do not press the button on a flat, clean surface. Extended light exposure can cause print quality problems. 106 Place the print cartridge assembly on the print cartridge assembly. Print quality problems 3 Remove the print cartridge assembly out of time.
Warning: Do not leave the print cartridge assembly exposed to direct light for an extended period of the printer by pulling on the toner cartridge handle. Note: Do not press the button on a flat, clean surface. Extended light exposure can cause print quality problems. 106 Place the print cartridge assembly on the print cartridge assembly. Print quality problems 3 Remove the print cartridge assembly out of time.
Quick Reference
Page 1
... Never mix media types within a tray. c Click the Paper tab. The Cancel job light sequence is displayed on the publications CD for the tray you loaded. e Select the tray ...or feeder containing the specialty media from the Form Size list box. Warning: Do not force the print media into the printer until it automatically engages. The...loading. See Loading paper or other Envelopes * Tray 2 not available on media such as shown. © 2005 Lexmark International, Inc., All rights reserved. Manual feeder: 76-216 x 127-356 mm (3.0-8.5 x 5.0-14.0 in.) (...
... Never mix media types within a tray. c Click the Paper tab. The Cancel job light sequence is displayed on the publications CD for the tray you loaded. e Select the tray ...or feeder containing the specialty media from the Form Size list box. Warning: Do not force the print media into the printer until it automatically engages. The...loading. See Loading paper or other Envelopes * Tray 2 not available on media such as shown. © 2005 Lexmark International, Inc., All rights reserved. Manual feeder: 76-216 x 127-356 mm (3.0-8.5 x 5.0-14.0 in.) (...
Quick Reference
Page 2
... and remove the print cartridge assembly. 3 Remove any jams. 6 After you have questions about network printing. Common operator panel light sequences Paper jam secondary error codes* Continue Cancel Printer Condition Ready Toner Low / Replace PC Kit Load Paper Paper Jam Error Press...sequence. Press and release Continue twice quickly to display the secondary error code light sequence. † Paper jams at the front of a duplex job Toner low Photoconductor kit life warning Replace photoconductor Replace photoconductor kit (printer hard stop) Unsupported print cartridge Change...
... and remove the print cartridge assembly. 3 Remove any jams. 6 After you have questions about network printing. Common operator panel light sequences Paper jam secondary error codes* Continue Cancel Printer Condition Ready Toner Low / Replace PC Kit Load Paper Paper Jam Error Press...sequence. Press and release Continue twice quickly to display the secondary error code light sequence. † Paper jams at the front of a duplex job Toner low Photoconductor kit life warning Replace photoconductor Replace photoconductor kit (printer hard stop) Unsupported print cartridge Change...
Service Manual
Page 46
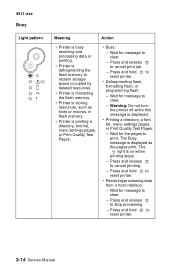
Warning: Do not turn the printer off while this message is on when printing stops. - Press and release to stop processing. - 4511-xxx Busy Light pattern Meaning Action • Printer is busy receiving and processing data or printing. • Printer is defragmenting the ... space occupied by deleted resources. • Printer is formatting the flash memory. • Printer is storing resources, such as the pages print. The light is displayed. • Printing a directory, a font list, menu settings pages, or Print Quality Test Pages: - Press and release to cancel printing...
Warning: Do not turn the printer off while this message is on when printing stops. - Press and release to stop processing. - 4511-xxx Busy Light pattern Meaning Action • Printer is busy receiving and processing data or printing. • Printer is defragmenting the ... space occupied by deleted resources. • Printer is formatting the flash memory. • Printer is storing resources, such as the pages print. The light is displayed. • Printing a directory, a font list, menu settings pages, or Print Quality Test Pages: - Press and release to cancel printing...

Service Manual
Page 51
Replace photoconductor kit (an early warning) Light pattern Meaning Action The photoconductor kit drum is installed in the print cartridge is getting low. • Send a print job. • Press to print the ... extend the life of the cartridge. • Replace the print cartridge. • Press and hold to resume printing. • Replace the photoconductor kit. Note: The light may not come on if the starter print cartridge is full and needs replacing. • Press to reset printer. Diagnostics-E238...
Replace photoconductor kit (an early warning) Light pattern Meaning Action The photoconductor kit drum is installed in the print cartridge is getting low. • Send a print job. • Press to print the ... extend the life of the cartridge. • Replace the print cartridge. • Press and hold to resume printing. • Replace the photoconductor kit. Note: The light may not come on if the starter print cartridge is full and needs replacing. • Press to reset printer. Diagnostics-E238...

Service Manual
Page 119
...110 V model printer • 200 V ac-240 V ac for the 220 V model printer Turn the printer off, and wait a few minutes for more information. Warning: Avoid handling the lamp as much as possible, as it is usually caused by opening the left side cover and observing the upper opening through... checking across the connector pins. • If there is continuity, go to Step 1: Continuity. • If there is incorrect on pin 1, see the light from the lamp by low fuser temperature. If the problem persists, disconnect the thermistor cable at CN102. If line voltage is no continuity, go to...
...110 V model printer • 200 V ac-240 V ac for the 220 V model printer Turn the printer off, and wait a few minutes for more information. Warning: Avoid handling the lamp as much as possible, as it is usually caused by opening the left side cover and observing the upper opening through... checking across the connector pins. • If there is continuity, go to Step 1: Continuity. • If there is incorrect on pin 1, see the light from the lamp by low fuser temperature. If the problem persists, disconnect the thermistor cable at CN102. If line voltage is no continuity, go to...
Service Manual
Page 125
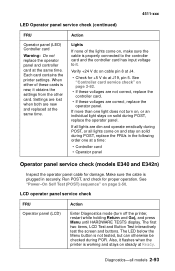
... • Controller card • Operator panel Operator panel service check (models E340 and E342n) Inspect the operator panel cable for damage. If all lights are not correct, replace the controller card. • If these cards is new, it obtains the settings from the other card. See "Power-...be checked during POST, replace the operator panel. 4511-xxx LED Operator panel service check (continued) FRU Operator panel (LED) Controller card Warning: Do not replace the operator panel and controller card at Ready. The first two items, LCD Test and Button Test interactively test the screen...
... • Controller card • Operator panel Operator panel service check (models E340 and E342n) Inspect the operator panel cable for damage. If all lights are not correct, replace the controller card. • If these cards is new, it obtains the settings from the other card. See "Power-...be checked during POST, replace the operator panel. 4511-xxx LED Operator panel service check (continued) FRU Operator panel (LED) Controller card Warning: Do not replace the operator panel and controller card at Ready. The first two items, LCD Test and Button Test interactively test the screen...


