User's Guide
Page 5
...time, called Power Saver. This limited warranty applies to a high value maintains a fast response, but may be available for the Lexmark E240/240n. Before you transfer this product to present the feature or option with an energy-saving mode called the Power Saver Timeout. ...item. Remote technical support is a feature or option, this statement applies only when that user for this product does not function as fuser units, transfer belts, and paper feed items)###, if any, and any product. The total printer energy usage is available are substantially...
...time, called Power Saver. This limited warranty applies to a high value maintains a fast response, but may be available for the Lexmark E240/240n. Before you transfer this product to present the feature or option with an energy-saving mode called the Power Saver Timeout. ...item. Remote technical support is a feature or option, this statement applies only when that user for this product does not function as fuser units, transfer belts, and paper feed items)###, if any, and any product. The total printer energy usage is available are substantially...
User's Guide
Page 35
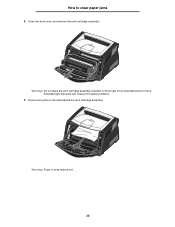
Warning: Do not leave the print cartridge assembly exposed to clear paper jams 2 Open the front cover, and remove the print cartridge assembly. How to direct light for an extended period of time. Warning: Fuser or area may be hot. 35 Extended light exposure can cause print quality problems. 3 Remove any jams in the area behind the print cartridge assembly.
Warning: Do not leave the print cartridge assembly exposed to clear paper jams 2 Open the front cover, and remove the print cartridge assembly. How to direct light for an extended period of time. Warning: Fuser or area may be hot. 35 Extended light exposure can cause print quality problems. 3 Remove any jams in the area behind the print cartridge assembly.

User's Guide
Page 36
..., the memory that holds the image of the printer, and remove any jams beneath the flap. 5 Open the rear exit, and remove any jams. Warning: Fuser or area may be reprinted, depending on the printer's overall memory usage. 36 Therefore, a jammed page may or may not be hot. 6 After you have...
..., the memory that holds the image of the printer, and remove any jams beneath the flap. 5 Open the rear exit, and remove any jams. Warning: Fuser or area may be reprinted, depending on the printer's overall memory usage. 36 Therefore, a jammed page may or may not be hot. 6 After you have...
User's Guide
Page 101
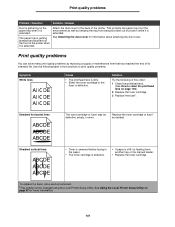
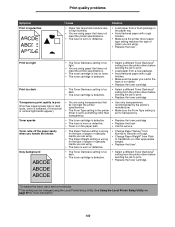
... Solution / Answer Dust is gathering on the paper tray when it is extended. Streaked horizontal lines ABCDE ABCDE ABCDE The toner cartridge or fuser may be changed using the Local Printer Setup Utility. Streaked vertical lines ABCDE ABCDE ABCDE • Toner is smeared before fusing to print ... environment as well as needed. See Using the Local Printer Setup Utility on page 105.) 2 Replace the toner cartridge. 3 Replace the fuser*. Attach the dust cover to clean the printhead lens on page 87 for information about attaching the dust cover. Solution Try the following table...
... Solution / Answer Dust is gathering on the paper tray when it is extended. Streaked horizontal lines ABCDE ABCDE ABCDE The toner cartridge or fuser may be changed using the Local Printer Setup Utility. Streaked vertical lines ABCDE ABCDE ABCDE • Toner is smeared before fusing to print ... environment as well as needed. See Using the Local Printer Setup Utility on page 105.) 2 Replace the toner cartridge. 3 Replace the fuser*. Attach the dust cover to clean the printhead lens on page 87 for information about attaching the dust cover. Solution Try the following table...
User's Guide
Page 102
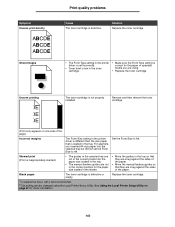
...printer's manufacturer. • Make sure the Form Type setting is set to print. • Replace the toner cartridge. *To replace the fuser, call a service technician. †This setting can be changed using the Local Printer Setup Utility. See Using the Local Printer Setup Utility on...meet the printer specifications. • The Form Type setting in the printer driver is set to something other appropriate weight). • Replace the fuser*. • Select a different Toner Darkness† setting from the printer driver before sending the job to transparency. • The toner cartridge ...
...printer's manufacturer. • Make sure the Form Type setting is set to print. • Replace the toner cartridge. *To replace the fuser, call a service technician. †This setting can be changed using the Local Printer Setup Utility. See Using the Local Printer Setup Utility on...meet the printer specifications. • The Form Type setting in the printer driver is set to something other appropriate weight). • Replace the fuser*. • Select a different Toner Darkness† setting from the printer driver before sending the job to transparency. • The toner cartridge ...
User's Guide
Page 103
... printer driver is different than the size paper that they are snug against the sides of the paper. Replace the toner cartridge. *To replace the fuser, call a service technician. †This setting can be changed using . • Replace the toner cartridge. Set the Form Size to A4. Remove and then reinsert...
... printer driver is different than the size paper that they are snug against the sides of the paper. Replace the toner cartridge. *To replace the fuser, call a service technician. †This setting can be changed using . • Replace the toner cartridge. Set the Form Size to A4. Remove and then reinsert...
User's Guide
Page 104
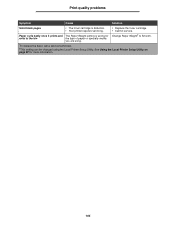
... toner cartridge is wrong for Change Paper Weight† to the bin the type of paper or specialty media you are using. *To replace the fuser, call a service technician. †This setting can be changed using the Local Printer Setup Utility. See Using the Local Printer Setup Utility on page 87...
... toner cartridge is wrong for Change Paper Weight† to the bin the type of paper or specialty media you are using. *To replace the fuser, call a service technician. †This setting can be changed using the Local Printer Setup Utility. See Using the Local Printer Setup Utility on page 87...
Service Manual
Page 4
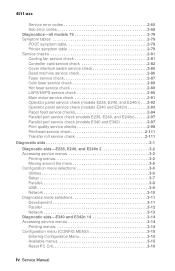
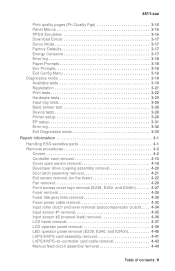
...fuser service check 2-89 Hot fuser service check 2-89 LVPS/HVPS service check 2-90 Main motor service check 2-91 Operator panel service check (models E238, E240, and E240n) . . . 2-92 Operator panel service check (models E340 and E342n 2-93 Paper feed service checks 2-94 Parallel port service check (models E238, E240...quality service checks 2-98 Printhead service check 2-111 Transfer roll service check 2-111 Diagnostic aids 3-1 Diagnostic aids-E238, E240, and E240n 2 3-2 Accessing service menus 3-2 Printing menus 3-2 Moving around the menu 3-5 Configuration menu selections 3-6 ...
...fuser service check 2-89 Hot fuser service check 2-89 LVPS/HVPS service check 2-90 Main motor service check 2-91 Operator panel service check (models E238, E240, and E240n) . . . 2-92 Operator panel service check (models E340 and E342n 2-93 Paper feed service checks 2-94 Parallel port service check (models E238, E240...quality service checks 2-98 Printhead service check 2-111 Transfer roll service check 2-111 Diagnostic aids 3-1 Diagnostic aids-E238, E240, and E240n 2 3-2 Accessing service menus 3-2 Printing menus 3-2 Moving around the menu 3-5 Configuration menu selections 3-6 ...
Service Manual
Page 5
... drive coupling assembly removal 4-20 Door latch assembly removal 4-21 Exit sensor removal (on the fuser 4-22 Fan removal 4-26 Front access cover logo removal (E238, E240, and E240n 4-27 Fuser removal 4-28 Fuser idle gear links removal 4-30 Fuser power cable removal 4-32 Input roller clutch and lever removal (autocompensator clutch). . . . 4-34 Input sensor...
... drive coupling assembly removal 4-20 Door latch assembly removal 4-21 Exit sensor removal (on the fuser 4-22 Fan removal 4-26 Front access cover logo removal (E238, E240, and E240n 4-27 Fuser removal 4-28 Fuser idle gear links removal 4-30 Fuser power cable removal 4-32 Input roller clutch and lever removal (autocompensator clutch). . . . 4-34 Input sensor...
Service Manual
Page 34
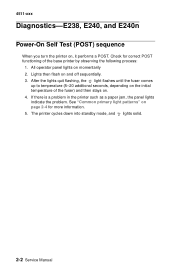
... a POST. See "Common primary light patterns" on and off sequentially. 3. After the lights quit flashing, the light flashes until the fuser comes up to temperature (5-20 additional seconds, depending on the initial temperature of the base printer by observing the following process: 1. The ...printer cycles down into standby mode, and lights solid. 2-2 Service Manual Check for more information. 5. 4511-xxx Diagnostics-E238, E240, and E240n 2 Power-On Self Test (POST) sequence When you turn the printer on . 4. All operator panel lights on momentarily 2. If ...
... a POST. See "Common primary light patterns" on and off sequentially. 3. After the lights quit flashing, the light flashes until the fuser comes up to temperature (5-20 additional seconds, depending on the initial temperature of the base printer by observing the following process: 1. The ...printer cycles down into standby mode, and lights solid. 2-2 Service Manual Check for more information. 5. 4511-xxx Diagnostics-E238, E240, and E240n 2 Power-On Self Test (POST) sequence When you turn the printer on . 4. All operator panel lights on momentarily 2. If ...
Service Manual
Page 57
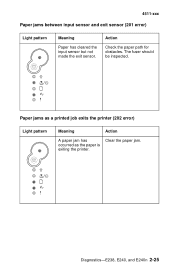
occurred as a printed job exits the printer (202 error) Light pattern Meaning Action A paper jam has Clear the paper jam. Diagnostics-E238, E240, and E240n 2-25 The fuser should be inspected. Paper jams as the paper is exiting the printer. Action Check the paper path for obstacles. 4511-xxx Paper jams between input sensor and exit sensor (201 error) Light pattern Meaning Paper has cleared the input sensor but not made the exit sensor.
occurred as a printed job exits the printer (202 error) Light pattern Meaning Action A paper jam has Clear the paper jam. Diagnostics-E238, E240, and E240n 2-25 The fuser should be inspected. Paper jams as the paper is exiting the printer. Action Check the paper path for obstacles. 4511-xxx Paper jams between input sensor and exit sensor (201 error) Light pattern Meaning Paper has cleared the input sensor but not made the exit sensor.

Service Manual
Page 68
... flashing as the primary notification or code. In the following pages) indicate specific device errors. Doubleclick for more information. • The secondary light pattern indicates a fuser or toner sensor error. The secondary light pattern indicates an area or function which has the error. 4511-xxx Service codes All service errors are...
... flashing as the primary notification or code. In the following pages) indicate specific device errors. Doubleclick for more information. • The secondary light pattern indicates a fuser or toner sensor error. The secondary light pattern indicates an area or function which has the error. 4511-xxx Service codes All service errors are...

Service Manual
Page 70
90x-Software 91x-DC motor or transfer roll 92x-Fuser or toner sensor 93x-Printhead, drive motor, RIP to engine 94x-RIP to engine communications, engine electronics 95x-Controller card (NVRAM, ROM, or NAND) 4511-xxx Service secondary error codes Service secondary error codes Service secondary error codes Lights ✷ ✷ ✷ ✷ ✷ ✷ Continue Ready Toner Low/ Replace PC Kit Load Paper Paper Jam Error ✷ ✷ ✷ ✷ ✷ ✷ ✷ 2-38 Service Manual
90x-Software 91x-DC motor or transfer roll 92x-Fuser or toner sensor 93x-Printhead, drive motor, RIP to engine 94x-RIP to engine communications, engine electronics 95x-Controller card (NVRAM, ROM, or NAND) 4511-xxx Service secondary error codes Service secondary error codes Service secondary error codes Lights ✷ ✷ ✷ ✷ ✷ ✷ Continue Ready Toner Low/ Replace PC Kit Load Paper Paper Jam Error ✷ ✷ ✷ ✷ ✷ ✷ ✷ 2-38 Service Manual

Service Manual
Page 74
... sensor Service secondary codes- 92x Service teriary codes-fuser, fan, or toner sensor 920-Fuser below temperature when printing 921-Fuser below standby temperature at idle 922-Fuser failed to reach standby temperature 923-Fuser too hot during printing or idle 924-Open circuit in the fuser (see "Fuser service check" on page 2-87 for more information...
... sensor Service secondary codes- 92x Service teriary codes-fuser, fan, or toner sensor 920-Fuser below temperature when printing 921-Fuser below standby temperature at idle 922-Fuser failed to reach standby temperature 923-Fuser too hot during printing or idle 924-Open circuit in the fuser (see "Fuser service check" on page 2-87 for more information...
Service Manual
Page 75
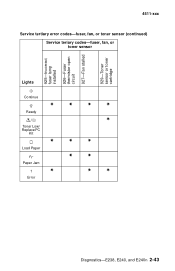
4511-xxx Service tertiary error codes-fuser, fan, or toner sensor (continued) Service teriary codes-fuser, fan, or toner sensor 925-Incorrect fuser lamp installed 926-Fuser thermistor open circuit 927-Fan stalled 929-Toner sensor or toner cartridge Lights Continue ✷ ✷ ✷ ✷ Ready ✷ Toner Low/ Replace PC Kit ✷ ✷ ✷ Load Paper ✷ ✷ Paper Jam ✷ ✷ ✷ Error Diagnostics-E238, E240, and E240n 2-43
4511-xxx Service tertiary error codes-fuser, fan, or toner sensor (continued) Service teriary codes-fuser, fan, or toner sensor 925-Incorrect fuser lamp installed 926-Fuser thermistor open circuit 927-Fan stalled 929-Toner sensor or toner cartridge Lights Continue ✷ ✷ ✷ ✷ Ready ✷ Toner Low/ Replace PC Kit ✷ ✷ ✷ Load Paper ✷ ✷ Paper Jam ✷ ✷ ✷ Error Diagnostics-E238, E240, and E240n 2-43

Service Manual
Page 97
... Service error codes Service error codes are generally non-recoverable except in an intermittent condition when you can POR the printer to "Fuser service check" on printing or when printer page 2-87. If the problem continues, replace the controller card. 905 Interface violation...proper temperature during Go to temporarily recover from the error condition. Go to Fuser failed to the fuser. Go to "Fuser service check" on Indicates that the fuser page 2-87. is below temperature when printing. 921 Fuser error Go to been detected in the transfer roll area. Service error codes...
... Service error codes Service error codes are generally non-recoverable except in an intermittent condition when you can POR the printer to "Fuser service check" on printing or when printer page 2-87. If the problem continues, replace the controller card. 905 Interface violation...proper temperature during Go to temporarily recover from the error condition. Go to Fuser failed to the fuser. Go to "Fuser service check" on Indicates that the fuser page 2-87. is below temperature when printing. 921 Fuser error Go to been detected in the transfer roll area. Service error codes...

Service Manual
Page 98
... There is stalling. Replace the controller card. 2-66 Service Manual 4511-xxx Service error codes (9xx) (continued) Error Description Action 925 Fuser Error Replace fuser with correct one of one . Replace the fan. See "Fan removal" on page 4-28. 927 Fan Error Fan is a mismatch between... motor ramp-up to speed. 937 Transport motor lost lock Replace the printhead. 935 Mirror motor unable to speed. See (Incorrect fuser lamp.) "Fuser removal" on page 4-26. 929 Toner sensor The toner sensor is not operating properly, the developer drive assembly is not operating properly...
... There is stalling. Replace the controller card. 2-66 Service Manual 4511-xxx Service error codes (9xx) (continued) Error Description Action 925 Fuser Error Replace fuser with correct one of one . Replace the fan. See "Fan removal" on page 4-28. 927 Fan Error Fan is a mismatch between... motor ramp-up to speed. 937 Transport motor lost lock Replace the printhead. 935 Mirror motor unable to speed. See (Incorrect fuser lamp.) "Fuser removal" on page 4-26. 929 Toner sensor The toner sensor is not operating properly, the developer drive assembly is not operating properly...

Service Manual
Page 102
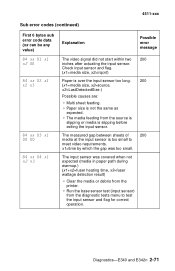
... no longer covered. (x1+x2=page ahead's expected length, x3+x4=Page ahead's measured length) This code indicates that might cause the paper to the fuser for anything that the input sensor 200 is still actuated from the first sheet, and the second sheet is no gap jam. 4511-xxx Sub...
... no longer covered. (x1+x2=page ahead's expected length, x3+x4=Page ahead's measured length) This code indicates that might cause the paper to the fuser for anything that the input sensor 200 is still actuated from the first sheet, and the second sheet is no gap jam. 4511-xxx Sub...
Service Manual
Page 103
x1=time by which the gap was covered when not expected (media in paper path during warmup.) (x1+x2=fuser heating time, x3=fuser wattage detection result) • Clear the media or debris from the printer. • Run the base sensor test (input sensor) from the source is slipping ...
x1=time by which the gap was covered when not expected (media in paper path during warmup.) (x1+x2=fuser heating time, x3=fuser wattage detection result) • Clear the media or debris from the printer. • Run the base sensor test (input sensor) from the source is slipping ...

Service Manual
Page 107
... or redrive assembly. Feed a sheet of paper, and if the same error occurs after clearing the fuser, or the same error occurs when no media is a piece of media in the exit of media indicating there is present, check the exit sensor ..., and select the base sensor test. See "Accessing service menus" on page 3-2 for media in the paper path during warm-up. Check for models E238, E240, or E240n or "Accessing service menus" on page 3-28. Select output sensor, and check the sensor for models E340 or E342n. 4511-xxx Sub error...
... or redrive assembly. Feed a sheet of paper, and if the same error occurs after clearing the fuser, or the same error occurs when no media is a piece of media in the exit of media indicating there is present, check the exit sensor ..., and select the base sensor test. See "Accessing service menus" on page 3-2 for media in the paper path during warm-up. Check for models E238, E240, or E240n or "Accessing service menus" on page 3-28. Select output sensor, and check the sensor for models E340 or E342n. 4511-xxx Sub error...


