User's Guide
Page 5
... Sleep Mode. The replacement may be required to the country-specific warranty information that this product: • Is manufactured from new parts, or new and serviceable used parts, which a Maintenance Kit is used up, depleted, or consumed. ###List product-specific maintenance items such as shown on the World Wide Web at Lexmark's option). For further explanation of each mode in warranty service, damaged beyond the limit of all print cartridges, programs, data, and removable storage media...
... Sleep Mode. The replacement may be required to the country-specific warranty information that this product: • Is manufactured from new parts, or new and serviceable used parts, which a Maintenance Kit is used up, depleted, or consumed. ###List product-specific maintenance items such as shown on the World Wide Web at Lexmark's option). For further explanation of each mode in warranty service, damaged beyond the limit of all print cartridges, programs, data, and removable storage media...

User's Guide
Page 9
... panel codes ...57 Primary codes ...58 Secondary error codes 70 Chapter 8: Understanding the printer configuration menus 80 Printing the Printer Settings Configuration sheet 80 Configuration menus overview 81 Network menu ...82 Parallel menu ...82 Setup menu ...83 USB menu ...83 Utilities menu ...84 Chapter 9: Software and network tasks 85 How to print the menu settings and network setup pages 85 How to print a test page 85 Windows ...85 How to configure for TCP/IP 86 Assigning a printer IP address 86 Verifying the IP settings 86 Using the printer resident Web page...
... panel codes ...57 Primary codes ...58 Secondary error codes 70 Chapter 8: Understanding the printer configuration menus 80 Printing the Printer Settings Configuration sheet 80 Configuration menus overview 81 Network menu ...82 Parallel menu ...82 Setup menu ...83 USB menu ...83 Utilities menu ...84 Chapter 9: Software and network tasks 85 How to print the menu settings and network setup pages 85 How to print a test page 85 Windows ...85 How to configure for TCP/IP 86 Assigning a printer IP address 86 Verifying the IP settings 86 Using the printer resident Web page...
User's Guide
Page 14
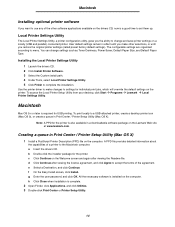
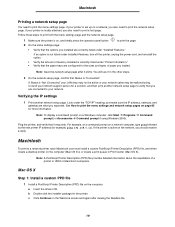
... Printer Settings Utility 1 Launch the drivers CD. 2 Click Install Printer Software. 3 Select the Custom install path. 4 Under Tools, select Local Printer Settings Utility. 5 Click Finish to a USB-attached printer, create a desktop printer icon (Mac OS 9), or create a queue in Print Center / Printer Setup Utility (Mac OS X) 1 Install a PostScript Printer Description (PPD) file on the printer. Use the printer driver to make other software applications available on the drivers CD, now is a good time to menu. Creating a queue in Print Center / Printer Setup Utility (Mac...
... Printer Settings Utility 1 Launch the drivers CD. 2 Click Install Printer Software. 3 Select the Custom install path. 4 Under Tools, select Local Printer Settings Utility. 5 Click Finish to a USB-attached printer, create a desktop printer icon (Mac OS 9), or create a queue in Print Center / Printer Setup Utility (Mac OS X) 1 Install a PostScript Printer Description (PPD) file on the printer. Use the printer driver to make other software applications available on the drivers CD, now is a good time to menu. Creating a queue in Print Center / Printer Setup Utility (Mac...
User's Guide
Page 16
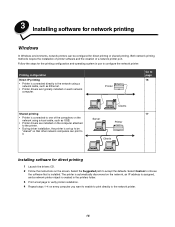
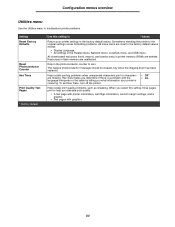
Server Printer Clients Installing software for direct printing 1 Launch the drivers CD. 2 Follow the instructions on every computer you want to enable to print directly to accept the defaults. 3 Installing software for network printing Windows In Windows environments, network printers can be "shared" so that is created in use to configure the network printer: Printing configuration Direct IP printing • Printer is connected directly to choose the software that other network computers can print to it. Printer Go to page 16 Clients Shared...
Server Printer Clients Installing software for direct printing 1 Launch the drivers CD. 2 Follow the instructions on every computer you want to enable to print directly to accept the defaults. 3 Installing software for network printing Windows In Windows environments, network printers can be "shared" so that is created in use to configure the network printer: Printing configuration Direct IP printing • Printer is connected directly to choose the software that other network computers can print to it. Printer Go to page 16 Clients Shared...
User's Guide
Page 19
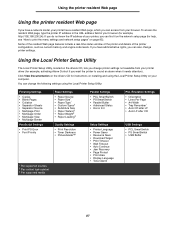
... new printer IP address (for the printer. a Insert the drivers CD. Consult your network support person for a solution, and then print another network setup page. Ping the printer, and verify that the paper trays are connected to your network cable may not be malfunctioning. b Double-click the installer package for example, ping 192.168.0.11). Look under "Printer Information." • Verify that it prints. Macintosh To print to a network printer, each Macintosh user must install a custom PostScript Printer...
... new printer IP address (for the printer. a Insert the drivers CD. Consult your network support person for a solution, and then print another network setup page. Ping the printer, and verify that the paper trays are connected to your network cable may not be malfunctioning. b Double-click the installer package for example, ping 192.168.0.11). Look under "Printer Information." • Verify that it prints. Macintosh To print to a network printer, each Macintosh user must install a custom PostScript Printer...
User's Guide
Page 84
... message should be cleared only when the imaging drum has been replaced. When you what information your printer settings to the factory default values except: • Display Language. • All settings in the Parallel menu, Network menu, LocalTalk menu, and USB menu. Resources in printer memory (RAM) are missing. Return the photoconductor counter to help you evaluate print quality: • A text page with printer information, cartridge information, current margin settings, and a graphic. • Two pages with the language interpreter or the cable...
... message should be cleared only when the imaging drum has been replaced. When you what information your printer settings to the factory default values except: • Display Language. • All settings in the Parallel menu, Network menu, LocalTalk menu, and USB menu. Resources in printer memory (RAM) are missing. Return the photoconductor counter to help you evaluate print quality: • A text page with printer information, cartridge information, current margin settings, and a graphic. • Two pages with the language interpreter or the cable...
User's Guide
Page 87
...; • Paper Loading‡ Quality Settings • Print Resolution • Toner Darkness • PictureGrade™ * Per supported sources † Per custom type number ‡ Per supported media Parallel Settings • PCL SmartSwitch • PS SmartSwitch • Parallel Buffer • Advanced Status • Honor Init PCL Emulation Settings • Orientation • Lines Per Page • A4 Width • Tray Renumber* • Auto CR after LF • Auto LF after CR Setup Settings • Printer Language • Power Saver...
...; • Paper Loading‡ Quality Settings • Print Resolution • Toner Darkness • PictureGrade™ * Per supported sources † Per custom type number ‡ Per supported media Parallel Settings • PCL SmartSwitch • PS SmartSwitch • Parallel Buffer • Advanced Status • Honor Init PCL Emulation Settings • Orientation • Lines Per Page • A4 Width • Tray Renumber* • Auto CR after LF • Auto LF after CR Setup Settings • Printer Language • Power Saver...
User's Guide
Page 99
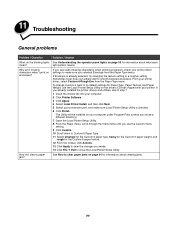
... for the Custom 6 paper texture. 12 From the toolbar, click Actions. 13 Click Apply to save the changes you see voids (missing characters) when printing envelopes, check your printer. The Utility will be installed on the drivers CD that shipped with your printer driver settings to a rougher setting. If you made. 14 Click File Æ Exit to clear paper jams on envelopes? 11 Troubleshooting General problems Problem / Question What do I print on page 34...
... for the Custom 6 paper texture. 12 From the toolbar, click Actions. 13 Click Apply to save the changes you see voids (missing characters) when printing envelopes, check your printer. The Utility will be installed on the drivers CD that shipped with your printer driver settings to a rougher setting. If you made. 14 Click File Æ Exit to clear paper jams on envelopes? 11 Troubleshooting General problems Problem / Question What do I print on page 34...
User's Guide
Page 100
... support card stock. After the first page has printed, reload the card stock in the output bin. Extend the paper support on . 11Factory defaults have to put in the feeder with the already-printed side down, with the low cartridge? Solution / Answer Sometimes restoring the printer to the original factory default settings solves formatting problems. To reset the factory defaults: 1 Turn off and back on the output bin. 100 To extend the life of the sheet first. Load the card...
... support card stock. After the first page has printed, reload the card stock in the output bin. Extend the paper support on . 11Factory defaults have to put in the feeder with the already-printed side down, with the low cartridge? Solution / Answer Sometimes restoring the printer to the original factory default settings solves formatting problems. To reset the factory defaults: 1 Turn off and back on the output bin. 100 To extend the life of the sheet first. Load the card...
User's Guide
Page 101
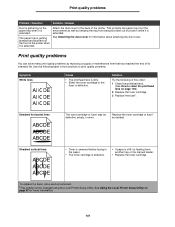
... fuser is defective. Streaked horizontal lines ABCDE ABCDE ABCDE The toner cartridge or fuser may be changed using the Local Printer Setup Utility. Replace the toner cartridge or fuser* as keeping the tray from another tray or the manual feeder. • Replace the toner cartridge. *To replace the fuser, call a service technician. †This setting can solve many print quality problems by replacing a supply or maintenance item that has reached the end of the printer. See Using the Local Printer Setup Utility on page 105.) 2 Replace the toner cartridge. 3 Replace the fuser...
... fuser is defective. Streaked horizontal lines ABCDE ABCDE ABCDE The toner cartridge or fuser may be changed using the Local Printer Setup Utility. Replace the toner cartridge or fuser* as keeping the tray from another tray or the manual feeder. • Replace the toner cartridge. *To replace the fuser, call a service technician. †This setting can solve many print quality problems by replacing a supply or maintenance item that has reached the end of the printer. See Using the Local Printer Setup Utility on page 105.) 2 Replace the toner cartridge. 3 Replace the fuser...
User's Guide
Page 102
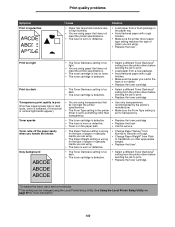
... the printer driver paper type setting matches the type of paper or specialty media you are using. • Replace the fuser*. See Using the Local Printer Setup Utility on toner. • The toner cartridge is defective. • The Toner Darkness setting is too dark. • The toner cartridge is defective. • Select a different Toner Darkness† setting from the printer driver before sending the job to print. • Replace the toner cartridge. *To replace the fuser, call a service technician. †This setting can be changed using...
... the printer driver paper type setting matches the type of paper or specialty media you are using. • Replace the fuser*. See Using the Local Printer Setup Utility on toner. • The toner cartridge is defective. • The Toner Darkness setting is too dark. • The toner cartridge is defective. • Select a different Toner Darkness† setting from the printer driver before sending the job to print. • Replace the toner cartridge. *To replace the fuser, call a service technician. †This setting can be changed using...
User's Guide
Page 103
... Printer Setup Utility on one side of the page.) Incorrect margins The Form Size setting in the tray so that they are snug against the sides of the paper. Replace the toner cartridge. *To replace the fuser, call a service technician. †This setting can be changed using . • Replace the toner cartridge. Symptom Uneven print density ABCDE ABCDE ABCDE Ghost Images Print quality problems Cause The toner cartridge is not properly installed. Solution Replace the toner cartridge. • The Form Type setting in the printer driver is set...
... Printer Setup Utility on one side of the page.) Incorrect margins The Form Size setting in the tray so that they are snug against the sides of the paper. Replace the toner cartridge. *To replace the fuser, call a service technician. †This setting can be changed using . • Replace the toner cartridge. Symptom Uneven print density ABCDE ABCDE ABCDE Ghost Images Print quality problems Cause The toner cartridge is not properly installed. Solution Replace the toner cartridge. • The Form Type setting in the printer driver is set...
User's Guide
Page 104
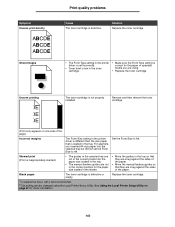
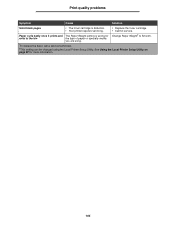
Print quality problems Symptom Cause Solution Solid black pages • The toner cartridge is wrong for Change Paper Weight† to the bin the type of paper or specialty media you are using. *To replace the fuser, call a service technician. †This setting can be changed using the Local Printer Setup Utility. See Using the Local Printer Setup Utility on page 87 for service. Paper curls badly once it prints and The Paper Weight setting is defective. • Your printer requires servicing. • Replace the...
Print quality problems Symptom Cause Solution Solid black pages • The toner cartridge is wrong for Change Paper Weight† to the bin the type of paper or specialty media you are using. *To replace the fuser, call a service technician. †This setting can be changed using the Local Printer Setup Utility. See Using the Local Printer Setup Utility on page 87 for service. Paper curls badly once it prints and The Paper Weight setting is defective. • Your printer requires servicing. • Replace the...
User's Guide
Page 109
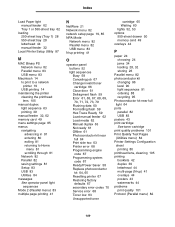
... factory defaults 67 secondary error codes 70 Service error 68 Toner low 63 Unsupported toner cartridge 65 Waiting 60 lights 52, 53 options 550-sheet drawer 50 memory card 49 overlays 44 P paper 24 choosing 24 jams 34 loading 28, 32 storing 26 Parallel menu 82 photoconductor kit changing 96 level 90 light sequences 91 ordering 88 recycling 95 Photoconductor kit near full light 64 ports parallel 82 USB 83 posters 43 print cartridge See toner cartridge print quality problems 101 Print Quality Test Pages (Utilities menu) 84 Printer Settings Configuration sheet printing...
... factory defaults 67 secondary error codes 70 Service error 68 Toner low 63 Unsupported toner cartridge 65 Waiting 60 lights 52, 53 options 550-sheet drawer 50 memory card 49 overlays 44 P paper 24 choosing 24 jams 34 loading 28, 32 storing 26 Parallel menu 82 photoconductor kit changing 96 level 90 light sequences 91 ordering 88 recycling 95 Photoconductor kit near full light 64 ports parallel 82 USB 83 posters 43 print cartridge See toner cartridge print quality problems 101 Print Quality Test Pages (Utilities menu) 84 Printer Settings Configuration sheet printing...

User's Guide
Page 110
... supplies 95 Replace photoconductor kit light 64, 65 Reset Factory Defaults (Utilities menu) 84 Reset Photoconductor Counter (Utilities menu) 84 S safety information 3 secondary error codes 70 Complex page 74 Error communicating with the host computer 77 Font error 76 Host interface disabled 77 Insufficient collation area 75 Insufficient printer memory 74 Invalid engine code 79 Invalid network code 79 Memory full 78 Network interface errors 76 Paper jam at the input sensor 71 Paper jam in the manual feeder 71 Paper jam in Tray 1 73 Paper jam in Tray 2 73 Paper jams as a printed job...
... supplies 95 Replace photoconductor kit light 64, 65 Reset Factory Defaults (Utilities menu) 84 Reset Photoconductor Counter (Utilities menu) 84 S safety information 3 secondary error codes 70 Complex page 74 Error communicating with the host computer 77 Font error 76 Host interface disabled 77 Insufficient collation area 75 Insufficient printer memory 74 Invalid engine code 79 Invalid network code 79 Memory full 78 Network interface errors 76 Paper jam at the input sensor 71 Paper jam in the manual feeder 71 Paper jam in Tray 1 73 Paper jam in Tray 2 73 Paper jams as a printed job...
Quick Reference
Page 2
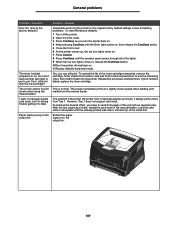
...Not ready (printer is offline) Close door Load media Load manual feeder Print side two of the printer, and remove any jams beneath the flap. 5 Open the rear exit, and remove any jams in the area behind the print cartridge assembly. 4 Lift the flap at the front of a duplex job Toner low Photoconductor kit life warning Replace photoconductor Replace photoconductor kit (printer hard stop) Unsupported print cartridge Change cartridge invalid refill Cartridge region mismatch Cancel job / Reset printer Service error Printer error * Paper jam printer error * Paper jam at the input sensor can be...
...Not ready (printer is offline) Close door Load media Load manual feeder Print side two of the printer, and remove any jams beneath the flap. 5 Open the rear exit, and remove any jams in the area behind the print cartridge assembly. 4 Lift the flap at the front of a duplex job Toner low Photoconductor kit life warning Replace photoconductor Replace photoconductor kit (printer hard stop) Unsupported print cartridge Change cartridge invalid refill Cartridge region mismatch Cancel job / Reset printer Service error Printer error * Paper jam printer error * Paper jam at the input sensor can be...
Service Manual
Page 100
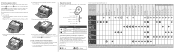
... programming network port. 979 Flash parts failed while programming network port. Each status byte has a different level of troubleshooting value for each area of data. Some or all of these bytes may be used to 8 status bytes of the printer. 4511-xxx Service error codes (9xx) (continued) Error Description Action 975 Unrecognizable network port 976 Software error in the base printer. The following table displays up to help isolate paper jams and paper feed problems in network port A failure...
... programming network port. 979 Flash parts failed while programming network port. Each status byte has a different level of troubleshooting value for each area of data. Some or all of these bytes may be used to 8 status bytes of the printer. 4511-xxx Service error codes (9xx) (continued) Error Description Action 975 Unrecognizable network port 976 Software error in the base printer. The following table displays up to help isolate paper jams and paper feed problems in network port A failure...
Service Manual
Page 124
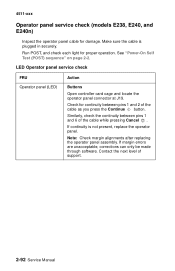
... panel service check FRU Operator panel (LED) Action Buttons Open controller card cage and locate the operator panel connector at J19. Similarly, check the continuity between pins 1 and 2 of the cable as you press the Continue button. If continuity is plugged in securely. 4511-xxx Operator panel service check (models E238, E240, and E240n) Inspect the operator panel cable for proper operation. Check for continuity between pins 1 and 6 of support. 2-92 Service Manual Note: Check margin...
... panel service check FRU Operator panel (LED) Action Buttons Open controller card cage and locate the operator panel connector at J19. Similarly, check the continuity between pins 1 and 2 of the cable as you press the Continue button. If continuity is plugged in securely. 4511-xxx Operator panel service check (models E238, E240, and E240n) Inspect the operator panel cable for proper operation. Check for continuity between pins 1 and 6 of support. 2-92 Service Manual Note: Check margin...
Service Manual
Page 140
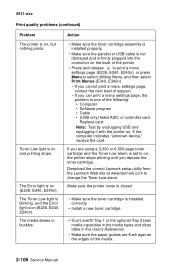
... replace the toner cartridge. Download the correct Lexmark setup utility from the Lexmark Web site at www.lexmark.com to select Utilities Menu, and then select Print Menus (E340, E342n). - Replace card. Make sure the printer cover is closed. • Make sure the toner cartridge is installed correctly. • Install a new toner cartridge. • Don't overfill Tray 1 or the optional Tray 2 (see media capacities in the media types and sizes table in the User's Reference). • Make sure the paper guides are using a 3,000 or 6,000 page toner cartridge...
... replace the toner cartridge. Download the correct Lexmark setup utility from the Lexmark Web site at www.lexmark.com to select Utilities Menu, and then select Print Menus (E340, E342n). - Replace card. Make sure the printer cover is closed. • Make sure the toner cartridge is installed correctly. • Install a new toner cartridge. • Don't overfill Tray 1 or the optional Tray 2 (see media capacities in the media types and sizes table in the User's Reference). • Make sure the paper guides are using a 3,000 or 6,000 page toner cartridge...
Service Manual
Page 250
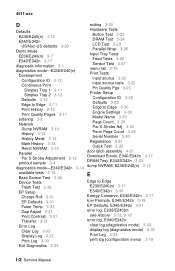
... Page Count 3-29 Serial Number 3-30 Registration 3-21 Quick Test 3-22 Parallel door latch assembly 4-21 Par S Strobe Adjustment 3-12 printout sample 3-4 Download Emuls, E340/E342n 3-17 DRAM Test, E340/E342n 3-24 diagnostics mode-E340/E342n 3-14 dump NVRAM, E238/E240(n) 3-13 available tests 3-19 Base Sensor Test 3-28 Device Tests Flash Test 3-28 EP Setup Charge Roll 3-31 EP Defaults 3-31 Fuser Temp 3-31 Gap Adjust 3-31 Print Contrast 3-31 Transfer 3-31 Error Log Clear...
... Page Count 3-29 Serial Number 3-30 Registration 3-21 Quick Test 3-22 Parallel door latch assembly 4-21 Par S Strobe Adjustment 3-12 printout sample 3-4 Download Emuls, E340/E342n 3-17 DRAM Test, E340/E342n 3-24 diagnostics mode-E340/E342n 3-14 dump NVRAM, E238/E240(n) 3-13 available tests 3-19 Base Sensor Test 3-28 Device Tests Flash Test 3-28 EP Setup Charge Roll 3-31 EP Defaults 3-31 Fuser Temp 3-31 Gap Adjust 3-31 Print Contrast 3-31 Transfer 3-31 Error Log Clear...


